HP e9150t Getting Started
HP e9150t - Pavilion Elite Desktop PC Manual
 |
UPC - 883685981341
View all HP e9150t manuals
Add to My Manuals
Save this manual to your list of manuals |
HP e9150t manual content summary:
- HP e9150t | Getting Started - Page 1
Getting Started - HP e9150t | Getting Started - Page 2
Vista are U.S. registered trademarks of Microsoft Corporation. The Windows logo and Windows Vista specifications and not final. If the final specifications differ from the draft specifications, it may affect the ability of this device to communicate with other 802.11n WLAN devices. HP supports - HP e9150t | Getting Started - Page 3
Using Software...33 Getting More Information 35 Using the Onscreen Help and Support Center 35 Accessing Support on the Web 35 Finding Guides on the Web 35 Finding Onscreen Guides 36 Using the PC Help & Tools Folder 36 Using HP Total Care Advisor Software 37 Using the Computer with Safety and - HP e9150t | Getting Started - Page 4
Troubleshooting and Maintenance 39 Troubleshooting Computer Problems 39 Repairing Software Problems 57 Maintenance ...60 System Recovery...63 Performing the Post-Recovery Procedure 67 Index...69 iv Getting Started (features vary by model) - HP e9150t | Getting Started - Page 5
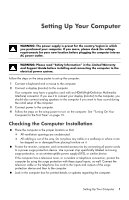
: Please read "Safety Information" in the Limited Warranty and Support Guide before installing and connecting the computer to the electrical power system cords to a power surge protection device. Use a power strip specifically labeled as having surge protection, or an uninterruptible power supply ( - HP e9150t | Getting Started - Page 6
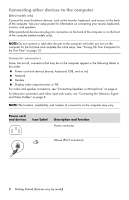
Connecting other devices to the computer (Select models only) Connect the main hardware devices, such as the monitor, keyboard, and mouse, to the back of the computer. See your setup poster for information on connecting your mouse, keyboard, monitor, and speakers. Other peripheral devices can plug - HP e9150t | Getting Started - Page 7
Power cord and devices Icon/Label Description and function (continued) Keyboard (PS/2 connector). Universal Serial Bus (USB) 2.0 for mouse, keyboard, digital cameras, or other devices with USB connectors. Network Modem Icon/Label ETHERNET Description and function Ethernet LAN connector to - HP e9150t | Getting Started - Page 8
Display video output Icon/Label Description and function NOTE: For specific information, see the documentation that came with the display device. VGA/Monitor VGA/Monitor (blue) display output connector, to connect to a VGA monitor. You may - HP e9150t | Getting Started - Page 9
speaker system must have its own power source, such as batteries or a separate power cord. For detailed instructions about how to connect and configure other multichannel speakers, go to the Web support page for your model; see "Accessing Support on the Web" on page 35. Setting Up Your Computer 5 - HP e9150t | Getting Started - Page 10
Connecting a stereo-speaker system To connect active speakers, such as left/right stereo speakers or a 2.1 system of two speakers and a subwoofer, to the computer: 1 Make sure the computer is turned off. Make sure the speaker system is turned off and unplugged. 2 Connect the speaker system cable to - HP e9150t | Getting Started - Page 11
existing wireless LAN with an Internet connection. Consult your Internet Service Provider (ISP) for further information. To verify that the integrated up a wireless network: Click the Windows Vista start button™ on the taskbar, click Help and Support, and then type Setting up a wireless network - HP e9150t | Getting Started - Page 12
. Before you can use telephone dial-up to connect to the Internet and send or receive e-mail and faxes, you must connect your telephone service line to the modem (A). 1 Plug a modem/telephone cable into the computer modem connector (A). Note that the modem connector on the computer may be green - HP e9150t | Getting Started - Page 13
input from a TV set-top box connector (white). NOTE: You can record audio by using this Audio In connector, which is connected to the motherboard. Some computers include this primary left audio input connector on the front of the computer (select models only). Primary right audio input from a TV - HP e9150t | Getting Started - Page 14
connector (white). NOTE: This Audio In connector is connected to the TV tuner. You must use the Audio In connector, which is connected to the motherboard and located on the back of the computer, to record audio only (select models only). Secondary right audio input connector (red). NOTE: This Audio - HP e9150t | Getting Started - Page 15
Connecting the TV signal source coaxial cable (no set-top box) To connect the computer into an existing setup for the TV signal source without a set-top box, insert (add) a splitter (B) to route the coaxial TV signal cable from the wall outlet (A) to the computer connector (C). Callouts A TV signal - HP e9150t | Getting Started - Page 16
Connecting the TV signal source with a set-top box and using S-video or composite video cable to the computer To use video output from the set-top box (F), add the cables to route video and audio to the computer: Do not detach any cables from the existing setup. Connect an S-video cable (or you can - HP e9150t | Getting Started - Page 17
Using an infrared receiver (IR) blaster (Select models only) If you have a cable TV or satellite TV set-top box, you can control the set-top box from the computer by using the remote control sensor cable/IR blaster (select models only) and the connector on the computer (not available on all models). - HP e9150t | Getting Started - Page 18
14 Getting Started (features vary by model) - HP e9150t | Getting Started - Page 19
the onscreen instructions to register with HP or Compaq, sign up for updates, and get online. The antivirus software may automatically open. Follow the onscreen instructions to set up this tool, which protects the computer and your privacy. 5 When you see the Windows Vista desktop, the initial - HP e9150t | Getting Started - Page 20
on the computer again, the programs, folders, and documents that you had open are restored to the screen. Action Shut Down Lock Click the Windows Vista start button and click: Description The Arrow button next to the Lock button, and then click Shut Down. When you shut down the computer, you - HP e9150t | Getting Started - Page 21
is idle for a specified number of minutes. To put the computer into a mode automatically, modify the power management settings: 1 Click the Windows Vista start button on the taskbar. 2 Click Control Panel. 3 Click System and Maintenance. 4 Click Power Options. Turning On Your Computer for the First - HP e9150t | Getting Started - Page 22
the computer after installation. To restart the computer: 1 Click the Windows Vista start button on the taskbar. 2 Click the Arrow button next to the or digital subscriber line (DSL). Check with your Internet Service Provider (ISP) for specific information on the connection. 1 Refer to "Setting Up - HP e9150t | Getting Started - Page 23
instructions provided by the ISP. If you did not set up the computer for Internet service during the initial setup, do so now by using Online Services: a Click the Windows Vista WLAN device, or the driver for the device is not properly installed. 4 Click the Windows Vista start button on the taskbar - HP e9150t | Getting Started - Page 24
are several ways to adjust volume. Use the Volume icon on the Windows Vista taskbar to set speaker volume. Then, you can adjust the volume by check the troubleshooting items in "Audio and speakers" on page 47. For more information, open the Help and Support Center or refer to the Support Web site - HP e9150t | Getting Started - Page 25
the General tab. 4 Click the microphone connector that you want to use, and then click Apply. 5 Click OK. Adjusting microphone recording level in Windows Vista To adjust the recording level of the microphone: 1 Right-click the Realtek HD Audio Manager Volume icon on the taskbar, and then click Audio - HP e9150t | Getting Started - Page 26
same password for more than one Windows Vista security feature. A password set in Windows Vista must be entered at a Windows Vista prompt. For information on Windows Vista passwords: Click the Windows Vista start button on the taskbar, click Help and Support, and then type passwords into the Search - HP e9150t | Getting Started - Page 27
service. Instructions for using and updating the antivirus software, and for purchasing extended update service, are provided within the program. For more information about computer viruses: Click the Windows Vista start button on the taskbar, click Help and Support solve the problem temporarily, - HP e9150t | Getting Started - Page 28
change passwords, to change system-wide settings, to access all files on the computer, and to install software and drivers that are compatible with Windows Vista. (Windows Vista requires at least one administrator user account.) Limited - Standard User: Is not allowed to change other user settings - HP e9150t | Getting Started - Page 29
create or change a user account: 1 Click the Windows Vista start button on the taskbar, and then click Control Panel you want to change. 4 Follow the onscreen instructions or click an action to proceed. Guidelines for manufacturer documentation or customer service information. For antivirus software - HP e9150t | Getting Started - Page 30
. 3 Click Windows Easy Transfer. 4 Follow the onscreen instructions in the Windows Easy Transfer Wizard to transfer your files from an old computer to your new one. For more information, click the Windows Vista start button on the taskbar, click Help and Support, and then type moving files into the - HP e9150t | Getting Started - Page 31
Special Features of Your Computer Using the Memory Card Reader (Select models only) Your computer may come with a multi-format memory card reader (optional, select models only). Digital cameras and other digital imaging devices use memory cards, or media, to store digital picture files. The memory - HP e9150t | Getting Started - Page 32
the media. For more information, open the Help and Support Center or refer to the Support Web site; see "Getting More Information" on page 35 to the media. Or If the AutoPlay window does not open, click the Windows Vista start button on the taskbar, click Computer, and then double-click the Memory - HP e9150t | Getting Started - Page 33
Using a Vertical CD/DVD Drive (Select models only) Your computer may have an optical disc drive that is installed in a vertical position. Press the Eject button on or near the drive door (A) to eject the CD/DVD tray. Place a standard-sized disc in the tray with the label facing out, and then press - HP e9150t | Getting Started - Page 34
The following section provides instructions for making a by the LightScribe logo Labeling software that supports LightScribe A writable LightScribe disc (sold you record data onto. 2 Close the drive. 3 Click the Windows Vista start button, click All Programs, and then click CyberLink DVD Suite. - HP e9150t | Getting Started - Page 35
8 Click the arrow button at the bottom of the window to continue. 9 Under Step 3: Edit Layout: a Select a layout style by clicking Select under Layout Style. Select the style you want, and then click OK. b Select a background image by clicking Select under Background Image. Highlight the image you - HP e9150t | Getting Started - Page 36
or DVD in the CD/DVD drive. 2 Press the HP Easy Backup button. Follow the onscreen instructions. 3 If you are using a CD or DVD, label the backup media clearly, and store it in a safe place. Peripheral Device Landing Pad and Cable Routing (HP Elite Series models only) On the top of the computer is - HP e9150t | Getting Started - Page 37
Organize digital media files. The following table describes the functionality that is specific to each of these programs. Use the table to determine which this, follow the installation instructions that came with the CD. To open any of these programs, click the Windows Vista start button on the - HP e9150t | Getting Started - Page 38
) Quickly organize the Web links you want available on your desktop. Comparison-shop using the convenient shopping search engine. Get HP software and driver updates. Get important messages from HP. Access PC Health and Security and PC Help tools. Microsoft Windows Movie Maker (select models only - HP e9150t | Getting Started - Page 39
Web site address listed in the Limited Warranty and Support Guide, or use the following steps: 1 Go to http://www.hp.com/support in your Web browser. 2 Select your country/region and language. 3 Click Support and Drivers. 4 Enter the model number of your computer, and then click Search . Click - HP e9150t | Getting Started - Page 40
folder, your computer has no onscreen guides. Using the PC Help & Tools Folder The PC Help & Tools folder contains special utilities for computer owners, such as support information and programs. To see the items in the PC Help & Tools folder: 1 Click the Windows Vista start button on the taskbar - HP e9150t | Getting Started - Page 41
simple access to help and support information for your computer. Products Showcase provides a listing of products and services available for your computer, and presents comparison-shopping information about those items. To open HP Total Care Advisor: 1 Click the Windows Vista start button on the - HP e9150t | Getting Started - Page 42
38 Getting Started (features vary by model) - HP e9150t | Getting Started - Page 43
Help and Support Center or access the Support Web site. (See "Getting More Information" on page 35). Refer to the documentation provided by the product manufacturer for information about peripheral-specific problems, such as issues with a monitor or a printer. Troubleshooting Computer Problems These - HP e9150t | Getting Started - Page 44
and Support Guide to contact Support. Test the wall outlet by connecting a different electrical device to it. Incompatible memory (RAM) may have been installed. Reinstall the old memory to return your computer to its original state. For instructions, refer to the Upgrading and Servicing Guide. Use - HP e9150t | Getting Started - Page 45
: If any of the pins are bent, replace the monitor connector cable. If no pins are bent, reconnect the monitor connector cable to the computer. Troubleshooting and Maintenance 41 - HP e9150t | Getting Started - Page 46
Realtek HDMI Output. The Realtek Digital Output Properties window opens. 6 Click the Supported Formats tab. 7 Place a check in the 48.0 KHz check box, and . Adjust the monitor resolution setting in Windows Vista: 1 Right-click an empty area on the desktop, and then click Personalize. 2 Click Display - HP e9150t | Getting Started - Page 47
the keyboard. 6 After the shutdown is complete, unplug and reconnect the mouse connector to the back of your computer, and then turn on your computer. Troubleshooting and Maintenance 43 - HP e9150t | Getting Started - Page 48
less reflective surface under the mouse. For detailed cleaning instructions, go to: http://www.hp.com/support Select your country/region and language, search on your does not work or is not detected. A Check for these problems: Ensure you are using the wireless keyboard or wireless mouse within - HP e9150t | Getting Started - Page 49
the Connect button (A) on the receiver (which is also the LED light), and hold it for 5 to 10 seconds until the A light starts to flash. Troubleshooting and Maintenance 45 - HP e9150t | Getting Started - Page 50
Wireless keyboard and mouse (continued) Symptom Possible solution Wireless keyboard or mouse does not work or is not detected. (continued) 3 Check that the mouse is on (B), and push and hold the Connect button (C) on the underside of the mouse for 5 to 10 seconds until the LED (A) on the - HP e9150t | Getting Started - Page 51
Mute button on the keyboard to see whether the Mute feature is enabled. Or 1 Click the Windows Vista start button, and then click Control Panel. 2 Click Hardware and Sound, and then click Adjust system they are connected to your computer (or speaker system). Troubleshooting and Maintenance 47 - HP e9150t | Getting Started - Page 52
Audio and speakers (continued) Symptom Volume is very low or unsatisfactory. Possible solution Make sure you connected the speakers to the Audio Out (lime green) connector on the back of the computer. (Additional audio connectors are used for multiple-channel speakers.) Detached non-powered - HP e9150t | Getting Started - Page 53
cable to the NIC. Do not plug a network cable into a telephone service line; doing so may damage the NIC. For more information about connecting to the Internet, open the Help and Support Center; see "Using the Onscreen Help and Support Center" on page 35. Run the wireless setup wizard: 1 Click the - HP e9150t | Getting Started - Page 54
about restoring and updating drivers, see "Updating drivers" on page 57. I cannot remove a CD or DVD. Turn on your computer, and press the Eject button nearest the drive to open the tray. If you suspect a problem with the Eject button itself: 1 Click the Windows Vista start button, and then - HP e9150t | Getting Started - Page 55
and windows before recording. Ensure you have enough available space on your hard disk drive to store a temporary copy of the content. Click the Windows Vista start button, and then click Computer. Right-click the hard disk drive, and then click Properties to view the available space - HP e9150t | Getting Started - Page 56
, and then resave the file in a supported format. Codec error messages appear when I Missing or Corrupt. 1 Click the Windows Vista start button, right-click Computer, and Driver Software. 5 Select Search automatically for updated driver software. 6 Follow the instructions to update the driver - HP e9150t | Getting Started - Page 57
device manufacturer Web site. You may need an updated driver for Windows Vista. Contact the device vendor directly for an update. For HP peripheral devices, visit the HP Web site. For details, refer to the Limited Warranty and Support Guide. Ensure that all cables are properly and securely connected - HP e9150t | Getting Started - Page 58
uninstall an old device driver: 1 Click the Windows Vista start button, right-click there is a device conflict or problem with the device. Exclamation points Troubleshoot button, and follow the onscreen instructions in the device troubleshooter wizard. 8 Restart the computer. Click the Windows Vista - HP e9150t | Getting Started - Page 59
to the device instructions. Remove and then reinstall the device: 1 Click the Windows Vista start button, and then click Next. 5 Follow the onscreen wizard instructions. The device may have too many connections. Either discoverability, refer to the device instructions. Ensure other devices that use - HP e9150t | Getting Started - Page 60
Device Manager. 3 Click the plus sign (+) next to Universal Serial Bus controllers. 4 If eHome Infrared Receiver is listed under Universal Serial Bus Controllers, Windows Vista is properly detecting the IR receiver. If it is not listed, go to the next step. 5 Unplug the end of the USB cable on the - HP e9150t | Getting Started - Page 61
(continued) Possible solution Ensure the memory card is one of the supported types: CompactFlash (I, II, and Microdrive), Memory Stick, Memory Stick update a driver, or to revert to an earlier version of the driver if the new one does not solve your problem: 1 Click the Windows Vista start button - HP e9150t | Getting Started - Page 62
-click the specific item (for example, HP DVD Writer 640b). 5 Click the Driver tab. 6 To update a driver, click Update Driver, and then follow the onscreen instructions. Or To revert to an earlier version of a driver, click Rollback Driver, and then follow the onscreen instructions. Microsoft System - HP e9150t | Getting Started - Page 63
Manager: 1 Click the Windows Vista start button, All Programs, PC Help & Tools, and then instructions. 5 When you have finished reinstalling, restart the computer. NOTE: Do not skip this last step. You must restart the computer after recovering software programs or hardware drivers. Troubleshooting - HP e9150t | Getting Started - Page 64
ensure trouble-free operation of your computer, and to ease the recovery of important information on your computer if problems arise in operating system bugs and improve performance. Also, be sure to check for driver updates for your hardware and new versions of your favorite programs. Sometimes a - HP e9150t | Getting Started - Page 65
, you may need to manually enable this feature (refer . If you encounter problems with your computer later Vista Properties window for the Computer. For more information, search for the topic in the Help and Support Center. See "Using the Onscreen Help and Support Troubleshooting and Maintenance 61 - HP e9150t | Getting Started - Page 66
Cleaning the computer and monitor 1 Unplug the computer from its power source. 2 Unplug the monitor from its power source. 3 Use a clean, dry cloth to dust the computer case and the monitor. 4 Use a clean cloth dampened with warm water to wipe the computer case and the monitor case clean. Do not use - HP e9150t | Getting Started - Page 67
. System recovery reinstalls the operating system, programs, and drivers. However, you must reinstall any software that was not system recovery from a recovery image, see "System recovery from the Windows Vista Start Menu" on page 64. NOTE: The recovery image uses a Troubleshooting and Maintenance 63 - HP e9150t | Getting Started - Page 68
discs that you create. 4 Through recovery discs purchased from HP Support. To purchase recovery discs, go to http://www.hp.com/support and visit the Software & Driver downloads page for your computer model. System recovery from the Windows Vista Start Menu If the computer is working, and Windows - HP e9150t | Getting Started - Page 69
registration process, and wait until you see the desktop. 11 Turn off the computer, reconnect all 67. System recovery at system startup If Windows Vista is not responding, but the computer is working, registration process, and wait until you see the desktop. 9 Turn off the computer, reconnect all - HP e9150t | Getting Started - Page 70
if it is not backed up. 2 Insert recovery disc #1 into the DVD drive tray, and close the tray. 3 If the computer works, click the Windows Vista start button, click the Arrow button next to the Lock button, and then click Shut Down. Or If the computer is not responding, press and - HP e9150t | Getting Started - Page 71
setup instructions, and then click Start in the last screen to display the Windows desktop. 2 HP Update to get critical updates from HP: a Click the Windows Vista start button, click All Programs, click the HP folder, and then click HP Update. b Follow the onscreen instruction to download driver - HP e9150t | Getting Started - Page 72
68 Getting Started (features vary by model) - HP e9150t | Getting Started - Page 73
left and right connectors 10 B backup 61 buttons Eject, for the CD/DVD drive 29 HP Easy Backup 32 Off, See turning off computer 16 C card reader, memory 27 carpal digital camera connecting 26 digital picture 27 documentation, onscreen 36 drivers, update 57 E eject a CD/DVD disc 29 Ethernet connection - HP e9150t | Getting Started - Page 74
connecting 6 connector type 4 Support Web site 35 surge protector 1 S-video In connector 9 System recovery 57, 63 system recovery discs, making 61, 63 System Restore 58 System Restore, Microsoft 58 T television 8 transferring information to your new computer 26 troubleshooting tables 39 turning off - HP e9150t | Getting Started - Page 75
U update drivers 57 system 23 Windows Vista 23 user accounts, creating 25 V video cables for TV 8 volume, adjusting in Windows Vista 20 W WEP 20 Windows Movie Maker, features 34 Windows Vista update 23 wired network connection 7 wireless LAN connection 7 network device, checking installation 19 - HP e9150t | Getting Started - Page 76
Part number: 517215-001
-
 1
1 -
 2
2 -
 3
3 -
 4
4 -
 5
5 -
 6
6 -
 7
7 -
8
-
9
-
10
-
11
-
12
-
13
-
14
-
15
-
16
-
17
-
18
-
19
-
20
-
21
-
22
-
23
-
24
-
25
-
26
-
27
-
28
-
29
-
30
-
31
-
32
-
33
-
34
-
35
-
36
-
37
-
38
-
39
-
40
-
41
-
42
-
43
-
44
-
45
-
46
-
47
-
48
-
49
-
50
-
51
-
52
-
53
-
54
-
55
-
56
-
57
-
58
-
59
-
60
-
61
-
62
-
63
-
64
-
65
-
66
-
67
-
68
-
69
-
70
-
71
-
72
-
73
-
74
-
75
-
76
 |
 |

Getting Started