HP rp5800 Getting Started rp5800, rp5700 and rp3000 Models
HP rp5800 Manual
 |
View all HP rp5800 manuals
Add to My Manuals
Save this manual to your list of manuals |
HP rp5800 manual content summary:
- HP rp5800 | Getting Started rp5800, rp5700 and rp3000 Models - Page 1
Getting Started rp5800, rp5700 and rp3000 Models - HP rp5800 | Getting Started rp5800, rp5700 and rp3000 Models - Page 2
. The only warranties for HP products and services are set forth in the express warranty statements accompanying such products and services. Nothing herein should be construed as constituting an additional warranty. HP shall not be liable for technical or editorial errors or omissions contained - HP rp5800 | Getting Started rp5800, rp5700 and rp3000 Models - Page 3
Manuals. To access Vision Diagnostics: ▲ Refer to Accessing Vision Diagnostics in this guide. To access the Safety and Comfort Guide: ▲ Select Start > All Programs > HP Safety and Comfort Guide. How to Check Warranty and Support Entitlement Your warranty is available on the hard drive (some models - HP rp5800 | Getting Started rp5800, rp5700 and rp3000 Models - Page 4
iv About This Book ENWW - HP rp5800 | Getting Started rp5800, rp5700 and rp3000 Models - Page 5
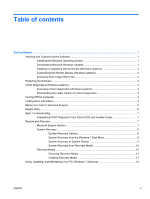
Diagnostics (Windows systems 3 Downloading the Latest Version of Vision Diagnostics 4 Turning Off the Computer ...4 Finding More Information ...4 Before You Call for Technical Support 5 Helpful Hints ...6 Basic Troubleshooting ...7 Interpreting POST Diagnostic Front Panel LEDs and Audible Codes - HP rp5800 | Getting Started rp5800, rp5700 and rp3000 Models - Page 6
vi ENWW - HP rp5800 | Getting Started rp5800, rp5700 and rp3000 Models - Page 7
. NOTE: If the computer shipped with more than one operating system language on the hard drive, the installation process could take up to 60 minutes. Downloading Microsoft Windows Updates 1. To set up your Internet connection, click Start > Internet Explorer and follow the instructions on the screen - HP rp5800 | Getting Started rp5800, rp5700 and rp3000 Models - Page 8
support software, including support software for the operating system from http://www.hp.com/support. Select your country and language, select Download drivers and software (and firmware), enter the model number of the computer, and press Enter. Customizing the Monitor Display (Windows systems - HP rp5800 | Getting Started rp5800, rp5700 and rp3000 Models - Page 9
drive, you may need to change the boot order in the Computer Setup utility. Refer to the Maintenance and Service Guide (English only) for more information. 5. At the boot menu, select either the Vision Diagnostics utility to test the various hardware components in the computer or the HP Memory - HP rp5800 | Getting Started rp5800, rp5700 and rp3000 Models - Page 10
to the Maintenance and Service Guide (English only) for more information about using the Computer Setup utility. Finding More Information The following publications are available on the computer hard drive. To access the publications, select Start > All Programs > HP User Manuals. NOTE: Not all of - HP rp5800 | Getting Started rp5800, rp5700 and rp3000 Models - Page 11
series of beeps emanating from the computer. The flashing lights and/or beeps are error codes that will help you diagnose the problem. Refer to the Maintenance and Service Guide (English only) for details. ● If the screen is blank, plug the monitor into a different video port on the computer if one - HP rp5800 | Getting Started rp5800, rp5700 and rp3000 Models - Page 12
number before calling. ● Spend time troubleshooting the problem with the service technician. ● Remove any hardware that was recently added to your system. ● Remove any software that was recently installed. NOTE: For sales information and warranty upgrades (HP Care Pack), call your local authorized - HP rp5800 | Getting Started rp5800, rp5700 and rp3000 Models - Page 13
select See support and troubleshooting information, enter the model number of the computer, and press Enter. Interpreting POST Diagnostic Front Panel LEDs and Audible Codes If you see flashing LEDs on the front of the computer or if you hear beeps, see the Maintenance and Service Guide (English only - HP rp5800 | Getting Started rp5800, rp5700 and rp3000 Models - Page 14
onscreen instructions. System Recovery System Recovery completely erases and reformats the hard disk drive, deleting all data files you have created, and then reinstalls the operating system, programs, and drivers. However, you must reinstall any software that was not installed on the computer at - HP rp5800 | Getting Started rp5800, rp5700 and rp3000 Models - Page 15
the desktop. 10. Turn off the computer, reconnect all peripheral devices, and turn the computer back on. System Recovery at System Startup CAUTION: System Recovery deletes all data and programs you created or installed. Back up any important data to a removable disc or USB flash drive. If Windows - HP rp5800 | Getting Started rp5800, rp5700 and rp3000 Models - Page 16
System Recovery from a USB flash drive, press the Esc key as the computer is powering on to bring up the boot menu. Use the arrow keys to select the USB device and press Enter to boot from that device. 7. If the Recovery Manager asks if you want to run System Recovery from Media or Hard Drive - HP rp5800 | Getting Started rp5800, rp5700 and rp3000 Models - Page 17
(s), and then click Next. 4. Follow the onscreen instructions. Label each disc as you make it (for example, Recovery 1, Recovery 2). To create a recovery USB flash drive: 1. Close all open programs. 2. Insert the USB flash drive into a USB port on the computer. 3. Click the Start button, click All - HP rp5800 | Getting Started rp5800, rp5700 and rp3000 Models - Page 18
● Add a device or printer and change other system settings ● Get help and support for your specific model ● Install HP support software for your computer ● Purchase supplies and accessories for your computer To access the centralized PC management location, click Start > Devices and Printers then
-
 1
1 -
 2
2 -
 3
3 -
 4
4 -
 5
5 -
 6
6 -
 7
7 -
8
-
9
-
10
-
11
-
12
-
13
-
14
-
15
-
16
-
17
-
18
 |
 |

Getting Started
rp5800, rp5700 and rp3000 Models