HP s3720y Upgrading and Servicing Guide - Page 27
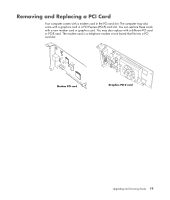
Replacing a PCI-E Card, Due to the small computer size, you can only install a small, low-profile - driver
 |
UPC - 884420938309
View all HP s3720y manuals
Add to My Manuals
Save this manual to your list of manuals |
Page 27 highlights
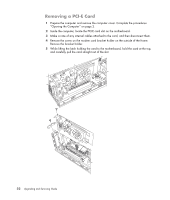
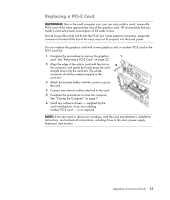
Replacing a PCI-E Card IMPORTANT: Due to the small computer size, you can only install a small, low-profile PCI-E card of the same approximate size of the graphics card. HP recommends that you install a card with power consumption of 25 watts or less. Not all low-profile cards will fit into the PCI-E slot. Some external connectors, especially connectors located at the top of the card, may not fit properly into the back panel. You can replace the graphics card with a new graphics card or another PCI-E card in the PCI-E card slot: 1 Complete the procedures to remove the graphics card. See "Removing a PCI-E Card" on page 22. 2 Align the edge of the add-in card with the slot on the computer, and gently but firmly press the card straight down into the card slot. The whole connector should be seated properly in the card slot. 3 Attach the bracket holder with the screw to secure the card. 4 Connect any internal cables attached to the card. 5 Complete the procedures to close the computer. See "Closing the Computer" on page 7. 6 Install any software drivers - supplied by the card manufacturer if you are installing another PCI-E card - or as required. NOTE: If the new card or device isn't working, read the card manufacturer's installation instructions, and recheck all connections, including those to the card, power supply, keyboard, and monitor. Upgrading and Servicing Guide 23
-
 1
1 -
2
-
3
-
4
-
5
-
6
-
7
-
8
-
9
-
10
-
11
-
12
-
13
-
14
-
15
-
16
-
17
-
18
-
19
-
20
-
21
-
 22
22 -
 23
23 -
 24
24 -
 25
25 -
 26
26 -
 27
27 -
 28
28 -
 29
29 -
 30
30
 |
 |