HP sb21 HP Digital Projectors xb31 and sb21 - (English) Quick Start Guide
HP sb21 - Digital Projector Manual
 |
View all HP sb21 manuals
Add to My Manuals
Save this manual to your list of manuals |
HP sb21 manual content summary:
- HP sb21 | HP Digital Projectors xb31 and sb21 - (English) Quick Start Guide - Page 1
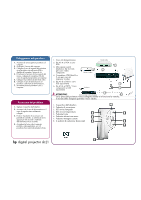
light up. 4. Turn on your video source (computer, notebook, video player, etc.). The projector will detect your source automatically. 1. power cord 2. M1-A to VGA and USB cable 3. 2.5mm mini phone jack for composite video cable 4. USB Mini-B 5-pin for S-video input cable 5. M1-D to DVI-D and USB - HP sb21 | HP Digital Projectors xb31 and sb21 - (English) Quick Start Guide - Page 2
. 3. Appuyez sur le bouton POWER ON/OFF (Marche/Arrêt) du panneau hp digital projector sb21 1. Cordon d'alimentation 2. M1-A vers VGA et câble USB 3. Mini-prise de téléphone 2,5 mm pour câble vidéo composite 4. USB Mini le ventilateur est en marche, la lampe pourrait se détériorer plus rapidement. 1. - HP sb21 | HP Digital Projectors xb31 and sb21 - (English) Quick Start Guide - Page 3
POWER-LED leuchtet auf. 4. Schalten Sie die Videoquelle ein (Computer, Notebook, Video VGA- und USB- Kabel 3 3. 2,5 mm-MiniMikrofonbuchse für gemischtadriges Videokabel 4 S-Video-Ausgang 4. 5-poliger USB-Mini -Schalter 8. vier Richtungswahlschalter 4 8 5 6 7 1 hp digital projector sb21 - HP sb21 | HP Digital Projectors xb31 and sb21 - (English) Quick Start Guide - Page 4
se reducirá la vida útil de la lámpara. 1. Tapa de la lente 2. Botón Power ON/OFF 3. LED de aviso de lámpara 4. LED de aviso de temperatura 5. Botón de fuente 2 6. Botón del menú ON/OFF 3 7. Botón Autoimagen 8. Cuatro botones direccionales 4 8 5 6 7 1 hp digital projector sb21 - HP sb21 | HP Digital Projectors xb31 and sb21 - (English) Quick Start Guide - Page 5
2. Da M1-A a VGA e cavo USB 3. Mini spina a jack telefonico da 2,5 mm per cavo video composito 4. Connettore USB Mini-B a 5 pin per cavo di ingresso S-video 5. Da M1-D a attivazione menu 3 7. Pulsante immagine autom. 8. 4 pulsanti di selezione direzionali 4 8 5 6 7 1 hp digital projector sb21 - HP sb21 | HP Digital Projectors xb31 and sb21 - (English) Quick Start Guide - Page 6
fonte. 1. cabo de alimentação 2. cabo M1-A para VGA e USB 3. mini tomada de 2,5 mm para telefone para cabo de vídeo composto 4. cabo de entrada USB Mini-B de 5 pinos para S vídeo 5. cabo M1 botãao de auto imagem 4 8. quatro botões direcionais para selecionar 8 5 6 7 1 hp digital projector sb21 - HP sb21 | HP Digital Projectors xb31 and sb21 - (English) Quick Start Guide - Page 7
hp digital projector sb21 - HP sb21 | HP Digital Projectors xb31 and sb21 - (English) Quick Start Guide - Page 8
hp digital projector sb21 - HP sb21 | HP Digital Projectors xb31 and sb21 - (English) Quick Start Guide - Page 9
hp digital projector sb21 - HP sb21 | HP Digital Projectors xb31 and sb21 - (English) Quick Start Guide - Page 10
P/N:36.85902.001 Rev:A
-
 1
1 -
 2
2 -
 3
3 -
 4
4 -
 5
5 -
 6
6 -
 7
7 -
8
-
9
-
10
 |
 |

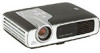
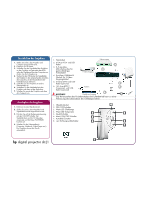
1
.
lens cap
2
. power
ON
/
OFF
button
3
.
lamp warning indicator light
4
.
temperature warning indicator light
5
.
source button
6
. menu
ON
/
OFF
button
7
.
auto image button
8
.
four directional select buttons
5
6
7
3
4
2
8
1
hp
digital projector sb
21
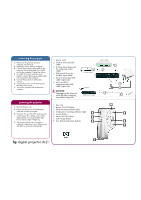
1
.
power cord
2
.
M1-A
to
VGA
and
USB
cable
3
.
2.5mm mini phone jack
for composite video
cable
4
.
USB Mini-B 5-pin for
S-video input cable
5
.
M1-D
to
DVI-D
and
USB
cable (optional)
6
.
M1-A
to
HDTV
/
component and
USB
cable (optional)
powering the projector
1.
Remove the lens cap.
2.
Ensure that the power cord and signal
cable are securely connected.
3.
Press the ±P
OWER
ON/OFF² button on the
control panel.
The
startup screen will be
displayed for
30
seconds and the blue
P
OWER
indicator light
will light up.
4.
Turn on your video source (computer,
notebook, video player, etc.). The projector
will detect your source automatically.
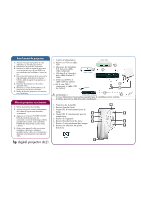
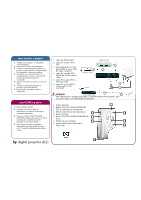
connecting the projector
1.
Make sure the projector and your
computer are turned off.
2.
Unplug the mouse from the computer.
3.
Connect the projector signal cable to the
projector and to either the
RGB
or digital
port on the computer. Tighten the screws.
4.
To enable the remote control³s mouse
features, connect the projector signal cable
USB
connector to the computer.
5.
Connect the projector to other video
sources.
6.
Connect the power cord to the projector
and the power source.
7.
Turn on the projector first and then the
computer.
video output
S-video output
digital tuner output
antenna
RGB
USB
DVI
3
4
1
6
5
2
!
CAUTION
!
Unplugging the projector
while the fan is running
may reduce lamp life.