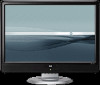
HP v216w User Guide
HP v216w - 21 Inch Wide LCD Monitor Manual
 |
View all HP v216w manuals
Add to My Manuals
Save this manual to your list of manuals |
HP v216w manual content summary:
- HP v216w | User Guide - Page 1
v216w LCD Monitor User's Guide - HP v216w | User Guide - Page 2
services. Nothing herein should be construed as constituting an additional warranty. HP shall not be liable for technical or editorial errors or omissions contained herein. HP proprietor and used by Hewlett-Packard Company under license. HP supports lawful use of technology and does not endorse or - HP v216w | User Guide - Page 3
This guide is intended for anyone who uses the v216w LCD Monitor. It describes the monitor's features, setup, and operation. The sections are as follows: • Safety and Maintenance Guidelines • Setup • Using the Monitor • Installing Drivers and Using the Auto-Adjustment Feature • Technical Support - HP v216w | User Guide - Page 4
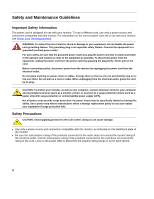
: To protect your monitor, as well as your computer, connect all power cords for your computer and its peripheral devices (such as a monitor, printer, or scanner) to a surge protection device such as a power strip with surge protection or uninterruptible power supply (UPS). Not all power strips - HP v216w | User Guide - Page 5
If your monitor is not operating properly or has been dropped or damaged, contact your HP authorized dealer, reseller, or service provider. • Adjust only those controls that are described in the operating instructions. • Turn your monitor off when not in use. You can substantially increase the life - HP v216w | User Guide - Page 6
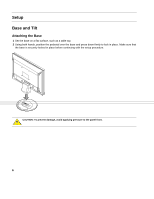
Setup Base and Tilt Attaching the Base 1 Set the base on a flat surface, such as a table top. 2 Using both hands, position the pedestal over the base and press down firmly to lock in place. Make sure that the base is securely locked in place before continuing with the setup procedure. CAUTION: To - HP v216w | User Guide - Page 7
Removing the Base 1 Set the panel face-down on a flat, protected surface. 2 Squeeze the tabs in the bottom of the base to release the lock. 3 Remove the base from the pedestal. CAUTION: To prevent damage, avoid applying pressure to the panel front. Adjusting the Tilt For optimal viewing, adjust the - HP v216w | User Guide - Page 8
Cables Attaching the Cables 1 Turn off your computer. 2 Connect the built-in monitor speakers to the computer, using the audio cable (green connector). 3 If you are attaching a VGA cable, connect one end of the 15-pin D-Sub VGA cable (blue connector) to the back of the monitor and connect the other - HP v216w | User Guide - Page 9
4 Connect one end of the power cord to the back of the monitor and plug the other end into a grounded outlet. 5 Turn on your monitor and computer. If your monitor displays an image, installation is complete. If it does not display an image, see Technical Support FAQs and Using the Monitor. 9 - HP v216w | User Guide - Page 10
, remove the screws and the pedestal/base attachment. 3 Follow the manufacturer's instructions to assemble the wall mounting arm. Installing a Wall Mounting Arm 1 Set to the user's manual that came with the wall mounting arm (purchased separately) for instructions on attaching it to the wall. 10 - HP v216w | User Guide - Page 11
Using the Monitor Operating Instructions Control buttons are located on the front of the panel, as shown below. Use the Menu button (C) to adjust the display settings to your personal - HP v216w | User Guide - Page 12
. Automatically fine-tunes the image quality. Turns the monitor on or off. Fully powered = green Sleep mode = amber Sleep timer mode = flashing amber See Technical Support FAQs for more information. 12 - HP v216w | User Guide - Page 13
Adjust Screen Resolution. 3 Set the resolution slide bar to 1680 x 1050. NOTE: If 1680 x 1050 is not shown, download the monitor driver from the Web. See Using the Monitor for instructions. Adjusting the Volume While the monitor is turned on but the OSD menu is inactive, press the volume increase - HP v216w | User Guide - Page 14
Adjusting On-Screen Display Settings Use the OSD menu to adjust the screen image and change settings. To access the OSD menu: 1 If the monitor is not already on, press the Power button to turn the monitor on. 2 Press the Menu button to activate the OSD menu. 3 Press the - (minus) and + (plus) - HP v216w | User Guide - Page 15
OSD Menu The table below shows the OSD menus and their functions at each level. OSD Menu Levels Level 1 Level 2 Brightness Adjustment Scale Reset Cancel Save and Return Contrast Adjustment Scale Reset Cancel Save and Return Volume Adjustment Scale Image Control Auto Adjustment - HP v216w | User Guide - Page 16
çais Italiano Nederlands Cancel Save and Return Management Power Saver Power On Recall Mode Display Power-On Status Display DDC/CI Support Sleep Timer Cancel Save and Return OSD Control Horizontal OSD Position Vertical OSD Position OSD Timeout Cancel Save and Return Information - HP v216w | User Guide - Page 17
http://www.hp.com/support 2 Select your country/region. 3 Select Download Drivers and Software. 4 Enter the model number of your monitor. The software download pages for your monitor will be displayed. 5 Download and install the driver and software files using the instructions in the download pages - HP v216w | User Guide - Page 18
Support FAQs Technical Support FAQs (Frequently Asked Questions) Problem & Question Possible Solutions Power LED is not on. No Plug & Play. Picture is fuzzy and has ghosting shadowing problem the HP monitor drivers are installed (HP monitor drivers are available at: http://www.hp.com/support) • - HP v216w | User Guide - Page 19
the optimal resolution (1680 x 1050). • Make sure that the latest supported driver is installed for the graphics card. For HP and Compaq systems, you can download the latest graphics driver for your system from: • http://www.hp.com/support • For other systems, refer to the Web site for your graphics - HP v216w | User Guide - Page 20
Specifications All specifications represent the typical specifications provided by HP's component manufacturers; actual performance may vary either higher or lower. v216w Display Type Viewable Image Size Tilt Face Treatment Maximum Weight (unpacked) Dimensions (including pedestal) Height Depth - HP v216w | User Guide - Page 21
Preset Display Modes Preset Pixel Format 1 640 x 480 2 640 x 480 3 720 x 400 4 800 x 600 5 800 x 600 6 832 x 624 7 1024 x 768 8 1024 x 768 9 1152 x 720 10 1152 x 870 11 1152 x 900 12 1280 x 768 13 1280 x 960 14 1280 x 1024 15 1280 x 1024 16 1440 x 900 17 1600 x - HP v216w | User Guide - Page 22
the cord must be between 4.94 ft (1.5 m) and 12 ft (3.6 m). If you have questions about the type of power cord to use, contact your HP-authorized service provider. A power cord should be routed so that it is not likely to be walked on or pinched by items placed upon it or against - HP v216w | User Guide - Page 23
HP LCD Monitor uses high-precision technology, manufactured according to high standards, to help guarantee trouble your v216w Monitor, refer to the HP Web site at: http://www.hp.com/support Agency installed and used in accordance with the instructions, may cause harmful interference to radio - HP v216w | User Guide - Page 24
Modifications The FCC requires the user to be notified that any changes or modifications made to this device that are not expressly approved by Hewlett-Packard Company may void the user's authority to operate the equipment. Cables Connections to this device must be made with shielded cables with - HP v216w | User Guide - Page 25
European Union Regulatory Notice This product complies with the following EU directives: • Low Voltage Directive 2006/95/EC • EMC Directive 2004/108/EC Compliance with these directives implies conformity to applicable harmonized European standards (European Norms) which are listed on the EU - HP v216w | User Guide - Page 26
environment. For more information about where you can drop off your waste equipment for recycling, please contact your local city office, your household waste disposal service or the shop where you purchased the product. Japanese Notice 26 - HP v216w | User Guide - Page 27
products offered for sale after July 1, 2006. To view the JIS C 0950 material declaration for this product, visit www.hp.com/go/jisc0950. Korean Notice Materials Disposal This HP product contains Mercury in the fluorescent lamp in the display LCD that might require special handling at end-of-life - HP v216w | User Guide - Page 28
programs vary by geography because of differences in regulatory requirements and local customer demand. For information on the HP recycling program, refer to the HP Web site at: http://www.hp.com/recycle EPA ENERGY STAR® Compliance Products marked with the ENERGY STAR® logo on the packaging box - HP v216w | User Guide - Page 29
29 - HP v216w | User Guide - Page 30
- HP v216w | User Guide - Page 31
- HP v216w | User Guide - Page 32
Part number: 457679-001
-
 1
1 -
 2
2 -
 3
3 -
 4
4 -
 5
5 -
 6
6 -
 7
7 -
8
-
9
-
10
-
11
-
12
-
13
-
14
-
15
-
16
-
17
-
18
-
19
-
20
-
21
-
22
-
23
-
24
-
25
-
26
-
27
-
28
-
29
-
30
-
31
-
32
 |
 |

v216w LCD Monitor User’s Guide