Hitachi 32HDT20 Owners Guide
Hitachi 32HDT20 Manual
 |
View all Hitachi 32HDT20 manuals
Add to My Manuals
Save this manual to your list of manuals |
Hitachi 32HDT20 manual content summary:
- Hitachi 32HDT20 | Owners Guide - Page 1
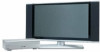
PLASMA TELEVISION AVC (Audio/Video Control Center) & Plasma Display Monitor 32HDT20 42HDT20 OPERATING GUIDE Video Audio Ch. Manager Locks Setup Move SEL Sel STB POWER TV INSTRUCTIONS 2-3 FIRST TIME USE 4-23 THE REMOTE CONTROL 24-39 ON-SCREEN DISPLAY USING THE RGB INPUT OF THE PLASMA TV - Hitachi 32HDT20 | Owners Guide - Page 2
EXPOSE THIS PLASMA TELEVISION TO RAIN OR MOISTURE. NOTE: • There are no user serviceable parts inside the AVC center/display monitor. • Model and serial numbers are indicated on back side of the AVC center/display monitor. CAUTION: Adjust only those controls that are covered in the instructions, as - Hitachi 32HDT20 | Owners Guide - Page 3
and supporting structure, POWER SERVICE GROUNDING ELECTRODE SYSTEM (NEC ART 250 PART television receivers. Such "SCREEN BURNS" constitute misuse and are NOT COVERED by your HITACHI Factory Warranty. PUBLIC VIEWING OF COPYRIGHTED MATERIAL Public viewing of programs broadcast by TV stations and cable - Hitachi 32HDT20 | Owners Guide - Page 4
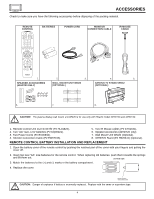
6. 7. 8. CAUTION: The plasma display wall mount unit WM20 is for use only with Hitachi model 32HDT20 and 42HDT20. 1. Remote Control Unit CLU-5723TSI (P# HL01823). 2. Two "AA" size, 1.5V batteries (P# EQ00021). 3. Two Power Cords (P# EV00832). 4. Monitor Connection Cable (P# EW07193). 5. Two IR - Hitachi 32HDT20 | Owners Guide - Page 5
HOW TO SETUP YOUR NEW HITACHI PLASMA TELEVISION SPEAKER INSTALLATION (MODEL 42HDT20 ONLY) 1. Screw the speaker holder to sure the core is toward the display monitor side.) Core NOTES: Do not connect speakers simultaneously to the speaker terminal of the Plasma TV and an external amplifier. 5 - Hitachi 32HDT20 | Owners Guide - Page 6
for stability. When moving the Display Monitor, lift the handles and the bottom frame as shown below. Do not grab the speakers or the back cover when lifting. Handgrips ANTENNA 32HDT20 42HDT20 Unless your Plasma Television is connected to a cable TV system or to a centralized antenna system - Hitachi 32HDT20 | Owners Guide - Page 7
NEW HITACHI PLASMA TELEVISION VIEWING The major benefit of the HITACHI Plasma Television is its large viewing screen. To see this large screen at its best, test various locations in the room to find the optimum spot for viewing. The best picture is seen by sitting directly in front of the TV and - Hitachi 32HDT20 | Owners Guide - Page 8
Plasma Television. IR Mouse Cable (Provided) Connect the IR Mouse to the IR ouput on your AVC center when A/V Network is used. You must place the IR mouse in front of the corresponding IR window of your cable box and VCR. This connection allows your TV to control your cable box and VCR. Monitor - Hitachi 32HDT20 | Owners Guide - Page 9
FRONT PANEL CONTROLS 32HDT20 DISPLAY MONITOR FRONT VIEW 42HDT20 DISPLAY MONITOR AUDIO/VIDEO CONTROL CENTER STANDBY (RED) ON (GREEN) MAIN POWER ቦ ቨ ቧ TruBass AUDIO/VIDEO CONTROL CENTER POWER STANDBY (RED) ON (GREEN) PULL STANDBY (RED) ON (GREEN) MAIN POWER ቨቦ ቧ ባብ POWER STANDBY (RED) ON - Hitachi 32HDT20 | Owners Guide - Page 10
2. Your HITACHI Plasma TV will appear to be turned OFF (lights orange) if there is no video input when VIDEO: 1, 2, 3, 4, 5, RGB1 or RGB2 is selected. Check the Power Light to make sure the Display Monitor is turned off or in Stand-by mode (lights red) when not in use. Remote Control can not turn - Hitachi 32HDT20 | Owners Guide - Page 11
DIGITAL INPUT TO MONITOR Y/VIDEO INPUT 2 Y AUDIO PB (MONO) L PB INPUT 1 AUDIO (MONO) L PR PR R R AUDIO R L AUDIOR L AUDIOR L AUDIO OUT IR BLASTER ቭ ቫ ቮ ቤ ባ ቩብ ቢ Antenna Input/Output The remote control different source such as a cable box, only when ANT B to the AVC Box's - Hitachi 32HDT20 | Owners Guide - Page 12
with your Plasma Television's remote control in TV mode. ቯ Subwoofer Out Connect the external audio component input to this SUB WOOFER OUT output. ተ To AVC Connect the Monitor Connection cable from the AVC center's "TO MONITOR" to these connectors ("FROM AVC"). ቱ SUB-POWER button This power is for - Hitachi 32HDT20 | Owners Guide - Page 13
and securely insert the Monitor Connection Cable to the rear panel of the AVC box "TO MONITOR" connectors. 3. Insert the other ends of the Monitor Connection Cable to the display monitor rear panel "FROM AVC" connectors. Back of Display Monitor 32HDT20 Back of Display Monitor 42HDT20 To AC outlet - Hitachi 32HDT20 | Owners Guide - Page 14
Plasma TV is dependent on the model and features of each component. Check the owner's manual the AVC Center below. 2. Connect the cable from Panel of AVC Center ANT A TO CONVERTER ANT B MONITOR OUT S- R AUDIO RGB 1 ANALOG INPUT RGB 2 DIGITAL INPUT TO MONITOR Y/VIDEO INPUT 2 Y AUDIO PB (MONO - Hitachi 32HDT20 | Owners Guide - Page 15
AVC Center below. 2. Connect the cable from the AUDIO OUT R of the VCR or the laserdisc player to the INPUT (AUDIO/R) jack. 3. Connect the cable AUDIO RGB 1 ANALOG INPUT RGB 2 DIGITAL INPUT TO MONITOR Y/VIDEO INPUT 2 Y AUDIO PB ( guide for more information on line input-output connections. 15 - Hitachi 32HDT20 | Owners Guide - Page 16
AVC Center below. 2. Connect the cable from the AUDIO OUT R of the VCR or the laserdisc player to the INPUT (AUDIO/R) jack. 3. Connect the cable AUDIO RGB 1 ANALOG INPUT RGB 2 DIGITAL INPUT TO MONITOR Y/VIDEO INPUT 2 Y AUDIO PB ( guide for more information on line input-output connections. 16 - Hitachi 32HDT20 | Owners Guide - Page 17
HDTV set top box to the INPUT (AUDIO/R) jack. 5. Connect the cable from the AUDIO OUT L of the Laserdisc/DVD player or HDTV set DVD Player Hitachi Model or Similar Model OUTPUT Back of VIDEO AUDIO DVD Player PB/CB PR/CR Y R L Rear Panel of the AVC Center ANT A TO CONVERTER ANT B MONITOR OUT - Hitachi 32HDT20 | Owners Guide - Page 18
EXTERNAL AUDIO AMPLIFIER To monitor the audio level of the Plasma TV to an external audio amplifier, connect the system as shown below. The "AUDIO OUT" from the AVC center is a fixed output. The Volume of the amplifier is controlled by the amplifier, not by the Plasma Television. The AUDIO OUT - Hitachi 32HDT20 | Owners Guide - Page 19
connector to control your equipment using your Hitachi Plasma TV Remote Control. You can use your Hitachi remote control to control the Audio/Video equipment command without the equipment's remote control. The Plasma Television AVC Center has 2 IR BLASTER jacks. Each IR Mouse cable can connect - Hitachi 32HDT20 | Owners Guide - Page 20
respond to POWER, PLAY or CH UP? Press DONE to finish this wizard or HELP to trouble shoot settings. HELP DONE DONE HITACHI AV NET Wizard Congratulations! Your VCR is now conected to your AV network. HELP TROUBLE SHOOTING Please check connections shown in the EASY GRAPHIC GUIDE. If connections - Hitachi 32HDT20 | Owners Guide - Page 21
NETWORK (not for remote control) VCR BRAND Harman/Kardon 0038, 0081 Harwood 0068, 0072 Headquarter 0046 Hitachi 0042, 0105, 0000, 0041 Hughes Network Systems 0042 Technics 0490 Techwood 0692 Theta Digital 0571 Toshiba 0503 Yamaha 0490, 0545 Zenith 0591, 0503 CABLE BRAND CODE ABC 0003, - Hitachi 32HDT20 | Owners Guide - Page 22
RGB 1 ANALOG INPUT RGB 2 DIGITAL INPUT TO MONITOR Please use Hitachi specified cable. Y/VIDEO INPUT 2 Y AUDIO PB (MONO) L PB INPUT 1 AUDIO (MONO) L PR PR R R AUDIO R L AUDIOR L AUDIOR L AUDIO OUT IR BLASTER Rear Panel of AVC Center INPUT OUTPUT Cable TV Box LR INPUT S-VIDEO - Hitachi 32HDT20 | Owners Guide - Page 23
has only one audio output (mono sound), connect it to the left audio jack on the AVC Center. Refer to the operating guide of your other electronic equipment for additional information on connecting your hook-up cables. A single VCR can be used for VCR #1 and VCR #2, but note that a VCR cannot record - Hitachi 32HDT20 | Owners Guide - Page 24
one area. To operate your Plasma TV, point the remote control at the remote sensor of the AVC box/Display Monitor and press the TV button. The TV button will blink, indicating that the remote will now control your television. To operate your VCR, point the remote at the remote sensor of the VCR and - Hitachi 32HDT20 | Owners Guide - Page 25
PIP VID CH 3 GUIDE/TV VID 4 SCHD VID 5 SWAP PIP ACCESS FREEZE REC VIDEO CLU-5723TSI CLU-5723TSI ᕃ POWER button Press this button to turn the Plasma TV on or off when the remote is in TV mode. (See page 24 for instructions on how to set the remote control to TV mode.) ባ TV button When the - Hitachi 32HDT20 | Owners Guide - Page 26
TV/RGB MENU LAST CH GUIDE/TV SCHD VID 4 VID 5 VOL MUTE SVCS VCR PLUS+ VID 2 VID 1 PIP FREEZE VID 3 PIP CH PIP ACCESS VIDEO SWAP PIP MODE REC CLU-5723TSI HOW TO USE THE REMOTE TO CONTROL YOUR PLASMA TV press the single digit channel you wish to tune then wait a few seconds for the TV to tune. - Hitachi 32HDT20 | Owners Guide - Page 27
user to control external components with the Plasma TV's remote control. When you press the A/V NET button, the following window will pop up within the Display Monitor Box POWER CH ̄ CH ̆ SETUP keys available. Press this button to select between the two pages. Cable Box Amplifier DVD TV/VCR - Hitachi 32HDT20 | Owners Guide - Page 28
HOW TO USE THE REMOTE TO CONTROL YOUR PLASMA TV ተ ASPECT button Press this button to quickly change the picture format ASPECT ratio. Depending on the input signal, the picture format ratio allows you to - Hitachi 32HDT20 | Owners Guide - Page 29
HOW TO USE THE GENIUS REMOTE TO CONTROL YOUR PLASMA TV (4) RGB1/RGB2 ASPECT DISPLAY MODE. RGB1 INPUT SIGNAL STICK toward desired direction and press down to SELECT. When no on-screen displays are on the TV screen, use THUMB STICK ̇ or ̈ to access the Favorite Channels feature. To add channels to - Hitachi 32HDT20 | Owners Guide - Page 30
ASPECT A/V NET SLEEP EXIT CH SELECT ANT TV/RGB MENU LAST CH GUIDE/TV SCHD VID 4 VID 5 VOL MUTE SVCS VCR PLUS+ VID 2 VID 1 PIP FREEZE VID 3 PIP CH PIP ACCESS VIDEO SWAP PIP MODE REC CLU-5723TSI HOW TO USE THE REMOTE TO CONTROL YOUR PLASMA TV ት VOLUME, MUTE button Press the VOLUME up - Hitachi 32HDT20 | Owners Guide - Page 31
PLUS+ CH PIP LAST CH PIP MODE PIP VID CH 3 GUIDE/TV VID 4 SCHD VID 5 SWAP PIP ACCESS FREEZE REC VIDEO CLU-5723TSI Your HITACHI Plasma TV incorporates Dual Tuner technology designed for improved viewing enjoyment. This Dual Tuner feature allows you to view antenna inputs on both the - Hitachi 32HDT20 | Owners Guide - Page 32
STB POWER TV CBL VCR SOURCE WIZARDTAPE CD 2 AMP 3 6 DVD 1 5 9 INFO 4 8 MODE 7 0 ASPECT A/V NET SLEEP EXIT CH SELECT ANT TV/RGB MENU LAST CH GUIDE/TV SCHD VID 4 VID 5 VOL MUTE SVCS VCR PLUS+ VID 2 VID 1 PIP through both PIP modes. Ant A 10 Ant A 12 2 PIP MODE 2 PIP MODE 3 4 32 - Hitachi 32HDT20 | Owners Guide - Page 33
PICTURE-IN-PICTURE (PIP) VOL TV POWER DVD 1 4 VCR CD SOURCETWAPIZEARD CBL 2 STB 7 SLEEP 5 3 AMP ANT 8 6 TV/RGB 0 9 A/V NET MENU INFO MODE ASPECT EXIT SELECT SVCS MUTE VID 2 VID 1 VCR PLUS+ CH PIP LAST CH PIP MODE PIP VID CH 3 GUIDE/TV VID 4 SCHD VID 5 SWAP PIP - Hitachi 32HDT20 | Owners Guide - Page 34
button light will flash 3 times if the code was accepted. 5. Aim the remote at the VCR and press the POWER button. The remote will turn off your VCR if the correct two digit preset code is entered. When this occurs, the remote control is programmed for your VCR. If the VCR does not turn off, try - Hitachi 32HDT20 | Owners Guide - Page 35
, please consult your cable box operating guide. 3. The remote control will remember the codes you have programmed until the batteries are removed from the remote control. After replacing the batteries repeat the entire programming procedure as stated above. ባ POWER TV DVD VCR CBL SOURCE - Hitachi 32HDT20 | Owners Guide - Page 36
at the set-top-box/satellite receiver and press the POWER button. The remote will turn off your set-top-box/satellite receiver if the correct two digit preset code is entered. When this occurs, the remote control is programmed for your set-topbox/satellite receiver. If the set-top-box/satellite - Hitachi 32HDT20 | Owners Guide - Page 37
USING THE REMOTE TO CONTROL DVD FUNCTIONS VOL TV POWER DVD 1 4 VCR CD SOURCETWAPIZEARD CBL 2 STB 7 SLEEP 5 3 AMP ANT 8 6 TV/RGB 0 9 A/V NET MENU INFO MODE ASPECT EXIT SELECT SVCS MUTE VID 2 VID 1 VCR PLUS+ CH PIP LAST CH PIP MODE PIP VID CH 3 GUIDE/TV VID 4 SCHD - Hitachi 32HDT20 | Owners Guide - Page 38
consult your Audio equipment operating guide. 3. The remote control will remember the codes you have programmed until the batteries are removed from the remote control. After replacing the batteries repeat the entire programming procedure as stated above. ባ POWER TV DVD VCR CBL SOURCE WIZARD - Hitachi 32HDT20 | Owners Guide - Page 39
/VIDEO CODES FOR REMOTE CONTROL ONLY VOL TV POWER DVD 1 4 VCR CD SOURCETWAPIZEARD CBL 2 STB 7 SLEEP 5 3 AMP ANT 8 6 TV/RGB 0 9 A/V NET MENU INFO MODE ASPECT EXIT SELECT SVCS MUTE VID 2 VID 1 VCR PLUS+ CH PIP LAST CH PIP MODE PIP VID CH 3 GUIDE/TV VID 4 SCHD VID - Hitachi 32HDT20 | Owners Guide - Page 40
your HITACHI Plasma TV. 2. Use the THUMB STICK to navigate to a different menu item. 3. Press EXIT on the remote control to quickly exit from a menu. 4. Press A/V NET on the remote control to access the A/V Network menu to control external components. A/V Net MENU EXIT SELECT OSD This part of - Hitachi 32HDT20 | Owners Guide - Page 41
front panel. Set specific time to Lock TV. Block various types of movies and video types based on motion picture ratings. Block various types of movies and television programming based on a parental guide ratings. Block various types of movies and television programming based on the Canadian ratings - Hitachi 32HDT20 | Owners Guide - Page 42
this function to choose from automatic picture settings to optimize your TV's performance. Video Audio Ch. Manager Locks Setup MENU Move MOVIES mode is selected from the PICTURE MODE menu, your Hitachi Plasma Television will activate the circuitry for this special feature to improve video - Hitachi 32HDT20 | Owners Guide - Page 43
- Use for High Definition Singal Y-PbPr from HDTV Set-Top Box. SDTV/DVD - Standard Definition Television or DVD (Digital Versatile Disc Player) Y-CbCr. NOTES: 1. If Color System is set improperly (does not match actual input signal), the color and tint of the main picture - Hitachi 32HDT20 | Owners Guide - Page 44
HITACHI Plasma TV to High for cooler color with more blue (9,300K for 32HDT20, 9,200K for 42HDT20), set to Medium for more Plasma Television is powered OFF, BLACK SIDE PANEL feature will be set to OFF automatically when the TV is powered ON. BLACK SIDE PANEL feature needs to be set every time the TV - Hitachi 32HDT20 | Owners Guide - Page 45
AUDIO Audio Select AUDIO to adjust the TV to your preference and to improve the sound quality. MENU controls the high frequency audio to all speakers. This function controls the low frequency audio to all speakers. Balance This function will control the left to right balance of the Plasma TV - Hitachi 32HDT20 | Owners Guide - Page 46
AUDIO Sound Enhancement The following surround settings will stimulate the "live" sound you would hear in concert halls, sports stadiums, movie theaters, etc. with only two speakers. Audio Treble Bass Balance Sound Enhancement Advanced Settings Move SEL Select 50% 50% THUMB STICK SELECT Audio - Hitachi 32HDT20 | Owners Guide - Page 47
a check (✓) in the box, it is ON. Audio Source Multi-Channel Television Sound will allow you to select STEREO (a stereo broadcast), MONO (monaural sound) separate stereo system, turn this feature OFF. When set to OFF, the Plasma TV speakers and the sub-woofer output are OFF. Auto Noise Cancel This - Hitachi 32HDT20 | Owners Guide - Page 48
Ch ID Lock Press THUMB STICK ̆ or ̄ to review more channels. Press EXIT to quit the menu. Scan Use this feature after Auto Channel Scan is completed to add (On) or erase (Off) additional channels to the remote control channel ̆ or ̄ buttons. Ch. Manager Ant A Ch# 2 3 4 5 6 7 8 9 Scan - Hitachi 32HDT20 | Owners Guide - Page 49
This section contains advanced features which will make TV viewing easier and more enjoyable. Use this feature (A-Z, 0-9, _, -) SEL Return NOTES: 1. If ANT A and ANT B are in the same ANTENNA/CABLE mode, the CHANNEL ID for both antenna inputs will be the same. 2. CHANNEL ID will be displayed only - Hitachi 32HDT20 | Owners Guide - Page 50
TV from being viewed for a scheduled time period that you set. The code to enter the Locks feature is a four digit will be deactivated, except the Power button. When TV TIME OUT is turned on (❒✔ TIME LOCK) you TV RATINGS is selected, various types of television programming based on a parental guide - Hitachi 32HDT20 | Owners Guide - Page 51
of any movie that you feel may be inappropriate due to its content. THUMB STICK MENU Locks Change Access Code Engage Lock TV Time Lock Movie Ratings TV Ratings Canadian Ratings (Eng) Canadian Ratings (Frn) Move SEL Select THUMB STICK SELECT Locks Movie Ratings Status Not Rated: G: PG: PG-13 - Hitachi 32HDT20 | Owners Guide - Page 52
RATINGS that you have selected. Press EXIT to quit the menu or select TV RATINGS to return to the previous menu. TV Parental Guide Ratings Chart N/A TV-Y TV-Y7 TV-G TV-PG TV-14 TV-MA FV V S L D None. All children. The themes and elements in this program are specifically designed for a very young - Hitachi 32HDT20 | Owners Guide - Page 53
Ratings (Eng) to block various types of movies and television programs used in (Eng) Canada that you feel may be inappropriate due to its content. MENU THUMB STICK Locks Change Access Code Engage Lock TV Time Lock Movie Ratings TV Ratings Canadian Ratings (Eng) Canadian Ratings (Frn) Move SEL - Hitachi 32HDT20 | Owners Guide - Page 54
content. THUMB STICK MENU Locks Change Access Code Engage Lock TV Time Lock Movie Ratings TV Ratings Canadian Ratings (Eng) Canadian Ratings (FRN) Move have selected. Once rating is selected, for example 8 ans+, all movies and television programs rated 8 ans+ and higher (13 ans+, 16 ans+, 18 ans+) - Hitachi 32HDT20 | Owners Guide - Page 55
SETUP Setup Select SETUP when setting up your TV for the first time. Use the THUMB STICK ̆ or ̄ on the remote to highlight the function desired. MENU THUMB STICK Video Audio Ch. Manager Locks Setup Move SEL Sel THUMB STICK SELECT Setup Menu Preference Screen Saver - Hitachi 32HDT20 | Owners Guide - Page 56
displays such as video games, stock market quotations, computer generated graphics, and other fixed (non-moving) patterns can cause permanent damage to Plasma Television. Use the SCREEN SAVER feature to hide screen burn. Setup Menu Preference Screen Saver Set The Clock Set The Channels Set The - Hitachi 32HDT20 | Owners Guide - Page 57
SETUP Set The Clock The time must be set before you can Set Event Timer or TV Time Out. Setup Menu Preference Screen Saver Set The Clock Set The Channels Set The Inputs Set Event Timer Set Closed Captions Move SEL Select - Hitachi 32HDT20 | Owners Guide - Page 58
ANTENNA if you are using an indoor or outdoor antenna. Select Cable if you have cable TV. Setup Menu Preference Screen Saver Set The Clock Set The 29 ~ W + 84 65 ~ 125 Reception channels for each mode are shown at the left. Refer to your cable or TV guide for channel identification standards. 58 - Hitachi 32HDT20 | Owners Guide - Page 59
Scan This feature will automatically store active TV channels in Auto Channel Scan. This will allow you to skip unused channels when using CHANNEL UP (̆) or DOWN (̄). Setup Set The Channels Ant A Source Antenna Cable(1) Auto Channel Scan Cable(2) Start THUMB STICK Setup Set The Channels - Hitachi 32HDT20 | Owners Guide - Page 60
factory preset condition. NOTE: The video input name will be displayed only when video input is displayed as main picture. Video Power Save Use this feature to reduce power consumption for video input. In RGB mode, this feature will always be on. Setup Set The Inputs Video 1 Rename Video 2 Rename - Hitachi 32HDT20 | Owners Guide - Page 61
Video Power Save Move SEL Select THUMB STICK SELECT THUMB STICK Setup Set The Inputs Video 2 Auto Link Auto Input Signal Sensor Remote Control Sensor reset and will turn on your TV as described above. 2. When using REMOTE CONTROL SENSOR mode, any remote control button will substitute for your video - Hitachi 32HDT20 | Owners Guide - Page 62
SETUP Set Event Timer This function will automatically turn the Plasma TV on and off, one time only, every day, or once a week , Channel, and On/Off Frequency. Use THUMB STICK ̆ or ̄ to select the time the TV will turn on and off. Use THUMB STICK ̆ or ̄ to select the day of the week you want the timer - Hitachi 32HDT20 | Owners Guide - Page 63
SETUP Closed Caption Closed Captions are the dialogue, narration, and/or sound effects of a television program or home video which are displayed on the Plasma Television screen. Your local TV program guide denotes these programs as or . Setup Menu Preference Screen Saver Set The Clock Set The - Hitachi 32HDT20 | Owners Guide - Page 64
L AUDIOR L AUDIO OUT IR BLASTER 2. AVC rear panel connection to an external component with a digital RGB2 output. RGB DIGITAL OUTPUT SET-TOP-BOX AUDIO OUT DIgital Link Cable (Optional) Audio Cable (Optional) ANT A TO CONVERTER ANT B MONITOR OUT S-VIDEO INPUT 4 S-VIDEO INPUT 3 S-VIDEO - Hitachi 32HDT20 | Owners Guide - Page 65
detect and display the signal format below. 1. RGB input signal. This Plasma Television can accept the following signal formats. Recommended Signal List Signal Mode No. Signal 480 Vertical Frequency (Hz) 70.10 59.94 72.81 75.00 56.25 60.32 72.19 75.00 60.00 70.07 75.03 60.02 75.03 59.94 - Hitachi 32HDT20 | Owners Guide - Page 66
will over-write the first user's setting, second setting and so on. 3. Operation in RGB mode in relation to TV functions are shown below. No. Item 1 Event Timer 2 Video Control 3 A/V Net 4 Audio Settings 5 Mute / Soft Mute 6 Closed Caption 7 Clock 8 Sleep Timer 9 Monitor Out 10 Lock 11 Front Panel - Hitachi 32HDT20 | Owners Guide - Page 67
is not available. 6. RGB input signal will not appear at all when receiving a signal which is not supported by this product. If the setting is wrong, the Display Monitor will display: NO SYNC. SIGNAL INVALID SCAN FREQ. Without sync Either horizontal or vertical frequency is inappropriate or - Hitachi 32HDT20 | Owners Guide - Page 68
MODE. 3. Press the THUMB STICK buttons to highlight a different feature. 4. Press EXIT on the remote control to quickly exit from a menu. TV/RGB MENU EXIT SELECT RGB MODE MENU VIDEO SETUP This part of the screen shows which Remote Control buttons to use. MOVE SEL TO SELECT EXIT TO QUIT 68 - Hitachi 32HDT20 | Owners Guide - Page 69
the picture. Adjust overall picture brightness. Select between HIGH (9,300K-32HDT20, 9,200K-42HDT20), MEDIUM (7,500K) or STANDARD (6,500K). Enhance picture input. INPUT LEVEL Set the preferred input signal level. RGB:2 Digital Input Mode Menu AUTO ADJUST Automatically adjust the geometry to fit - Hitachi 32HDT20 | Owners Guide - Page 70
EXIT to quit. MOVE CHANGE VALUE EXIT TO QUIT NOTE: See TV contrast feature for additional information regarding contrast. BRIGHTNESS This feature allows TEMPERATURE. Set this to HIGH for cooler with more blue (9,300K - 32HDT20; 9,200K - 42HDT20), set to MEDIUM for more natural color (7,500K), - Hitachi 32HDT20 | Owners Guide - Page 71
% : MEDIUM : ON : : Press down on THUMB STICK to select BLACK SIDE PANEL ON/OFF. MOVE SEL ON/OFF EXIT TO QUIT NOTE: To prevent the plasma phosphor from burning when watching 4:3 signal, turn off the BLACK SIDE PANEL. It is recommended to watch 4:3 signal with gray side bar. 71 - Hitachi 32HDT20 | Owners Guide - Page 72
. • Allow the Plasma TV to warm up for 20 minutes before performing AUTO ADJUST. • Select a bright image for display while AUTO ADJUST takes place. • If AUTO ADJUST terminates unsuccessfully, try AUTO ADJUST again. If AUTO ADJUST fails several times in succession, try using manual - Hitachi 32HDT20 | Owners Guide - Page 73
RGB ON SCREEN DISPLAY Adjusts the pixel clock frequency to reduce the vertical stripe. HORIZONTAL CLOCK RGB MODE MENU SET UP AUTO ADJUST H POSITION V POSITION HORIZONTAL CLOCK CLOCK PHASE RESET RGB2 INPUT INPUT LEVEL MOVE CHANGE VALUE : : 0 : 0 : ̇0̈ : +22 : : MODE:1 : 0.7V - Hitachi 32HDT20 | Owners Guide - Page 74
RGB ON SCREEN DISPLAY RGB2 INPUT This feature allows you to select between Mode A and Mode B depending on signal input to RGB2 Input, depending on your preference. RGB MODE MENU SET UP AUTO ADJUST H POSITION V POSITION HORIZONTAL CLOCK CLOCK PHASE RESET RGB2 INPUT INPUT LEVEL MOVE CHANGE - Hitachi 32HDT20 | Owners Guide - Page 75
products or cellophane tape on your Plasma Television. Avoid repeatedly touching the screen. Do not subject the remote control to shocks such as dropping it on the floor, etc. This may cause physical damage to the precision parts. Avoid placing the remote control in a high humidity place or getting - Hitachi 32HDT20 | Owners Guide - Page 76
fringe area of a television station where the signal monitor. - Use a coaxial cable for antenna. You can check if this monitor influences Radio receivers by turning off all other equipment other than the monitor. If you find a problem receiveing Radio when using the monitor, check the instructions - Hitachi 32HDT20 | Owners Guide - Page 77
USEFUL INFO SYMPTOMS No Picture, no sound Sound OK, picture poor © Picture OK, sound poor © Picture blurred © Lines or streaks in picture Poor reception on some channels Picture rolls vertically No color © Poor color © © ©©© © © ©©© © © ©©© © © ©©© © © © ©©© © ©©© 77 - Hitachi 32HDT20 | Owners Guide - Page 78
B digital apparatus complies with Canadian ICES-003. Cet appareil numérique de la classe B est conforme à la norme NMB-003 du Canada. Cable Compatible Television Apparatus- Tèlèvision câblocompatible, Canada. Notes on Closed Caption: This Plasma Television receiver will display television closed - Hitachi 32HDT20 | Owners Guide - Page 79
Class B digital device, pursuant to Part 15 of television technician for help. Modifications The FCC requires the user to be notified that any changes or modifications made to this device that are not expressly approved by Hitachi Home Electronics (America), Inc. may void the user's warranty. Cables - Hitachi 32HDT20 | Owners Guide - Page 80
Surround • 10W+10W (42HDT20) • 7W+ 7W (32HDT20) • Soft Mute (50% and 100%) Supplied Accesories: • Illuminated Preprogrammed Remote Control • Batteries • 9' Monitor Connection Cable • 6' AC Cable (2) Optional Accesories: • 32' Monitor Connection Cable • Wall Mount Bracket INPUTS/OUTPUTS • Inputs - Hitachi 32HDT20 | Owners Guide - Page 81
, 24 hours a day 800 HITACHI (1-800-448-2244) Hitachi America, LTD. Home Electronics Division Hitachi has made every effort to assure you hours of trouble free operation from your unit. However, should you require service, a network of Hitachi Authorized Service Facilities has been established in - Hitachi 32HDT20 | Owners Guide - Page 82
INFO Hitachi Canada, LTD. Digital Media Division Should you have any questions regarding warranty, service, operation, or technical assistance, please contact: In Canada: 1-800-HITACHI (1-800-448-2244) Monday - Friday EST 9:00am - 7:00pm Saturday EST 9:00am - 5:00pm Look for your French Manual on - Hitachi 32HDT20 | Owners Guide - Page 83
NOTES 83 - Hitachi 32HDT20 | Owners Guide - Page 84
QR52141
-
 1
1 -
 2
2 -
 3
3 -
 4
4 -
 5
5 -
 6
6 -
 7
7 -
8
-
9
-
10
-
11
-
12
-
13
-
14
-
15
-
16
-
17
-
18
-
19
-
20
-
21
-
22
-
23
-
24
-
25
-
26
-
27
-
28
-
29
-
30
-
31
-
32
-
33
-
34
-
35
-
36
-
37
-
38
-
39
-
40
-
41
-
42
-
43
-
44
-
45
-
46
-
47
-
48
-
49
-
50
-
51
-
52
-
53
-
54
-
55
-
56
-
57
-
58
-
59
-
60
-
61
-
62
-
63
-
64
-
65
-
66
-
67
-
68
-
69
-
70
-
71
-
72
-
73
-
74
-
75
-
76
-
77
-
78
-
79
-
80
-
81
-
82
-
83
-
84
 |
 |

PLASMA TELEVISION
AVC (Audio/Video Control Center) & Plasma Display Monitor
32HDT20
42HDT20
OPERATING GUIDE
IMPORTANT SAFETY INSTRUCTIONS
2-3
FIRST TIME USE
4-23
THE REMOTE CONTROL
ON-SCREEN DISPLAY
USEFUL INFORMATION INDEX
75-82
Setup
Locks
Ch. Manager
Audio
Video
Move
SEL
Sel
40-63
24-39
Setup
Locks
Ch. Manager
Audio
Video
Move
SEL
Sel
USING THE RGB INPUT
OF THE PLASMA TV
64-74