Hitachi 42V715 Owners Guide - Page 47
Color Decoding, Auto Color, Noise Reduction, Auto Movie Mode - green tint
 |
View all Hitachi 42V715 manuals
Add to My Manuals
Save this manual to your list of manuals |
Page 47 highlights
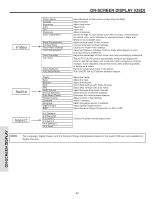
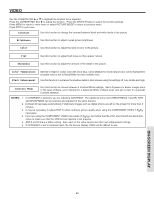
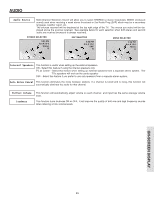
VIDEO Color Decoding Use this function to adjust and balance the percentage of Red, Green and Blue according to the user's preference in each of the four color temperature settings. Use TINT to adjust flesh tones so they appear natural. Video Color Management Color Decoding Auto Color Noise Reduction Auto Movie Mode Move SEL Select Off Low Off Video Color Decoding RGB R G B Red 50% Green 50% Color 50% Tint Reset Move SEL Return Use the CURSOR PAD to highlight function. Press down to select from 4 menu items. Press the CURSOR PAD to highlight and adjust Red, Green, Color and Tint. Use the CURSOR PAD to highlight and select "Reset" to return all settings to default. NOTE: Color Decoding settings are independently stored in each of the 4 Color Temperature settings. Auto Color The AUTO COLOR function automatically monitors and adjusts the color to maintain constant color levels even after a program or channel changes. It also maintains natural flesh tones while preserving fidelity of background colors. NOTES: 1. When using Component, HDMI or DVI input, Auto Color will not be available (grayed out). 2. When using digital channels, Auto Color will not be available (grayed out). Noise Reduction The NOISE REDUCTION function automatically reduces conspicuous noise in the picture without degrading picture quality. Set NOISE REDUCTION to OFF if the TV experiences picture blocking. Auto Movie Mode The Auto Movie Mode function turns ON or OFF the 3:2 PULLDOWN DETECTION SPECIAL FEATURE. Theatrical movies are shot on film at 24 frames or still pictures per second, instead of 30 frames or 60 fields like video. When film is transferred to video for television viewing, the disparity between the two frame rates must be reconciled. This involves a process known as 3:2 pulldown. When Auto Movie Mode is turned ON from the VIDEO menu, your Hitachi Projection Television will activate the circuitry for this special feature to improve video performance when watching film based sources. NOTES: 1. When using Progressive Scan Component, HDMI or DVI input (Ex. 480p, 720p, 1080i), Auto Movie Mode will not be available (grayed out). 2. All Video settings are independent of each other based on it's input (ANT A/B, Input 1~5, Photo Input). ON-SCREEN DISPLAY 47
-
 1
1 -
2
-
3
-
4
-
5
-
6
-
7
-
8
-
9
-
10
-
11
-
12
-
13
-
14
-
15
-
16
-
17
-
18
-
19
-
20
-
21
-
22
-
23
-
24
-
25
-
26
-
27
-
28
-
29
-
30
-
31
-
32
-
33
-
34
-
35
-
36
-
37
-
38
-
39
-
40
-
41
-
 42
42 -
 43
43 -
 44
44 -
 45
45 -
 46
46 -
 47
47 -
 48
48 -
 49
49 -
 50
50 -
 51
51 -
 52
52 -
53
-
54
-
55
-
56
-
57
-
58
-
59
-
60
-
61
-
62
-
63
-
64
-
65
-
66
-
67
-
68
-
69
-
70
-
71
-
72
-
73
-
74
-
75
-
76
-
77
-
78
-
79
-
80
-
81
-
82
-
83
-
84
 |
 |