Hitachi 43FDX01B Owners Guide - Page 22
LAST CHANNEL LAST CH button
 |
View all Hitachi 43FDX01B manuals
Add to My Manuals
Save this manual to your list of manuals |
Page 22 highlights
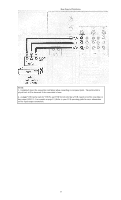
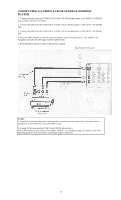
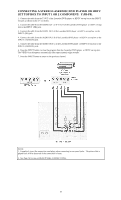
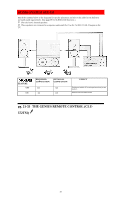
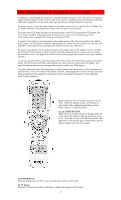
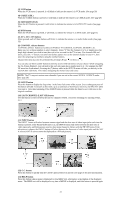
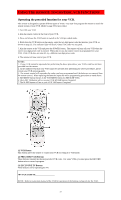
(3) VCR button When the VCR button is pressed, it will blink to indicate the remote is in VCR mode. (See page 28) (4) CABLE (CBL) When the CABLE button is pressed, it will blink to indicate the remote is in CABLE mode. (See page 29) (5) SATELLITE (SAT) When the SAT button is pressed, it will blink, to indicate the remote is in SATELLITE mode. (See page 30) (6) DVD button When the DVD button is pressed, it will blink, to indicate the remote is in DVD mode. (See page 31) (7) AV1, AV2, AV3 buttons When pressed, each of these buttons will blink to indicate the remote is in Audio/Video mode. (See page 32) (8) CHANNEL selector buttons CHANNEL selector buttons are used to set FAMILY FAVORITES, CHANNEL MEMORY, etc. Enter one, two or three numbers to select channels. Enter "0" first for channels 1 to 9, or simply press the single digit channel you wish to tune then wait a few seconds for the TV to tune. For channels 100 and above, press the "1" button, wait until two dashes appears next to the channel display on your TV, then enter the remaining two numbers using the number buttons. Channel selection may also be performed by pressing CH up ( ) or down ( ). You can also use these number buttons to directly access OSD sub-menu's of your choice. While navigating the On-Screen-Display's, you will notice that each sub-menu has a number next to it. For example the SET UP menu has 9 sub-menu's. Pressing the (7) button while in the SET UP menu will take you directly to the CLOCK SET sub-menu. This makes navigating the menu's faster and easier. NOTE: The TV may not receive some channels if you are not in the correct SIGNAL SOURCE mode. (See page 38) (9) SLEEP button Press this button to display the sleep timer in the lower left corner of the screen. Every subsequent press of this button will add 15 minutes to this timer, up to a maximum of three hours. Once set, use RECALL when you want to view time remaining. If the SLEEP button is pressed while the timer is set, it will reset to the original condition. (10) LAST CHANNEL (LAST CH) button Use this button to select between the last two channels viewed. (Good for watching two sporting events, etc.) (11) INPUT button The INPUT button will select between antenna signal and the three sets of video input jacks each time the button is pressed. If the Picture-in-Picture is on, the INPUT button will select between the three sets of video input jacks and both antenna sources when main channel is chosen with the PIP CH button. If the sub-picture is chosen, the INPUT button will select between the three sets of video input jacks and the ANT A source (ANT B source cannot be displayed as a PIP sub-picture). (12) C.C. button Press this button to quickly turn the Closed Caption feature on and off (see page 56 for more information). (13) HELP button Press this button when a menu is displayed to view HELP text, which gives a description of the displayed menu. The HELP text will be displayed every time a MENU is displayed, until this button is pressed again. 22
-
 1
1 -
2
-
3
-
4
-
5
-
6
-
7
-
8
-
9
-
10
-
11
-
12
-
13
-
14
-
15
-
16
-
 17
17 -
 18
18 -
 19
19 -
 20
20 -
 21
21 -
 22
22 -
 23
23 -
 24
24 -
 25
25 -
 26
26 -
 27
27 -
28
-
29
-
30
-
31
-
32
-
33
-
34
-
35
-
36
-
37
-
38
-
39
-
40
-
41
-
42
-
43
-
44
-
45
-
46
-
47
-
48
-
49
-
50
-
51
-
52
-
53
-
54
-
55
-
56
-
57
-
58
-
59
-
60
-
61
-
62
 |
 |