Hitachi 50EX12BA Owners Guide
Hitachi 50EX12BA Manual
 |
View all Hitachi 50EX12BA manuals
Add to My Manuals
Save this manual to your list of manuals |
Hitachi 50EX12BA manual content summary:
- Hitachi 50EX12BA | Owners Guide - Page 1
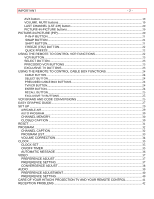
COLOR TV 50EX12BA 50EX13KA OPERATING GUIDE TABLE OF CONTENTS IMPORTANT ...3 SAFETY TIPS ...4 PICTURE CAUTIONS...9 ACCESSORIES ...9 REMOTE CONTROL BATTERY INSTALLATION AND REPLACEMENT 10 HOW TO SET UP YOUR NEW HITACHI PROJECTION 10 HOOK-UP CABLES AND CONNECTORS 11 ANTENNA CONNECTIONS TO REAR - Hitachi 50EX12BA | Owners Guide - Page 2
...35 CLOCK SET ...35 ON/OFF TIMER ...35 AUTOMATIC MESSAGE ...36 VIDEO ...37 PREFERENCE ADJUST...37 PREFERENCE SETTING ...37 CONVERGENCE ADJUST...38 AUDIO ...39 PREFERENCE ADJUSTMENT...40 PREFERENCE SETTING ...40 CARE OF YOUR HITACHI PROJECTION TV AND YOUR REMOTE CONTROL 41 RECEPTION PROBLEMS ...42 - Hitachi 50EX12BA | Owners Guide - Page 3
THIS TELEVISION SYSTEM TO RAIN OR MOISTURE. NOTE: There are no user serviceable parts inside the receiver. Model number and serial number are indicated on the back side of the set. POWER SOURCE: This projection color TV is designed to operate on 120 volts 60 Hz, AC household current. Insert - Hitachi 50EX12BA | Owners Guide - Page 4
set and call your dealer or service shop. SAFETY TIPS IMPORTANT SAFEGUARDS SAFETY POINTS YOU SHOULD KNOW ABOUT YOUR HITACHI TELEVISION RECEIVER CAUTION: * Read all of these instructions. * Save these instructions for later use. * Follow all warnings and instructions marked on the television receiver - Hitachi 50EX12BA | Owners Guide - Page 5
to rest on or roll over the power cord, and do not place the TV where the power cord is subject to traffic or abuse. This may result in a shock or fire hazard. 5 Do not attempt to service this television set yourself as opening or removing covers may expose you to dangerous - Hitachi 50EX12BA | Owners Guide - Page 6
television set. Wall or shelf mounting should follow the manufacturer's instructions, and should use a mounting kit approved by the manufacturer. 11 to rain or water, unplug the set from the wall outlet and refer servicing personnel. 13 Choose a place where light (artificial or sunlight) does not - Hitachi 50EX12BA | Owners Guide - Page 7
is protected against voltage surges and built up static charges, Section 810 of the National Electrical Code, NFPA No. 70-1975, provides information with respect to proper grounding of the mast and supporting structure, grounding of the lead-in wire to an antenna discharge unit, size of grounding - Hitachi 50EX12BA | Owners Guide - Page 8
servicing to qualified service personnel. Adjust only those controls that are covered in the operating instructions as improper adjustment of other controls indicates a need for service, unplug the set and have it checked by a professional service technician. 24 It is normal for some TV sets to make - Hitachi 50EX12BA | Owners Guide - Page 9
part. Unauthorized substitutions may result in fire, electric shock, or other hazards. 27 Upon completion of any service or repairs to the television set, ask the service damage to projection television receivers. Such "PATTERN BURNS" constitute misuse and are NOT COVERED by your Hitachi Factory - Hitachi 50EX12BA | Owners Guide - Page 10
HOW TO SET UP YOUR NEW HITACHI PROJECTION - 10 - Check to make sure you have the following accessories before disposing of the packing material. 1. Remote Control Unit CLU-413UI (Part No. HL00222) 2. Two "AA" size, 1.5 V batteries (For Remote Control Unit). REMOTE CONTROL BATTERY INSTALLATION AND - Hitachi 50EX12BA | Owners Guide - Page 11
avoid cabinet warping, cabinet color changes, and increased chance of set failure, do not place the TV where temperatures can become excessively hot. For example, in direct sunlight or near a heating appliance, etc. VIEWING The major benefit of the HITACHI Projection Television is its large viewing - Hitachi 50EX12BA | Owners Guide - Page 12
and audio cables which connect to inputs and outputs located on the Television's rear jack panel and front control panel. "F" Type 75-Ohm Coaxial Antenna Connector For connecting RF signals (antenna or cable TV) to the antenna jack on the television. S-Video (Super Video) Connector This connector - Hitachi 50EX12BA | Owners Guide - Page 13
VHF and UHF antennas are connected Attach an optional antenna cable mixer to the TV antenna terminal, and connect the cables to the antenna mixer. Consult your dealer or service store for the antenna mixer. FRONT PANEL CONTROLS Click to see front panel diagram. AVX (Audio/Video) selector Press this - Hitachi 50EX12BA | Owners Guide - Page 14
on the amount of light in the room to give the best picture. (See page 34) REMOTE CONTROL sensor Point your Remote at this area when selecting channels, adjusting volume, etc. REAR PANEL JACKS Click to see Rear Panel Jacks. Antenna Input Use an "F" type coaxial cable to connect an antenna or cable - Hitachi 50EX12BA | Owners Guide - Page 15
remote control main volume buttons. Use speakers with 8 Ohm impedance only. Speaker Matrix Surround Switch Use this switch to choose between the surround and external speaker features. See page 13 for Audio System setup. The TV's Internal Speakers will be switched off when "EXT." is selected. REAR - Hitachi 50EX12BA | Owners Guide - Page 16
the REAR SPEAKER terminal of the Projection TV and an external amplifier. This could damage both the TV and the speakers. Your TV was sound), connect it to the left audio jack on the TV. Refer to the operating guide of your other electronic equipment for additional information on connecting your - Hitachi 50EX12BA | Owners Guide - Page 17
operating guide for TV. These speakers are connected to the Rear Speaker 8 Ohm output on the TV. (Click to see Audio System Set-Up) * See page 10 for location of Surround Switch. THE REMOTE CONTROL (CLU-413UI) In addition to controlling all the functions on your HITACHI Projection TV, the new remote - Hitachi 50EX12BA | Owners Guide - Page 18
THE REMOTE CONTROL (CLU-413UI) - 18 - When you are in a dark room, press this button on the side of the remote to light up the always transmit the chosen precoded VCR codes. TV/VCR BUTTON When the remote is in the TV or VCR mode, this is the TV/VCR button. When the remote is in the CABLE mode, - Hitachi 50EX12BA | Owners Guide - Page 19
REMOTE CONTROL (CLU-413UI) - 19 - You can also use the RECALL button to quickly clear many of the other on-screen displays. MENU, ENTER, CURSOR buttons All the on-screen display features can be set or adjusted by using these buttons. The "MENU down ( ). NOTE: The TV may not receive some channels if - Hitachi 50EX12BA | Owners Guide - Page 20
PICTURE-IN-PICTURE (PIP) - 20 - Press the "VOLUME" up ( ) or down ( ) button until you obtain the desired sound level. To turn the sound off instantly to answer the telephone, etc., press the "MUTE" button. Press the "MUTE" button again or press the "VOLUME" up ( ) button to restore the sound. - Hitachi 50EX12BA | Owners Guide - Page 21
from the screen, press the button a third time. Press the AVX button when the sub-picture is on to change between VIDEO: 1 or VIDEO: 2. The TV channel will always be either the main picture or the sub-picture. SWAP BUTTON If you wish to switch what is being shown on the - Hitachi 50EX12BA | Owners Guide - Page 22
USING THE REMOTE TO CONTROL VCR FUNCTIONS - 22 - To move the sub-picture to another corner, press the "SHIFT" button. The sub-picture moves one step PIP will not work with a CHILD LOCK channel as the Main Picture but it will be displayed as a Sub-Picture. USING THE REMOTE TO CONTROL VCR FUNCTIONS - Hitachi 50EX12BA | Owners Guide - Page 23
be operated after performing the above procedures, please consult your VCR operating guide. 3. The remote control will remember the codes you have programmed in until the batteries are removed from the remote control. After replacing the batteries repeat the entire programming procedure stated above - Hitachi 50EX12BA | Owners Guide - Page 24
operate after performing the above procedures, consult your cable box operating guide. 3. The remote control will remember the codes you have programmed in until the batteries are removed from the remote control. After replacing the batteries repeat the entire programming procedure stated above - Hitachi 50EX12BA | Owners Guide - Page 25
If your cable box does not have a last channel function, this button will send the TV channel recall code. EXCLUSIVE TV BUTTONS These buttons are for operating the TV. VCR BRAND AND CODE CONVERSIONS VCR BRAND CODE Adventura 00 Aiko 50 Aiwa 00 Akai 14,23,49 American High 09 Asha 48 - Hitachi 50EX12BA | Owners Guide - Page 26
Electricord 37 Garrard 40 GC Electronics 31,44 Gemini 13,32,36,46 General Instrument 09 Hamlin 08,16,27,49,50 Hitachi 09 Hytex 05 Jasco 40 CABLE BRAND CODE Panasonic 17,38 Paragon 00 Philips 19,21,22,23 24,25,40,46,54 Pioneer 18,39 Pulsar 00 RCA - Hitachi 50EX12BA | Owners Guide - Page 27
Artists 05 United Cable 03 Universal 28,31,37,40,43,44 Videoway 48 Viewstar 21,34,35,45 Zenith 00 Press MENU on the remote control to display the different features on your HITACHI TV. The feature to be selected will be highlighted in a magenta (purple) color. Press the CURSOR buttons to - Hitachi 50EX12BA | Owners Guide - Page 28
using timer features. ON/OFF TIMER Turn TV on or off one time or daily. AUTOMATIC MESSAGE - 1 Set for one time or daily. AUTOMATIC MESSAGE - 2 Set for one time or daily. PREFERENCE ADJUST PREFERENCE SETTING CONVERGENCE ADJUST Adjust color, brightness, etc. Improve picture performance. Match - Hitachi 50EX12BA | Owners Guide - Page 29
SET UP - 29 - PREFERENCE ADJUST PREFERENCE SETTING Adjust balance, bass, and treble. Improve sound performance. SET UP Select SET UP when setting your TV up for the first time. Use the CURSOR UP/DOWN buttons on the remote to highlight the function desired. AIR/CABLE AIR Select AIR if you are - Hitachi 50EX12BA | Owners Guide - Page 30
MENU button is pressed while the auto programming function is engaged, programming will stop. See CHANNEL MEMORY to add or erase additional channels. CHANNEL MEMORY Using this function after AUTOPROGRAM to add or erase additional channels to the remote control TV screen. Your local TV program guide - Hitachi 50EX12BA | Owners Guide - Page 31
information such as news reports or a TV program guide. This information covers the entire screen and viewing the TV program is not possible. TEXT may not highlight the function to change, press ENTER to change the function, and press MENU to exit. NOTE: The word MUTE will not be displayed if the - Hitachi 50EX12BA | Owners Guide - Page 32
- 32 - NOTE: This RESET Selection will not change your preferred adjustments. To change back to your adjustments, see VIDEO (page 33 ) or Audio (page 36). PROGRAM This selection contains advanced features which will make TV viewing easier and more enjoyable. CHANNEL CAPTION 3Use this feature to - Hitachi 50EX12BA | Owners Guide - Page 33
CHANNEL MEMORY (SCAN), and which are protected by CHILD LOCK (LOCK). Press CURSOR , to review more channels. Press MENU to EXIT. 4CHILD LOCK This function will block out the picture and sound of the selected channel. The code to set or cancel CHILD LOCK is a three digit key number. The factor preset - Hitachi 50EX12BA | Owners Guide - Page 34
use the factory code 777 to erase TV channels. Press the CURSOR , to select one of the four volume corrections. Use the CHANNEL , or number buttons to select a channel. Press ENTER to set the channel. Press CURSOR , to adjust volume level. Press MENU to exit. NOTE: 1. VOLUME CORRECTION adjustment - Hitachi 50EX12BA | Owners Guide - Page 35
the time, press ENTER to start. ON/OFF TIMER This function will automatically turn the TV on or off, one time only or everyday. The selection to change will be in day). Press CHANNEL , or the NUMBER buttons to set the channel the TV will tune to when it automatically turns on. Your choice for AM/PM - Hitachi 50EX12BA | Owners Guide - Page 36
will be the same for both. CAUTION: Do not use your TV as a deterrent when away from home by using both the ON and OFF TIMERS. For safety, the TV should be turned off when you are away from home. AUTOMATIC MESSAGE blue. Use the NUMBER buttons to set the time. Press ENTER to start and MENU to exit. - Hitachi 50EX12BA | Owners Guide - Page 37
Message-1. VIDEO Select VIDEO to adjust picture settings, improve picture quality, and to adjust convergence. PREFERENCE ADJUST Use this feature to adjust contrast, color, etc. Press the CURSOR buttons to select and make adjustments. The function to be adjusted will be in magenta. CONTRAST - Hitachi 50EX12BA | Owners Guide - Page 38
the picture. NOISE REDUCER The NOISE REDUCER automatically reduces conspicuous noise in the picture without degrading picture quality. CONVERGENCE ADJUST Your Projection TV has three color projection tubes: one for red, one for green, one for blue. When mixed together in the proper proportion, the - Hitachi 50EX12BA | Owners Guide - Page 39
produce the white lines. Press the CURSOR , to move the color displayed up or down. Press the CURSOR , to move the color displayed left or right. Press ENTER to change the color. Press MENU to exit. AUDIO Select AUDIO to adjust the TV to your preference, to improve the sound quality, and to select - Hitachi 50EX12BA | Owners Guide - Page 40
to set balance, bass, and treble. Press the CURSOR buttons to select and make adjustments. The function to be adjusted will be in magenta. BALANCE - This function will control the left to right balance of the TV internal speakers, the AUDIO TO HI-FI output, and the surround speakers. BASS - This - Hitachi 50EX12BA | Owners Guide - Page 41
when first setting up the external speakers, or if you prefer to use only speakers from a separate stereo system. CARE OF YOUR HITACHI PROJECTION TV AND YOUR REMOTE CONTROL DO Dust the screen and cabinet with a soft cloth. Clean the screen with a soft cloth moistened with warm water. Dry with a soft - Hitachi 50EX12BA | Owners Guide - Page 42
PROBLEMS - 42 - Do not place rubber or vinyl products or cellophane tape on your set. Do not touch the screen too often. Do not subject the Remote Control to shocks such as dropping it on the floor, etc. Physical damage to the precision parts may result. Avoid placing the Remote Control - Hitachi 50EX12BA | Owners Guide - Page 43
picture. CHECK HERE BEFORE CALLING FOR SERVICE This Projection Television incorporates advanced power surge protection Projection Television. SPECIFICATIONS Features: Superfine Picture Quality 750 Line Horizontal Resolution (50EX12BA, 50EX13KA) Artificial Intelligence System Remote (Controls - Hitachi 50EX12BA | Owners Guide - Page 44
Dimensions: 50EX12BA/KA Height (in.) 50 7/8 Width (in.) 41 5/8 Depth (in.) 23 5/8 Weight (lbs.) 243 - 44 - NOTE: Due to improvements, specifications in this operating guide are subject to change without notice. HITACHI SERVICE HOTLINE To locate an authorized HITACHI service facility in - Hitachi 50EX12BA | Owners Guide - Page 45
Limited Warranty Hitachi Projection TVs are warranted to be free of defects in parts and workmanship from the time of purchase by the original owner. If this product is found to be defective, Hitachi will repair or replace defective parts at no charge for the parts to the original owner, subject to - Hitachi 50EX12BA | Owners Guide - Page 46
of the continental United States or its possessions. E. Uncrating, setup, installation, or adjustments of customer operated controls. F. Repairs or replacement parts supplied by other than an Authorized Hitachi Service Facility. G. Any defect, malfunction, or failure caused by or resulting from - Hitachi 50EX12BA | Owners Guide - Page 47
warranty purposes. Please complete the section below for your records, as it may be needed in the event of loss. HITACHI Projection TV Limited Warranty Registration (For your record - Attach sales receipt to this card) Model no. Serial no. Dealer Name Date of Purchase Dealer Address City State Zip
-
 1
1 -
 2
2 -
 3
3 -
 4
4 -
 5
5 -
 6
6 -
 7
7 -
8
-
9
-
10
-
11
-
12
-
13
-
14
-
15
-
16
-
17
-
18
-
19
-
20
-
21
-
22
-
23
-
24
-
25
-
26
-
27
-
28
-
29
-
30
-
31
-
32
-
33
-
34
-
35
-
36
-
37
-
38
-
39
-
40
-
41
-
42
-
43
-
44
-
45
-
46
-
47
 |
 |
IMPORTANT
- 1 -
1
PROJECTION COLOR TV
50EX12BA
50EX13KA
OPERATING GUIDE
TABLE OF CONTENTS
IMPORTANT
.............................................................................................................................................
3
SAFETY TIPS
...........................................................................................................................................
4
PICTURE CAUTIONS
..............................................................................................................................
9
ACCESSORIES
........................................................................................................................................
9
REMOTE CONTROL BATTERY INSTALLATION AND REPLACEMENT
.................................
10
HOW TO SET UP YOUR NEW HITACHI PROJECTION
................................................................
10
HOOK-UP CABLES AND CONNECTORS
........................................................................................
11
ANTENNA CONNECTIONS TO REAR JACK PANEL
...................................................................
12
FRONT PANEL CONTROLS
................................................................................................................
13
AVX (Audio/Video) selector
..........................................................................................................
13
VOLUME level
................................................................................................................................
13
CHANNEL selector
........................................................................................................................
13
POWER button
...............................................................................................................................
14
POWER light
...................................................................................................................................
14
AI (Artificial Intelligence) sensor
...................................................................................................
14
REMOTE CONTROL sensor
........................................................................................................
14
REAR PANEL JACKS
...........................................................................................................................
14
Antenna Input
..................................................................................................................................
14
Audio/Video Inputs 1, 2
.................................................................................................................
14
Output
...............................................................................................................................................
15
Audio to Hi-Fi
..................................................................................................................................
15
S-Video
............................................................................................................................................
15
Rear Speaker Terminals
...............................................................................................................
15
Speaker Matrix Surround Switch
.................................................................................................
15
REAR PANEL CONNECTIONS
...........................................................................................................
15
REAR SPEAKER TERMINAL CONNECTIONS
................................................................................
15
TIPS ON REAR PANEL CONNECTIONS
.........................................................................................
16
AUDIO SYSTEM SET-UP
.....................................................................................................................
17
THE REMOTE CONTROL (CLU-413UI)
............................................................................................
17
............................................................................................................................................................
17
,
LIGHT BUTTON
.........................................................................................................................
17
PRECODED VCR BUTTONS
......................................................................................................
18
TV/VCR BUTTON
...........................................................................................................................
18
SELECT BUTTON
..........................................................................................................................
18
POWER button
...............................................................................................................................
18
RECALL button
...............................................................................................................................
18
MENU, ENTER, CURSOR buttons
.............................................................................................
19
CHANNEL SELECTOR buttons
...................................................................................................
19