Hitachi 50HDT50 Owners Guide - Page 72
V Position, H Position, Auto Adjust
 |
View all Hitachi 50HDT50 manuals
Add to My Manuals
Save this manual to your list of manuals |
Page 72 highlights
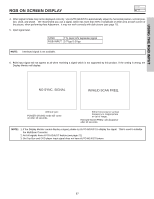
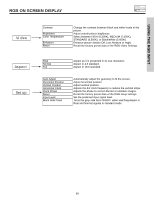
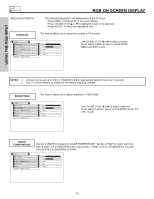
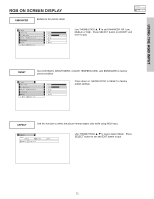
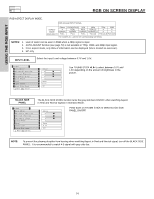
USING THE RGB INPUT RGB ON SCREEN DISPLAY AUTO ADJUST Video Auto Adjust Horizontal Position Vertical Position Horizontal Clock Clock Phase Reset Input Level Black Side Panel Move SEL Select HORIZONTAL POSITION, VERTICAL POSITION, HORIZONTAL CLOCK and CLOCK PHASE for current RGB format are adjusted automatically. Adjust 0 0 0 0 Reset 0.7V Off Press SELECT to select AUTO ADJUST. NOTE: • Press SELECT to AUTO ADJUST the RGB mode. • The other functions do not operate while AUTO ADJUST is in progress. • Allow the Plasma TV to warm up for 20 minutes before performing AUTO ADJUST. • Select a bright image for display while AUTO ADJUST takes place. • If AUTO ADJUST terminates unsuccessfully, try AUTO ADJUST again. If AUTO ADJUST fails several times in succession, try using manual adjustment to adjust Vertical Frequency, Aspect Ratio, Timing Frequency and Picture. • Always reset AUTO ADJUST when setting new display setting or when changing to a new external component. H POSITION This feature allows you to adjust the horizontal position of the display. Video Auto Adjust Horizontal Position Vertical Position Horizontal Clock Clock Phase Reset Input Level Black Side Panel Move SEL Select Adjust 0 0 0 0 Reset 0.7V Off Use Left/Right cursors to adjust the horizontal position. Press the MENU button to return to previous menu item. Press EXIT to quit. V POSITION Video Auto Adjust Horizontal Position Vertical Position Horizontal Clock Clock Phase Reset Input Level Black Side Panel Move SEL Select This feature allows you to adjust the vertical position in RGB mode. Adjust 0 0 0 0 Reset 0.7V Off Use THUMB STICK ̇, ̈ to adjust the vertical position. Press MENU button to return to previous menu item. Press EXIT to quit. 72
-
 1
1 -
2
-
3
-
4
-
5
-
6
-
7
-
8
-
9
-
10
-
11
-
12
-
13
-
14
-
15
-
16
-
17
-
18
-
19
-
20
-
21
-
22
-
23
-
24
-
25
-
26
-
27
-
28
-
29
-
30
-
31
-
32
-
33
-
34
-
35
-
36
-
37
-
38
-
39
-
40
-
41
-
42
-
43
-
44
-
45
-
46
-
47
-
48
-
49
-
50
-
51
-
52
-
53
-
54
-
55
-
56
-
57
-
58
-
59
-
60
-
61
-
62
-
63
-
64
-
65
-
66
-
 67
67 -
 68
68 -
 69
69 -
 70
70 -
 71
71 -
 72
72 -
 73
73 -
 74
74 -
 75
75 -
 76
76 -
 77
77 -
78
-
79
-
80
-
81
-
82
-
83
-
84
 |
 |