Hitachi 50HDT50 Owners Guide - Page 9
Front Panel Controls
 |
View all Hitachi 50HDT50 manuals
Add to My Manuals
Save this manual to your list of manuals |
Page 9 highlights
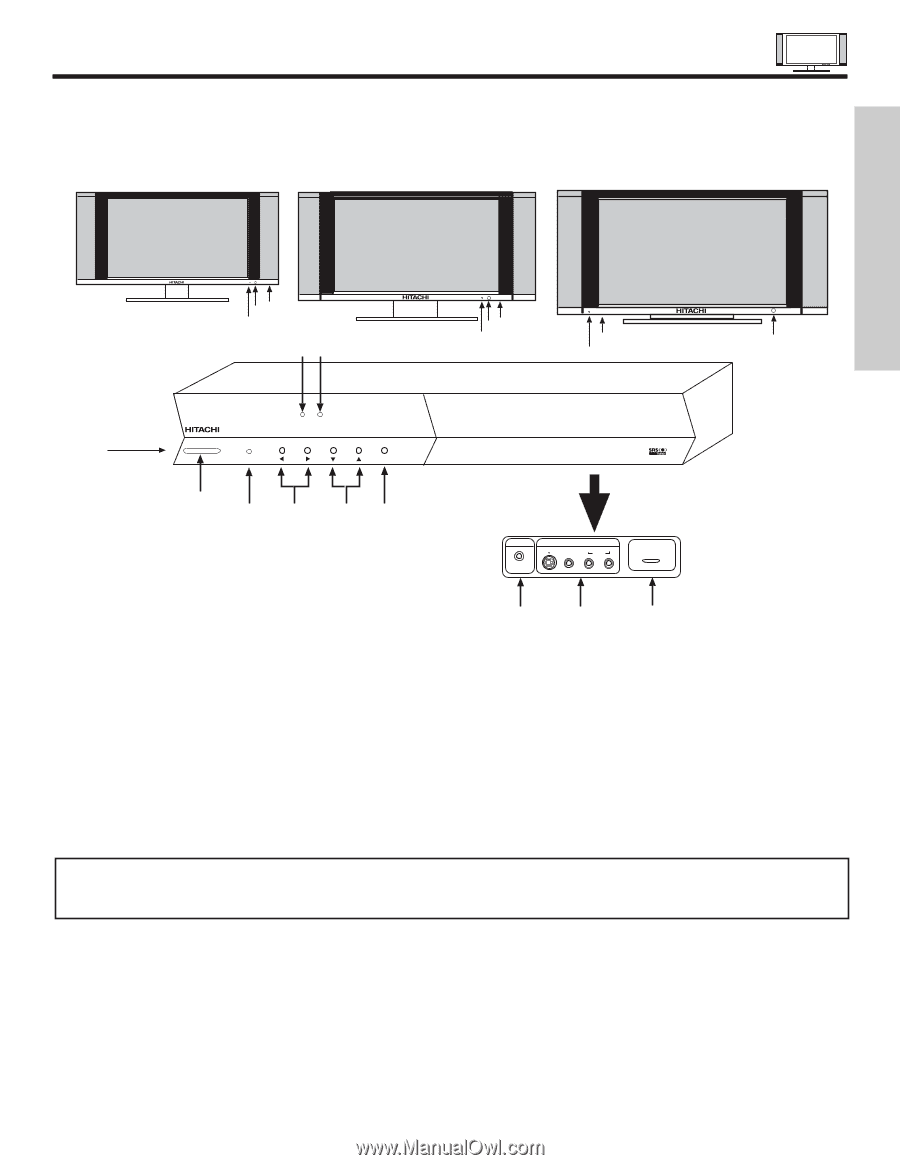
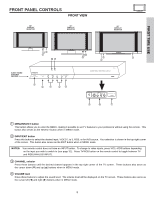
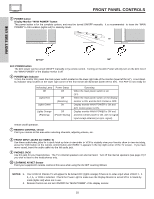
FRONT PANEL CONTROLS FRONT VIEW 32" DISPLAY MONITOR 42" DISPLAY MONITOR 50" DISPLAY MONITOR FIRST TIME USE AUDIO VIDEO CONTROL CENTER STANDBY (RED) ON (GREEN) MAIN POWER ቨቦ ቧ ቫቨ POWER STANDBY (RED) ON (GREEN) VOL- VOL+ CH- CH+ INPUT/EXIT ቦ ቧ ብ ቤባ STANDBY (RED) ON (GREEN) MAIN POWER ቨቦ ቧ STANDBY (RED) ON (GREEN) ቦ ቧ AUDIO VIDEO CONTROL CENTER PULL PHONES S-VIDEO INPUT 5 VIDEO L/(MONO) R AUDIO MENU/SELECT ቪ ቩ ቢ ቨ ቢ MENU/SELECT button This button allows you to enter the MENU, making it possible to set TV features to your preference without using the remote. This button also serves as the SELECT button when in MENU mode. ባ INPUT/EXIT button Press this button to select the desired input, VIDEO 1 to 5, RGB, or Ant A/B source. Your selection is shown in the top right corner of the screen. This button also serves as the EXIT button when in MENU mode. NOTES: Your remote control does not have an INPUT button. To change to video inputs, press VID1~VID5 buttons depending on the input you wish to switch to (see page 31). Press TV/RGB button on the remote control to toggle between TV and RGB (ANALOG INPUT). ቤ CHANNEL selector Press these buttons until the desired channel appears in the top right corner of the TV screen. These buttons also serve as the cursor down (̄) and up (̆) buttons when in MENU mode. ብ VOLUME level Press these buttons to adjust the sound level. The volume level will be displayed on the TV screen. These buttons also serve as the cursor left (̇) and right (̈) buttons when in MENU mode. 9
-
 1
1 -
2
-
3
-
 4
4 -
 5
5 -
 6
6 -
 7
7 -
 8
8 -
 9
9 -
 10
10 -
 11
11 -
 12
12 -
 13
13 -
 14
14 -
15
-
16
-
17
-
18
-
19
-
20
-
21
-
22
-
23
-
24
-
25
-
26
-
27
-
28
-
29
-
30
-
31
-
32
-
33
-
34
-
35
-
36
-
37
-
38
-
39
-
40
-
41
-
42
-
43
-
44
-
45
-
46
-
47
-
48
-
49
-
50
-
51
-
52
-
53
-
54
-
55
-
56
-
57
-
58
-
59
-
60
-
61
-
62
-
63
-
64
-
65
-
66
-
67
-
68
-
69
-
70
-
71
-
72
-
73
-
74
-
75
-
76
-
77
-
78
-
79
-
80
-
81
-
82
-
83
-
84
 |
 |