Hitachi 50V500 Owners Guide - Page 21
Av Network Setup Wizard
 |
View all Hitachi 50V500 manuals
Add to My Manuals
Save this manual to your list of manuals |
Page 21 highlights
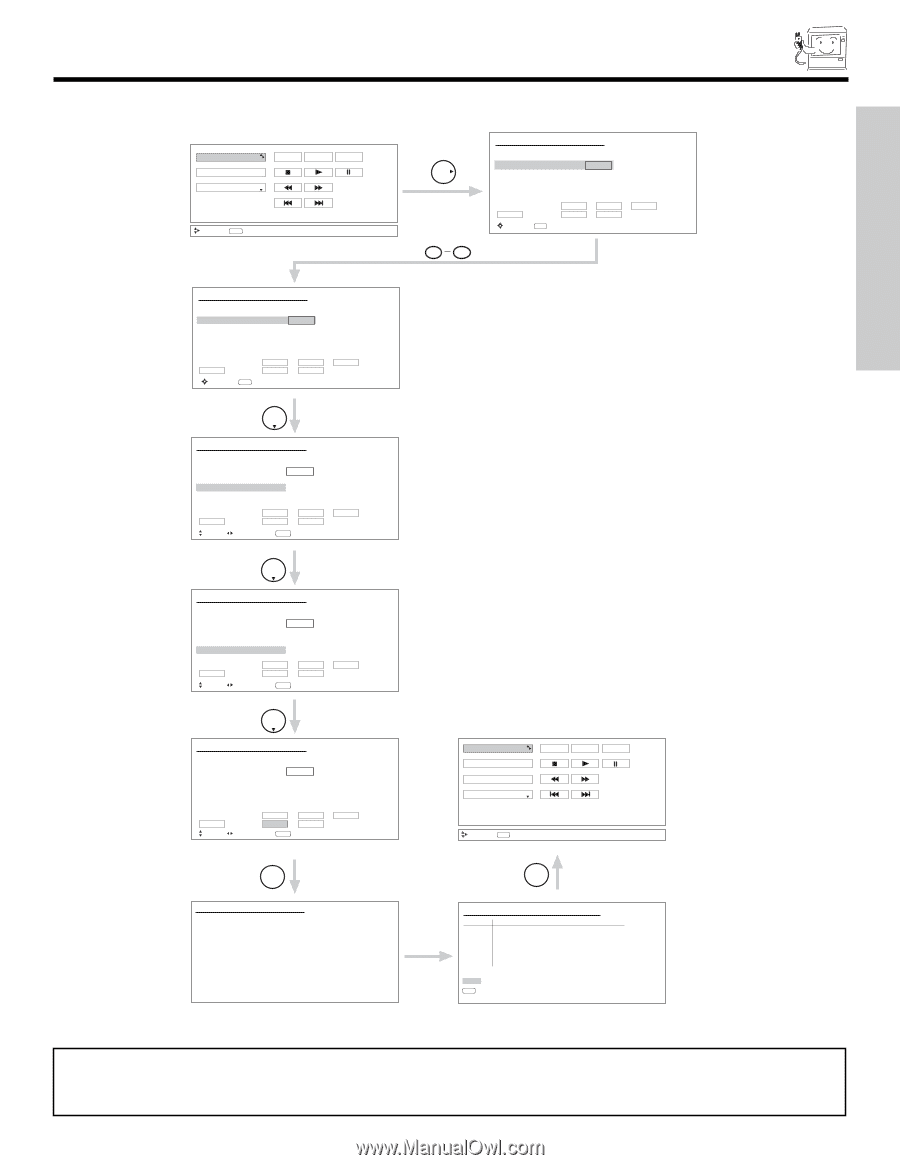
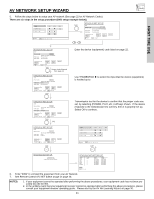
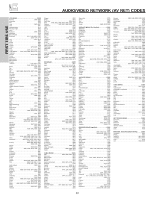
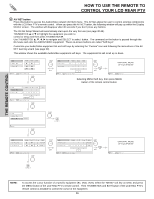
AV NETWORK SETUP WIZARD 5. Follow the steps below to setup your AV network (See page 22 for AV Network Codes). There are six steps in the setup procedure (DVD setup example below). DVD Cable Box Photo MC POWER MENU MORE Move INFO Device Setting THUMB STICK HITACHI AV NET SET UP DVD Device Code Video Input Audio Input - - - (Enter code "9999" to uninstall) No Connection No Connection Transmission Test BACK Move 0-9 POWER OK Input PLAY EXIT 0 9 CH UP FIRST TIME USE HITACHI AV NET SET UP DVD Device Code 0 6 7 2 (Enter code "9999" to uninstall) Video Input No Connection Audio Input No Connection Transmission Test BACK Move 0-9 POWER OK Input PLAY EXIT CH UP THUMB STICK Proper Code Entered from page 22. HITACHI AV NET SET UP DVD Device Code Video Input Audio Input 0 6 7 2 (Enter code "9999" to uninstall) Input 1 No Connection Transmission Test BACK POWER OK PLAY EXIT Move Set Input SEL Select THUMB STICK CH UP Enter the device (equipment) code listed on page 22. Use THUMBSTICK ̈ to select the input that the device (equipment) is hooked-up to. HITACHI AV NET SET UP DVD Device Code Video Input Audio Input 0 6 7 2 (Enter code "9999" to uninstall) Input 1 Using TV Transmission Test BACK POWER OK PLAY EXIT Move Set Input SEL Select THUMB STICK (x2) CH UP Transmission test for the device to confirm that the proper code was set, by selecting (POWER, PLAY, etc.) soft keys shown. If the device responds to the transmission test soft key, then it is properly set up. Select OK to continue. HITACHI AV NET SET UP DVD Device Code Video Input Audio Input 0 6 7 2 (Enter code "9999" to uninstall) Input 1 Using TV Transmission Test BACK POWER OK PLAY EXIT Move Set Input SEL Select CH UP THUMB STICK SELECT DVD VCR Cable Box Photo MC POWER MENU MORE Move INFO Device Setting THUMB STICK SELECT HITACHI AV NET SET UP Congratulations Your DVD is now connected to your AV network. HITACHI AV NET SETTING LIST Device DVD VCR CBL STB PVR AVR Custom Code 0672 Video INPUT 1 Not Setup Not Setup Not Setup Not Setup Not Setup Not Setup Audio Using TV Not Setup Not Setup Not Setup Not Setup Not Setup Not Setup EXIT SEL Select 6. Enter "9999" to uninstall the equipment from your AV Network. 7. See Remote Control A/V NET button usage on page 26. NOTES: 1. If your equipment cannot be operated after performing the above procedures, your equipment code has not been precoded into the AV Net. 2. In the unlikely event that your equipment receiver cannot be operated after performing the above procedures, please consult your equipment receiver operating guide. Please also try the AV Net Learning Wizard on page 30. 21
-
 1
1 -
2
-
3
-
4
-
5
-
6
-
7
-
8
-
9
-
10
-
11
-
12
-
13
-
14
-
15
-
 16
16 -
 17
17 -
 18
18 -
 19
19 -
 20
20 -
 21
21 -
 22
22 -
 23
23 -
 24
24 -
 25
25 -
 26
26 -
27
-
28
-
29
-
30
-
31
-
32
-
33
-
34
-
35
-
36
-
37
-
38
-
39
-
40
-
41
-
42
-
43
-
44
-
45
-
46
-
47
-
48
-
49
-
50
-
51
-
52
-
53
-
54
-
55
-
56
-
57
-
58
-
59
-
60
-
61
-
62
-
63
-
64
-
65
-
66
-
67
-
68
-
69
-
70
-
71
-
72
-
73
-
74
-
75
-
76
-
77
-
78
-
79
-
80
-
81
-
82
-
83
-
84
 |
 |