Hitachi 50V500 Owners Guide - Page 42
Using Your Remote, To Control Additional Audio Equipment
 |
View all Hitachi 50V500 manuals
Add to My Manuals
Save this manual to your list of manuals |
Page 42 highlights
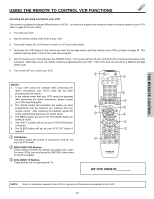
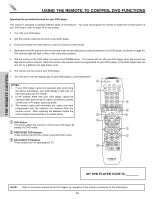
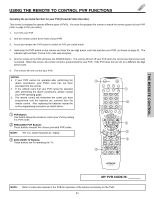
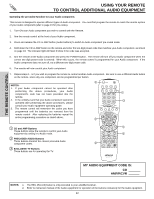
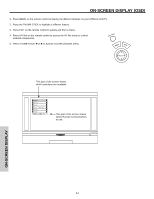
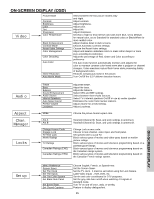
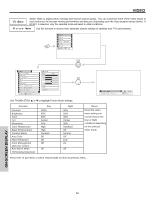
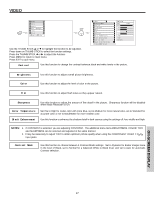
THE REMOTE CONTROL USING YOUR REMOTE TO CONTROL ADDITIONAL AUDIO EQUIPMENT Operating the precoded function for your Audio component. This remote is designed to operate different types of Audio component. You must first program the remote to match the remote system of your Audio component (refer to page 43 for pre-codes). 1. Turn ON your Audio component you wish to control with the Remote. 2. Aim the remote control at the front of your Audio component. 3. Press and release the CD or AMP button (Audio buttons) to switch to Audio component pre-coded mode. 4. Hold down the CD or AMP button on the remote and enter the two digit preset code that matches your Audio component, as shown on page 43. The indicator light will flash 3 times if the code was accepted. 5. Aim the remote at the Audio component and press the POWER button. The remote will turn off your Audio component when the correct two digit preset code is entered. When this occurs, the remote control is programmed for your Audio component. If the Audio component does not turn off, try a different two digit preset code. 6. The remote will now control your Audio component. 7. Repeat steps 1 - 6 if you wish to program the remote to control another Audio component. Be sure to use a different Audio button on the remote, since only one component can be programmed per button. NOTES: 1. If your Audio component cannot be operated after performing the above procedures, your Audio component's code has not been precoded into the remote. 2. In the unlikely event that your Audio component cannot be operated after performing the above procedures, please consult your Audio equipment operating guide. 3. The remote control will remember the codes you have programmed until the batteries are removed from the remote control. After replacing the batteries repeat the entire programming procedure as stated above. ባ POWER TV DVD VCR CBL SOURCE WIZARD CD PVR STB AMP 1 2 3 4 5 6 7 8 9 SLEEP C.C. ANT 0 INFO A/V NET ASPECT VIDEO ቢ ቤ ቤ MENU EXIT VOL SELECT CH ቢ CD and AMP Buttons These buttons allow the remote to control your Audio equipment by setting it to Audio mode. ባ PRECODED AUDIO Buttons These buttons transmit the chosen precoded Audio component codes. ቤ EXCLUSIVE TV Buttons These buttons are for operating the TV. MUTE LAST CH VID1 VID2 PIP VID3 SURF VID5 VID4 FREEZE PIP MODE PIP ACCESS SWAP DAY/NIGHT ባ REC ቤ ቤ CLU-5729TSI MY AUDIO EQUIPMENT CODE IS: CD AMP/RCVR NOTES: 1. The REC (Record) button is only precoded to your amplifier/receiver. 2. Refer to instruction manual of the Audio equipment for operation of the buttons exclusively for the Audio equipment. 42
-
 1
1 -
2
-
3
-
4
-
5
-
6
-
7
-
8
-
9
-
10
-
11
-
12
-
13
-
14
-
15
-
16
-
17
-
18
-
19
-
20
-
21
-
22
-
23
-
24
-
25
-
26
-
27
-
28
-
29
-
30
-
31
-
32
-
33
-
34
-
35
-
36
-
 37
37 -
 38
38 -
 39
39 -
 40
40 -
 41
41 -
 42
42 -
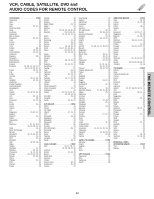 43
43 -
 44
44 -
 45
45 -
 46
46 -
 47
47 -
48
-
49
-
50
-
51
-
52
-
53
-
54
-
55
-
56
-
57
-
58
-
59
-
60
-
61
-
62
-
63
-
64
-
65
-
66
-
67
-
68
-
69
-
70
-
71
-
72
-
73
-
74
-
75
-
76
-
77
-
78
-
79
-
80
-
81
-
82
-
83
-
84
 |
 |