Hitachi 50VS810 Owners Guide
Hitachi 50VS810 - 50" Rear Projection TV Manual
 |
View all Hitachi 50VS810 manuals
Add to My Manuals
Save this manual to your list of manuals |
Hitachi 50VS810 manual content summary:
- Hitachi 50VS810 | Owners Guide - Page 1
LCD REAR PROJECTION TELEVISION Operating Guide for 50VS810, 60VS810, 70VS810, 50VS810A, 60VS810A, IMPORTANT SAFETY INSTRUCTIONS 2-3 FIRST TIME USE ...4-20 THE REMOTE CONTROL 21-40 ON-SCREEN DISPLAY...41-68 LAMP REPLACEMENT ...69-72 CARE OF YOUR HITACHI TV & REMOTE CONTROL 73 RECEPTION PROBLEMS - Hitachi 50VS810 | Owners Guide - Page 2
• There are no user serviceable parts inside the television. • Model and serial numbers are indicated on back side of the television. CAUTION: Adjust only those controls that are covered in the instructions, as improper changes or modifications not expressly approved by HITACHI could void the user - Hitachi 50VS810 | Owners Guide - Page 3
Servicing is required when the apparatus has been damaged in any way, such as power-supply cord or plug is damaged, liquid has been spilled or objects have fallen into apparatus, the apparatus has been exposed to rain or moisture, does not operate normally, or has been dropped. 15. Televisions - Hitachi 50VS810 | Owners Guide - Page 4
material. REMOTE CONTROL BATTERIES ("AA") OPTIONAL LCD REAR PTV STAND (NOT INCLUDED, ORDER SEPARATELY) GUIDE C.C. 2. CLEANING CLOTH LCD TV MODEL LCD STAND/PART NO. 50VS810/50VS810A SPF50 / QJ01521 60VS810/60VS810A SPF60 / QJ01581 70VS810 SPF70 / QJ01591 CUSTOM HITACHI TELEVISION STAND - Hitachi 50VS810 | Owners Guide - Page 5
directly on the picture screen. Also, be sure that the location selected allows a free flow of air to and from the perforated back cover of the set. To avoid cabinet warping, cabinet color changes, and increased chance of set failure, do not place the TV where temperatures can become excessively - Hitachi 50VS810 | Owners Guide - Page 6
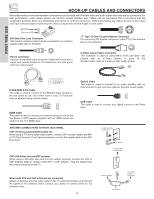
television's rear jack panel and front control panel. "F" Type 75-Ohm Coaxial Antenna Connector For connecting RF signals (antenna or cable TV) to the antenna jack on the television to the TV antenna terminal, and connect the cables to the antenna mixer. Consult your dealer or service store for the - Hitachi 50VS810 | Owners Guide - Page 7
your Digital Camera to view your digital still pictures (see pages 9 and 25-27). ቨ IR RECEIVER sensor The screen area acts as the IR receiver (remote sensor). When using the remote control, point it towards the screen for best response. ቩ POWER button Press this button to turn the TV on or off. 7 - Hitachi 50VS810 | Owners Guide - Page 8
up the TV screen. Make sure to turn off the Power when you do not watch the LCD Rear Projection Television for longer lamp life. ቫ TEMP indicator This light is off during normal operation. If this indicator is lit, the optic unit is too hot. If this indicator is blinking, the cooling fan has stopped - Hitachi 50VS810 | Owners Guide - Page 9
Input Jack is provided to view digital still pictures from your digital camera using a USB cable and displaying them on the TV screen. PHOTO INPUT USB CABLE First, connect your digital camera to the Photo Input using a USB cable. Turn on the power of your digital camera. Press the INPUTS button - Hitachi 50VS810 | Owners Guide - Page 10
(MONO) TV AS CENTER HDMI 2 OPTICAL OUT Digital picture. ANT B cannot be displayed as a sub-picture. NOTE: You may ask your local cable company whether DTV services are available. ባ Audio/Video Inputs 1, 2, 3 and 4 By using the INPUTS button and CURSOR PAD of the remote control provide fixed or - Hitachi 50VS810 | Owners Guide - Page 11
all the way to your television screen. HDMI 2 (INPUT 2) are available for HDMI input. ቨ Optical Out (Digital Audio) This jack provides control systems which are commercially available. Please see your dealer regarding these "non Hitachi" home control systems (see page 67 to activate this input). ቫ TV - Hitachi 50VS810 | Owners Guide - Page 12
-FI PR PR (MONO) (MONO) (MONO) (MONO) TV AS CENTER CableCARD HDMIIN1SERT THIS END HDMI 2 OPTICAL OUT Digital Audio Upgrade Card Apparatus Claims of U.S. Patent Nos button to exit the second screen. Acquiring Data. Please wait. In order to start cable service for this device, please contact - Hitachi 50VS810 | Owners Guide - Page 13
INPUT 2 Y/ VIDEO PB INPUT 1 Y/ VIDEO PB HDMI 1 VIDEO L AUDIO R AUDIO TO HI-FI PR PR (MONO) (MONO) (MONO) (MONO) TV AS CENTER HDMI 2 CableCARD (Top of card faces right) OPTICAL OUT Digital Audio Upgrade Card Apparatus Claims of U.S. Patent Nos. 4,631,603; 4,577,216; 4,819,098; 4,907,093; and - Hitachi 50VS810 | Owners Guide - Page 14
to the left audio jack on the television. • Refer to the operating guide of your other electronic equipment for TV's PB input and the components CR output to the TV's PR input. • You may use composite video signal for Input 1~Input 5. • It may be necessary to adjust TINT to obtain optimum picture - Hitachi 50VS810 | Owners Guide - Page 15
FIRST TIME USE CONNECTING EXTERNAL AUDIO DEVICES Match the numbers below to the diagram for speaker placement. ᕃ The television's internal speakers will act as center speaker (select Audio-Internal Speakers-TV as Center see page 49). ᕄ These FRONT left and right speakers are connected to the FRONT - Hitachi 50VS810 | Owners Guide - Page 16
TV set is dependent on the model and features of each component. Check the owner's manual of each component for the location of video and audio inputs and outputs. The following connection diagrams INPUTS menu. Use MONO) (MONO) (MONO) TV AS CENTER HDMI 2 OPTICAL OUT Digital Audio Upgrade Card - Hitachi 50VS810 | Owners Guide - Page 17
3 from the INPUTS menu to view the program (MONO) (MONO) TV AS CENTER HDMI 2 CableCARD (Top of card faces right) OPTICAL OUT Digital Audio Upgrade Card connecting to rear panel jacks. The picture and sound that is played back will guide for more information on line input-output connections. 17 - Hitachi 50VS810 | Owners Guide - Page 18
3 from the INPUTS menu to view the program (MONO) (MONO) TV AS CENTER HDMI 2 CableCARD (Top of card faces right) OPTICAL OUT Digital Audio Upgrade when connecting to rear panel jacks. The picture and sound that is played back will guide for more information on line input-output connections. 18 - Hitachi 50VS810 | Owners Guide - Page 19
select INPUT 1 from the INPUTS menu to view the program from the (MONO) (MONO) (MONO) TV AS CENTER HDMI 2 CableCARD (Top of card faces right) OPTICAL OUT Digital Audio Upgrade Card Apparatus to rear panel jacks. The picture and sound that is played digital output device controls the HDMI interface - Hitachi 50VS810 | Owners Guide - Page 20
INPUT 2 from the INPUTS menu to view the program from the Laserdisc (MONO) (MONO) (MONO) TV AS CENTER HDMI 2 CableCARD (Top of card faces right) OPTICAL OUT Digital Audio Upgrade Card Apparatus plugs when connecting to rear panel jacks. The picture and sound that is played back will be abnormal - Hitachi 50VS810 | Owners Guide - Page 21
for instructions on how to program the remote to control additional Audio/Video equipment). GUIDE C.C. NOTE: When you are in a dark room, press any button on the remote to light up the buttons. The illumination will light for a few seconds during this time. The current mode indicator will flash one - Hitachi 50VS810 | Owners Guide - Page 22
THE REMOTE TO CONTROL YOUR LCD REAR PTV ቢ ባ ቤ ብ ቦ ቧ ቩ ቨ GUIDE ቫ ቪ ቭ ቮ ቯ ቱ C.C. ተ ቲ ታ ታ ቴ ት THE REMOTE CONTROL ቢ POWER button Press this button to turn the TV set on or off when the remote is in TV mode. (See page 21 for instructions on how to set the remote control to TV mode - Hitachi 50VS810 | Owners Guide - Page 23
HOW TO USE THE REMOTE TO CONTROL YOUR LCD REAR PTV ቧ ASPECT button Press this button to quickly change the picture format ASPECT ratio. Depending on the input signal format received, the picture format ratio allows you to adjust the images through the following options. 4:3 STANDARD Use this - Hitachi 50VS810 | Owners Guide - Page 24
THE REMOTE CONTROL HOW TO USE THE REMOTE TO CONTROL YOUR LCD REAR PTV ቨ DAY/NIGHT button Press this button to toggle between Day and Night picture mode settings. Select Day for day time viewing with more brightness and contrast to compete with room light. Select Night for night time viewing with - Hitachi 50VS810 | Owners Guide - Page 25
REMOTE TO CONTROL YOUR LCD REAR PTV ተ INPUTS button When the remote control is in TV mode, press this button to access the INPUTS menu. Move SEL Sel Select to access your pictures from a digital camera connected to the Photo Input in the front panel of the TV (see page 26). Select to choose Antenna - Hitachi 50VS810 | Owners Guide - Page 26
of the TV. Photo Input Ant B Ant A Input 1 Input 2 Move SEL Sel No. 7/10 03/04/03 1632x1232 Vacation Picture No. Date Resolution File Name JUMP Select this menu item to view the chosen picture number. Jump Slideshow Rotate Jump 7 0 Please Enter Picture Number - - THE REMOTE CONTROL NOTES - Hitachi 50VS810 | Owners Guide - Page 27
REMOTE TO CONTROL YOUR LCD REAR PTV SLIDESHOW Select this menu main directory with a "dcim" file name format. 2. Supported image types are up to 3072 x 2304; JPEG format should conform ). 3. This TV set displays only digital pictures from digital cameras which meet DCF Standard. Pictures that were copied - Hitachi 50VS810 | Owners Guide - Page 28
THE REMOTE CONTROL HOW TO USE THE REMOTE TO CONTROL YOUR LCD REAR PTV ቱ INFO button Press this button when you want to check the channel being received, the picture source, if the channel has stereo (ST) or second audio program (SAP), the time, CHANNEL ID and if the TIMER is set. ANALOG CHANNELS - Hitachi 50VS810 | Owners Guide - Page 29
THE REMOTE TO CONTROL YOUR LCD REAR PTV ቲ VOLUME (VOL) WHEEL, MUTE button Use the VOL WHEEL (̆ or ̄) until you obtain the desired sound level. To reduce the sound to one half of normal volume (SOFT MUTE) to answer the telephone, etc., press the VOL wheel down. Press the VOL wheel again to turn the - Hitachi 50VS810 | Owners Guide - Page 30
THE REMOTE CONTROL PICTURE-IN-PICTURE (PIP) Your HITACHI LCD Rear PTV incorporates Two Tuner technology designed for improved viewing enjoyment. This Two Tuner feature allows you to view antenna inputs on both the main picture and sub-picture simultaneously, with separate tuning control for each. - Hitachi 50VS810 | Owners Guide - Page 31
or Digital signal 16x9 Format. SPLIT MODE PICTURE-IN-PICTURE Split Mode PIP displays the main picture and sub-picture evenly on the screen. Main Picture Sub Picture Main Picture Sub Picture THE REMOTE CONTROL SURF MODE PICTURE-IN-PICTURE Surf Mode PIP automatically scans all active channels - Hitachi 50VS810 | Owners Guide - Page 32
800-555-1212 SPLIT FREEZE Press the PAUSE button to freeze the picture you are currently viewing (only the right sub-picture will freeze). Press the EXIT button to return to normal viewing. Main Picture Sub Picture THE REMOTE CONTROL STROBE FREEZE Press the PAUSE button to freeze three frames of - Hitachi 50VS810 | Owners Guide - Page 33
BOX buttons These buttons transmit the chosen precoded cable codes. ባ EXCLUSIVE TV buttons These buttons are for operating the TV. ባ GUIDE ቢ ባ C.C. ባ ቢ ቢ THE REMOTE CONTROL MY CABLE BOX CODE IS: NOTE: Refer to instruction manual of the Cable Box for operation of the buttons exclusively for the - Hitachi 50VS810 | Owners Guide - Page 34
transmit the chosen pre-coded set-topbox/satellite codes. ባ EXCLUSIVE TV buttons These buttons are for operating the TV. ባ GUIDE ቢ ባ C.C. ባ ቢ ቢ THE REMOTE CONTROL MY SATELLITE RECEIVER/STB CODE IS: NOTE: Refer to instruction manual of the set-top-box/satellite receiver for operation of the - Hitachi 50VS810 | Owners Guide - Page 35
ENT button. The indicator light will flash 3 times if the code was accepted. 5. Aim the remote at the DVD player and press the POWER button. The remote will turn off your DVD player when the correct four digit preset code is entered. When this occurs, the remote control is programmed for your DVD - Hitachi 50VS810 | Owners Guide - Page 36
/PVR Buttons These buttons transmit the chosen precoded VCR/PVR codes. ባ EXCLUSIVE TV Buttons These buttons are for operating the TV. ቢ ቢ ባ GUIDE ቢ C.C. ባ ቢ ቢ THE REMOTE CONTROL MY VCR/PVR CODE IS: NOTE: Refer to instruction manual of the VCR/PVR for operation of the buttons exclusively for the - Hitachi 50VS810 | Owners Guide - Page 37
button. The indicator light will flash 3 times if the code was accepted. 5. Aim the remote at the Audio component and press the POWER button. The remote will turn off your Audio component when the correct four digit preset code is entered. When this occurs, the remote control is programmed for your - Hitachi 50VS810 | Owners Guide - Page 38
remote will now control the desired device. 7. Pressing the ENTER (ENT) button will now access the video input (1-5) of the desired device. SETUP EXAMPLE (Hitachi DVD with precode 0573 connected to INPUT 1 of the TV will flash 3 times to confirm proper setup. ᕈ The remote will now control the - Hitachi 50VS810 | Owners Guide - Page 39
CODES FOR REMOTE CONTROL THE REMOTE CONTROL VCR BRAND 1972 Hitachi 0000, 0041, 0042, 0105 Howard Computers 1972 Hughes Network Systems 0042 iBuy Power 0045 Sharp 0048, 0848, 0062 Shintom 0072 Shogun 0240 Singer 0072 Sonic Blue 0614, 0616 Sony 0035, 0032, 0000 0033, 0636, 1032, 1972 - Hitachi 50VS810 | Owners Guide - Page 40
AUDIO CODES FOR REMOTE CONTROL THE REMOTE CONTROL NSC 0063 . 0891, 0110, 0189 Hewlett Packard 1181 Hitachi 0228 Integra 0135 JBL 0110 JVC 0074, 1263 Sharper Image 1263 Sherwood 0491, 0502 Sonic Blue 1383 Sony 1058, 1441, 1759, 0158 0325 Nikko 0376 Paramount Pictures 0317, 0351 RCA 0056 - Hitachi 50VS810 | Owners Guide - Page 41
HITACHI LCD TV. 2. Press the CURSOR PAD to highlight a different feature. 3. Press EXIT on the remote control to quickly exit from a menu. GUIDE This part of the screen shows which selections are available. Video Audio Aspect Chan. Manager Locks Timers Setup Move SEL Sel. This part of the screen - Hitachi 50VS810 | Owners Guide - Page 42
Video Audio Aspect Picture Mode Contrast Brightness Color Tint Sharpness Color Temperature Black Enhancement Contrast Mode Reset Video Settings Color Management Color Decoding Auto Color Noise Reduction Auto Movie Mode Treble Bass Balance SRS BBE Audio Source Internal Speakers Auto Noise Cancel - Hitachi 50VS810 | Owners Guide - Page 43
TV Time Lock Movie Ratings TV Ratings Canadian Ratings (ENG) Canadian Ratings (FRN) Set the Clock Set Sleep Timer Set Day/Night Timer Set Event Timer Set Auto Power Off Menu Preference Screen Saver Set The Inputs Set Black Side Panel Set Closed Captions Set Monitor Out CableCARD Info Set AV Control - Hitachi 50VS810 | Owners Guide - Page 44
function to choose from automatic picture settings to optimize your TV's performance. Video Audio Aspect Chan. Manager Locks Timers Setup Move SEL Sel. Video Picture Mode Contrast Brightness Color Tint Sharpness Color Temperature Black Enhancement Contrast Mode Reset Video Settings Move SEL Select - Hitachi 50VS810 | Owners Guide - Page 45
adjust the level of color in the picture. Tint Sharpness Use this function to adjust flesh tones so they appear natural. Use this function to adjust the amount of fine detail in the picture. Color Temperature Black Enhancement Set this to High for cooler color with more blue, set to Medium for - Hitachi 50VS810 | Owners Guide - Page 46
Color Tint Sharpness Color Temperature Black Enhancement Contrast Mode Reset Video Settings Move SEL Select ANT A/B Day 100% 50% 50% 50% High High Dynamic Night Video Color Management Color Decoding Auto Color Noise Reduction Auto Movie Mode Move SEL Select Off Low Off ON-SCREEN DISPLAY Color - Hitachi 50VS810 | Owners Guide - Page 47
of the four color temperature settings. Use TINT to adjust flesh tones so they appear natural. Video Color Management Color Decoding Auto Color Noise Reduction Auto Movie Mode Move SEL Select Off Low Off Video Color Decoding RGB R G B Red 50% Green 50% Color 50% Tint Reset Move SEL - Hitachi 50VS810 | Owners Guide - Page 48
will control the left to right balance of the Projection TV internal speakers. Based on the principles of the human hearing system, SRS 3D technology delivers an exciting and realistic 3D Sound experience from just two external speakers or the two internal speakers found in your HITACHI Television - Hitachi 50VS810 | Owners Guide - Page 49
Television Sound will allow you to select STEREO (a stereo broadcast), MONO (monaural sound) used when receiving a weak stereo broadcast or 2nd Audio Prog (SAP) which may be a secondary language, weather report, etc. The sources received will be displayed at the top right edge of the TV turns - Hitachi 50VS810 | Owners Guide - Page 50
night but also to raise the volume of low sound. This is only effective when the TV is connected via the optical out (digital audio) to an amplifier/receiver with a Dolby® Digital decoder. The default setting These functions are only available when viewing digital programs. ON-SCREEN DISPLAY 50 - Hitachi 50VS810 | Owners Guide - Page 51
to select the Picture Format Aspect Ratio. Video Audio Aspect Chan. Manager Locks Timers Setup Move SEL Sel picture with 480i/480P signal. Adjustable range is -10 (video center is toward bottom of screen) to +10 (video center is toward top of screen). Press the CURSOR PAD ̆, ̄, to select menu - Hitachi 50VS810 | Owners Guide - Page 52
Aspect Chan. Manager Locks Timers Setup Move SEL Sel. Chan. Manager Set The Antenna Manager Auto Chan. Scan Ant A Auto Channel Scan Start Reset Ant B Auto Channel Scan Start Reset Move SEL Return NOTE: When a CableCARD is installed, Auto Channel Scan will not be available. ON-SCREEN - Hitachi 50VS810 | Owners Guide - Page 53
watching analog channels. Channel List This function allows you to review which channels are labeled (CH ID), which have been added protected by LOCK and which are your Favorite (FAV) Channels. Chan. Manager Set The Antenna Auto Chan. Scan Signal Meter Channel List Move SEL SCREEN DISPLAY 53 - Hitachi 50VS810 | Owners Guide - Page 54
7777 to erase your key number. This will reset the access code number back to the factory preset 0000. Press EXIT to quit the menu. NOTE: 1. When using TV TIME LOCK make sure the clock is set (see page 59). 2. Text appears on the screen to indicate that TV TIME LOCK is activated. 3. If MOVIE - Hitachi 50VS810 | Owners Guide - Page 55
Engage Lock TV Time Lock Movie Ratings TV Ratings Canadian menu or select MOVIE RATING to return to the previous menu. Motion Picture TV will not block it. 2. Blocking "NOT RATED (NR)" programs may block emergency programming, sports, news, public service the Projection Television will immediately - Hitachi 50VS810 | Owners Guide - Page 56
that you want to block. Press select to block the TV RATINGS that you have selected. Press EXIT to quit the menu or select TV RATINGS to return to the previous menu. TV Parental Guide Ratings Chart N/A TV-Y TV-Y7 TV-G TV-PG TV-14 TV-MA FV V S L D None. All children. The themes and elements in - Hitachi 50VS810 | Owners Guide - Page 57
television program in Canada that (Eng) you feel might be inappropriate in its content. Locks Change Access Code Engage Lock TV Time Lock Movie Ratings TV and television programs rated C8+ and higher (G, PG, 14+ and 18+) will be blocked automatically. Press EXIT to quit menu. SCREEN DISPLAY 57 - Hitachi 50VS810 | Owners Guide - Page 58
Access Code Engage Lock TV Time Lock Movie Ratings TV Ratings Canadian Ratings television programs rated 8 ans+ and higher will be automatically blocked. Press EXIT to quit menu or select the CURSOR PAD ̇ to return to the previous menu but contains light or occasional violence SCREEN DISPLAY 58 - Hitachi 50VS810 | Owners Guide - Page 59
TIMERS Timers Select Timers to set your Clock, Sleep Timer, Event Timer and Day/Night Timer Recordings. Video Audio Aspect Chan. Manager Locks Timers Setup Move SEL Sel. Timers Set The Clock Set Sleep Timer Set Day/Night Timer Set Event Timer Set Auto Power Off Move SEL Return Set The - Hitachi 50VS810 | Owners Guide - Page 60
30 and 3:00. Set Day/Night Timer Select this feature to activate and set your TV's Day/Night Picture Mode automatically. Timers Set The Clock Set Sleep Timer Set Day/Night Timer Set Event Timer Set Auto Power Off Move SEL Select Timers Set Day/Night Timer Activate Day Mode On Day Mode Off - Hitachi 50VS810 | Owners Guide - Page 61
Set Event Timer for more than three hours if you do not plan to control your television with the remote control. CAUTION: Do not use your TV as a deterrent when away from home by using the On and Off Timers. For safety, the TV should be turned off when you are away from home. 61 ON-SCREEN DISPLAY - Hitachi 50VS810 | Owners Guide - Page 62
Day/Night Timer Set Event Timer Set Auto Power Off Move SEL Select Timers Set Auto Power Off Automatic Power Saving Yes No Select yes to have the TV turn off Automatically when a video signal is not detected for 15 minutes. Move SEL Return Use the CURSOR PAD to highlight the sub-menu of - Hitachi 50VS810 | Owners Guide - Page 63
SETUP Setup Select SETUP when setting your TV up for the first time. Use the CURSOR PAD ̆ or ̄ on the remote to highlight the function desired. Video Audio Aspect Chan. Manager Locks Timers Setup Move SEL Sel. Setup Menu Preference Screen Saver Set The Inputs Set Black Side Panel Set Closed - Hitachi 50VS810 | Owners Guide - Page 64
(no picture can be seen behind menu screen), or select Shaded for a light background. Screen Saver Continuous on-screen displays such as video games, stock market quotations, computer generated graphics, and other fixed (non-moving) patterns can cause "temporary image retention" to the LCD Rear - Hitachi 50VS810 | Owners Guide - Page 65
menu. NOTES: 1. Once the TV has been turned on using the Auto Link feature, it must be reset before Auto Link is used again. To do this, turn your VCR, laserdisc, or DVD player OFF. This feature is now reset and will turn on your TV as described above. 2. When using Remote mode, any remote control - Hitachi 50VS810 | Owners Guide - Page 66
Closed Captions are the dialogue, narration, and/or sound effects of a television program or home video which are displayed on the TV screen. Your local TV program guide denotes these programs as or . Setup Menu Preference Screen Saver Set The Inputs Set Black Side Panel Set Closed Captions Set - Hitachi 50VS810 | Owners Guide - Page 67
will select the source of the Monitor Output. Setup Menu Preference Screen Saver Set The Inputs Set Black Side Panel Set Closed Captions Set Monitor Out Move SEL Select Setup Set Monitor Out Monitor Out Monitor TV Tuner Out Audio Out Fixed Variable Move SEL Return Monitor- Select Monitor to - Hitachi 50VS810 | Owners Guide - Page 68
television to quickly present a picture. A small amount of electricity is used to continually monitor signals when this feature is selected. Setup CableCARD Info Set AV Control Upgrades Quick Start Up Move SEL Select Setup Quick Start Up Select ON to have the TV tune channels quickly at 1st turn - Hitachi 50VS810 | Owners Guide - Page 69
LAMP REPLACEMENT LAMP REPLACEMENT Lamp Life The lamp life may vary based on usage of the LCD Rear PTV. Turning on and off frequently may shorten the life of the lamp. Lamp Replacement After extended use, if the TV picture turns dark, the color looks unusual or LAMP INDICATOR light turns on, then it - Hitachi 50VS810 | Owners Guide - Page 70
Turn off the main power switch and unplug the power cord. LAMP REPLACEMENT 120V CAUTION: THE LAMP IS VERY HOT AND MAY CAUSE FIRE OR SEVERE BURNS. WAIT AT LEAST 30~45 MINUTES TO ALLOW THE LAMP TO COOL BEFORE PROCEEDING WITH LAMP REMOVAL. 2. Locate the Lamp Compartment on the left side of the LCD TV - Hitachi 50VS810 | Owners Guide - Page 71
screw driver as shown. Remove the lamp cover. LAMP REPLACEMENT SCREW PHILLIPS HEAD SCREW DRIVER LAMP COVER CAUTION: THE LAMP IS VERY HOT AND MAY CAUSE FIRE OR SEVERE BURNS. WAIT AT LEAST 30~45 MINUTES TO ALLOW THE LAMP TO COOL BEFORE PROCEEDING WITH LAMP REMOVAL. 4. Remove the two screws that - Hitachi 50VS810 | Owners Guide - Page 72
LAMP REPLACEMENT LAMP REPLACEMENT 6. Without installing the lamp cover, the power will be off and the Lamp Indicator will flash (see page 8). Be sure to install the lamp cover by re-engaging the two clips and tighten the screws before turning the power on, otherwise it may cause unusual colors. - Hitachi 50VS810 | Owners Guide - Page 73
CARE OF YOUR HITACHI TELEVISION AND YOUR REMOTE CONTROL DO Dust the screen and cabinet with a soft cloth. Clean the screen with a soft cloth moistened in warm water and dry with a soft cloth. A mild soap may be used if the screen is extremely dirty. Place your Television away from extreme heat, - Hitachi 50VS810 | Owners Guide - Page 74
RECEPTION PROBLEMS • IGNITION NOISE: Black spots or horizontal streaks may appear, picture may flutter or drift. Usually caused by interference from automobile ignition systems, neon lamps, electrical drills, and other electrical appliances. • GHOSTS: Ghosts are caused by the television signal - Hitachi 50VS810 | Owners Guide - Page 75
© © No color © © ©©© © Poor color © © ©©© ©© Dark Picture ©© © HITACHI Liquid Crystal Display incorporates advanced power surge protection technology designed to protect against component or circuit damage due to external or internal voltage power surges. IF YOUR TELEVISION SHOULD APPEAR - Hitachi 50VS810 | Owners Guide - Page 76
USEFUL INFO Features: • Superfine Picture Quality 1280 Line Horizontal Resolution • Remote (Controls many PVR/VCR brands, cable boxes, satellite boxes, and other audio equipment). • New Easy-to-Use (3-Language) On-Screen Menu • Full Set of Input Jacks, including S-VIDEO • COMPONENT VIDEO: Y- - Hitachi 50VS810 | Owners Guide - Page 77
a week, 24 hours a day (1-800-448-2244) Hitachi America, LTD. Home Electronics Division Hitachi has made every effort to assure you hours of trouble free operation from your unit. However, should you require service, a network of Hitachi Authorized Service Facilities has been established in all 50 - Hitachi 50VS810 | Owners Guide - Page 78
EST 9:00am - 7:00pm Saturday EST 9:00am - 5:00pm Look for your French Manual on the outside of the box. If the manual is missing, call 1-800-HITACHI (1-800-448-2244) for a copy. Pour de plus amples renseignements sur le service durant la période couverte par la garantie, sur le fonctionnement ou - Hitachi 50VS810 | Owners Guide - Page 79
Analog Captions 66 Digital Captions 66 Color Management 46 Color Temperature 45 Color 45 Contrast 45 D DVI Input 19 E Event Timer 61 H HDMI 11, 19 I Input Setup 65 Inputs Button 25 L Lamp Lamp Indicator 8 Lamp Replacement 69-72 Language Menu Language 63 Locks Change Access Code - Hitachi 50VS810 | Owners Guide - Page 80
Hitachi labeled DTV owned by you. 2. RIGHTS AND LIMITATIONS. Software Not for Resale. You may not resell or otherwise transfer for value the Software, except that you may transfer the Software as part content owner and may restricted the export of goods or services, which currently include, but - Hitachi 50VS810 | Owners Guide - Page 81
AGREEMENT FOR HITACHI DTV SOFTWARE INCLUDING, BUT NOT LIMITED TO, PROCUREMENT OF SUBSTITUTE GOODS OR SERVICES; LOSS OF USE, DATA, OR PROFITS; OR BUSINESS INTERRUPTION) Federal Courts in the Southern District of California. If any part of this License Agreement is unenforceable, the remainder shall be - Hitachi 50VS810 | Owners Guide - Page 82
NOTES 82 - Hitachi 50VS810 | Owners Guide - Page 83
NOTES 83 - Hitachi 50VS810 | Owners Guide - Page 84
QR62064
-
 1
1 -
 2
2 -
 3
3 -
 4
4 -
 5
5 -
 6
6 -
 7
7 -
8
-
9
-
10
-
11
-
12
-
13
-
14
-
15
-
16
-
17
-
18
-
19
-
20
-
21
-
22
-
23
-
24
-
25
-
26
-
27
-
28
-
29
-
30
-
31
-
32
-
33
-
34
-
35
-
36
-
37
-
38
-
39
-
40
-
41
-
42
-
43
-
44
-
45
-
46
-
47
-
48
-
49
-
50
-
51
-
52
-
53
-
54
-
55
-
56
-
57
-
58
-
59
-
60
-
61
-
62
-
63
-
64
-
65
-
66
-
67
-
68
-
69
-
70
-
71
-
72
-
73
-
74
-
75
-
76
-
77
-
78
-
79
-
80
-
81
-
82
-
83
-
84
 |
 |

LCD REAR PROJECTION TELEVISION
Operating Guide for
50VS810, 60VS810,
70VS810, 50VS810A, 60VS810A,
IMPORTANT SAFETY INSTRUCTIONS
................................................................................
2-3
FIRST TIME USE
..................................................................................................................
4-20
THE REMOTE CONTROL
..................................................................................................
21-40
ON-SCREEN DISPLAY
........................................................................................................
41-68
LAMP REPLACEMENT
......................................................................................................
69-72
CARE OF YOUR HITACHI TV & REMOTE CONTROL
............................................................
73
RECEPTION PROBLEMS
........................................................................................................
74
USEFUL INFORMATION / INDEX
......................................................................................
75-83
As an E
NERGY
S
TAR
®
Partner, Hitachi, Ltd. has determined that this
product meets the E
NERGY
S
TAR
®
guidelines for energy efficiency.