Hitachi 51S500 Owners Guide - Page 57
NOTES, Manual Convergence Adjustment Mode, To Move Adjustment Point, To Change the Color - manual focus
 |
View all Hitachi 51S500 manuals
Add to My Manuals
Save this manual to your list of manuals |
Page 57 highlights
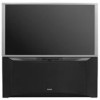
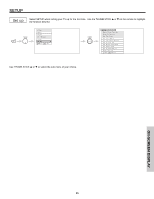
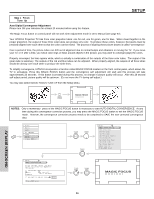
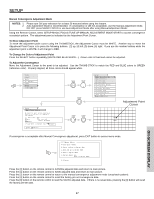
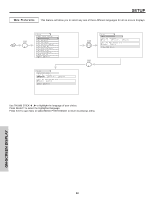
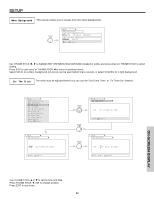
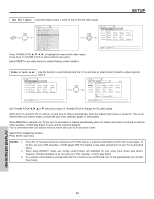
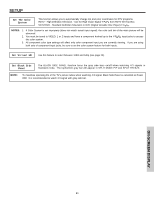
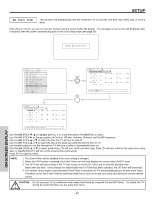
SETUP Manual Convergence Adjustment Mode NOTES: 1. Please turn ON your television for at least 20 minutes before using this feature. 2. Auto Adjustment Mode is recommended. If convergence is still not acceptable, use the Manual Adjustment Mode. DO NOT press MAGIC FOCUS or use Auto Adjustment Mode after using Manual Adjustment Mode. Using the Remote Control, select SETUP-MAGIC FOCUS TUNE UP-MANUAL ADJUSTMENT MODE-START to access convergence crosshatch pattern. The adjustment point is indicated by the Adjustment Point Cursor. To Move Adjustment Point To move the adjustment point cursor using the THUMBSTICK, the Adjustment Cursor must be WHITE. Another way to move the Adjustment Point Cursor is to press the following buttons: [2] up, [4] left, [5] down, [6] right. If you use the number buttons while the adjustment point is WHITE, it will change to RED. To Change the Color of Adjustment Point Press the SELECT button repeatedly (WHITE-RED-BLUE-WHITE...). Green color is fixed and cannot be adjusted. To Adjust the Convergence Move the Adjustment Cursor to the point to be adjusted. Use the THUMB STICK to match the RED and BLUE colors to GREEN (reference color). Properly aligned, all three colors should appear white. Video Aspect Audio Ch. Manager Locks MENU Setup Move SEL Sel Setup Magic Focus Tune Up Aligns the Red, Green, and Blue colors to correct for Magnetic Influences. Adjustment Mode Auto Manual At Turn Off (After 90 Days) If you want to adjust now Start Move SEL Return THUMB STICK SELECT THUMB STICK THUMB STICK SELECT Setup Magic Focus Tune Up Menu Preference Set The Clock Set The Inputs Set The Color System Set Virtual HD Set Black Side Panel Set Event Timer Set Closed Caption About Your TV Move SEL Select THUMB STICK THUMB STICK SELECT Adjustment Point Cursor If convergence is acceptable after Manual Convergence adjustment, press EXIT button to access menu mode. 117 Manual Adjust Please Enter Number. 0.Cancel and go to Normal Mode. 1.Done and go to Normal Mode. EXIT 2.Back to Adjust Mode 3.Factory Reset and Back to Adjust Mode. 0-3.Select Press the [0] button on the remote control to CANCEL adjusted data and return to main picture. Press the [1] button on the remote control to SAVE adjusted data and return to main picture. Press the [2] button on the remote control to return to the manual convergence adjustment mode (crosshatch pattern). Press the [3] button on the remote control to recall the factory pre-set convergence data. Press the [9] button on the remote control to read the SAVED adjusted data. If there is no saved data, pressing the [9] button will recall the factory pre-set data. ON-SCREEN DISPLAY 57
-
 1
1 -
2
-
3
-
4
-
5
-
6
-
7
-
8
-
9
-
10
-
11
-
12
-
13
-
14
-
15
-
16
-
17
-
18
-
19
-
20
-
21
-
22
-
23
-
24
-
25
-
26
-
27
-
28
-
29
-
30
-
31
-
32
-
33
-
34
-
35
-
36
-
37
-
38
-
39
-
40
-
41
-
42
-
43
-
44
-
45
-
46
-
47
-
48
-
49
-
50
-
51
-
 52
52 -
 53
53 -
 54
54 -
 55
55 -
 56
56 -
 57
57 -
 58
58 -
 59
59 -
 60
60 -
 61
61 -
 62
62 -
63
-
64
-
65
-
66
-
67
-
68
-
69
-
70
-
71
-
72
 |
 |