Hitachi 53SDX20B Operating Guide
Hitachi 53SDX20B Manual
 |
View all Hitachi 53SDX20B manuals
Add to My Manuals
Save this manual to your list of manuals |
Hitachi 53SDX20B manual content summary:
- Hitachi 53SDX20B | Operating Guide - Page 1
PROJECTION COLOR TV 53FDX20B 53SDX20B 53SDX20BB OPERATING GUIDE 43FDX20B 43FDX15B IMPORTANT SAFETY INSTRUCTIONS 2-3 FIRST TIME USE 4-18 REMOTE CONTROL 19-29 SETUP CUSTOMIZE VIDEO SEL AUDIO THEATER ULTRATEC BIT-MAP ON-SCREEN DISPLAY USEFUL INFORMATION INDEX As an ENERGY STAR® Partner, - Hitachi 53SDX20B | Operating Guide - Page 2
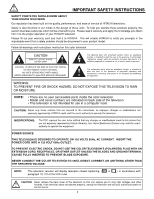
that a safety problem should be discovered in your product model. Follow all warnings and instructions marked on this color television. CAUTION RISK OF ELECTRIC SHOCK DO NOT OPEN CAUTION: TO REDUCE THE RISK OF ELECTRIC SHOCK, DO NOT REMOVE COVER (OR BACK). NO USER SERVICEABLE PARTS INSIDE. REFER - Hitachi 53SDX20B | Operating Guide - Page 3
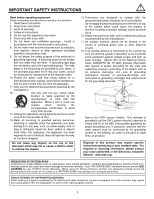
injury. 16. Follow instructions for wall, shelf or provide some protection against voltage surges and built up the mast and supporting structure, grounding POWER SERVICE GROUNDING ELECTRODE SYSTEM (NEC ART 250 PART HITACHI Factory Warranty. When using the Picture-in-Picture function, the sub-picture - Hitachi 53SDX20B | Operating Guide - Page 4
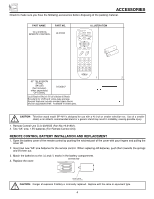
ACCESSORIES Check to make sure you have the following accessories before disposing of the packing material. PART NAME PART NO. CLU-4322UG REMOTE CONTROL HL01832 ILLUSTRATION POWER TV CBL/SAT DVD/VCR SWAP PIP MODE PIP FREEZE HELP PIP CH MENU SELECT MUTE EXIT LAST CH VOL CH 1 2 - Hitachi 53SDX20B | Operating Guide - Page 5
HOW TO SET UP YOUR NEW HITACHI PROJECTION TV ANTENNA Unless your TV is connected to a cable TV system or to a centralized antenna system, a good outdoor color TV antenna is recommended for best performance. However, if you are located in an exceptionally good signal area that is free from - Hitachi 53SDX20B | Operating Guide - Page 6
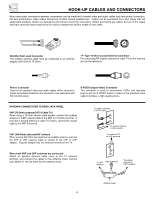
cable to produce a high quality picture. ANTENNA CONNECTIONS TO REAR JACK PANEL VHF (75-Ohm) antenna/CATV (Cable TV) When using a 75-Ohm coaxial cable system cable mixer to the TV antenna terminal, and connect the cables to the antenna mixer. Consult your dealer or service store for the antenna - Hitachi 53SDX20B | Operating Guide - Page 7
when in MENU mode. NOTES: Your remote control does not have an INPUT button. TV on or off. NOTES: 1. Your HITACHI Projection TV will appear to be turned OFF if there is no video input when VIDEO: 1, 2, 3, 4 or 5 is selected. Check the Power Light to make sure the TV is turned off when not in use - Hitachi 53SDX20B | Operating Guide - Page 8
CONTROLS ቧ POWER light You will see a red light when the TV is turned on. ቨ PERFECT PICTURE sensor The Perfect Picture sensor will make automatic picture adjustments depending on the amount of light in the room to give the best picture. (see page 57) ቩ REMOTE CONTROL sensor Point your remote at this - Hitachi 53SDX20B | Operating Guide - Page 9
OUTPUT NOTE: 1. Completely insert connection cord plugs when connecting to front panel jacks. If you do not, the played back picture may be abnormal. 2. If you have a S-VHS VCR, use the S-INPUT cable in place of the standard video cable. 3. If you have a mono VCR, insert the audio cable into - Hitachi 53SDX20B | Operating Guide - Page 10
MONITOR OUT ብ ባ ቤ ቢ Antenna Input/Output The remote control allows you to switch between two separate 75- picture or sub-picture. ANT B can only be displayed as a main picture. (ANT B cannot be displayed as a sub-picture sound, insert the audio cable into the left audio jack.) NOTE: You may use - Hitachi 53SDX20B | Operating Guide - Page 11
be labeled Y-CBCR. In this case, connect the component CB output to the TV's PB input and the component CR output to the TV's PR input. 3. It may be necessary to adjust TINT to obtain optimum picture quality when using the Y-PBPR inputs. (See pages 55 and 56.) 4. To ensure no copyright infringement - Hitachi 53SDX20B | Operating Guide - Page 12
1 INPUT 2 PB (MONO) L PR R AUDIO INPUT 4 PB (MONO) L L PR R AUDIO R AUDIO INPUT 5 MONITOR OUT Optional, see tips on page 13 OUTPUT INPUT Cable TV Box Optional, see tips on page 13 S-VIDEO V L R OUTPUT Y PB PR L R OUTPUT Laserdisc player, VCR, camcorder, etc. HDTV Set-Top Box NOTE - Hitachi 53SDX20B | Operating Guide - Page 13
(mono sound), connect it to the left audio jack on the television. Refer to the operating guide of your TV's PB input and the components CR output to the TV's PR input. You may use standard video signal for INPUT:4 and 5. It may be necessary to adjust TINT to obtain optimum picture quality when using - Hitachi 53SDX20B | Operating Guide - Page 14
To control the audio level of an external audio amplifier with the remote control, connect the system as shown below. REAR PANEL OF TELEVISION ANT the speaker and distorted sound, set the volume control of the audio amplifier lower and adjust the sound using the remote control of the TV set. 14 - Hitachi 53SDX20B | Operating Guide - Page 15
use to connect the VCR, camcorder, laserdisc player, DVD player, or HDTV Set Top Box to your TV set is dependent on the model and features of each component. Check the owner's manual L PR R AUDIO R AUDIO INPUT 5 MONITOR OUT AUDIO OUT VIDEO OUT Back of VCR VCR Hitachi Model or Similar Model 15 - Hitachi 53SDX20B | Operating Guide - Page 16
, as shown on the TV set below. 2. Connect Hitachi Model or Similar Model NOTES: 1. Completely insert the connection cord plugs when connecting to rear panel jacks. The picture and sound that is played back will be abnormal if the connection is loose. 2. A single VCR can be used - Hitachi 53SDX20B | Operating Guide - Page 17
the INPUT (S-VIDEO) jack, as shown on the TV set below. 2. Connect the cable from the AUDIO Back of VCR VCR or Laserdisc Player Hitachi Model or Similar Model Rear Panel of Television picture and sound that is played back will be abnormal if the connection is loose. 2. A single VCR can be used - Hitachi 53SDX20B | Operating Guide - Page 18
INPUT (Y) jack, as shown on the TV set below. 2. Connect the cable from PR HDTV Set-Top Box DVD Player Hitachi Model or Similar Model OUTPUT Back of use standard video signal for INPUT:4 and 5. 2. Completely insert the connection cord plugs when connecting to rear panel jacks. The picture and sound - Hitachi 53SDX20B | Operating Guide - Page 19
on your HITACHI Projection TV, the new remote control is designed to operate different types of VCRs, CBL (Cable TV) converters, satellite remote will now control your DVD/VCR player. (See pages 26 and 28 for instruction on how to program the remote to control your DVD/VCR player.) POWER TV CBL - Hitachi 53SDX20B | Operating Guide - Page 20
TO USE THE REMOTE TO CONTROL YOUR TV ቢ TV POWER button ባ PICTURE-IN-PICTURE ቤ HELP button ብ SELECT, MENU, CURSOR buttons ቦ VOLUME, MUTE buttons POWER TV up (̆) or down (̄) button until you obtain the desired sound level. To reduce the sound to one half of normal volume (SOFT MUTE) to answer the - Hitachi 53SDX20B | Operating Guide - Page 21
HOW TO USE THE REMOTE TO CONTROL YOUR TV ቧ CHANNEL SELECTOR buttons Use these buttons to select the CHANNEL you wish to watch. ቨ ANTENNA button The ANT button will select between Antenna A and Antenna B each time the button is pressed. Ant A 10 Ant B 28 ANT ቩ VID1 ~ VID5 buttons When the remote - Hitachi 53SDX20B | Operating Guide - Page 22
TO USE THE REMOTE TO CONTROL YOUR TV ቯ LAST CHANNEL (LAST CH) button Use this button to select between the last two channels viewed. (Good for watching two sporting events, etc.) Ant A 10 LAST CH Ant A 39 ተ PIP CH button Use the PIP CH button to select between main picture and sub-picture tuning - Hitachi 53SDX20B | Operating Guide - Page 23
) L L PR R AUDIO R AUDIO INPUT 5 MONITOR OUT ባ ቢ POWER TV CBL/SAT DVD/VCR SWAP PIP MODE PIP FREEZE HELP PIP CH MENU ቤ ብ,ቦ SELECT VCR Hitachi Model or Similar Model MUTE EXIT LAST CH Use above connection to view VCR program as a sub-picture while viewing another program as main - Hitachi 53SDX20B | Operating Guide - Page 24
ANT A is selected as the main channel. If PARENTAL CONTROL MOVIE/TV RATINGS setting is ON, PIP SURF mode will be deactivated. Closed Caption SWAP button If you wish to switch what is being shown on the main picture to the sub-picture, press the SWAP button. SINGLE Ant A 10 Video: 1 SWAP Video: - Hitachi 53SDX20B | Operating Guide - Page 25
the FREEZE button to freeze the picture, depending on the mode selected (SINGLE or STROBE). To change FREEZE modes, use the PIP MODE button to cycle USA 98765 Check or Money Order Only FREEZE STROBE FREEZE(with PIP off) Press the FREEZE button to freeze three frames of the picture you are - Hitachi 53SDX20B | Operating Guide - Page 26
for operating the TV. POWER TV CBL/SAT DVD/VCR ቢ SWAP PIP MODE PIP FREEZE HELP PIP CH MENU SELECT MUTE EXIT LAST CH VOL CH ባ 1 2 3 4 5 6 7 8 9 ANT 0 STATUS VID1 REC VID2 VID5 VID3 VID4 ASPECT MODE CLU-4322UG MY VCR CODE IS: NOTE: Refer to instruction manual of the - Hitachi 53SDX20B | Operating Guide - Page 27
the TV. POWER TV CBL/SAT DVD/VCR SWAP PIP MODE PIP FREEZE HELP PIP CH MENU SELECT MUTE EXIT LAST CH VOL CH ባ 1 2 3 4 5 6 7 8 9 ANT 0 STATUS VID1 REC VID2 VID5 VID3 VID4 ASPECT MODE CLU-4322UG MY CABLE/SATELLITE BOX CODE IS: NOTE: Refer to instruction manual of - Hitachi 53SDX20B | Operating Guide - Page 28
operating the TV. POWER TV CBL/SAT DVD/VCR SWAP PIP MODE PIP FREEZE HELP PIP CH MENU SELECT MUTE EXIT LAST CH VOL CH 1 2 3 4 5 6 7 8 9 ANT 0 STATUS VID1 REC VID2 VID5 VID3 VID4 ASPECT MODE CLU-4322UG ቢ ባ MY DVD PLAYER CODE IS: NOTE: Refer to instruction manual of - Hitachi 53SDX20B | Operating Guide - Page 29
08,09,10 Tocom 15,16 Zenith 11,12 SATELLITE BRAND CODE Ecostar 32 Hitachi 29 Hughes 33 Panasonic 34 RCA 30, 35 Samsung 36 Sony 31 VCR BRAND ,23,24 Fisher 34,37,38,39 Funai 52 General Electric 33 Goldstar 36 Hitachi 00,01,02,03,04,05,06 JVC 18,49,50,51 Magnavox 12, - Hitachi 53SDX20B | Operating Guide - Page 30
the remote control to display the different features on your HITACHI Projection TV. 2. Press CURSOR to highlight a different feature. 3. Press EXIT on the remote control to The Clock Magic Focus Picture Formats To Quit Exit This part of the screen shows which remote control buttons to use. 30 - Hitachi 53SDX20B | Operating Guide - Page 31
TV. First time set up for channel buttons. Channel buttons, add or skip. Check channel name, scan, and child lock. Set before using timer features. Automatically match red, green, and blue colors Block channel picture and sound. Turn TV on and off once, daily, or weekly. Automatically turn TV on to - Hitachi 53SDX20B | Operating Guide - Page 32
List Set The Clock Magic Focus Picture Formats To Q u i t E x i t Use CURSOR ̆ or ̄ to select the sub-menu of your choice. NOTE: To see an auto-demonstration of the on-screen displays with HELP text displayed, press and hold the POWER button on the TV set for approximately five seconds. Press - Hitachi 53SDX20B | Operating Guide - Page 33
Magic Focus Picture Formats M e n u To M e n u B a r To E x i t Q u i t CURSOR Welcome To Your Plug & Play On Screen Set Up Guide. After Detailed Connections Refer To Owners Guide) Press SELECT to start M e n u To M e n u B a r To E x i t Q u i t Question 1. My TV Signal Comes From: A) Antenna - Hitachi 53SDX20B | Operating Guide - Page 34
using an indoor or outdoor antenna. Select CATV if you have cable TV. SETUP CUSTOMIZE VIDEO SEL AUDIO THEATER Set Menu Language Plug & Play Set Antenna/Cable Set Channel Memory Edit Channel Memory View Channel List Set The Clock Magic Focus Picture cable or TV guide for channel identification standards. If - Hitachi 53SDX20B | Operating Guide - Page 35
store active TV channels in SET CHANNEL MEMORY. This will allow you to skip unused channels when using CHANNEL UP & Play Set Antenna/Cable Set Channel Memory Edit Channel Memory View Channel List Set The Clock Magic Focus Picture Formats M e n u To M e n u B a r Begin To Q u i t E x i t SELECT - Hitachi 53SDX20B | Operating Guide - Page 36
MEMORY Use this function after SET CHANNEL MEMORY is completed to add or erase additional channels to the remote control Play Set Antenna/Cable Set Channel Memory Edit Channel Memory View Channel List Set The Clock Magic Focus Picture Formats M e n u To M e n u B a r Channel 3 Add Erase Next - Hitachi 53SDX20B | Operating Guide - Page 37
Set Channel Memory Edit Channel Memory View Channel List Set The Clock Magic Focus Picture Formats M e n u To M e n u B a r To n u B a r To Q u i t E x i t CURSOR Press CURSOR ̆ or ̄ to review more channels. Press EXIT to quit menu or CURSOR ̇ to return to previous menu. NOTE: Each touch of - Hitachi 53SDX20B | Operating Guide - Page 38
before you can SET PROGRAM TIMER or TV TIME OUT. SETUP CUSTOMIZE VIDEO SEL AUDIO THEATER Set Menu Language Plug & Play Set Antenna/Cable Set Channel Memory Edit Channel Memory View Channel List Set The Clock Magic Focus Picture Formats M e n u To M e n u B a r To Q u i t E x i t CURSOR SET UP - Hitachi 53SDX20B | Operating Guide - Page 39
of alignment due to normal bumps and vibrations or moving the TV. If you move your TV, or if, after a time, you notice color rings or halos around objects in the picture, you may want to converge (align) the colors. Properly converged, the lines appear white, which is actually a combination of the - Hitachi 53SDX20B | Operating Guide - Page 40
u i t E x i t CURSOR SELECT SETUP Press Select To Set SEL Picture Formats Aspect Style V. Position Comp Color Type Video Display M e n u To M e n u B a r by pressing the Video:4 or 5 button on the Remote Control when planning to use all Picture Formats feature. Aspect 1 - Display the actual - Hitachi 53SDX20B | Operating Guide - Page 41
(16x9 mode) Aspect 2 405p/810i Aspect key Aspect 3 (Zoom 1 Mode) Aspect 3 540p/1080i SETUP Press Select To Set SEL Picture Formats Aspect Style V. Position Comp Color Type Video Display M e n u To M e n u B a r Y-PBPR: 4 Aspect 1 Aspect 2 Aspect 3 Aspect 4 Aspect 5 +5 HDTV SDTV/DVD 1080i 540P To - Hitachi 53SDX20B | Operating Guide - Page 42
If Comp Color Type is set improperly (does not match actual input signal), the color and tint of the main picture will be TV's internal flex converter. 5. Aspect 5 must be selected from the OSD menu at all times. The aspect button on the remote control will skip the Aspect 5 feature. 6. Using - Hitachi 53SDX20B | Operating Guide - Page 43
CUSTOMIZE CUSTOMIZE CUSTOMIZE This selection contains advanced features which will make TV viewing easier and more enjoyable. NAME THE CHANNEL Use this feature to give up to 20 channels a name when ANTENNA signal CHANNEL NAMES will be displayed only when channel is displayed as main picture. 43 - Hitachi 53SDX20B | Operating Guide - Page 44
CUSTOMIZE CUSTOMIZE NAME THE INPUTS Use this feature to give a name to any of the five video inputs. SETUP CUSTOMIZE VIDEO SEL AUDIO THEATER Name the RESET to set INPUT NAMES to original condition. NOTE: INPUT NAME will be displayed only when video INPUT is displayed as main picture. 44 - Hitachi 53SDX20B | Operating Guide - Page 45
Quit Exit Channel stored with CHANNEL MEMORY will automatically be stored in FAVORITE CHANNELS. To rename the categories, use the CURSOR to highlight the category you would like to rename. Use CURSOR ̆ or ̄ to change a letter and CURSOR ̈ to select the next character to change. To enter a channel - Hitachi 53SDX20B | Operating Guide - Page 46
CURSOR ̇ or ̈. Press MENU and the category will be displayed as sub-pictures at the right edge of the screen. This is useful for previewing a category. Use CURSOR ̇, ̈, ̆ or ̄ to highlight a favorite channel and the TV will automatically tune to that channel. Press EXIT to remove FAVORITE CHANNELS - Hitachi 53SDX20B | Operating Guide - Page 47
CUSTOMIZE CUSTOMIZE SET PARENTAL LOCKS This function will block out the picture and sound of the selected channel or video input. It can also be used to keep the TV from being viewed for a scheduled amount of time that you set. The code to enter SET PARENTAL LOCKS is a four digit secret code - Hitachi 53SDX20B | Operating Guide - Page 48
TV Ratings Lock Canadian Ratings (Eng) Canadian Ratings (Frn) Menu To Menu Bar To Quit Exit CURSOR CUSTOMIZE P r e s s S e l e c t t o S e t SEL Movie Ratings Lock VIEW G VIEW PG BLOCK PG-13 BLOCK R BLOCK NC-17 BLOCK X VIEW Not Rated (NR) Menu To Menu Bar To Quit Exit Use PICTURE RATING - Hitachi 53SDX20B | Operating Guide - Page 49
. "B" is to block. TV PARENTAL GUIDE RATING CHART NR TV-Y TV-Y7 TV-G TV-PG TV-14 TV-MA FV V S L TV Rating system that is used Service Announcements · Religious · Sports · Weather NOTE: If you Block TV-14D, you will still permit TV MA programs; If you block TV-14DV, you will automatically block TV - Hitachi 53SDX20B | Operating Guide - Page 50
3 Video Lock Quick Lock Front Panel Lock Set Time Lock Movie Ratings Lock TV Ratings Lock Canadian Ratings (Eng) Canadian Ratings (Frn) Menu To Menu Bar BLOCK BLOCK C C8+ G PG 14+ 18+ Menu To Menu Bar To Quit Exit Use CURSOR ̆ or ̄ to select the CANADIAN RATINGS (ENG) category that you want to - Hitachi 53SDX20B | Operating Guide - Page 51
Quick Lock Front Panel Lock Set Time Lock Mo v ie R a tin g s Lock TV Ratings Lock Canadian Ratings (Eng) Canadian Ratings (Frn) CURSOR Canadian Ratings (Frn): VIEW Menu To Menu Bar To Quit Exit Menu To Menu Bar To Quit Exit Use CURSOR ̆ or ̄ to highlight the category that you want to block. - Hitachi 53SDX20B | Operating Guide - Page 52
OFF Timer will deactivate. 2. If no remote control button is pressed after ON Timer is activated, the TV will automatically turn off after three hours. CAUTION: Do not use your TV as a deterrent when away from home by using the ON and OFF TIMERS. For safety, the TV should be turned off when you are - Hitachi 53SDX20B | Operating Guide - Page 53
feature, it must be reset before VIDEO INPUT SENSOR is used again. To do this, turn your VCR, laserdisc, or DVD player OFF. This feature is now reset and will turn on your TV as described above. 2. When using REMOTE mode, any remote control button will substitute for your video input device play - Hitachi 53SDX20B | Operating Guide - Page 54
sound effects of a television program or home video which are displayed on the TV screen. Your local TV program guide Menu Bar Dk. Gray Shaded To Quit Exit Use CURSOR ̆ or ̄ to highlight MENU BACKGROUND setting menu. Select DARK GRAY and a dark gray background is visible (no picture can be seen - Hitachi 53SDX20B | Operating Guide - Page 55
to adjust TINT to obtain optimum picture quality when using the COMPONENT VIDEO Y-PBPR input jacks. 2. If you are using the COMPONENT VIDEO input jacks (Y-PBPR) and notice that the TINT and COLOR are abnormal, check to make sure that Picture Formats - Component Color Type is set properly. (see page - Hitachi 53SDX20B | Operating Guide - Page 56
VIDEO ADVANCED SETTINGS VIDEO Your HITACHI Projection TV has a PERFECT PICTURE function which will automatically adjust picture settings to produce the highest quality picture possible. When PERFECT PICTURE is highlighted, press the SELECT button to turn the PERFECT PICTURE on or off. SETUP - Hitachi 53SDX20B | Operating Guide - Page 57
AUDIO AUDIO Select AUDIO to adjust the TV to your preference and to improve the sound quality. AUDIO MENU CURSOR SETUP CUSTOMIZE VIDEO SEL AUDIO THEATER Bass Treble Balance Reset Advanced Settings 50% 50% CURSOR SETUP CUSTOMIZE VIDEO SEL AUDIO THEATER - Hitachi 53SDX20B | Operating Guide - Page 58
select STEREO (a stereo broadcast), MONO (monaural sound) used when receiving a weak stereo broadcast or SAP (second audio program) which may be a secondary language, weather report, etc. The sources received will be displayed at the top center edge of the TV. The source you select will be displayed - Hitachi 53SDX20B | Operating Guide - Page 59
Use this function to choose from automatic picture settings to optimize your TV from the THEATER menu, your Hitachi Projection Television will activate the circuitry mode is chosen, the following are automatically set: CONTRAST - 100%, COLOR TEMPERATURE - COOL, BASS - 63%, LOUDNESS - OFF, PERFECT - Hitachi 53SDX20B | Operating Guide - Page 60
audible. The ear can then more easily recognize the unique tonal colors of each sound as though the sound was being produced live. NOTES: BBE functions the same manner on TV mode and on VIDEO mode. NOTES: Licensed by BBE Sound, Inc. under USP4638258 and 4482866. BBE and BBE symbol are registered - Hitachi 53SDX20B | Operating Guide - Page 61
CARE OF YOUR HITACHI PROJECTION TV AND YOUR REMOTE CONTROL DO Dust the screen and cabinet with a soft cloth. Clean the screen with a soft cloth moistened in warm water and dry with a soft cloth. A mild soap may be used if the screen is extremely dirty. Place your television away from extreme heat, - Hitachi 53SDX20B | Operating Guide - Page 62
necessary to install a special antenna to improve the picture. • RADIO FREQUENCY INTERFERENCE: The interference produces moving ripples or diagonal streaks, and in some cases, causes loss of contrast in the picture. NOTE: The TV set can generate sound distortion in external devices such as a radio - Hitachi 53SDX20B | Operating Guide - Page 63
poor © Picture OK, sound poor © © ©©© © © Picture blurred © © ©©© © Lines or streaks in picture © ©©© © Poor reception on some channels © ©©© © Picture rolls vertically © © No color © © ©©© © Poor color © © ©©© ©© HITACHI Projection Television incorporates advanced power surge - Hitachi 53SDX20B | Operating Guide - Page 64
Picture-In-Picture with Freeze • Tuned Port Bass Reflex Speakers • Magic Focus (Auto Digital Convergence) • Dual Antenna Inputs • Video Input Sensor • 3 Dimensional Y/C Comb Filter • Full 1080i HDTV capable when used 470mVrms, 1k Ohm Dimensions: 43FDX20B 53FDX20B 53SDX20BB • Height (in.) - Hitachi 53SDX20B | Operating Guide - Page 65
USEFUL INFO service To locate an authorized HITACHI service facility in the continental U.S.A. and Canada, DIAL TOLL FREE 7 days a week, 24 hours a day 800 HITACHI (1-800-448-2244) Hitachi America, LTD. Home Electronics Division Hitachi has made every effort to assure you hours of trouble free - Hitachi 53SDX20B | Operating Guide - Page 66
EST 9:00am - 7:00pm Saturday EST 9:00am - 5:00pm Look for your French Manual on the outside of the box. If the manual is missing, call 1-800-HITACHI (1-800-448-2244) for a copy. Pour de plus amples renseignements sur le service durant la période couverte par la garantie, sur le fonctionnement ou - Hitachi 53SDX20B | Operating Guide - Page 67
NOTES 67 - Hitachi 53SDX20B | Operating Guide - Page 68
QR52482
-
 1
1 -
 2
2 -
 3
3 -
 4
4 -
 5
5 -
 6
6 -
 7
7 -
8
-
9
-
10
-
11
-
12
-
13
-
14
-
15
-
16
-
17
-
18
-
19
-
20
-
21
-
22
-
23
-
24
-
25
-
26
-
27
-
28
-
29
-
30
-
31
-
32
-
33
-
34
-
35
-
36
-
37
-
38
-
39
-
40
-
41
-
42
-
43
-
44
-
45
-
46
-
47
-
48
-
49
-
50
-
51
-
52
-
53
-
54
-
55
-
56
-
57
-
58
-
59
-
60
-
61
-
62
-
63
-
64
-
65
-
66
-
67
-
68
 |
 |

PROJECTION COLOR TV
53FDX20B
43FDX20B
53SDX20B
43FDX15B
53SDX20BB
OPERATING GUIDE
IMPORTANT SAFETY INSTRUCTIONS
2-3
FIRST TIME USE
4-18
REMOTE CONTROL
ULTRATEC BIT-MAP
ON-SCREEN DISPLAY
USEFUL INFORMATION INDEX
61-66
30-60
19-29
CUSTOMIZE
SETUP
VIDEO
AUDIO
THEATER
SEL
As an
E
NERGY
S
TAR
®
Partner, Hitachi, Ltd. has determined that this
product meets the
E
NERGY
S
TAR
®
guidelines for energy efficiency.