Hitachi 55DMX01W Owners Guide
Hitachi 55DMX01W Manual
 |
View all Hitachi 55DMX01W manuals
Add to My Manuals
Save this manual to your list of manuals |
Hitachi 55DMX01W manual content summary:
- Hitachi 55DMX01W | Owners Guide - Page 1
PROJECTION TELEVISION 55DMX01W OPERATING GUIDE IMPORTANT SAFEGUARDS 2-4 FIRST TIME USE 5-24 THE REMOTE CONTROL 25-37 SETUP CUSTOMIZE VIDEO AUDIO THEATER ULTRATEC BIT MAP ON SCREEN DISPLAY 38-68 USING THE DLPTM TECHNOLOGY REAR PROJECTION TV AS A PC MONITOR 69-79 LAMP REPLACEMENT PLUG - Hitachi 55DMX01W | Owners Guide - Page 2
user to the presence of important operating and maintenance (servicing) instructions in the literature accompanying the appliance. WARNING: TO PREVENT or modifications made to this device that are not expressly approved by Hitachi America, Ltd. Home Electronics Division may void the user s warranty - Hitachi 55DMX01W | Owners Guide - Page 3
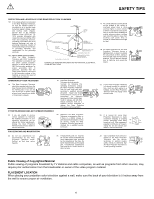
instructions marked on the Rear Projection Television receiver. SAFETY POINTS YOU SHOULD KNOW ABOUT YOUR HITACHI REAR PROJECTION TELEVISION RECEIVER Our reputation has been built on the quality, performance, and ease of service of HITACHI electrician to replace your unstable cart, stand, or table. - Hitachi 55DMX01W | Owners Guide - Page 4
mast and supporting structure, grounding service technician has used replacement parts specified by the manufacturer that have the same characteristics as the original part. Unauthorized substitutions may result in fire, electric shock, or other hazards. 27. Upon completion of any service or repairs - Hitachi 55DMX01W | Owners Guide - Page 5
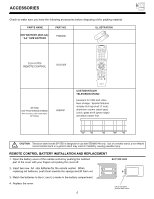
-55D is designed for use with 55DMX01W only. Use of a smaller stand, a non Hitachi recommended stand or a generic stand may result in instability, causing possible injury. REMOTE CONTROL BATTERY INSTALLATION AND REPLACEMENT 1. Open the battery cover of the remote control by pushing the notched part - Hitachi 55DMX01W | Owners Guide - Page 6
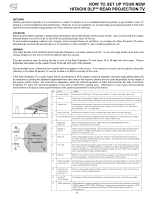
HITACHI DLPTM REAR PROJECTION TV ANTENNA Unless your Rear Projection TV is connected to a cable TV system or to a centralized antenna system, a good outdoor color TV lamp. 0' 5' 10' 15' 20' 5 Lamp replacement It is recommended that you replace the lamp lamp is cooling down, the remote control - Hitachi 55DMX01W | Owners Guide - Page 7
. When both VHF and UHF antennas are connected Attach an optional antenna cable mixer to the TV antenna terminal, and connect the cables to the antenna mixer. Consult your dealer or service store for the antenna mixer. 7 To outdoor antenna or CATV cable ANT A TO CONVERTER ANT B To second antenna or - Hitachi 55DMX01W | Owners Guide - Page 8
REMOTE CONTROL Sensor Point your remote at the screen when selecting channels, adjusting volume, etc. The remote lamp has failed. See page 80-83 for lamp replacement procedure. Consult your Hitachi dealer for proper part. If light is blinking, lamp cover is not assembled securely after replacement - Hitachi 55DMX01W | Owners Guide - Page 9
MENU, making it possible to set TV features to your preference without using the remote. This button also serves as the LAMP UNIT TEMP LED LIGHT ON BLINKING Too Hot inside the OPTIC unit COOLING FAN STOPPED Call Service POWER LIGHT ON SLOWLY BLINKING NORMAL OPERATION COOL DOWN 2. If the LAMP - Hitachi 55DMX01W | Owners Guide - Page 10
have a mono VCR, insert the audio cable into the left audio jack of your TV. INPUT 3 audio can be used for PC INPUT 2 audio when a PC INPUT ON and # 1, 4, 5, 8, 9, 10 = OFF. See below: Example - See Switch Instructions for details. Mode 5 = 2367 (SVGA 800 x 600/60 Hz configuration) (VGA 640 x480/ - Hitachi 55DMX01W | Owners Guide - Page 11
player or HDTV Set Top Box. Use a digital optical cable to connect your TV to a compatible device. This input can be used for VIDEO: 1 or selected in the THEATERINPUT SOURCE menu. (see page 66). NOTE: This TV s optical digital input jack fully complies with the international standard governing - Hitachi 55DMX01W | Owners Guide - Page 12
case, connect the components B-Y output to the TV s PB input and the components R-Y output to the TV s PR input. It may be necessary to D-Sub Input for your PC connection. (see page 69) ቮ ANTENNA Input/Output The remote control allows you to switch between two separate 75-Ohm RF antenna inputs, ANT A - Hitachi 55DMX01W | Owners Guide - Page 13
to the left audio jack on the television. Refer to the operating guide of your other electronic equipment for additional information on connecting your hook-up the Y-PBPR input jacks, connect your components audio output to the TV s Left and Right audio input jacks. Your component outputs may be - Hitachi 55DMX01W | Owners Guide - Page 14
10 9 8 7 6 15 14 13 12 11 PC RGB INPUT 1 OPTIONAL Optional, see tips on page 13 AUDIO OUT ANT A TO CONVERTER ANT B OUTPUT INPUT Cable TV Box Stereo System Amplifier Optional, see tips on page 13 S-VIDEO V L R OR OUTPUT Y PB PR L R OUTPUT INPUT S-VIDEO V L R 54321 10 9 8 7 6 15 14 13 12 - Hitachi 55DMX01W | Owners Guide - Page 15
across any two terminals). This could cause damage to your audio outputs or TV. + - L TO EXTERNAL SPEAKER R + - CAUTION: Do not connect SPEAKER terminal of the Rear Projection TV and an external amplifier. This could damage both the TV and the speakers. Your TV was designed to use 8-Ohm - Hitachi 55DMX01W | Owners Guide - Page 16
SOURCES CONNECTING EXTERNAL AUDIO AMPLIFIER To control the audio level of an external audio amplifier with the remote control, connect the system as shown below. REAR PANEL OF TELEVISION SUB WOOFER L R AUDIO audio amplifier lower and adjust the sound using the remote control of the TV set. 16 - Hitachi 55DMX01W | Owners Guide - Page 17
audio amplifier. Use the AUDIO TO HI-FI output on the TV. ብ These speakers are connected to a rear speaker 8-Ohm output on the TV. ቦ This sub woofer is connected to the SUB WOOFER output on the TV. ቤ ቤ L ቦ IN L R L R R IN OUT SUB WOOFER ᕃ ᕃ STEREO SYSTEM ባ AMPLIFIER ብ LS ብ RS 17 - Hitachi 55DMX01W | Owners Guide - Page 18
AUDIO SYSTEM SETUP SURROUND FEATURE REQUIRED CONNECTION OPTIONAL CONNECTION EFFECT OFF ᕃ ᕅ ᕇ Receive mono and stereo sound. STADIUM ᕃ ᕄ ᕆ ᕅ ᕇ Listener has feeling of being at a stadium. ROCK ARENA ᕃ ᕄ ᕆ ᕅ ᕇ Listener has feeling of being at a rock concert. JAZZ CLUB ᕃ ᕄ ᕆ ᕅ ᕇ - Hitachi 55DMX01W | Owners Guide - Page 19
to your TV set is dependent on the model and features of each component. Check the owner s manual of each component time the INPUT button on the Front Panel or the Remote Control is pressed as shown below. Connect an external source ANT B VIDEO OUT AUDIO OUT VCR Hitachi Model or Similar Model 19 - Hitachi 55DMX01W | Owners Guide - Page 20
the INPUT (VIDEO) jack, as shown on the TV set below. 2. Connect the cable from the AUDIO OUT A TO CONVERTER ANT B Back of VCR R L V OUTPUT VCR Hitachi Model or Similar Model NOTES: 1. Completely insert the connection cord plugs guide for more information on line input-output connections. 20 - Hitachi 55DMX01W | Owners Guide - Page 21
player to the INPUT (S-VIDEO) jack, as shown on the TV set below. 2. Connect the cable from the AUDIO OUT R V S-VIDEO Laserdisc Player OUTPUT VCR or Laserdisc Player Hitachi Model or Similar Model NOTES: 1. Completely insert the guide for more information on line inputoutput connections. 21 - Hitachi 55DMX01W | Owners Guide - Page 22
player or HDTV set top box to the INPUT (Y) jack, as shown on the TV set below. 2. Connect the cable from the CB/PB OUT or B-Y OUT of seconds. 7. Press the INPUT button to return to the previous channel. DVD Player Hitachi Model or Similar Model OUTPUT OUTPUT Back of L R Y PB PR OR AUDIO - Hitachi 55DMX01W | Owners Guide - Page 23
the DVD player or HDTV Set Top Box to the INPUT (Y) jack, as shown on the TV set below. 2. Connect the cable from the CB/PB OUT or B-Y OUT of the DVD to return to the previous channel. HDTV SET-TOP BOX DVD Player Hitachi Model or Similar Model Back of SET-TOP BOX player VIDEO OUTPUT OPTICAL - Hitachi 55DMX01W | Owners Guide - Page 24
DVD player or HDTV Set Top Box to the INPUT (Y) jack, as shown on the TV set below. 2. Connect the cable from the CB/PB OUT or B-Y OUT of the button to return to the previous channel. HDTV SET-TOP BOX DVD Player Hitachi Model or Similar Model Back of SET-TOP BOX player VIDEO OUTPUT COAXIAL - Hitachi 55DMX01W | Owners Guide - Page 25
on your HITACHI Projection TV, the new remote control is designed to operate different types of VCRs, CATV (Cable TV) converters, remote will now control the desired component. (See page 36 for instructions on how to program the remote to control additional Audio/Video equipment.) POWER ባ ቢ TV - Hitachi 55DMX01W | Owners Guide - Page 26
CH SVCS MUTE RECALL SCHD VCR PLUS+ INFO GUIDE/TV ብ ቦ ቨ PIP PIP CH FREEZE 1 PIP MODE PIP ACCESS SWAP PROG TV/VCR SLOW REC ᕃ POWER button Press this button to turn the TV set on or off when the remote is in TV mode. ባ TV button When the TV button is pressed, it will blink, to - Hitachi 55DMX01W | Owners Guide - Page 27
HOW TO USE THE GENIUS REMOTE TO CONTROL YOUR TV ቨ AV1, AV2, AV3 buttons When pressed, each of these buttons will blink to indicate the remote is in Audio/Video mode. (see page 36) ቩ CHANNEL selector buttons CHANNEL selector buttons are used to set FAMILY FAVORITES, CHANNEL MEMORY, etc. Enter one, - Hitachi 55DMX01W | Owners Guide - Page 28
HOW TO USE THE GENIUS REMOTE TO CONTROL YOUR TV ተ ASPECT button Press this button to quickly change the aspect button repeatedly to select channel skip time (30~180 seconds) when no menu is displayed and the TV will tune to the last channel viewed when the selected amount of time is up. The user can - Hitachi 55DMX01W | Owners Guide - Page 29
PIP sub-picture tuning, press the PIP CH button on the remote. The highlighted channel display will move with every press of the VCR Hitachi Model or Similar Model MENU EXIT VOL SELECT CH Back of VCR R L V OUTPUT Rear Panel of Television SVCS MUTE RECALL SCHD VCR PLUS+ INFO GUIDE/TV SUB - Hitachi 55DMX01W | Owners Guide - Page 30
-pictures will be removed from the screen. SURF MODE PIP is allowed only when ANT A is selected as the main channel. If PARENTAL CONTROL MOVIE/TV RATINGS setting is ON, PIP SURF mode will be deactivated. ባ SWAP button If you wish to switch what is being shown on the main picture - Hitachi 55DMX01W | Owners Guide - Page 31
PICTURE-IN-PICTURE (PIP) ብ FREEZE button (With PIP ON) If you wish to freeze the sub-picture, press the FREEZE button. This is convenient when trying to write down the address for a mail order company, recording statistics for a sporting event, etc. To return the picture to motion, press the FREEZE - Hitachi 55DMX01W | Owners Guide - Page 32
C.S. ቤ MENU EXIT ቤ ቤ VOL SELECT CH ባ SVCS MUTE RECALL SCHD VCR PLUS+ INFO GUIDE/TV ባ PIP PIP CH FREEZE PIP MODE PROG PIP ACCESS SWAP TV/VCR SLOW REC ቤ MY VCR CODE IS: NOTE: Refer to instruction manual of the VCR for operation of the buttons exclusively for the VCR. 32 - Hitachi 55DMX01W | Owners Guide - Page 33
button allows the remote to control your cable box by setting it to CABLE mode. ባ PRECODED CABLE BOX buttons These buttons transmit the chosen precoded cable codes. ቤ EXCLUSIVE TV buttons These buttons are for operating the TV. REC MY CABLE BOX CODE IS: NOTE: Refer to instruction manual of the - Hitachi 55DMX01W | Owners Guide - Page 34
remote control. After replacing the batteries repeat the entire programming procedure as stated above. 4. The INPUT button will act as the TV/ GUIDE/TV ባ ቤ ባ ቤ PIP PIP CH FREEZE PIP MODE PIP ACCESS SWAP PROG TV/VCR SLOW REC MY SATELLITE RECEIVER CODE IS: NOTE: Refer to instruction manual - Hitachi 55DMX01W | Owners Guide - Page 35
remote control. After replacing the batteries repeat the entire programming procedure as stated above. ቢ DVD Button This button allows the remote to INFO GUIDE/TV PIP PIP CH FREEZE PIP MODE PIP ACCESS SWAP PROG TV/VCR SLOW REC ቤ MY DVD PLAYER CODE IS: NOTE: Refer to instruction manual of - Hitachi 55DMX01W | Owners Guide - Page 36
VOL SELECT CH ባ SVCS MUTE RECALL SCHD VCR PLUS+ INFO GUIDE/TV PIP PIP CH FREEZE PIP MODE PIP ACCESS SWAP PROG TV/VCR SLOW REC ቤ MY AUDIO/VIDEO EQUIPMENT CODE IS: AV1 AV2 AV3 NOTE: Refer to instruction manual of the Audio/Video equipment for operation of the buttons exclusively - Hitachi 55DMX01W | Owners Guide - Page 37
18 Teleview 25 Texscan 18 Tocom 07, 27, 50 Toshiba 03 Tusa 51 TV 86 29 Unika 11, 39 United Artists 36 United Cable 49 Universal . . , 29, 40 Zenith 03, 48 Zentek 52 SATELLITE BRAND CODE Echostar 04 Hitachi 01 Hughes 05 RCA 02 Sony 03 AMPLIFIER BRAND CODE Aiwa 05, 06 Carver - Hitachi 55DMX01W | Owners Guide - Page 38
remote control to display the different features on your HITACHI Projection TV. 2. Press the THUMB STICK to highlight a different feature. 3. Press EXIT on the remote SET 8. PICTURE FORMATS 9. LAMP TIME TO QUIT EXIT PUSH This part of the screen shows which remote control buttons to use. 38 - Hitachi 55DMX01W | Owners Guide - Page 39
SIGNAL SOURCE 4. AUTO CHANNEL SET 5. CHANNEL MEMORY 6. CHANNEL LIST 7. CLOCK SET 8. PICTURE FORMATS 9. LAMP TIME Choose English, French, or Spanish text. Optimum hook up for your system. Select Antenna or Cable TV. First time set up for channel buttons. Channel buttons, add or skip. Check channel - Hitachi 55DMX01W | Owners Guide - Page 40
SET UP Select SETUP when setting your TV up for the first time. Use the THUMB STICK ̆ or ̄ on the remote to highlight the function desired. MENU SETUP 5. CHANNEL MEMORY 6. CHANNEL LIST 7. CLOCK SET 8. PICTURE FORMATS 9. LAMP TIME AUDIO THEATER ENGLISH FRANCAIS ES PAÑOL MENU TO MENU BAR TO QUIT - Hitachi 55DMX01W | Owners Guide - Page 41
5. CHANNEL MEMORY 6. CHANNEL LIST 7. CLOCK SET 8 . PICTURE FORMATS 9. LAMP TIME AUDIO THEATER MENU TO MENU BAR TO QUIT EXIT THUMB STICK WELCOME TO PLAY ON SCREEN SET UP GUIDE. AFTER ANSWERING THREE SIMPLE QUESTIONS, THIS SYSTEM WILL SHOW YOU TYPICAL CONNECTIONS FOR YOUR TV, CABLE, VCR, DVD, SET - Hitachi 55DMX01W | Owners Guide - Page 42
5. CHANNEL MEMORY 6. CHANNEL LIST 7. CLOCK SET 8. PICTURE FORMATS 9. LAMP TIME ANTENNA C ATV 1 C ATV 2 MENU TO MENU BAR TO channels for each mode are shown at the left. Refer to your cable or TV guide for channel identification standards. If certain CATV channels are poor or not possible in CATV1 - Hitachi 55DMX01W | Owners Guide - Page 43
UP AUTO CHANNEL SET This feature will automatically store active TV channels in CHANNEL MEMORY. This will allow you to AUTO CHANNEL SET 5. CHANNEL MEMORY 6. CHANNEL LIST 7. CLOCK SET 8. PICTURE FORMATS 9. LAMP TIME BEGIN MENU TO MENU BAR TO QUIT EXIT THUMB STICK SELECT SETUP CUSTOMIZE VIDEO AUTO - Hitachi 55DMX01W | Owners Guide - Page 44
function after AUTO CHANNEL SET to add or erase additional channels to the remote control CHANNEL ̆ or ̄ buttons. SETUP CUSTOMIZE VIDEO AUDIO THEATER 1. CHANNEL SET 5.CHANNEL MEMORY 6. CHANNEL LIST 7. CLOCK SET 8. PICTURE FORMATS 9. LAMP TIME CHANNEL 3 ADD ERASE NEXT CH CH ̆ CH ̄ OR # KEYS MENU - Hitachi 55DMX01W | Owners Guide - Page 45
CHAN N E L LIS T 7. CLOCK SET 8. PICTURE FORMATS 9. LAMP TIME AUDIO THEATER MENU TO MENU BAR TO QUIT EXIT THUMB STICK SETUP CUSTOMIZE FAM ON -- MENU TO MENU BAR TO QUIT EXIT Press THUMB STICK ̆ or ̄ to review more channels. Press EXIT to quit menu or THUMB STICK ̇ to return to previous menu. - Hitachi 55DMX01W | Owners Guide - Page 46
set before you can use the 4 EVENT PROGRAM or TV TIME OUT. SET UP SETUP CUSTOMIZE VIDEO AUDIO THEATER 1. M EN U LA N GUAGE 2. PLUG & PLAY 3. SIGNAL SOURCE 4. AUTO CHANNEL SET 5. CHANNEL MEMORY 6. CHANNEL LIST 7. CLOC K S E T 8. PICTURE FORMATS 9. LAMP TIME MENU TO MENU BAR TO QUIT EXIT THUMB - Hitachi 55DMX01W | Owners Guide - Page 47
VIDEO AUDIO THEATER 1. M ENU LA N GUAGE 2. PLUG & PLAY 3. SIGNAL SOURCE 4. AUTO CHANNEL SET 5. CHANNEL MEMORY 6. CHANNEL LIST 7. CL OC K SE T 8. PICTURE FORMATS 9. LAMP TIME MENU TO MENU BAR TO QUIT EXIT THUMB STICK PRESS SELECT TO ACTIVATE/DEACTIVATE SETUP PICTURE FORMATS ANT A ASPECT STYLE - Hitachi 55DMX01W | Owners Guide - Page 48
SET UP SET UP ASPECT STYLE Fill This function allows you to select when receiving either NTSC or SDTV. Full screen picture is available in this mode when receiving letterbox signal. Both vertical edges will be hidden if you select Fill for ordinary 4:3 picture. Smooth Wide This function - Hitachi 55DMX01W | Owners Guide - Page 49
BAR TO QUIT EXIT Press SELECT to reset LAMP TIME (after lamp replacement). NOTE: LAMP TIME should be left on to keep track of time lamp operates. LAMP TIME should be reset when lamp is replaced. At around 4,000 hours of operations, the lamp needs to be replaced with a new one. There is a spare - Hitachi 55DMX01W | Owners Guide - Page 50
CUSTOMIZE CUSTOMIZE This selection contains advanced features which will make TV viewing easier and more enjoyable. CUSTOMIZE CHANNEL ID. Use this feature to give up to 20 channels a name when ANTENNA signal source is selected and - Hitachi 55DMX01W | Owners Guide - Page 51
CUSTOMIZE VIDEO ID. Use this feature to give a name to any of the three video inputs. CUSTOMIZE SETUP CUSTOMIZE VIDEO AUDIO THEATER 1. CHANNEL ID. 2. VIDEO ID. 3. FAMILY FAVORITES 4. PARENTAL CONTROL 5. 4 EVENT PROGRAM 6. AUTO LINK 7. CLOSED CAPTION 8. MENU BACKGROUND MENU TO MENU BAR TO QUIT - Hitachi 55DMX01W | Owners Guide - Page 52
CUSTOMIZE CUSTOMIZE FAMILY FAVORITES This function allows you to group your favorite channels into six personalized categories that you can rename. (MENU) A total of 36 channels can be stored in the FAMILY FAVORITES function. SETUP CUSTOMIZE VIDEO AUDIO THEATER 1. CHANNEL ID. 2. VIDEO ID. 3. - Hitachi 55DMX01W | Owners Guide - Page 53
at the right edge of the screen. This is useful for previewing a category. Use THUMB STICK ̇, ̈, ̆ or ̄ to highlight a favorite channel and the TV will automatically tune to that channel. Press EXIT to remove FAMILY FAVORITES OSD from the screen. NOTES: 1. If a category has some blank channel - Hitachi 55DMX01W | Owners Guide - Page 54
disable this function) and then press down on THUMB STICK to SELECT your choice. MOVIE RATINGS, TV RATINGS, and CANADIAN RATINGS are explained in detail in the Parental Control Movie/TV Ratings Reference Guide. To change the secret code number, select CHANGE SECRET CODE. Enter a new four digit key - Hitachi 55DMX01W | Owners Guide - Page 55
TV ON --:-- AM TV OFF SUN TV ON 11:00 AM TV select the time the TV will turn on and timer to turn on TV. (If you set set the channel the TV will tune to the TV remote control button is pressed after ON Timer is activated, the TV will automatically turn off after three hours. CAUTION: Do not use your TV - Hitachi 55DMX01W | Owners Guide - Page 56
2 or 3 input device is turned on. This is convenient when you want to watch a movie with your VCR, laserdisc player, or DVD player. When REMOTE is selected, the TV will turn on and tune to VIDEO: 1, 2 or 3 automatically, when the VIDEO: 1, 2 or 3 input device is turned on and the VCR, laserdisc, or - Hitachi 55DMX01W | Owners Guide - Page 57
are the dialogue, narration, and/or sound effects of a television program or home video which are displayed on the TV screen. Your local TV program guide denotes these programs as or . SETUP CUSTOMIZE VIDEO 1. CHANNEL ID. 2. VIDEO ID. 3. FAMILY FAVORITES 4. PARENTAL CONTROL 5. 4 EVENT PROGRAM - Hitachi 55DMX01W | Owners Guide - Page 58
VIDEO VIDEO Select VIDEO to adjust picture settings and improve picture quality. VIDEO THUMB STICK MENU SETUP CUSTOMIZE VIDEO AUDIO THEATER 1. CONTRAST 2. BRIGHTNESS 3. COLOR 4. TINT 5. SHARPNESS 6. RESET 7. ADVANCED SETTINGS 100% 50% 50% 50% MENU TO MENU BAR TO QUIT EXIT THUMB STICK 100% - Hitachi 55DMX01W | Owners Guide - Page 59
VIDEO ADVANCED SETTINGS VIDEO Your HITACHI Projection TV has a PERFECT PICTURE function which will return to previous menu. PERFECT PICTURE When the PERFECT PICTURE function is on, the TVs internal computer will perform the following: 1. Automatically monitor and adjust contrast depending on room - Hitachi 55DMX01W | Owners Guide - Page 60
AUDIO AUDIO Select AUDIO to adjust the TV to your preference and to improve the sound quality. AUDIO MENU THUMB STICK SETUP CUSTOMIZE VIDEO AUDIO THEATER 1. EQUALIZER ̆ ̆ ̆ ̆ ̆ THUMB STICK SETUP CUSTOMIZE VIDEO AUDIO - Hitachi 55DMX01W | Owners Guide - Page 61
SAP (second audio program) which may be a secondary language, weather report, etc. The sources received will be displayed at the top center edge of the TV. The source you select will be displayed above the sources received. See example below for each selection when both stereo and second audio are - Hitachi 55DMX01W | Owners Guide - Page 62
INPUT SOURCE 4. LISTENING POSITION 5. LISTENING MODE 6. SPEAKER SETUP TV MOVIES MUSIC SPORTS RESET MENU TO MENU BAR TO QUIT EXIT Use ̄ to change THEATER MODES settings. MENU TO MENU BAR TO QUIT EXIT When TV mode is chosen, the following are automatically set: CONTRAST - 100%, COLOR TEMPERATURE - Hitachi 55DMX01W | Owners Guide - Page 63
viewing a program which is DOLBY DIGITAL encoded and you have a digital (optical or coaxial) input. (see pages 65 and 66 for more information) NOTES: 1. This TV can not decode or process DTS (Digital Theater Surround). 2. If you can not adjust SR, SL, or SW, make sure they are turned on in - Hitachi 55DMX01W | Owners Guide - Page 64
. Press SELECT on THUMB STICK when TEST TONE is highlighted and TV will automatically cycle through all speakers. Simply wait until the speaker desired level. Press ̄ on THUMB STICK when TEST TONE is highlighted to manually cycle through all speakers. When main VOLUME is changed, all speaker volumes - Hitachi 55DMX01W | Owners Guide - Page 65
. Press SELECT on THUMB STICK when TEST TONE is highlighted and TV will automatically cycle through all speakers. Simply wait until the speaker desired level. Press ̄ on THUMB STICK when TEST TONE is highlighted to manually cycle through all speakers. When main VOLUME is changed, all speaker volumes - Hitachi 55DMX01W | Owners Guide - Page 66
THEATER THEATER INPUT SOURCE Set audio input to Digital or Analog. This fueature is used only when viewing VIDEO:1 or VIDEO:2 inputs, since only these inputs can accept DIGITAL audio input. SETUP CUSTOMIZE VIDEO SEL AUDIO THEATER SETUP CUSTOMIZE VIDEO SEL AUDIO THEATER Theater Modes - Hitachi 55DMX01W | Owners Guide - Page 67
THEATER LISTENING MODE AUDIO Choose between pre-set audio modes Standard, Night, or Maximum. Take advantage of these features to reduce or increase sound effects. SETUP CUSTOMIZE VIDEO SEL AUDIO THEATER Theater Modes Surround Input Source Listening Position Listening Mode Speaker Setup Menu To - Hitachi 55DMX01W | Owners Guide - Page 68
you wish to use the TV internal Left and Right speakers. Select FRONT L/R- EXTERNAL W/AMP if you wish to turn off the TV internal Left and Right when main volume is adjusted. Refer to THEATER-SURROUND menu on page 63 for instructions on how to set up your speakers. 2. If SURROUND-NO, SUB WOOFER - Hitachi 55DMX01W | Owners Guide - Page 69
OPERATION IMPORTANT: TURN OFF THE REAR PROJECTION TV/PC MONITOR AND THE PC BEFORE CONNECTING 3 54321 10 9 8 7 6 15 14 13 12 11 PC2 INPUT MENU VOL- VOL+ CH- CH+ ̇ ̇ TV/PC EXIT SELECT ̇̈ udio Cable Optional) D-SUB 15 Pin RGB Cable (Optional) AUDIO OUT Audio Cable (Optional) RGB OUTPUT - Hitachi 55DMX01W | Owners Guide - Page 70
4 Audio 5 Audio-Balance 6 Surround Mode 7 Mute / Soft Mute 8 Closed Caption 9 Clock 10 Sleep Timer 11 Monitor Out 12 Child Lock / Video Lock / V-Chip 13 TV Time Out 14 Front Panel Lock 15 Menu Language 16 Auto Link 17 Menu Background Operation Only power on is available Not available. Contrast and - Hitachi 55DMX01W | Owners Guide - Page 71
level H/V separate signal 0.7Vpp NOTE: Interlaced signal is not available. 6. PC picture will not appear at all when receiving a signal which is not supported by this product. If PC display setting is wrong, the monitor will display: PC:1 PC:1 NO SYNC. SIGNAL INVALID SCAN FREQ. Without sync - Hitachi 55DMX01W | Owners Guide - Page 72
control until you select PC mode. 4. Turn the PC power on. 5. Press the menu button on the DLPTM Rear Projection TV/PC monitor front panel or on the remote control to display the PC on screen display. 6. Press the left (̇) or right (̈) cursor buttons to select the audio menu . 7. Press the - Hitachi 55DMX01W | Owners Guide - Page 73
control to display the different features in PC MODE. 2. Press the CURSOR buttons to highlight a different feature. 3. Press EXIT on the remote control to quickly exit from a menu. MENU EXIT SELECT AUTO R E ON OFF EXIT TO QUIT PUSH This part of the screen shows what selections are - Hitachi 55DMX01W | Owners Guide - Page 74
PC MODE ULTRATEC OSD AUTO AUTO ADJUST Automatically adjust the geometry to fit the screen. PHASE Adjusts the phase to correct blurred or unstable images. H POSITION Adjust horizontal position. V POSITION Adjust vertical position. CLOCK Adjusts the dot clock frequency to reduce the - Hitachi 55DMX01W | Owners Guide - Page 75
PC ON SCREEN DISPLAY SET UP ADJUSTMENTS The following adjustments are independent of the TV mode: ¥Press MENU in PC mode for on screen display. ¥Press CURSORS to highlight , try automatic adjustment again. If automatic adjustment fails several times in succession, try using manual adjustment. 75 - Hitachi 55DMX01W | Owners Guide - Page 76
PC ON SCREEN DISPLAY H POSITION This feature allows you to adjust the horizontal position of the display. Use Left/Right cursors to adjust the horizontal position. Press the MENU button to return to initial position of menu icon and EXIT to quit. H POSITION 50 V POSITION This feature allows - Hitachi 55DMX01W | Owners Guide - Page 77
cursors to adjust contrast. Press MENU button to return to initial position of menu icon and EXIT to quit. CONTRAST 50% NOTE: See TV contrast feature for additional information regarding contrast. BRIGHTNESS This feature allows you to adjust brightness in PC Mode. Use Left/Right cursors to - Hitachi 55DMX01W | Owners Guide - Page 78
PC ON SCREEN DISPLAY COLOR BALANCE Use the CURSOR to change the COLOR BALANCE of red, green and blue. COLOR BALANCE RED 100% GREEN 100% BLUE 100% THUMB STICK COLOR BALANCE RED 100% GREEN 100% BLUE 100% EXPANSION The picture size is expanded when switching from REAL, NORMAL and FULL - Hitachi 55DMX01W | Owners Guide - Page 79
your choice. Press SELECT to return AUDIO adjustments to factory preset conditions. BALANCE This function will control the left to right balance of the TV internal speakers and the AUDIO TO HI FI output. Press CURSOR ̄ for more AUDIO ADJUSTMENT. DYNAMIC BASS EQUALIZER 60 250 1k 3k 10k RESET - Hitachi 55DMX01W | Owners Guide - Page 80
is still lit, please contact your authorized service center. (see page 8) NOTES: ¥ Contact your Hitachi dealer for a new lamp unit. Using other lamps may cause damage to the TV Set. TYPE NAME: DLPTM LAMP ASSEMBLY PART NUMBER: DP00341 ¥ When replacing the lamp, let it cool down completely, for - Hitachi 55DMX01W | Owners Guide - Page 81
LAMP REPLACEMENT DEMAN ASK MOI! ME! 1. Turn off the main power switch on the front panel and unplug the power cord from the wall outlet. LAMP TEMP POWER POWER PUSH DLP A TEXAS INSTRUMENTS TECHNOLOGY PUSH 120V CAUTION: THE LAMP IS VERY HOT AND MAY CAUSE FIRE OR SEVERE BURNS. WAIT AT LEAST 30 - Hitachi 55DMX01W | Owners Guide - Page 82
DEMAN MOI! LAMP REPLACEMENT 3. Loosen the two screws securing the latch cover with a Phillips Head Screw Driver as shown. If these screws are not loosened completely, the lamp unit cannot be removed. ✬ ☞✍ ✬ ✲ ☞✍ 8Ω ONLY STOP CONNECT ONLY 8 OHM SPEAKERS DO NOT SHORT CIRCUIT THESE - Hitachi 55DMX01W | Owners Guide - Page 83
securing the spare lamp unit. Remove the spare lamp unit. Replace the spare lamp cover. 6. Replace the lamp. ¥ Push the lamp unit back to its original position. ¥ Tighten the scres firmly on the lamp unit. If they are loose, the TV may not operate correctly. Spare Lamp SUB WOOFER L R AUDIO - Hitachi 55DMX01W | Owners Guide - Page 84
This DLPTM Rear Projection TV complies with VESA DDC2B specifications, Plug & Play is a system with computer, peripherals (including monitors) and operating system. It works when the monitor is connected to a - Hitachi 55DMX01W | Owners Guide - Page 85
and if not installed and used in accordance with the instructions, may cause harmful interference to radio communications. However, there the system must be replaced with identical cables in order to assure compliance with FCC rules. Order Hitachi spares as replacement cables. Declaration of - Hitachi 55DMX01W | Owners Guide - Page 86
a heater. Excessive heat or moisture may cause the unit to cease operation. When the batteries run down, remote control operation will become erratic or possibly stop altogether. Replace the old batteries with two new AA size batteries. Exposure of the viewing screen to prolonged direct sunlight or - Hitachi 55DMX01W | Owners Guide - Page 87
gooElJVebgnneiIaietUasrcsdTdkosSi-ciEunowoTnfibrtlrMceRwMei)herScetEaerdNAPrOTNojNSeDction TV. SYMPTOMS No picture the power cord back in. Press the power switch again. This protective technology should provide for years of lasting entertainment from your HITACHI Rear Projection Television. 87 - Hitachi 55DMX01W | Owners Guide - Page 88
HITACHI PROJECTION TV ¥ IGNITION NOISE: Black spots or horizontal streaks may appear, picture may flutter or drift. Usually caused by interference from automobile ignition systems, neon lamps are lit and some are not. This is not a problem. SCREEN The screen surface is easily scratched. Do not rub - Hitachi 55DMX01W | Owners Guide - Page 89
Compressed, SVGA/VGA: Real) ¥ Perfect Picture System ¥ Remote (controls many VCR brands, cable box, satellite boxes and Ohm ¥ Video 1.0Vp-p. 75 Ohm ¥ Audio 470mVrms, 1k Ohm Dimensions: 55DMX01W ¥ Height (in.) ¥ Width (in.) ¥ Depth (in.) ¥ Weight guide are subject to change without notice. 89 - Hitachi 55DMX01W | Owners Guide - Page 90
) For accessories or replacement lamps, contact your nearest Hitachi dealer, or call 1-800-HITACHI Hitachi has made every effort to assure you hours of trouble free operation from your unit. However, should you require service, a network of Hitachi Authorized Service Facilities has been established - Hitachi 55DMX01W | Owners Guide - Page 91
digital era dawns, Hitachi has models that provide neatest picture possible. PROGRESSIVE SCANNING A standard TV uses Interlaced Scanning where each frame of video input, a computer. DDC2B PROTOCOL SUPPORT In order for a computer to recognize a monitor it must have DDC2B support, which you ll find in - Hitachi 55DMX01W | Owners Guide - Page 92
QR46312
-
 1
1 -
 2
2 -
 3
3 -
 4
4 -
 5
5 -
 6
6 -
 7
7 -
8
-
9
-
10
-
11
-
12
-
13
-
14
-
15
-
16
-
17
-
18
-
19
-
20
-
21
-
22
-
23
-
24
-
25
-
26
-
27
-
28
-
29
-
30
-
31
-
32
-
33
-
34
-
35
-
36
-
37
-
38
-
39
-
40
-
41
-
42
-
43
-
44
-
45
-
46
-
47
-
48
-
49
-
50
-
51
-
52
-
53
-
54
-
55
-
56
-
57
-
58
-
59
-
60
-
61
-
62
-
63
-
64
-
65
-
66
-
67
-
68
-
69
-
70
-
71
-
72
-
73
-
74
-
75
-
76
-
77
-
78
-
79
-
80
-
81
-
82
-
83
-
84
-
85
-
86
-
87
-
88
-
89
-
90
-
91
-
92
 |
 |

DLP
TM
TECHNOLOGY REAR PROJECTION TELEVISION
55DMX01W
OPERATING GUIDE
IMPORTANT SAFEGUARDS
2-4
SETUP
CUSTOMIZE
VIDEO
AUDIO
THEATER
USING THE DLP
TM
TECHNOLOGY
REAR PROJECTION TV AS A PC
MONITOR
FIRST TIME USE
5-24
THE REMOTE CONTROL
25-37
ULTRATEC BIT MAP
ON SCREEN DISPLAY
LAMP REPLACEMENT
PLUG AND PLAY
TRADEMARK ACKNOWLEDGMENT
AGENCY REGULATORY INFORMATION
USEFUL INFORMATION
SPECIFICATIONS
SERVICE HOTLINE
FEATURE INFORMATION
80-91
69-79
38-68
Digital Light Processing, DLP, Digital Micromirror Device and DMD are trademarks of Texas Instruments.
The DLP logo is a trademanrk of Texas Instruments.