Hitachi 55HDS52 Owners Guide - Page 25
First time use, The Remote Control
 |
View all Hitachi 55HDS52 manuals
Add to My Manuals
Save this manual to your list of manuals |
Page 25 highlights
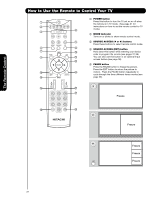
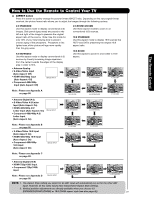
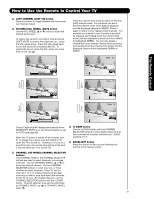
First time use The Remote Control How to Use the Remote to Control Your TV PHOTO INPUT This feature is useful for viewing digital still pictures from your digital camera, USB Drive or memory cards USB drive using the Photo Input in the left side panel of the TV. 1. Press the INPUTS button to cycle through the INPUTS selections until the PHOTO INPUT is selected. Press the SELECT button or CURSOR PAD ̈. Input 5 Photo Input Cable Air Input 1 Move SEL Sel. 2. Press the CURSOR PAD ̇ or ̈ to access the next or previous photo. 3. Press the SELECT button to view THUMBNAIL. 4. Use the CURSOR PAD buttons ̆, ̄, ̇ or ̈ and the SELECT button to navigate and select individual chosen photos. Next SEL Thumbnail [0-9] Jump 5. Press the picture number to jump from picture to picture. Please Enter Picture Number -- 6. Press the INFO button to access PHOTO Input menu and to view Photo information. 7. Press the CURSOR PAD ̆ or ̄ and the SELECT button to navigate and select the PHOTO Input menu. Picture No. Date Resolution File Name No. 02/08 06/13/05 2048x1536 DSC00467 Rotate Slideshow Device NOTES: 1. Contrast will decrease automatically if stationary images such as digital still photos are left on the screen for more than 3 minutes. 2. The maximum number of digital Photos that can be displayed is 999. 3. Press INFO button to show Picture Numbers in Thumbnail view, plus other information in individual photos. 4. Digital photos recorded on a DVD-RAM disc may not work with this Photo Input. 5. Certain types of digital cameras may not work with this Photo Input. 6. Digital cameras with low battery power may not properly display your photos in this input. 7. The screen may show "Input device not detected" if the digital camera's large capacity memory is fully loaded, or because of slow access time on some digital cameras. Please wait 1 or 2 minutes before checking your Photo Input connections. 25
-
 1
1 -
2
-
3
-
4
-
5
-
6
-
7
-
8
-
9
-
10
-
11
-
12
-
13
-
14
-
15
-
16
-
17
-
18
-
19
-
 20
20 -
 21
21 -
 22
22 -
 23
23 -
 24
24 -
 25
25 -
 26
26 -
 27
27 -
 28
28 -
 29
29 -
 30
30 -
31
-
32
-
33
-
34
-
35
-
36
-
37
-
38
-
39
-
40
-
41
-
42
-
43
-
44
-
45
-
46
-
47
-
48
-
49
-
50
-
51
-
52
-
53
-
54
-
55
-
56
-
57
-
58
-
59
-
60
-
61
-
62
-
63
-
64
-
65
-
66
-
67
-
68
-
69
-
70
-
71
-
72
-
73
-
74
-
75
-
76
-
77
-
78
-
79
-
80
-
81
-
82
-
83
-
84
-
85
-
86
-
87
-
88
 |
 |