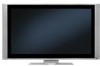
Hitachi 55HDS69 Owners Guide
Hitachi 55HDS69 - UltraVision HDS Series Manual
 |
UPC - 050585126848
View all Hitachi 55HDS69 manuals
Add to My Manuals
Save this manual to your list of manuals |
Hitachi 55HDS69 manual content summary:
- Hitachi 55HDS69 | Owners Guide - Page 1
PLASMA TELEVISION Operating Guide for 42HDS69 and 55HDS69 IMPORTANT SAFETY INSTRUCTIONS 2-3 FIRST TIME USE ...4-22 THE REMOTE CONTROL...23-34 ON-SCREEN DISPLAY ...35-59 USEFUL INFORMATION...60-66 END USER LICENSE AGREEMENT FOR HITACHI DTV SOFTWARE 67-75 APPENDIXES...76-77 INDEX...78 As an Energy - Hitachi 55HDS69 | Owners Guide - Page 2
for long periods of time. 14. Refer all servicing to qualified service personnel. Follow all warnings and instructions marked on this plasma television. Servicing is required when the apparatus has been damaged in any way, such as power-supply cord or plug is damaged, liquid has been spilled or - Hitachi 55HDS69 | Owners Guide - Page 3
digital cable services such as video-on-demand, a cable operator's enhanced program guide and data-enhanced television services may require the use of a set-top box. For more information call your local cable company. Note • There are no user serviceable parts inside the plasma television - Hitachi 55HDS69 | Owners Guide - Page 4
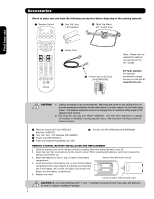
Top Stand (42" models only) First time use » Power Cord ´ Ferrite Core on AC Cord (Only 55HDS69) Note: Please visit our website for optional accessories for the 55" models. For U.S. models: For optional accessories, please access our web site at: www.hitachi.us/tv CAUTION: 1. Ceiling mounting - Hitachi 55HDS69 | Owners Guide - Page 5
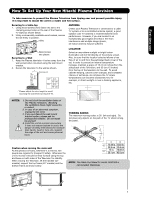
to a Wall 1. Keep the Plasma television 4 inches away from the wall except when mounted using the wall mount bracket. 2. Secure the television to the wall as shown. A Fixing point LOCATION Select an area where sunlight or bright indoor illumination will not fall directly on the picture screen. Also - Hitachi 55HDS69 | Owners Guide - Page 6
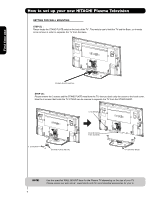
How to set up your new HITACHI Plasma Television SETTING FOR WALL MOUNTING STEP (1) : Please locate the STAND PLATE metal on the back of the TV . This metal is use to hold the TV and the Base ; so it needs to be remove in order to separate the TV from the Base. First time use STAND PLATE METAL - Hitachi 55HDS69 | Owners Guide - Page 7
First time use How to set up your new HITACHI Plasma Television VIEWING The best picture is seen by sitting directly in front of the TV and about 10 to 18 feet from the screen. During daylight hours, reflections from outside light may appear on the screen. If so, drapes or screens can be used to - Hitachi 55HDS69 | Owners Guide - Page 8
place of the standard video cable to produce a high quality picture. Optical Cable This cable is used to connect to an audio amplifier with an Optical Audio In jack. Use this cable for the best sound quality. HDMI Cable This cable is used to connect your external devices such as Set-Top-Boxes or DVD - Hitachi 55HDS69 | Owners Guide - Page 9
First time use This page is left blank intentionally 9 - Hitachi 55HDS69 | Owners Guide - Page 10
of the TV or pause other devices. LEGEND TV- Television CBL - Cable Box VCR - Video Cassette Recorder/Player SAT- Satellite Receiver DVD - Digital Video Disc Player NOTES: 1. The TV's remote control sensor is located on the right bottom portion of the TV screen. To control TV functions, please - Hitachi 55HDS69 | Owners Guide - Page 11
button Press this button to turn the Plasma Television ON/OFF. It can also be turned ON/OFF by remote control. The "MAIN POWER" button must be at stand-by mode. ባ MENU/SELECT button This button allows you to enter the MENU, making it possible to set TV features to your preference without using the - Hitachi 55HDS69 | Owners Guide - Page 12
Status Lamp 1 Lamp 2 Off Off OFF. Lights Red Off Off Off Blinking Blue Lights Blue Lights Orange Off OFF. (Stand-by) OFF. (Turning ON ) O n Off (Power Saving) Operating When the main power switch is set to O . When the main power switch on the TV is ON. TV MAIN POWER is ON ; but no picture - Hitachi 55HDS69 | Owners Guide - Page 13
video input. ቩ Upgrade Card This card slot is for future software upgrades. HITACHI will notify you if a software upgrade is required for your TV. In order to receive written notification, please complete and return your warranty card. Use the HDMI input for your external devices such as Set - Hitachi 55HDS69 | Owners Guide - Page 14
chosen cable channels. Please call your local cable operator if this service is available before requesting a CableCARD (also known as Point of Deployment installed or removed, the TV will display the following respective screens. CableCARD is installed OR Digital Cable CableCARD is not installed - Hitachi 55HDS69 | Owners Guide - Page 15
. OUTPUT R L PR/C R PB /C B Y OUTPUT R L V Video Game COMPONENT OUTPUT CAPABILITY DVD , Set Top Box, Video Game Console. Video Camera NOTE: 1. Completely insert connection cord plugs when connecting to left side panel jacks. If you do not, the played back picture may be abnormal. 15 - Hitachi 55HDS69 | Owners Guide - Page 16
laserdisc player, DVD player, or HDTV Set Top Box to your Plasma TV is dependent on the model and features of each component. Check the owner's manual of each component for the location of video and audio inputs and outputs. The following connection diagrams are offered as suggestions. However, you - Hitachi 55HDS69 | Owners Guide - Page 17
OUTPUT AUDIO OUT DVI to HDMI OUTPUT Y PB/CB PR/CR L R Optional S-VIDEO V L R INPUT S-VIDEO V L R OUTPUT Y PB PR L R OUTPUT HDMI to HDMI HDMI OUTPUT DVD Player VCR #2 Laserdisc player, VCR, camcorder, etc. HDTV Set-Top Box HDMI DIGITAL OUTPUT CAPABILITY NOTE: Cables are optional, except - Hitachi 55HDS69 | Owners Guide - Page 18
is of S-VIDEO type. • When using a HDMI input from a Set-Top-Box, it is recommended to use a 1080i or 720p input signal. INSTALLATION RECOMMENDATION: 1. Video signals fed through a VCR may be affected by copyright protection systems and the picture will be distorted on the television. 2. Connecting - Hitachi 55HDS69 | Owners Guide - Page 19
cord plugs when connecting to rear panel jacks. The picture and sound that is played back will be abnormal if the connection is loose. 2. A single VCR can be used for VCR #1 and VCR #2 (see page 17), but note that a VCR cannot record its own video or line output. Refer to your VCR operating guide - Hitachi 55HDS69 | Owners Guide - Page 20
1. Completely insert the connection cord plugs when connecting to rear panel jacks. The picture and sound that is played back will be abnormal if the connection is loose. 2. The HDMI input on INPUT 1 , 2 and 5 contains the copy protection system called High-bandwidth Digital Content Protection (HDCP - Hitachi 55HDS69 | Owners Guide - Page 21
cable from the Y OUT of the NOTE: 1. Completely insert the connection cord Laserdisc/DVD player or HDTV set top box to plugs when connecting to rear panel jacks. the INPUT (Y) jack, as shown on the Rear The picture and sound that is played back panel below. will be abnormal if the connection - Hitachi 55HDS69 | Owners Guide - Page 22
monitor the audio level of the Plasma TV to an external audio amplifier, connect the system as shown on the right. The "OPTICAL OUT" from the Rear Panel is a fixed output. The Volume of the amplifier is controlled by the amplifier, not by the Plasma Television. The OPTICAL OUT terminal outputs all - Hitachi 55HDS69 | Owners Guide - Page 23
In addition to controlling all the functions on your HITACHI Plasma Television , the new remote control is designed to operate different types of VCRs, CATV (Cable TV) converters, set-top-boxes, satellite receivers (SAT) and DVD players with one touch. Basic operation keys are grouped together - Hitachi 55HDS69 | Owners Guide - Page 24
Control How to Use the Remote to Control Your TV ³ POWER button Press this button to turn the TV set on or off when ³ the remote is in TV mode. · MODE buttons · These buttons allow the remote to control your TV, VCR, DVD, Cable box/Satellite box depending on ² ¿ which button is pressed - Hitachi 55HDS69 | Owners Guide - Page 25
Control How to Use the Remote to Control Your TV ´ ASPECT button Press this button to quickly change the picture format ASPECT ratio. Depending on the input signal format received, the picture format ratio allows you to adjust the images through the following options. 4:3 STANDARD Use this aspect - Hitachi 55HDS69 | Owners Guide - Page 26
The show description will be in this area of the screen. The Remote Control ¶ PICTURE-IN-PICTURE button See separate section on pages 28-29 for a description. º MENU button The MENU button will start the On-Screen Display. ¾ GUIDE button [Cable Box (CBL), Satellite Receiver (SAT) modes only] The - Hitachi 55HDS69 | Owners Guide - Page 27
MUTE/SOFT MUTE is on and Closed Caption is set to AUTO (see page 56). When the TV power is turned off at a volume level 31 or code, etc. Use the CHANNEL SELECTOR buttons to enter one, two, or three numbers to select channels. Enter 0 first for channels 1 to 9, or simply press the single digit - Hitachi 55HDS69 | Owners Guide - Page 28
Remote Control Picture-in-Picture (PIP) Your HITACHI Plasma TV incorporates one Tuner technology designed for improved viewing enjoyment. This feature allows you to view Digital Channels and Video inputs on both the main picture and sub picture simultaneously, with separate control. When a Digital - Hitachi 55HDS69 | Owners Guide - Page 29
/720p signal. To prevent a pattern burn, occasionally move the sub-picture using the CURSOR PAD. The Remote Control Main Picture Sub Picture SWAP PIP Specifications Table PIP Mode Sub Picture Digital Channel Component/Composite/S-lN/HDMI 1080i 720p 480p 480p 480i 480i 1080i 720p 480p 480p - Hitachi 55HDS69 | Owners Guide - Page 30
and STROBE). SPLIT FREEZE Press the PAUSE button to freeze the picture you are currently viewing (only the right sub-picture will freeze). Press the EXIT button to return to normal viewing. Freeze Main Picture Sub Picture Freeze Freeze Freeze Freeze STROBE FREEZE Press the PAUSE button to - Hitachi 55HDS69 | Owners Guide - Page 31
After replacing the batteries repeat the entire programming procedure as stated above. ³ CABLE (CBL) button This button allows the remote to control your cable box by setting it to CABLE mode. · PRECODED CABLE BOX buttons These buttons transmit the chosen precoded cable codes. » EXCLUSIVE TV buttons - Hitachi 55HDS69 | Owners Guide - Page 32
for operating the TV. 32 SATELLITE BRAND CODES ECOSTAR 03 HITACHI 00 HUGHES 04 RCA 01 SONY 02 SET TOP BOX BRAND CODES PANASONIC 05 RCA 06 SAMSUNG 07 ZENITH 08 MY SATELLITE RECEIVER/ SET TOP BOX CODE IS NOTE: Refer to instruction manual of the set-topbox/satellite receiver - Hitachi 55HDS69 | Owners Guide - Page 33
This button allows the remote to control your DVD player by setting it to DVD mode. · PRECODED DVD Buttons These buttons transmit the chosen precoded DVD codes. » EXCLUSIVE TV Buttons These buttons are for operating the TV. · DVD BRAND CODES APEX 10 GO VIDEO 09 HITACHI 00 KENWOOD 11 - Hitachi 55HDS69 | Owners Guide - Page 34
matches your VCR, as shown below. Release the VCR button. 5. Aim the remote at the VCR and press the POWER button. The remote will turn off your VCR when the correct two digit preset code is entered. When this » » occurs, the remote control is programmed for your VCR. If the VCR does not turn - Hitachi 55HDS69 | Owners Guide - Page 35
HITACHI Plasma TV. 2. Use the CURSOR PAD (buttons ̆, ̄, ̇ and ̈) and highlight a different feature of the On-Screen Display menu. Press the SELECT button to select. 3. Press EXIT on the remote control to quickly exit from a menu. This part of the screen shows which selections are available. Video - Hitachi 55HDS69 | Owners Guide - Page 36
color with more blue, set to based on a parental guide Medium for natural color, set to ratings. Standard for standard colors Canadian Ratings (ENG) Block various types of movies and television programming Black Enhancement Enhance picture brightness in light scenes. based on the Canadian - Hitachi 55HDS69 | Owners Guide - Page 37
the function. 4. Press MENU to return to main menu. 5. Press EXIT to quit menu. Contrast Use this function to change the contrast between black and white levels in the picture. Brightness Use this function to adjust overall picture brightness. Video Audio Channel Manager Locks Timers Setup Move - Hitachi 55HDS69 | Owners Guide - Page 38
, your Hitachi Plasma Television will activate the circuitry for this special feature to improve video performance when watching film based sources. NOTE: 1. When using Progressive Scan Component (Ex. 480p, 720p, 1080i), Auto Movie Mode will not be available (grayed out). 2. All Video settings are - Hitachi 55HDS69 | Owners Guide - Page 39
Reduction Auto Movie Mode Black Side Panel Aspect Reset Video Settings Move SEL Return 50% High High Dynamic Low Off Off Cable Video Reset Video Settings Select "Reset" to return the video menu settings on this Input to the original factory settings. Reset Move SEL Return On-Screen Display 39 - Hitachi 55HDS69 | Owners Guide - Page 40
the TV to your preference and to improve the sound quality. Video Audio Channel Manager Locks Timers Setup Move SEL Select 1. Press CURSOR PAD ̆ or ̄ to select menu item. 2. Press CURSOR PAD ̇ or ̈ to adjust the function. 3. Press EXIT to quit the MENU, or select AUDIO to return to the main - Hitachi 55HDS69 | Owners Guide - Page 41
Multi-Channel Television Sound will allow you to select STEREO (a stereo broadcast), MONO (monaural sound) used when receiving a weak stereo broadcast or SECOND AUDIO PROG (SAP) which may be a secondary language, weather report, etc. Internal Speakers This function is useful when setting up the - Hitachi 55HDS69 | Owners Guide - Page 42
is installed, Auto OR Channel Scan will not be available since channels will be fixed based on what was agreed upon by you and your cable operator. 2. If certain channels are poor or not possible in cable(1) mode, set cable source to cable(2) by using the CURSOR buttons ̇ or ̈. 42 Channel Manager - Hitachi 55HDS69 | Owners Guide - Page 43
function allows you to review which channels are labeled , input the access code. (Default access code: 0000) OR 4. Press the FAV button to set or remove the FAVORITE settings. 5. Press the operator. The Channel List cannot be updated by only changing the cable source. Auto Channel Scan must be performed - Hitachi 55HDS69 | Owners Guide - Page 44
POWER button. When MOVIE RATINGS is selected, you can block various types of movies and video tapes based on motion picture ratings. Picture-in-Picture will also be blocked automatically (see page 45). When TV RATINGS is selected, various types of television programming based on a parental guide - Hitachi 55HDS69 | Owners Guide - Page 45
Code Engage Lock Movie Ratings TV SEL Return Motion Picture Ratings Table NOT Television will immediately tune to an EAS channel as directed by the EAS message. Please be advised that if the EAS channel is blocked using the LOCKS feature, you will not be able to tune to that channel. On-Screen - Hitachi 55HDS69 | Owners Guide - Page 46
Locks Change Access Code Engage Lock Movie Ratings TV Ratings Canadian Ratings(Eng) Canadian Ratings(Frn) Alternate Ratings U.S. Move SEL Select Locks TV Ratings OR Sub Rating Status D L S V FV TV-Y TV-Y7 TV-G TV-PG TV-14 TV-MA Move SEL Return TV Parental Guide Ratings Table TV-Y All - Hitachi 55HDS69 | Owners Guide - Page 47
television program in Canada that you feel might be inappropriate in its content. 1. Use the CURSOR PAD ̆, ̄ or CHANNEL UP/ DOWN buttons to select the CANADIAN RATINGS (ENG) category that you want to block. Locks Change Access Code Engage Lock Movie Ratings TV and/or sex. On-Screen Display 47 - Hitachi 55HDS69 | Owners Guide - Page 48
selected, for example 8 ANS+, all movies and television programs rated 8 ANS+ and higher will OR be previous menu. Locks Change Access Code Engage Lock Movie Ratings TV Ratings Canadian Ratings(Eng) Canadian a broad audience but contains light or occasional violence that could Screen Display 48 - Hitachi 55HDS69 | Owners Guide - Page 49
unavailable (grayed out). In order to set the Alternate Ratings the ATSC Digital channel received must include Alternate Ratings data Guide Model 1. Use the CURSOR buttons ̄ or to select the ALTERNATE RATING category that you want to block. ̄ Locks Change Access Code Engage Lock Movie Ratings TV - Hitachi 55HDS69 | Owners Guide - Page 50
calculate the clock adjustment for Daylight Saving. 2. When the CableCARD is used, the TV will SET THE CLOCK automatically. 3. The TV counts electrical pulses for regulating the TIMERS. When the power cord is unplugged then plugged in quickly, the clock is stopped momentarily and the TIME - Hitachi 55HDS69 | Owners Guide - Page 51
SEL Select -- : -- AM PST 0:00 Not Set Not Set Timers Set The Clock Set Sleep Timer Set Day/Night Timer Set Event Timer Move SEL Set -- : -- AM PST 0:00 Not Set Not Set Set Day/Night Timer Select this feature to activate and set your TV's DAY/NIGHT PICTURE MODE automatically. This feature is not - Hitachi 55HDS69 | Owners Guide - Page 52
SET EVENT TIMER for more than three hours if you do not plan to control your television with the remote control. CAUTION: Do not use your TV as a deterrent when away from home by using the ON and OFF TIMERS. For safety, the TV should be turned off when you are away from home. On-Screen - Hitachi 55HDS69 | Owners Guide - Page 53
Locks Timers Setup Power Swivel Move SEL Select Setup Set The Menu Options Set The Screen Saver Set The Inputs Set The Closed Captions Set The Output Terminals CableCARD Information Set The Quick Start Options Reset The Software Move SEL Select Setup Set The Menu Options OR Set The Language - Hitachi 55HDS69 | Owners Guide - Page 54
OR OR Setup Set The Menu Options Set The Screen Saver Set The Inputs Set The Closed Captions Set The Output Terminals CableCARD Information Set The Quick Start Options Reset The Software Move SEL Select Setup Set The Screen Saver Main Picture Moving : Image Power : Screen Wipe : Option 1 Max - Hitachi 55HDS69 | Owners Guide - Page 55
will substitute for your video input device play button. However, intended operation is for use with your VCR, laserdisc, or DVD play button. 3. If no remote control button is pressed after the TV is turned on by AUTO LINK, the TV will automatically turn off after three hours. On-Screen Display 55 - Hitachi 55HDS69 | Owners Guide - Page 56
are the dialogue, narration, and/or sound effects of a television program or home video which are displayed on the TV screen. Your local TV program guide denotes these programs as or . Setup Set The Menu Options OR Set The Screen Saver Set The Inputs Set The Closed Captions 1. Use the CURSOR - Hitachi 55HDS69 | Owners Guide - Page 57
to a VCR or other A/V device. Setup Set The Menu Options OR Set The Screen Saver Set The Inputs Set The Closed Captions Set The Output Terminals CableCARD Information Set The Quick Start Options Reset The Software Move SEL Select TV Tuner Out: Select TV TUNER OUT to output the audio - Hitachi 55HDS69 | Owners Guide - Page 58
the TV's card slot and CableCARD pins for obstructions or damage. 6. If problems still remain, please contact your Cable Service Provider. Video Audio Channel Manager Locks Timers Setup Power Swivel Move SEL Select Setup Set The Menu Options OR Set The Screen Saver Set The Inputs Set The - Hitachi 55HDS69 | Owners Guide - Page 59
Setup Reset The Software OR Software Version # : Main Vxxxx.xxxx MMC Software Upgrade Upgrade Now Please Insert MMC card before upgrading. Reset TV Settings No Yes (Select "Yes" to return all settings to the factory default after main power OFF/ON.) Move SEL Return Reset TV Settings This - Hitachi 55HDS69 | Owners Guide - Page 60
the power cord from the wall. Wait 30 seconds and plug the power cord back in. Press the POWER SWITCH again. This protective technology should provide for years of lasting entertainment from your HITACHI Plasma Television. SYMPTOMS No Picture, no sound Sound OK, picture poor © Picture OK - Hitachi 55HDS69 | Owners Guide - Page 61
ignition systems, neon lamps, electrical drills, ghosting of the image and weak signals. BLACK SCREEN: When using an antenna, weak signals will display a black screen. It may be necessary to upgrade your antenna. Useful Information NOTE: The TV set can generate sound distortion in external - Hitachi 55HDS69 | Owners Guide - Page 62
ON or OFF Repeatedly turning the plasma television Power ON and OFF at short intervals may result in failure of the television. 13 Lip sync The on-screen motion of an actor's lips or other moving object may not be in sync with the associated audio heard from the TV's speakers. This is caused by - Hitachi 55HDS69 | Owners Guide - Page 63
the limits for a Class B digital device, pursuant to Part 15 of the FCC Rules. These supplied with the system must be replaced with identical cables in order to assure compliance with FCC rules. Order Hitachi spares as replacement cables. Note This Plasma Television receiver will display television - Hitachi 55HDS69 | Owners Guide - Page 64
• Bass Boost • Surround Sound • 36W • Soft Mute (50%) Supplied Accessories: • Remote Control • Batteries • 6' AC Cable • Table Top Stand (42" models only) • Ferrite Core (55" models only) Optional Accessories: • For U.S. Models: Please access our website: www.hitachi.us/tv INPUTS/OUTPUTS • Wideband - Hitachi 55HDS69 | Owners Guide - Page 65
Set Dimensions 42 Inch Models (Includes Table Top Stand) Weight (lbs./kg): 88/39.8 A K B LM C I D E J H G F N Units A B 104 713.2 648 485.3 393.2 328 926 526.6 108.5 18 90.5 365 55 Inch Models (Plasma Television Only) Weight (lbs./kg): 151/68.4 Useful Information Units A B C DE - Hitachi 55HDS69 | Owners Guide - Page 66
, 24 hours a day 1-800-HITACHI (1-800-448-2244) HITACHI AMERICA, LTD. HOME ELECTRONICS DIVISION HITACHI has made every effort to assure you hours of trouble free operation from your unit. However, should you require service, a network of HITACHI Authorized Service Facilities has been established in - Hitachi 55HDS69 | Owners Guide - Page 67
owner of a HITACHI brand digital television (the "DTV"), and HITACHI America, Ltd., Home Electronics Division ("HITACHI"). By using the DTV or the digital television software installed on the DTV (the "DTV Software") or any Upgrade procurement of substitute goods or services, or expenditures made or - Hitachi 55HDS69 | Owners Guide - Page 68
Version 2.1 as defined by the Free Software Foundation, Inc. The operating system software incorporated in this Hitachi TV is shown in the table below and the applicable license(s) are detailed on the following pages of this Owner's Guide. Software Module Linux Kernel busybox dhcpcd ifupdow - Hitachi 55HDS69 | Owners Guide - Page 69
free software, we are referring to freedom, not price. Our General Public Licenses are designed to make sure that you have the freedom to distribute copies of free software (and charge for this service if you wish), that you receive source code sections as part of a whole which is a work based on the - Hitachi 55HDS69 | Owners Guide - Page 70
distribute the Program (or a work based on it, under Section 2) in object code or executable form under the terms of terminated so long as such parties remain in full compliance. 5. You are not required to Free Software Foundation. 10. If you wish to incorporate parts of the Program into other free - Hitachi 55HDS69 | Owners Guide - Page 71
should have at least the "copyright" line and a pointer to where the full notice is found. - Hitachi 55HDS69 | Owners Guide - Page 72
below. When we speak of free software, we are referring to freedom of use, not price. Our General Public Licenses are designed to make sure that you have the freedom to distribute copies of free software (and charge for this service if you wish); that you receive source code or can get it if you - Hitachi 55HDS69 | Owners Guide - Page 73
only if its contents constitute a work based on the Library (independent of the modified work must itself be a software library. b) You must cause the or a table of data to be supplied by an application program that uses the useful when you wish to copy part of the code of the Library into a program - Hitachi 55HDS69 | Owners Guide - Page 74
covered by this License. You must supply a copy of this License. If with the complete corresponding machine-readable source code for the Library including whatever changes were library of the fact that part of it is a work based on the Library, and of the free software distribution system which - Hitachi 55HDS69 | Owners Guide - Page 75
published by the Free Software Foundation. 14. If you wish to incorporate parts of the Library into other free programs whose distribution SHOULD THE LIBRARY PROVE DEFECTIVE, YOU ASSUME THE COST OF ALL NECESSARY SERVICING, REPAIR OR CORRECTION. 16. IN NO EVENT UNLESS REQUIRED BY APPLICABLE LAW OR - Hitachi 55HDS69 | Owners Guide - Page 76
Appendix A: Picture Format No 4x3 No No Y P BP R 1080i/720p No 16x9 Yes Ye s HDMI 1080i/720p No 16x9 Yes Ye s 480p Auto ON 16x 9 Y es Initial tte r No No 4x3 No No No Info Yes No Auto OF F No Ye s No Video NTSC Auto ON 16x 9 Y es Initial No S -V ideo L e tte r No - Hitachi 55HDS69 | Owners Guide - Page 77
(Continuation ) Input S ignal Auto As pect Input 4 YPBPR 1080i/720p 480p 480i No Auto ON V ideo No Signal NTS C Auto OF F No Auto ON Input 5 HDMI Auto OF F 1080i/720p No 480p 480i Auto ON YPBPR Auto OF F 1080i/720p No 480p Auto ON 480i V ideo No Signal NTS C Auto OF - Hitachi 55HDS69 | Owners Guide - Page 78
Favorite Channel 27 Freeze 24,30 H HDMI 16,20 Timers 50-52 Tint 37 Treble 40 V I Video Settings 37-39 Input Setup 26,55 L Language Menu Language 53 Locks Change Access Code 44 Channel Lock 44 Front Panel Lock 44 Movie Ratings 45 TV Ratings 46 TV Ratings (Canadian - English 47 78 - Hitachi 55HDS69 | Owners Guide - Page 79
Notes 79 - Hitachi 55HDS69 | Owners Guide - Page 80
QR66761
-
 1
1 -
 2
2 -
 3
3 -
 4
4 -
 5
5 -
 6
6 -
 7
7 -
8
-
9
-
10
-
11
-
12
-
13
-
14
-
15
-
16
-
17
-
18
-
19
-
20
-
21
-
22
-
23
-
24
-
25
-
26
-
27
-
28
-
29
-
30
-
31
-
32
-
33
-
34
-
35
-
36
-
37
-
38
-
39
-
40
-
41
-
42
-
43
-
44
-
45
-
46
-
47
-
48
-
49
-
50
-
51
-
52
-
53
-
54
-
55
-
56
-
57
-
58
-
59
-
60
-
61
-
62
-
63
-
64
-
65
-
66
-
67
-
68
-
69
-
70
-
71
-
72
-
73
-
74
-
75
-
76
-
77
-
78
-
79
-
80
 |
 |

PLASMA TELEVISION
Operating Guide for
42HDS69 and 55HDS69
IMPORTANT SAFETY INSTRUCTIONS
.......................................................................................
2-3
FIRST TIME USE
.......................................................................................................................
4-22
THE REMOTE CONTROL
........................................................................................................
23-34
ON-SCREEN DISPLAY
............................................................................................................
35-59
USEFUL INFORMATION
..........................................................................................................
60-66
END USER LICENSE AGREEMENT FOR HITACHI DTV SOFTWARE
...........................................
67-75
APPENDIXES
............................................................................................................................
76-77
INDEX
.............................................................................................................................................
78
As an Energy Star
®
Partner,
Hitachi, Ltd. has determined
that this product meets the
Energy Star
®
guidelines for
energy efficiency.
CH1 Updated 12/13/2007