Hitachi 55HDX61 Owners Guide
Hitachi 55HDX61 Manual
 |
View all Hitachi 55HDX61 manuals
Add to My Manuals
Save this manual to your list of manuals |
Hitachi 55HDX61 manual content summary:
- Hitachi 55HDX61 | Owners Guide - Page 1
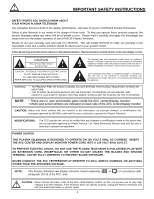
PLASMA TELEVISION AVC (Audio Video Control Center) & Plasma Display Monitor Operating Guide for 42HDX61, 55HDX61 IMPORTANT SAFETY INSTRUCTIONS 2-3 FIRST TIME USE ...4-26 THE REMOTE CONTROL 27-50 ON-SCREEN DISPLAY...51-78 USING THE RGB INPUT OF THE PLASMA TV 79-88 USEFUL INFORMATION INDEX 89-99 - Hitachi 55HDX61 | Owners Guide - Page 2
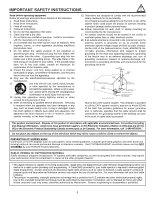
on back side of the AVC center/display monitor. CAUTION: Adjust only those controls that are covered in the instructions, as improper changes or modifications not expressly approved by HITACHI could void the user's authority to operate the Plasma Television. MODIFICATIONS: The FCC requires the - Hitachi 55HDX61 | Owners Guide - Page 3
Refer all servicing to qualified service personnel. Servicing is required when the apparatus has been damaged in any way, such as power-supply cord or digital cable services such as video-on-demand, a cable operator's enhanced program guide and data-enhanced television services may require - Hitachi 55HDX61 | Owners Guide - Page 4
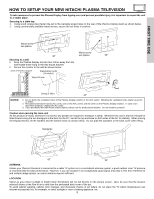
not provide adequate ventilation for the electronics or proper support for the front glass panel. This plasma television product is designed for a maximum tilting angle of 45 degrees from vertical. This TTB55 stand for use only with Hitachi 55HDX61. Use with other apparatus is capable of resulting - Hitachi 55HDX61 | Owners Guide - Page 5
below. Do not grab the speakers or the back cover when lifting. Handgrips 42" 55" ANTENNA Unless your Plasma Television is connected to a cable TV system or to a centralized antenna system, a good outdoor color TV antenna is recommended for best performance. However, if you are located in an - Hitachi 55HDX61 | Owners Guide - Page 6
environment of PDP temperature. Moreover, since there is also high power consumption value, a specified television (temperature) temperature environment is required. 14 Caution on prolonged storage Storing the plasma television for a period of more than 2 to 3 months without use might - Hitachi 55HDX61 | Owners Guide - Page 7
be set correctly to display the signal on the Plasma Television. Monitor Connection Cable (Provided) This cable is used to connect the Display Monitor to the AVC Center. Optical Cable This cable is used to connect to an audio amplifier with an Optical Audio In jack. Use this cable for the best - Hitachi 55HDX61 | Owners Guide - Page 8
. When both VHF and UHF antennas are connected Attach an optional antenna cable mixer to the TV antenna terminal, and connect the cables to the antenna mixer. Consult your dealer or service store for the antenna mixer. ANT B To UHF antenna ANT A To outdoor VHF or UHF antenna To outdoor antenna - Hitachi 55HDX61 | Owners Guide - Page 9
55" DISPLAY MONITOR ቭቩ STANDBY (RED) ON (GREEN) MAIN POWER ቩቧ ቨ (AVC) AUDIO VIDEO CONTROL CENTER POWER STANDBY (RED) ON (GREEN) VOL- VOL+ CH- CH+ INPUT/EXIT ቧ ቨ ቦ ብቤ STANDBY (RED) ON (GREEN) ቩቧ ቨ AUDIO VIDEO CONTROL CENTER top right corner of the TV screen. These buttons also serve - Hitachi 55HDX61 | Owners Guide - Page 10
. NOTES: 1. 2. Your HITACHI Plasma TV will appear to be turned OFF (lights orange) if there is no video input when VIDEO: 1, 2, 3, 4, 5, or RGB is selected. Check the Power Light to make sure the Display Monitor is turned off or in Stand-by mode (lights red) when not in use. Remote Control can not - Hitachi 55HDX61 | Owners Guide - Page 11
FIRST TIME USE REAR PANEL JACKS Audio Video Control Center (AVC) ቢ ቯ ቦ ቨቪ ቫ ትታ ብ ቤ ባ ቧ ቭ ቮቩ 42" Monitor Bottom View 55" Monitor Bottom View ቢ Antenna Input The remote control allows you to switch between two separate 75-Ohm RF antenna inputs, ANT A and ANT B. ANT A input can be - Hitachi 55HDX61 | Owners Guide - Page 12
will allow you to control the external components with your Plasma Television's remote control in TV mode. ቮ RS232C Input For use with third party home Audio/Video control systems which are commercially available. Please see your dealer regarding these "non Hitachi" home control systems (see page 77 - Hitachi 55HDX61 | Owners Guide - Page 13
the CableCARD is properly installed or not installed, the TV will display the following respective screens. CableCARD is installed exit the second screen. Acquiring Data. Please wait. In order to start cable service for this device, please contact your cable provider CableCARD(tm): 123-456-789-1 - Hitachi 55HDX61 | Owners Guide - Page 14
Display Monitor 55" To AC outlet Core To AC outlet Core NOTE: Please use HITACHI specified cable. TO MONITOR AC IN Back of AVC Center TruBass SRS AVC Front panel of AVC PHONES S-VIDEO INPUT 5 AUDIO VIDEO L/(MONO) R PHONES S-VIDEO INPUT 5 AUDIO VIDEO L/(MONO) R NOTES: 1. Completely - Hitachi 55HDX61 | Owners Guide - Page 15
connect the VCR, camcorder, laserdisc player, DVD player, or HDTV Set Top Box to your Plasma TV is dependent on the model and features of each component. Check the owner's manual of each component for the location of video and audio inputs and outputs. The following connection diagrams are offered - Hitachi 55HDX61 | Owners Guide - Page 16
VIDEO) jack, as shown on the AVC Center below. 2. Connect the cable from the AUDIO OUT R of the VCR or the laserdisc player to the INPUT (AUDIO/R) jack. 3. Connect the cable from the AUDIO own video or line output (INPUT: 4 in example on page 25). Refer to your VCR operating guide for more information - Hitachi 55HDX61 | Owners Guide - Page 17
VIDEO) jack, as shown on the AVC Center below. 2. Connect the cable from the AUDIO OUT R of the VCR or the laserdisc player to the INPUT (AUDIO/R) jack. 3. Connect the cable from the AUDIO own video or line output (INPUT: 4 in example on page 25). Refer to your VCR operating guide for more information - Hitachi 55HDX61 | Owners Guide - Page 18
to the HDMI input as shown on the AVC Center below. 2. With DVI output, connect the cable from the AUDIO OUT R of the HDTV set top box or DVD player to the INPUT (AUDIO/R) jack. 3. With DVI output, connect the cable from the AUDIO OUT L of the HDTV set top box or DVD player to the - Hitachi 55HDX61 | Owners Guide - Page 19
HDTV set top box to the INPUT (Y) jack, as shown on the AVC Center below. 2. Connect the cable from the CB/PB OUT or B-Y OUT of the Laserdisc/DVD player or HDTV previous channel. OUTPUT L R Y PB PR OR HDTV Set-Top Box DVD Player OUTPUT Back of VIDEO AUDIO DVD Player PR/CR PB/CB Y L R NOTE - Hitachi 55HDX61 | Owners Guide - Page 20
the AVC Center below. IEEE 1394 allows the plasma television and the external device to communicate with one another. When using IEEE1394 connections, you enable video and audio digital data exchange between a compatible device. This connection also enables you to control basic equipment functions - Hitachi 55HDX61 | Owners Guide - Page 21
CONNECTING EXTERNAL AUDIO/VIDEO DEVICES CONNECTING EXTERNAL AUDIO AMPLIFIER To monitor the audio level of the Plasma TV to an external audio amplifier, connect the system as shown below. The "OPTICAL OUT" from the AVC center is a fixed output. The Volume of the amplifier is controlled by the - Hitachi 55HDX61 | Owners Guide - Page 22
it allows your IR Mouse connector to control your equipment using your Hitachi Plasma TV Remote Control. You can use your Hitachi remote control to control the Audio/Video equipment command without the equipment's remote control. The Plasma Television AVC Center has 2 IR BLASTER jacks. Each IR Mouse - Hitachi 55HDX61 | Owners Guide - Page 23
Custom) ( ) STB2 (Custom) List MODIFY Move SEL Select DVD Device Code - - - - (Enter Code "9999" to uninstall) Video Input No Connection Audio Input No Connection Transmission Test BACK POWER OK PLAY EXIT CH UP Move 0-9 Input Find your DVD 4-digit manufacturers code and enter it here - Hitachi 55HDX61 | Owners Guide - Page 24
AUDIO/VIDEO CODES FOR AV NETWORK (not for remote control) FIRST TIME USE VCR BRAND CODE Admiral 0048, 0209 Echostar 1005, 0775 Expressvu 0775 GE 0566 GOI 0775 General Instrument 0869 HTS 0775 Hitachi 0819 Hughes Network Systems 1142, 0749, 1749 JVC 0775 Magnavox 0724, 0722 Memorex - Hitachi 55HDX61 | Owners Guide - Page 25
PANEL CONNECTIONS Outside antenna or cable TV coaxial cable 2-Way signal splitter VCR #1 ANT OUTPUT IN S-VIDEO V L R Rear Panel of Display Monitor DIGITAL OUTPUT CAPABILITY DIGITAL OUTPUT AUDIO OUT DVI to HDMI 54321 10 9 8 7 6 15 14 13 12 11 RGB OUTPUT AUDIO OUT Subwoofer Stereo/Amplifier - Hitachi 55HDX61 | Owners Guide - Page 26
Use these connections in place of the standard video connection if your device has this feature. • If your device has only one audio output (mono sound), connect it to the left audio jack on the AVC Center. • Refer to the operating guide of your other electronic equipment for additional information - Hitachi 55HDX61 | Owners Guide - Page 27
REMOTE CONTROL A/V NET GUIDE THE REMOTE CONTROL In addition to controlling all the functions on your HITACHI Plasma TV, the new remote control is designed to operate different types of VCRs, CATV (Cable TV) converters, set-top-box, satellite receiver, DVD players, and other audio/video equipment - Hitachi 55HDX61 | Owners Guide - Page 28
A/V NET GUIDE TO CONTROL YOUR PLASMA TV ቢ ባ ቤ ብ ቦ ቧ ቩ ቨ ቯ ቪ ቭ ቮ ቫ ቱ ተ ቲ ታ ታ ቴ ት THE REMOTE CONTROL ቢ POWER button Press this button to turn the TV set on or off when the remote is in TV mode. (See page 27 for instructions on how to set the remote control to TV mode.) ባ MODE - Hitachi 55HDX61 | Owners Guide - Page 29
GUIDE TO CONTROL YOUR PLASMA TV by linearly increasing image expansion from the center towards the edges of the display area Use this aspect mode to display 16:9 sources like HDTV and DVD's preserving the original 16:9 aspect ratio. 55" Model only. 5. Depending on the Aspect selection, Closed - Hitachi 55HDX61 | Owners Guide - Page 30
HOW TO USE THE REMOTE A/V NET GUIDE TO CONTROL YOUR PLASMA TV ቨ DAY/NIGHT button Press this button to Press the SELECT button to tune the subchannel of choice. NOTE: The availability of Channel Guide Information will depend on the type of Antenna input (Analog, Digital) and Cable subscription. ቭ - Hitachi 55HDX61 | Owners Guide - Page 31
HOW TO USE THE REMOTE A/V NET GUIDE TO CONTROL YOUR PLASMA TV ቯ AV NET button Press this button to access the Audio/Video network (AV Net) menu. The AV Net allows the user to control external components with the Plasma TV's remote control. When you press the AV NET button, the following window will - Hitachi 55HDX61 | Owners Guide - Page 32
HOW TO USE THE REMOTE A/V NET GUIDE TO CONTROL YOUR PLASMA TV AV NET LEARNING WIZARD This function of the AV NET makes it more expandable because it allows the user to use equipment that is not supported by the pre-code library, listed on page 24. For example, after programming your equipment to - Hitachi 55HDX61 | Owners Guide - Page 33
THE REMOTE A/V NET GUIDE TO CONTROL YOUR PLASMA TV ተ INPUTS button When the remote control is in TV mode, press this button 1 for Video 1. Select to choose Input 2 for Video 2. Select to choose Input 3 for Video 3. Select to choose Input 4 for Video 4. Select to choose Input 5 for Video 5. Select - Hitachi 55HDX61 | Owners Guide - Page 34
GUIDE TO CONTROL YOUR PLASMA TV PHOTO INPUT This feature is useful for viewing digital still pictures from your digital camera using the Photo Input in the front panel of the TV. Photo Input Ant B Ant A Input 1 Input 2 THE REMOTE CONTROL cameras with low battery power may not properly display - Hitachi 55HDX61 | Owners Guide - Page 35
HOW TO USE THE REMOTE A/V NET GUIDE TO CONTROL YOUR PLASMA TV SLIDESHOW Select this menu item to start directory then should be placed on a main directory with a "dcim" file name format. 3. Supported image types are up to 3072 x 2304; JPEG format should conform with DCF Standard (Design rule for - Hitachi 55HDX61 | Owners Guide - Page 36
A/V NET GUIDE CONTROL YOUR PLASMA TV IEEE1394 Use this function to control your devices with Video Camcorder) or a PC. 4. The On-Screen-Display will not disappear until the EXIT button is pressed. 5. Not all devices with IEEE1394 capability are compatible with this TV. Any compatibility problems - Hitachi 55HDX61 | Owners Guide - Page 37
HOW TO USE THE REMOTE A/V NET GUIDE TO CONTROL YOUR PLASMA TV ቱ INFO button Press this button when you want to check the channel being received, the picture source, if the channel has stereo (ST) or second audio program (SAP), the time, CHANNEL ID and if the TIMER is set. ANALOG CHANNELS 3:32 - Hitachi 55HDX61 | Owners Guide - Page 38
HOW TO USE THE REMOTE A/V NET GUIDE TO CONTROL YOUR PLASMA TV ቲ VOLUME (VOL) WHEEL, MUTE button Use the VOL WHEEL (̆ or set to AUTO (see page 76). When the TV power is turned off at a volume level 31 or greater, the volume level will default to 30 when the TV is turned on. However, if it is set - Hitachi 55HDX61 | Owners Guide - Page 39
REMOTE CONTROL A/V NET GUIDE PICTURE-IN-PICTURE (PIP) Your HITACHI Plasma TV incorporates Two Tuner technology designed for improved viewing enjoyment. This Two Tuner feature allows you to view antenna inputs on both the main picture and sub-picture simultaneously, with separate tuning control for - Hitachi 55HDX61 | Owners Guide - Page 40
THE REMOTE CONTROL A/V NET GUIDE PICTURE-IN-PICTURE (PIP) PIP MODE PICTURE-IN-PICTURE This feature is only available with a 1080i component input or Digital signal. To prevent a pattern burn, - Hitachi 55HDX61 | Owners Guide - Page 41
A/V NET GUIDE PICTURE-IN-PICTURE (PIP) ባ PAUSE button If you wish to freeze the will freeze). Press the EXIT button to return to normal viewing. Main Picture Sub Picture THE REMOTE CONTROL STROBE FREEZE Press the PAUSE button to freeze three frames of the picture you are currently viewing (only - Hitachi 55HDX61 | Owners Guide - Page 42
accepted. 5. Aim the remote at the cable box and press the POWER button. The remote will turn off your cable box when the correct four TV buttons These buttons are for operating the TV. ባ A/V NET ቢ ባ GUIDE ባ ቢ ቢ THE REMOTE CONTROL MY CABLE BOX CODE IS: NOTE: Refer to instruction manual - Hitachi 55HDX61 | Owners Guide - Page 43
ባ GUIDE ቢ PRE-CODED SET-TOP-BOX/SATELLITE RECEIVER buttons ባ ቢ These buttons transmit the chosen pre-coded set-topbox/satellite codes. ቢ ባ EXCLUSIVE TV buttons These buttons are for operating the TV. THE REMOTE CONTROL MY SATELLITE RECEIVER/STB CODE IS: NOTE: Refer to instruction manual - Hitachi 55HDX61 | Owners Guide - Page 44
accepted. 5. Aim the remote at the DVD player and press the POWER button. The remote will turn off your DVD player when the correct four digit EXCLUSIVE TV Buttons These buttons are for operating the TV. ባ GUIDE ባ ቢ THE REMOTE CONTROL MY DVD PLAYER CODE IS: NOTE: Refer to instruction manual of - Hitachi 55HDX61 | Owners Guide - Page 45
the POWER button. The remote will turn off your PVR when the correct four digit preset code is entered. When this occurs, the remote control TV Buttons These buttons are for operating the TV. ቢ ቢ ባ A/V NET ቢ GUIDE ባ ቢ ቢ THE REMOTE CONTROL MY VCR/PVR CODE IS: NOTE: Refer to instruction manual - Hitachi 55HDX61 | Owners Guide - Page 46
are removed from the remote control. After replacing the batteries repeat the entire programming procedure as stated above. 4. CD precode library is included in the AMP mode. Default device for this mode is Hitachi Audio/Video Receiver (AVR/AMP). 5. INPUT, GUIDE, Channel (up/down), Volume (up - Hitachi 55HDX61 | Owners Guide - Page 47
HOW TO USE THE REMOTE "ENT" BUTTON TO A/V NET GUIDE ACCESS THE SPECIFIED INPUT OF THE PLASMA TV INPUT ACCESS This optional feature allows the user of the remote control to setup it's ENTER (ENT) button to access the specified input of the TV. Setup for this feature is applicable to the remote - Hitachi 55HDX61 | Owners Guide - Page 48
button to start the On-Screen Display. ቫ AV NET button Press this button to access the Audio/Video network (AV Net) menu. The AV Net allows the user to control external components with the TV's remote control. (See complete explanation and example on pages 31-32) NOTE: The Simple Remote cannot be - Hitachi 55HDX61 | Owners Guide - Page 49
GUIDE AUDIO CODES FOR REMOTE CONTROL 0761 Garrard 0000 Gateway 1972 Go Video 0432, 0526 GoldStar 0037, Hitachi 0000, 0041, 0042, 0105 Howard Computers 1972 Hughes Network Systems 0042 iBuy Power , 0035 Marta 0037 Matsushita 0035, 0162, 1162 Media Center PC 1972 Memorex . . . . 0035, 0162, - Hitachi 55HDX61 | Owners Guide - Page 50
SATELLITE, DVD AND A/V NET GUIDE AUDIO CODES FOR REMOTE CONTROL NSC 0063 Novaplex 0618 Oak . . . . 0891, 0110, 0189 Hewlett Packard 1181 Hitachi 0228 Integra 0135 JBL 0110 JVC 0074, 1263 KLH 1428 1126 Sharp 1010 Sony 0639 PERSONAL VIDEO RECORDER BRAND CODE Panasonic 0616 Philips - Hitachi 55HDX61 | Owners Guide - Page 51
from a menu. 4. Press the A/V NET button on the remote control to access the AV Network menu to control external components. This part of the screen shows which selections are available. Video Audio Aspect Chan. Manager Locks Timers Setup Power Swivel Move SEL Sel. This part of the screen shows - Hitachi 55HDX61 | Owners Guide - Page 52
Color Tint Sharpness Color Temperature Black Enhancement Contrast Mode Reset Video Settings Color Management Color Decoding Auto Color Noise Reduction Auto Movie Mode Treble Bass Balance SRS TruBass Matrix Surround Audio Source Internal Speakers Auto Noise Cancel Perfect Volume Language Digital - Hitachi 55HDX61 | Owners Guide - Page 53
feature. Select to upgrade TV software. Set the IEEE 1394 function in stand by. Controls the motorized stand. Power Swivel enabled. Control the motorized stand. Power Swivel disabled. NOTES: cable operator is installed in the rear panel of the Audio Video Control Center (AVC). ON-SCREEN DISPLAY 53 - Hitachi 55HDX61 | Owners Guide - Page 54
optimize your TV's performance. Video Audio Aspect Chan. Manager Locks Timers Setup Power Swivel Move SEL Sel. Video Picture Enhancement Contrast Mode Auto Color Noise Reduction Color Management (Set User Colors) Auto Movie Mode (TV/Cinema Detection) 42" Day 55" 100% 50% 50% 50% 50% High Middle - Hitachi 55HDX61 | Owners Guide - Page 55
VIDEO Video Audio Aspect Chan. Manager Locks Timers Setup Power Swivel Move SEL Sel. Video Picture Mode Contrast Brightness Color Tint Sharpness Color Temperature Black Enhancement Contrast Mode Reset Video picture quality when using the COMPONENT VIDEO Y-PBPR input jacks. Contrast Mode Use - Hitachi 55HDX61 | Owners Guide - Page 56
Management Color Decoding Auto Color Noise Reduction Auto Movie Mode Move SEL Select Off Low Off Video Color Management Set User Colors Magenta Red Yellow Green Cyan Blue Reset Phase 50% 50% 50% 50% 50% 50% Move SEL Return Gain 50% 50% 50% 50% 50% 50% - Hitachi 55HDX61 | Owners Guide - Page 57
using Component or DVI-HDTV input, Auto Color OFF if the TV experiences picture blocking. VIDEO menu, your Hitachi Plasma Television will activate the circuitry for this special feature to improve video VIDEO, 480i 480p/720p/1080i 55" AVAILABLE GRAYED OUT 42" AVAILABLE GRAYED OUT 2. All Video - Hitachi 55HDX61 | Owners Guide - Page 58
. Treble This function controls the high frequency audio to all speakers. Bass This function controls the low frequency audio to all speakers. Balance This function will control the left to right balance of the Plasma TV internal speakers. TruBass is an audio enhancement technology from SRS - Hitachi 55HDX61 | Owners Guide - Page 59
the output of loud sound at night but also to raise the volume of low sound. This is only effective when the TV is connected via the optical out (digital audio) to an amplifier/receiver with a Dolby® Digital decoder. The default setting is ON. Use the CURSOR PAD ̇, ̈ to select the chosen - Hitachi 55HDX61 | Owners Guide - Page 60
the Picture Format Aspect Ratio. ASPECT Video Audio Aspect Chan. Manager Locks Timers Setup Power Swivel Move SEL Sel. Aspect Mode picture with 480i/480P signal. Adjustable range is -10 (video center is toward bottom of screen) to +10 (video center is toward top of screen). Press CURSOR PAD ̆, - Hitachi 55HDX61 | Owners Guide - Page 61
Channel Manager to set your Antenna options, run Auto Channel Scan, Check Signal Meter and Set Channel Manager List. Video Audio Aspect Chan. Manager Locks Timers Setup Power Swivel Move SEL Sel. Chan. Manager Set The Antenna Auto Channel Scan Signal Meter Channel List Move SEL Return Press - Hitachi 55HDX61 | Owners Guide - Page 62
"close" to exit. NOTE: The Signal Meter will not be available (grayed out) when watching analog channels. Channel List This function allows you to review which channels are labeled (CH ID), which have been added to Channel Memory (SCAN), which are protected by LOCK and which are your Favorite (FAV - Hitachi 55HDX61 | Owners Guide - Page 63
the Power button. When MOVIE RATINGS is selected, you can block various types of movies and video tapes based on motion picture ratings. Picturein-Picture will also be blocked automatically (see page 64). When TV RATINGS is selected, various types of television programming based on a parental guide - Hitachi 55HDX61 | Owners Guide - Page 64
, the TV will not block it. 2. Blocking "NOT RATED (NR)" programs may block emergency programming, sports, news, public service announcements, alerting the general public. When you receive such messages, the Projection Television will immediately tune to an EAS channel as directed by the EAS - Hitachi 55HDX61 | Owners Guide - Page 65
RATINGS that you have selected. Press EXIT to quit the menu or select TV RATINGS to return to the previous menu. TV Parental Guide Ratings Chart N/A TV-Y TV-Y7 TV-G TV-PG TV-14 TV-MA FV V S L D None. All children. The themes and elements in this program are specifically designed for a very young - Hitachi 55HDX61 | Owners Guide - Page 66
Ratings Use Canadian Ratings (Eng) to block any type of movie and television program in Canada that (Eng) you feel might be inappropriate in its content. Locks Change Access Code Engage Lock TV Time Lock Movie Ratings TV Ratings Canadian Ratings (Eng) Canadian Ratings (Frn) Move SEL Return Locks - Hitachi 55HDX61 | Owners Guide - Page 67
in its content. Locks Change Access Code Engage Lock TV Time Lock Movie Ratings TV Ratings Canadian Ratings (Eng) Canadian Ratings (Frn) Move selected. Once rating is selected, for example 8 ans+, all movies and television programs rated 8 ans+ and higher will be automatically blocked. Press EXIT to - Hitachi 55HDX61 | Owners Guide - Page 68
Sleep Timer, Event Timer and Day/Night Timer Recordings. Video Audio Aspect Chan. Manager Locks Timers Setup Power Swivel Move SEL Sel. Timers Set The Clock Set Saving Correction" is checked "✓", the TV will automatically calculate the clock adjustment for Daylight Saving. ON-SCREEN DISPLAY 68 - Hitachi 55HDX61 | Owners Guide - Page 69
to set your Timer from 0:00, 0:30, 1:00, 1:30, 2:00, 2:30 and 3:00. Set Day/Night Timer Select this feature to activate and set your TV's Day/Night Picture Mode automatically. Timers Set The Clock Set Sleep Timer Set Day/Night Timer Set Event Timer Set Timer Recording Move SEL Select - Hitachi 55HDX61 | Owners Guide - Page 70
Event Timer for more than three hours if you do not plan to control your television with the remote control. CAUTION: Do not use your TV as a deterrent when away from home by using the On and Off Timers. For safety, the TV should be turned off when you are away from home. 70 ON - Hitachi 55HDX61 | Owners Guide - Page 71
priority over the Event Timer. If the Timer Recording is set at the same time as the Event Timer or overlaps with each other, the TV will only perform the function of the Timer Recording. ON-SCREEN DISPLAY 71 - Hitachi 55HDX61 | Owners Guide - Page 72
TV for the first time. Use the CURSOR PAD ̆ or ̄ on the remote to highlight the function desired. Video Audio Aspect Chan. Manager Locks Timers Setup Power Set Monitor Out Move SEL Select Setup CableCARD Info. Set AV Control Upgrades Set Stand-By Mode Move SEL Return Use CURSOR PAD to select the - Hitachi 55HDX61 | Owners Guide - Page 73
such as video games, stock market quotations, computer generated graphics, and other fixed (non-moving) patterns can cause permanent damage to the Plasma Television. Use the Saver Picture's Movement ON-SCREEN DISPLAY Image Power This function allows you to choose Power Consumption reduction. 73 - Hitachi 55HDX61 | Owners Guide - Page 74
names to original factory preset condition. NOTE: The video input name will be displayed only when video input is displayed as main picture. Video Power Save Use this feature to reduce power consumption for video input when there is no video input signal. In RGB mode, this feature will always be - Hitachi 55HDX61 | Owners Guide - Page 75
CAM CBL CBL2 Reset DVD DVD2 DVD3 LD Auto Link Auto Remote Video Power Save Move SEL Return PVR PVR2 SAT STB Off STB2 VCR VCR2 reset and will turn on your TV as described above. 2. When using REMOTE mode, any remote control button will substitute for your video input device play button. However, - Hitachi 55HDX61 | Owners Guide - Page 76
sound effects of a television program or home video which are displayed on the TV screen. Your local TV program guide denotes these programs as Service: [1 2 3 4 5 6] Language: [Unknown ] Font : [Default 1 2 3 4 5 6 7 8] Size : Standard Small Large Style : Standard High Visibility [HITACHI - Hitachi 55HDX61 | Owners Guide - Page 77
RS232C Move SEL Return Use the CURSOR PADS and the SELECT button to check the Connected RS232C box. NOTE: For use with third party home Audio/Video control systems which are commercially available. Please see your dealer regarding these "non Hitachi" home control systems. ON-SCREEN DISPLAY 77 - Hitachi 55HDX61 | Owners Guide - Page 78
set to OFF to return your TV set to the power saving Stand-By mode. Power Swivel This feature controls the motorized stand. It allows the customer to turn the plasma display left or right using the remote control. This feature is optional for the 55" model. Video Audio Aspect Chan. Manager Locks - Hitachi 55HDX61 | Owners Guide - Page 79
14 13 12 11 SET-TOP-BOX AUDIO OUT D-SUB 15 Pin RGB Cable (Optional) Audio Cable (Optional) This Plasma Television can automatically detect and display the signal (1024 x 768) and SVGA (800 x 600) for 55". 2. Always reset AUTO ADJUST feature when setting new display setting or when changing to a - Hitachi 55HDX61 | Owners Guide - Page 80
additional new settings (more than 15) will over-write the first user's setting, second setting and so on. 3. Operation in RGB mode in relation to TV functions are shown below. No. Item 1 Video Control 2 AV Net 3 Audio Settings 4 Closed Caption 5 Clock 6 Monitor Out 7 Lock 8 Auto Link Operation - Hitachi 55HDX61 | Owners Guide - Page 81
signal will not appear at all when receiving a signal which is not supported by this product. If the setting is wrong, the Display Monitor will display: NO SYNC. SIGNAL INVALID SCAN FREQ. Without sync POWER SAVING mode will come on after 10 seconds. Either horizontal or vertical - Hitachi 55HDX61 | Owners Guide - Page 82
button, then use the CURSOR PAD and SELECT button on the remote control to display the different features in RGB MODE. 2. Press EXIT on the remote control to quickly exit from a menu. USING THE RGB INPUT Video Aspect Setup Power Swivel Move SEL Sel This part of the screen shows which Remote - Hitachi 55HDX61 | Owners Guide - Page 83
Off, Low, Medium or High). Recall the factory preset data of the RGB Video Settings. Aspect Setup Power Swivel Real Normal Full WXGA Mode Aspect as it is presented in its true resolution in standard mode. Unlock Lock Power Swivel enabled. Controls motorized stand. Power Swivel disabled. 83 - Hitachi 55HDX61 | Owners Guide - Page 84
can be set up to 110% if CURSOR PAD ̈ is pressed and held for more than 3 seconds. 2. See TV contrast feature for additional information regarding contrast. BRIGHTNESS Video Contrast Brightness Color Temperature Enhancer Reset Move SEL Select This feature allows you to adjust brightness in RGB - Hitachi 55HDX61 | Owners Guide - Page 85
to quit. RESET Set CONTRAST, BRIGHTNESS, COLOR TEMPERATURE, and ENHANCER to factory preset condition. Video Contrast Brightness Color Temperature Enhancer Reset Move SEL Select 100% 50% High Off Reset Use 95% of information can be displayed (5% is treated as overscan). 4. 55" Model only. 85 - Hitachi 55HDX61 | Owners Guide - Page 86
. • Allow the Plasma TV to warm up for 20 minutes before performing AUTO ADJUST. • Select a bright image for display while AUTO ADJUST takes place. • If AUTO ADJUST terminates unsuccessfully, try AUTO ADJUST again. If AUTO ADJUST fails several times in succession, try using manual - Hitachi 55HDX61 | Owners Guide - Page 87
USING THE RGB INPUT RGB ON SCREEN DISPLAY Adjusts the pixel clock frequency to reduce the vertical stripe. HORIZONTAL CLOCK Setup Auto Adjust Horizontal Position Vertical Position Horizontal Clock Clock Phase Reset Input Level Black Side Panel Move SEL Select Adjust 0 0 0 0 Reset 0.7V Off Use - Hitachi 55HDX61 | Owners Guide - Page 88
to turn the plasma display left or right using the remote control. Video Audio Aspect Chan. Manager Locks Timers Setup Power Swivel Move SEL Sel. Power Swivel Move Unlocked SEL Set Exit OSD menu system before controlling the motorized stand. Use CURSOR PAD ̈ to rotate the TV to the right - Hitachi 55HDX61 | Owners Guide - Page 89
Plasma Television away from extreme heat, humidity, and extremely dusty places. Remove the plug (AVC Center/Display Monitor) from the wall outlet if your Plasma Television tape on your Plasma Television. Avoid repeatedly touching the screen. Do not subject the remote control to shocks such - Hitachi 55HDX61 | Owners Guide - Page 90
. • SNOW: If your receiver is located in the fringe area of a television station where the signal is weak, your picture may be marred by the appearance than the monitor. If you find a problem receiving Radio when using the monitor, check the instructions mentioned above. • Adjust the horizontal clock - Hitachi 55HDX61 | Owners Guide - Page 91
USEFUL INFO SYMPTOMS No Picture, no sound Sound OK, picture poor © Picture OK, sound poor © Picture blurred © Lines or streaks in picture Poor reception on some channels Picture rolls vertically No color © Poor color © © ©©© © © ©©© © © ©©© © © ©©© © © © ©©© © ©©© 91 - Hitachi 55HDX61 | Owners Guide - Page 92
& play. When a Plug and Play PC is powered on, it sends a command to the Monitor requesting DDCTM is a trademark of Video Electronics Standard Association. IBM Television Apparatus- Tèlèvision câblocompatible, Canada. Notes on Closed Caption: This Plasma Television receiver will display television - Hitachi 55HDX61 | Owners Guide - Page 93
used in accordance with the instructions, may cause harmful interference experienced radio/television technician for help. Modifications The FCC requires the user to be notified supplied with the system must be replaced with identical cables in order to assure compliance with FCC rules. Order Hitachi - Hitachi 55HDX61 | Owners Guide - Page 94
Pitch 0.90(horiz.) x 0.51(vert.) mm (42") • FCC class B for Consumer Use • Power Requirements 108-132V, 60Hz DIMENSIONS • Width • Height • Depth • Weight 42" 40 9/16" 25 1/16" 3 3/4" 86 lbs. 55" 48 28 1/8 4 1/8 108 lbs. Audio Video Control Center • Width 16 15/16" • Height 3 3/8" • Depth - Hitachi 55HDX61 | Owners Guide - Page 95
a week, 24 hours a day (1-800-448-2244) Hitachi America, LTD. Home Electronics Division Hitachi has made every effort to assure you hours of trouble free operation from your unit. However, should you require service, a network of Hitachi Authorized Service Facilities has been established in all 50 - Hitachi 55HDX61 | Owners Guide - Page 96
EST 9:00am - 7:00pm Saturday EST 9:00am - 5:00pm Look for your French Manual on the outside of the box. If the manual is missing, call 1-800-HITACHI (1-800-448-2244) for a copy. Pour de plus amples renseignements sur le service durant la période couverte par la garantie, sur le fonctionnement ou - Hitachi 55HDX61 | Owners Guide - Page 97
54 Picture-in-Picture (PIP 39-41 Position (RGB Input) Horizontal 86 Vertical 86 R Remote Control Functions 27-50 Programming Codes 49-50 Installing Batteries 4 R/G/B 25, 79-88 S E Event Timer 70 External Video Source 14-22 F Favorite Channel 38 Freeze 28 H HDMI 18 I Input Setup 74-75 - Hitachi 55HDX61 | Owners Guide - Page 98
USER LICENSE AGREEMENT FOR HITACHI DTV SOFTWARE IMPORTANT - READ CAREFULLY: This License Agreement is a legal agreement between you and Hitachi America, Ltd., Home Electronics Division ("HAL-HED"). By using this Hitachi digital television video, audio, of goods or services, which currently include - Hitachi 55HDX61 | Owners Guide - Page 99
END USER LICENSE AGREEMENT FOR HITACHI DTV SOFTWARE 7. LIMITATION OF LIABILITY. IN NO EVENT SHALL HAL , EXEMPLARY, OR CONSEQUENTIAL DAMAGES (INCLUDING, BUT NOT LIMITED TO, PROCUREMENT OF SUBSTITUTE GOODS OR SERVICES; LOSS OF USE, DATA, OR PROFITS; OR BUSINESS INTERRUPTION) HOWEVER CAUSED AND ON ANY - Hitachi 55HDX61 | Owners Guide - Page 100
QR60951
-
 1
1 -
 2
2 -
 3
3 -
 4
4 -
 5
5 -
 6
6 -
 7
7 -
8
-
9
-
10
-
11
-
12
-
13
-
14
-
15
-
16
-
17
-
18
-
19
-
20
-
21
-
22
-
23
-
24
-
25
-
26
-
27
-
28
-
29
-
30
-
31
-
32
-
33
-
34
-
35
-
36
-
37
-
38
-
39
-
40
-
41
-
42
-
43
-
44
-
45
-
46
-
47
-
48
-
49
-
50
-
51
-
52
-
53
-
54
-
55
-
56
-
57
-
58
-
59
-
60
-
61
-
62
-
63
-
64
-
65
-
66
-
67
-
68
-
69
-
70
-
71
-
72
-
73
-
74
-
75
-
76
-
77
-
78
-
79
-
80
-
81
-
82
-
83
-
84
-
85
-
86
-
87
-
88
-
89
-
90
-
91
-
92
-
93
-
94
-
95
-
96
-
97
-
98
-
99
-
100
 |
 |

PLASMA TELEVISION
AVC (Audio Video Control Center) & Plasma Display Monitor
Operating Guide for 42HDX61, 55HDX61
IMPORTANT SAFETY INSTRUCTIONS
................................................................................
2-3
FIRST TIME USE
..................................................................................................................
4-26
THE REMOTE CONTROL
..................................................................................................
27-50
ON-SCREEN DISPLAY
........................................................................................................
51-78
USING THE RGB INPUT OF THE PLASMA TV
................................................................
79-88
USEFUL INFORMATION INDEX
........................................................................................
89-99
As an E
NERGY
S
TAR
®
Partner, Hitachi, Ltd. has determined that this
product meets the E
NERGY
S
TAR
®
guidelines for energy efficiency.