Hitachi 60V525E Owners Guide
Hitachi 60V525E - LCD Projection TV Manual
 |
View all Hitachi 60V525E manuals
Add to My Manuals
Save this manual to your list of manuals |
Hitachi 60V525E manual content summary:
- Hitachi 60V525E | Owners Guide - Page 1
LCD REAR PROJECTION TELEVISION Operating Guide for 50V525E, 60V525E IMPORTANT SAFETY INSTRUCTIONS 2-3 FIRST TIME USE ...4-19 THE REMOTE CONTROL 20-33 ON-SCREEN DISPLAY...34-61 LAMP REPLACEMENT ...62-65 CARE OF YOUR HITACHI TV & REMOTE CONTROL 66 RECEPTION PROBLEMS ...67 USEFUL INFORMATION / INDEX - Hitachi 60V525E | Owners Guide - Page 2
no user serviceable parts inside the television. • Model and serial numbers are indicated on back side of the television. CAUTION: Adjust only those controls that are covered in the instructions, as improper changes or modifications not expressly approved by HITACHI could void the user's authority - Hitachi 60V525E | Owners Guide - Page 3
Servicing is required when the apparatus has been damaged in any way, such as power-supply cord or plug is damaged, liquid has been spilled or objects have fallen into apparatus, the apparatus has been exposed to rain or moisture, does not operate normally, or has been dropped. 15. Televisions - Hitachi 60V525E | Owners Guide - Page 4
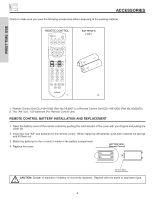
No. HL02072). 2. Two "AA" size, 1.5V batteries (For Remote Control Unit). REMOTE CONTROL BATTERY INSTALLATION AND REPLACEMENT 1. Open the battery cover of the remote control by pushing the notched part of the cover with your fingers and pulling the cover off. 2. Insert two new "AA" size batteries - Hitachi 60V525E | Owners Guide - Page 5
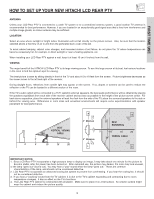
HITACHI LCD REAR PTV ANTENNA Unless your LCD Rear PTV is connected to a cable TV system or to a centralized antenna system, a good outdoor TV Since LCD Rear PTV incorporates a high pressure lamp to display an image, it may take about one minute for the picture to become stable, after the power has - Hitachi 60V525E | Owners Guide - Page 6
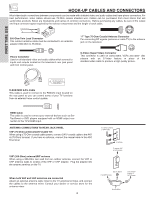
(antenna or cable TV) to the antenna jack on the television. S-Video (Super Video) Connector This connector is used on camcorders, VCRs and laser antenna cable mixer to the TV antenna terminal, and connect the cables to the antenna mixer. Consult your dealer or service store for the antenna mixer. - Hitachi 60V525E | Owners Guide - Page 7
be displayed on the TV screen. These buttons also serve as the cursor left (̇) and right (̈) buttons when in MENU mode. When the TV power is turned OFF was set when the TV is turned ON. ቦ FRONT INPUT JACKS (INPUT 5) Use these audio/video jacks for a quick hook-up from a camcorder or VCR to instantly - Hitachi 60V525E | Owners Guide - Page 8
for long lasting performance. 4. Your Hitachi LCD Rear Projection Television has an internal lamp that lights up the TV screen. Make sure to turn off the Power when you do not watch the LCD Rear Projection Television for longer lamp life. ቪ TEMP indicator This light is off during normal operation - Hitachi 60V525E | Owners Guide - Page 9
PANEL JACKS AND CONNECTORS The front panel jacks are provided as a convenience to allow you to easily connect a camcorder or VCR as shown in the following examples: INPUT 5 AUDIO S-VIDEO VIDEO L/MONO R INPUT 5 AUDIO a mono VCR, insert the audio cable into the left audio jack of your TV. 9 - Hitachi 60V525E | Owners Guide - Page 10
VIDEO L AUDIO R AUDIO TO HI-FI PR PR (MONO) (MONO) (MONO) (MONO) TV AS CENTER ባ ቩቧ RS232C 1 2 345 6 789 ቨ ቢ Antenna Input/Output The remote control the audio and video inputs to connect external devices, such as VCRs, camcorders, laserdisc players, DVD players etc. (If you have mono sound, - Hitachi 60V525E | Owners Guide - Page 11
images retain the highest video quality from the source all the way to your television screen. Use the HDMI input for your external devices such as Set-Top- see your dealer regarding these "non Hitachi" home control systems (see page 61 to activate this input). ቩ TV AS CENTER (INPUTS 1-4) These jacks - Hitachi 60V525E | Owners Guide - Page 12
VIDEO L AUDIO R AUDIO TO HI-FI PR PR (MONO) (MONO) (MONO) (MONO) TV AS CENTER RS232C 1 2 345 6 789 External Digital Component with HDMI output capability HDMI OUT INPUT OUTPUT S-VIDEO V L R VCR #2 Laserdisc player, VCR, camcorder, etc. VCR #1 NOTES: 1. Connect only 1 component to each - Hitachi 60V525E | Owners Guide - Page 13
left audio jack on the television. • Refer to the operating guide of your other electronic equipment time. • Connect only 1 component (VCR, DVD player, camcorder, etc.) to each input jack. • COMPONENT: Y-PBPR CB output to the TV's PB input and the components CR output to the TV's PR input. • - Hitachi 60V525E | Owners Guide - Page 14
TIME USE CONNECTING EXTERNAL AUDIO DEVICES Match the numbers below to the diagram for speaker placement. ᕃ The television's internal speakers will act as center speaker (select Audio-Internal Speakers-TV as Center see page 42). ᕄ These FRONT left and right speakers are connected to the FRONT output - Hitachi 60V525E | Owners Guide - Page 15
camcorder, laserdisc player, DVD player, or HDTV Set Top Box to your TV set is dependent on the model and features of each component. Check the owner's manual VCR or the laserdisc player to the INPUT (VIDEO) jack, as shown on the TV set below. 2. Connect the cable from the AUDIO OUT of the VCR or the - Hitachi 60V525E | Owners Guide - Page 16
VIDEO OUT of the VCR or the laserdisc player to the INPUT (VIDEO) jack, as shown on the TV set below. 2. Connect the cable from the AUDIO OUT R of the VCR or the laserdisc player to own video or line output. Refer to your VCR operating guide for more information on line input-output connections. 16 - Hitachi 60V525E | Owners Guide - Page 17
S-VIDEO OUT of the VCR or the laserdisc player to the INPUT (S-VIDEO) jack, as shown on the TV set below. 2. Connect the cable from the AUDIO OUT R of the VCR or the laserdisc player to the or line output. Refer to your VCR operating guide for more information on line input-output connections. 17 - Hitachi 60V525E | Owners Guide - Page 18
the output of the HDTV set top box or DVD player to the HDMI input as shown on the TV set below. When using a component with DVI output, you also have to connect the AUDIO OUT (R/L) device controls the HDMI interface so proper set-up of device user settings determines final video appearance. 18 - Hitachi 60V525E | Owners Guide - Page 19
DVD player or HDTV set top box to the INPUT (Y) jack, as shown on the TV set below. 2. Connect the cable from the CB/PB OUT or B-Y OUT of 1 VIDEO L AUDIO R AUDIO TO HI-FI PR PR (MONO) (MONO) (MONO) (MONO) TV AS CENTER RS232C 1 2 345 6 789 OUTPUT R L PR PB Y DVD Player NOTES: 1. Completely - Hitachi 60V525E | Owners Guide - Page 20
at the screen of the TV and press the TV button. The remote will now control your television. To operate your VCR, point the remote at the remote sensor of the VCR and press the VCR button. The remote will now control your VCR (see page 32 for instructions on how to program the - Hitachi 60V525E | Owners Guide - Page 21
LCD REAR PTV ቢ ባ ቧ ብ ቦ ቨ ቩ ቫ ቭ ተ ቱ ቲ ታ ቤ THE REMOTE CONTROL ቢ POWER button Press this button to turn the TV set on or off when the remote is in TV mode. (See page 20 for instructions on how to set the remote control to TV to compete with room light. Select Night for night time - Hitachi 60V525E | Owners Guide - Page 22
HOW TO USE THE REMOTE TO CONTROL YOUR LCD REAR PTV ቦ ASPECT button Press this button to quickly change the picture format ASPECT ratio. Depending on the input signal format received, the picture format - Hitachi 60V525E | Owners Guide - Page 23
HOW TO USE THE REMOTE TO CONTROL YOUR LCD REAR PTV ቧ INPUTS button When the remote control is in TV mode, press this button to access the INPUTS menu. Use the CURSOR and SELECT buttons to select the inputs that are being used. Pressing the - Hitachi 60V525E | Owners Guide - Page 24
THE REMOTE CONTROL HOW TO USE THE REMOTE TO CONTROL YOUR LCD REAR PTV ቨ PICTURE-IN-PICTURE button See separate section on pages 26-28 for a description. ቩ MENU button The MENU button will start the On-Screen Display. ቪ GUIDE button [Cable Box (CBL), Satellite Receiver (SAT)/Set-Top-Box (STB) mode - Hitachi 60V525E | Owners Guide - Page 25
THE REMOTE TO CONTROL YOUR LCD REAR PTV ቯ VOLUME ( When the TV power is turned off at a volume level 31 or greater, the volume level will default to 30 when the TV is turned on channels. You can add any channel to your Favorite channel list by pressing and holding down the FAV CH button until the - Hitachi 60V525E | Owners Guide - Page 26
PICTURE-IN-PICTURE (PIP) Your HITACHI LCD Rear PTV incorporates Two Tuner technology designed is convenient when you want to watch more than one program at the same time. You can watch a TV program while viewing other programs from any of the video inputs. ANT A To Converter ANT B MONITOR OUT - Hitachi 60V525E | Owners Guide - Page 27
THE REMOTE CONTROL PICTURE-IN-PICTURE (PIP) PIP MODE PICTURE-IN-PICTURE This feature is only available with a 1080i component input or Digital signal 16x9 Format. To prevent a pattern burn, occasionally move the sub-picture using the CURSOR buttons. Main Picture Sub Picture SPLIT MODE PICTURE-IN- - Hitachi 60V525E | Owners Guide - Page 28
PICTURE-IN-PICTURE (PIP) ባ PAUSE button If you wish to freeze the sub-picture, press the PAUSE button. This is convenient when trying to write down the address for a mail order company, recording statistics for a sporting event, etc. To return the picture to motion, press the EXIT button. Press the - Hitachi 60V525E | Owners Guide - Page 29
box and press the POWER button. The remote guide. 3. The remote control will remember the codes you have programmed until the batteries are removed from the remote control. After replacing TV buttons These buttons are for operating the TV. MY CABLE BOX CODE IS: NOTE: Refer to instruction manual - Hitachi 60V525E | Owners Guide - Page 30
press the POWER button. The guide. 3. The remote control will remember the codes you have programmed until the batteries are removed from the remote control. After replacing TV buttons These buttons are for operating the TV. MY SATELLITE RECEIVER/STB CODE IS: NOTE: Refer to instruction manual - Hitachi 60V525E | Owners Guide - Page 31
and press the POWER button. The remote guide. 3. The remote control will remember the codes you have programmed until the batteries are removed from the remote control. After replacing TV Buttons These buttons are for operating the TV. ባ MY DVD PLAYER CODE IS: NOTE: Refer to instruction manual - Hitachi 60V525E | Owners Guide - Page 32
and press the POWER button. The remote guide. 3. The remote control will remember the codes you have ባ programmed until the batteries are removed from the remote control. After replacing TV Buttons ባ These buttons are for operating the TV. ባ MY VCR CODE IS: NOTE: Refer to instruction manual - Hitachi 60V525E | Owners Guide - Page 33
CODE EMERSON . . . . . 20, 21, 22, 23 ,24 FISHER 34, 37, 38, 39 HITACHI . 00, 01, 02, 03, 04, 05, 06 JVC 49, 50, 51 MAGNAVOX 12, 13 MITSUBISHI 31, 32 SONY 07, 08, 09 DVD BRAND CODE APEX 10 GO VIDEO 09 HITACHI 00 KENWOOD 11 PANASONIC 02 PIONEER 03 RCA 04 SAMSUNG 06 SANYO 07 SONY 01 - Hitachi 60V525E | Owners Guide - Page 34
MENU on the remote control to display the different features on your HITACHI LCD TV. 2. Press the CURSOR buttons to highlight a different feature. 3. Press EXIT on the remote control to quickly exit from a menu. This part of the screen shows which selections are available. Video Audio Aspect Chan - Hitachi 60V525E | Owners Guide - Page 35
ON-SCREEN DISPLAY (OSD) Video Picture Mode Contrast Brightness Color Tint Sharpness Color Temperature Black Enhancement Contrast Mode Reset Video Settings Color Management Color Decoding Auto Color Audio Noise Reduction Auto Movie Mode Treble Bass Balance SRS BBE Audio Source Internal Speakers - Hitachi 60V525E | Owners Guide - Page 36
front panel. Set specific time to Lock TV. Block various types of movies and video types based on motion picture ratings. Block various types of movies and television programming based on a parental guide ratings. Block various types of movies and television programming based on the Canadian ratings - Hitachi 60V525E | Owners Guide - Page 37
this function to choose from automatic picture settings to optimize your TV's performance. Video Audio Aspect Chan. Manager Locks Timers Setup Black Enhancement Contrast Mode Color Management (Set User Colors) Auto Color Noise Reduction Auto Movie Mode (TV/Cinema Detection) Day 100% 50% 50% - Hitachi 60V525E | Owners Guide - Page 38
VIDEO Use the CURSOR button ̆ or ̄ to highlight the function to be adjusted. Press the CURSOR button ̇ or ̈ to adjust the function. Press the SELECT button to select the function settings. Press MENU to return to the main menu or select Picture Mode to return to the previous menu. Press EXIT to - Hitachi 60V525E | Owners Guide - Page 39
Mode Move SEL Select Off Low Off Color Management Use this function to adjust and balance the listed individual colors to make them either deeper or more pure depending on the user's preference. Adjust the GAIN settings to make the color brighter (+) or darker (-). Video Color Management Color - Hitachi 60V525E | Owners Guide - Page 40
of Red, Green and Blue according to the user's preference in each of the four color Set NOISE REDUCTION to OFF if the TV experiences picture blocking. Auto Movie Mode is turned ON from the VIDEO menu, your Hitachi Projection Television will activate the circuitry for this special feature - Hitachi 60V525E | Owners Guide - Page 41
to right balance of the LCD TV internal speakers. SRS Based on the principles of the human hearing system, SRS 3D technology delivers an exciting and realistic 3D Sound experience from just two external speakers or the two internal speakers found in your HITACHI Television. SRS will also enhance - Hitachi 60V525E | Owners Guide - Page 42
Channel Television Sound will allow you to select STEREO (a stereo broadcast), MONO (monaural sound) used when receiving a weak stereo broadcast or 2nd Audio Prog (SAP) which may be a secondary language, weather report, etc. The sources received will be displayed at the top right edge of the TV. The - Hitachi 60V525E | Owners Guide - Page 43
Sel Aspect Mode 16:9 Standard 4:3 Standard 4:3 Zoom1 Auto Aspect Vertical Position 16:9 Zoom 4:3 Expanded 4:3 Zoom2 0 Move SEL Return Mode This function manually selects the Aspect Mode from six (6) choices. Use the CURSOR buttons ̆, ̄, ̇ and ̈ to select the menu item. Press the SELECT button - Hitachi 60V525E | Owners Guide - Page 44
an indoor or outdoor antenna. Select Cable if you have cable TV. Chan. Manager Ant. A Ant. B Move SEL Select Chan. Manager Ant. A Channel Source Antenna Cable(1) Cable(2) or Auto Channel Scan Channel List Start Move SEL Return Chan. Manager Ant. A Channel Source Antenna Cable - Hitachi 60V525E | Owners Guide - Page 45
Scan This feature will automatically store active TV channels in Auto Channel Memory. This will allow you to skip unused channels when using CHANNEL UP (̆) or DOWN (̄). Chan. Manager Ant. A Channel Source Antenna Cable(1) Auto Channel Scan Channel List Cable(2) Start Move SEL Select Chan - Hitachi 60V525E | Owners Guide - Page 46
Cable(2) Start Move SEL Select Chan. Manager Channel List Ch# 2 3 4 5 6 7 8 9 Scan Off Off Off Off Off Off Off Off CH ID Move SEL Return Lock Use the CURSOR button ̆ or ̄ to review more channels. Press EXIT to quit the menu or select CHAN. MANAGER to return to the previous menu. Scan - Hitachi 60V525E | Owners Guide - Page 47
CHANNEL MANAGER Channel ID This section contains advanced features which will make TV viewing easier and more enjoyable. Use this feature to give up to 20 channels a name when ANTENNA signal source is selected and up to 60 - Hitachi 60V525E | Owners Guide - Page 48
, all buttons on the Front Panel will be deactivated, except the Power button. When TV TIME LOCK is turned on (❒✔ TIME LOCK), then you can set the BEGIN and be blocked automatically. When TV RATINGS is selected, various types of television programming based on a parental guide ratings will be blocked - Hitachi 60V525E | Owners Guide - Page 49
: 1. A movie rating is dependent upon the movie that is viewed. If the movie does not carry a rating, the TV will not block it. 2. Blocking "NOT RATED (NR)" programs may block emergency programming, sports, news, public service announcements, religious programs and weather. ON-SCREEN DISPLAY 49 - Hitachi 60V525E | Owners Guide - Page 50
RATINGS that you have selected. Press EXIT to quit the menu or select TV RATINGS to return to the previous menu. TV Parental Guide Ratings Table TV-Y TV-Y7 TV-G TV-PG TV-14 TV-MA FV V S L D All children. The themes and elements in this program are specifically designed for a very young audience - Hitachi 60V525E | Owners Guide - Page 51
Ratings Use Canadian Ratings (ENG) to block any type of movie and television program in Canada that (Eng) you feel might be inappropriate in its content. Locks Change Access Code Engage Lock TV Time Lock Movie Ratings TV Ratings Canadian Ratings (Eng) Canadian Ratings (Frn) Move SEL Select Locks - Hitachi 60V525E | Owners Guide - Page 52
Locks Change Access Code Engage Lock TV Time Lock Movie Ratings TV Ratings Canadian Ratings (Eng) Canadian is selected, for example 8 ans+, all movies and television programs rated 8 ans+ and higher will be automatically a broad audience but contains light or occasional violence that could disturb - Hitachi 60V525E | Owners Guide - Page 53
Clock Set Sleep Timer Set Day/Night Timer Set Event Timer Set Auto Power Off or Move SEL Return Set The Clock The Clock must be adjusted Timers Set The Clock Set Sleep Timer Set Day/Night Timer Set Event Timer Set Auto Power Off Move SEL Select Timers Set The Clock Time: 2:53 PM Jun 28 2005 - Hitachi 60V525E | Owners Guide - Page 54
and 3:00. Set Day/Night Timer Select this feature to activate and set your TV's Day/Night Picture Mode automatically. Timers Set The Clock Set Sleep Timer Set Day/Night Timer Set Event Timer Set Auto Power Off Move SEL Select Timers Set Day/Night Timer Activate Day Mode On 12:00 - Hitachi 60V525E | Owners Guide - Page 55
Set The Clock Set Sleep Timer Set Day/Night Timer Set Event Timer Set Auto Power Off Move SEL Select Timers Set Event Timer Event 1 --:-- AM 10:00 --:-- AM if you do not plan to control your television with the remote control. CAUTION: Do not use your TV as a deterrent when away from home by - Hitachi 60V525E | Owners Guide - Page 56
. Timers Set The Clock Set Sleep Timer Set Day/Night Timer Set Event Timer Set Auto Power Off Move SEL Select Timers Set Auto Power Off Automatic Power Saving Yes No or Select yes to have the TV turn off Automatically when a video signal is not detected for 15 minutes. Move SEL Return Use - Hitachi 60V525E | Owners Guide - Page 57
SETUP Setup Select SETUP when setting your TV up for the first time. Use the CURSOR buttons ̆ or ̄ on the remote to highlight the function desired. Video Audio Aspect Chan. Manager Locks Timers - Hitachi 60V525E | Owners Guide - Page 58
no picture can be seen behind menu screen), or select Shaded for a light background. Screen Saver Continuous on-screen displays such as video games, stock fixed (non-moving) patterns can cause "temporary image retention" to the LCD Rear PTV. Use the SCREEN SAVER feature to avoid any temporary image - Hitachi 60V525E | Owners Guide - Page 59
to original factory preset condition. Setup Set The Inputs Video1 Rename List Video2 AVR DVD Video3 CAM DVD2 Video4 CBL DVD3 Video5 CBL2 automatically turn the TV on and tune to Video2 when it detects a video signal to input 2. Setup Set The Inputs Video1 Rename List Video2 AVR DVD - Hitachi 60V525E | Owners Guide - Page 60
SETUP Set Closed Caption Closed Captions are the dialogue, narration, and/or sound effects of a television program or home video which are displayed on the TV screen. Your local TV program guide denotes these programs as or . Setup Menu Preference Screen Saver Set The Inputs Set Black Side - Hitachi 60V525E | Owners Guide - Page 61
select the AV Control feature. Set this feature if you want to control some of the TV functions from an external home control system. Setup Menu Preference Screen Saver Set The Inputs Set available. Please see your dealer regarding these "non Hitachi" home control systems. ON-SCREEN DISPLAY 61 - Hitachi 60V525E | Owners Guide - Page 62
is still lit, please contact your authorized service center (see page 70-71). NOTES: • Contact your Hitachi dealer for a new lamp unit. Using other lamps may cause damage to the TV Set. LAMP TYPE: LM500 / LAMP PART # UX21513 • When replacing the lamp, let it cool down completely, for approximately - Hitachi 60V525E | Owners Guide - Page 63
REPLACEMENT LAMP REPLACEMENT 1. Turn off the power button and unplug the power cord. 120V FRONT COVER CAUTION: THE LAMP IS VERY HOT AND MAY CAUSE FIRE OR SEVERE BURNS. WAIT AT LEAST 30~45 MINUTES TO ALLOW THE LAMP TO COOL BEFORE PROCEEDING WITH LAMP REMOVAL. 2. Remove the front cover from the TV - Hitachi 60V525E | Owners Guide - Page 64
LAMP REPLACEMENT LAMP REPLACEMENT 3. Remove the screw securing the lamp cover with a Phillips head screw driver as shown. Remove the lamp cover. SCREW LAMP COVER PHILLIP HEAD SCREW DRIVER CAUTION: THE LAMP IS VERY HOT AND MAY CAUSE FIRE OR SEVERE BURNS. WAIT AT LEAST 30~45 MINUTES TO ALLOW THE - Hitachi 60V525E | Owners Guide - Page 65
LAMP REPLACEMENT LAMP REPLACEMENT 6. Without installing the lamp cover, the power will be off and the Lamp Indicator will flash (see page 8). Be sure to install the lamp cover by re-engaging the two clips and tighten the screws before turning the power For more information, call "1-800-HITACHI." 65 - Hitachi 60V525E | Owners Guide - Page 66
HITACHI TELEVISION AND YOUR REMOTE CONTROL DO Dust the screen and cabinet with a soft cloth. Clean the screen with a soft cloth moistened in warm water and dry with a soft cloth. A mild soap may be used if the screen is extremely dirty. Place your Television the precision parts may result Replace - Hitachi 60V525E | Owners Guide - Page 67
PROBLEMS • IGNITION NOISE: Black spots or horizontal streaks may appear, picture may flutter or drift. Usually caused by interference from automobile ignition systems, neon lamps, electrical drills, and other electrical appliances. • GHOSTS: Ghosts are caused by the television The TV set can generate - Hitachi 60V525E | Owners Guide - Page 68
Dark Picture ©© © HITACHI Liquid Crystal Display incorporates advanced power surge protection technology designed to protect against component or circuit damage due to external or internal voltage power surges. IF YOUR TELEVISION SHOULD APPEAR TO HAVE A LOSS OF POWER, PLEASE FOLLOW THIS PROCEDURE - Hitachi 60V525E | Owners Guide - Page 69
HDMI Licensing LLC. Inputs: • Power Input AC 120V, 60Hz • Stand-by Power 0.6W • Power Consumption - Refer to rear panel at .0 • Depth (in.) 16 3/8 (mm) 415.0 • Weight (lbs.) 114.0 (kg) 51.7 60V525E 40 1/4 1023.0 63 3/8 1609.0 20 1/2 520.0 128.5 58.3 NOTE: Due to improvements, specifications - Hitachi 60V525E | Owners Guide - Page 70
a week, 24 hours a day (1-800-448-2244) Hitachi America, LTD. Home Electronics Division Hitachi has made every effort to assure you hours of trouble free operation from your unit. However, should you require service, a network of Hitachi Authorized Service Facilities has been established in all 50 - Hitachi 60V525E | Owners Guide - Page 71
EST 9:00am - 7:00pm Saturday EST 9:00am - 5:00pm Look for your French Manual on the outside of the box. If the manual is missing, call 1-800-HITACHI (1-800-448-2244) for a copy. Pour de plus amples renseignements sur le service durant la période couverte par la garantie, sur le fonctionnement ou - Hitachi 60V525E | Owners Guide - Page 72
Indicator 8 Lamp Replacement 62-65 Language Menu Language 57 Locks Change Access Code 48 Channel Lock 48 Input Lock 48 Front Panel Lock 48 TV Time Lock 48 Movie Ratings 49 TV Ratings 50 TV Ratings (Canadian - English 51 TV Ratings (Canadian - French 52 Loudness 42 M Menu Preference - Hitachi 60V525E | Owners Guide - Page 73
NOTES 73 - Hitachi 60V525E | Owners Guide - Page 74
NOTES 74 - Hitachi 60V525E | Owners Guide - Page 75
NOTES 75 - Hitachi 60V525E | Owners Guide - Page 76
QR64311
-
 1
1 -
 2
2 -
 3
3 -
 4
4 -
 5
5 -
 6
6 -
 7
7 -
8
-
9
-
10
-
11
-
12
-
13
-
14
-
15
-
16
-
17
-
18
-
19
-
20
-
21
-
22
-
23
-
24
-
25
-
26
-
27
-
28
-
29
-
30
-
31
-
32
-
33
-
34
-
35
-
36
-
37
-
38
-
39
-
40
-
41
-
42
-
43
-
44
-
45
-
46
-
47
-
48
-
49
-
50
-
51
-
52
-
53
-
54
-
55
-
56
-
57
-
58
-
59
-
60
-
61
-
62
-
63
-
64
-
65
-
66
-
67
-
68
-
69
-
70
-
71
-
72
-
73
-
74
-
75
-
76
 |
 |
LCD REAR PROJECTION TELEVISION
Operating Guide for 50V525E, 60V525E
IMPORTANT SAFETY INSTRUCTIONS
................................................................................
2-3
FIRST TIME USE
..................................................................................................................
4-19
THE REMOTE CONTROL
..................................................................................................
20-33
ON-SCREEN DISPLAY
........................................................................................................
34-61
LAMP REPLACEMENT
......................................................................................................
62-65
CARE OF YOUR HITACHI TV & REMOTE CONTROL
............................................................
66
RECEPTION PROBLEMS
........................................................................................................
67
USEFUL INFORMATION / INDEX
......................................................................................
68-72
As an E
NERGY
S
TAR
®
Partner, Hitachi, Ltd. has determined that this
product meets the E
NERGY
S
TAR
®
guidelines for energy efficiency.