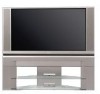
Hitachi 60VX500 Owners Guide
Hitachi 60VX500 - Director's Series - 60" Rear Projection TV Manual
 |
View all Hitachi 60VX500 manuals
Add to My Manuals
Save this manual to your list of manuals |
Hitachi 60VX500 manual content summary:
- Hitachi 60VX500 | Owners Guide - Page 1
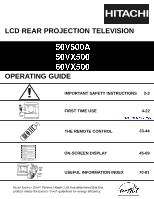
LCD REAR PROJECTION TELEVISION 50V500A 50VX500 60VX500 OPERATING GUIDE IMPORTANT SAFETY INSTRUCTIONS 2-3 FIRST TIME USE THE REMOTE CONTROL 4-22 Page 7 updated 01/09/04 23-44 Video Audio Aspect Chan. Manager Locks Setup Move SEL Sel ON-SCREEN DISPLAY 45-69 USEFUL - Hitachi 60VX500 | Owners Guide - Page 2
IMPORTANT SAFETY INSTRUCTIONS SAFETY POINTS YOU SHOULD KNOW ABOUT YOUR HITACHI LCD REAR PROJECTION TELEVISION Our reputation has been built on the quality, performance, and ease of service of HITACHI televisions. Safety is also foremost in our minds in the design of these units. To help you operate - Hitachi 60VX500 | Owners Guide - Page 3
CLAMP ANTENNA DISCHARGE UNIT (NEC SECTION 810-20) ELECTRIC SERVICE EQUIPMENT GROUNDING CONDUCTORS (NEC SECTION 810-21) GROUNDING CONDUCTORS POWER SERVICE GROUNDING ELECTRODE SYSTEM (NEC ART 250 PART H) NEC NATIONAL ELECTRICAL CODE Note to the CATV system installer: This reminder is provid - Hitachi 60VX500 | Owners Guide - Page 4
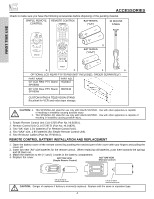
CABLE 3. BATTERIES ("AAA") REC CLU-5729TSI 1. 2. 4. 5. OPTIONAL LCD REAR PTV STAND (NOT INCLUDED, ORDER SEPARATELY) PART NAME PART NO. 50" LCD Rear PTV Stand H520447 SPX50W 60" LCD Rear PTV Stand H520448 SPX60W CUSTOM HITACHI TELEVISION STAND Excellent for VCR and video tape storage - Hitachi 60VX500 | Owners Guide - Page 5
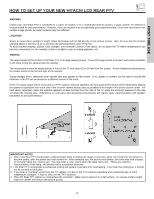
If you hear the cooling fan, it should not be considered defective. 3. If you hear a "cracking" sound from the TV cabinet, it is due to the TV's cabinet expanding and contracting due to room temperature changes. It has no effect on the TV's functions. 4. The LCD Rear PTV cabinet is constructed with - Hitachi 60VX500 | Owners Guide - Page 6
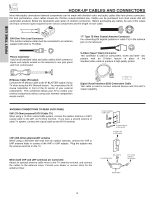
outputs located on the television's rear jack panel and front control panel. "F" remote control. Digital Visual Interface (DVI) Connection Cable This cable is used to connect external devices with DVI-HDTV output capability. ANTENNA CONNECTIONS TO REAR JACK PANEL VHF (75-Ohm) antenna/CATV (Cable TV - Hitachi 60VX500 | Owners Guide - Page 7
VID1~VID5 buttons depending on your choice (see page 33). To change antenna source, press the ANT button on your remote control. ቤ CHANNEL selector Press these buttons until the desired channel appears in the top right corner of the TV screen. These buttons also serve as the cursor down (̄) and up - Hitachi 60VX500 | Owners Guide - Page 8
from the input jacks. Please make sure the Blue Power light indicator is not lit (OFF) when you are not watching for long lasting performance. 4. Your Hitachi LCD Rear Projection Television has an internal lamp that lights up the TV screen. Make sure to turn off the Power when you do not watch the - Hitachi 60VX500 | Owners Guide - Page 9
S-INPUT cable in place of the standard video cable. 3. If you have a mono VCR, insert the audio cable into the left audio jack of your TV. 9 - Hitachi 60VX500 | Owners Guide - Page 10
FIRST TIME USE REAR PANEL JACKS ቢ ባ ቪ ቨ ANT A TO audio to the stereo can be controlled by the television's main volume. ቦ CENTER IN (Input) This jack is This feature allows the TV speakers to be used as a center speaker. The TV must be set as a center channel by selecting "TV as Center" on - Hitachi 60VX500 | Owners Guide - Page 11
REAR the components B-Y output to the TV's PB input and the components R-Y output to the TV's PR input. 3. Your component you to control the external components with your television's remote control (see page 20). ቪ DVI-HDTV digital out terminal, a high definition picture can be displayed on the - Hitachi 60VX500 | Owners Guide - Page 12
REAR PANEL CONNECTIONS TYPICAL FULL-FEATURE SETUP Outside antenna or cable TV coaxial cable 2-Way signal splitter CONNECT TO IR BLASTER IR Sensor (Provided) DVD Player OUTPUT Y PB/CB PR/CR L R HDTV Set-Top Box Y PB PR L R OUTPUT D-VHS DIGITAL R OUTPUT INPUT Cable TV Box LR INPUT CENTER - Hitachi 60VX500 | Owners Guide - Page 13
ON REAR connect it to the left audio jack on the television. • Refer to the operating guide of your other electronic equipment for additional information on case, connect the components CB output to the TV's PB input and the components CR output to the TV's PR input. • You may use composite video - Hitachi 60VX500 | Owners Guide - Page 14
TIME USE CONNECTING EXTERNAL AUDIO DEVICES To control the audio level of an external audio amplifier with the TV remote control, connect the system as shown below. REAR PANEL OF TELEVISION ANT A TO CONVERTER ANT B INPUT 1 INPUT 2 DVI-HDTV PR PB Y R (MONO)/L AUDIO PR PB Y/VIDEO R (MONO - Hitachi 60VX500 | Owners Guide - Page 15
HDTV Set Top Box to your TV set is dependent on the model and features of each component. Check the owner's manual of each component for the location coaxial shielded wire. Before Operating External Video Source The input mode is changed every time the VID1~VID5 button is pressed as shown below. - Hitachi 60VX500 | Owners Guide - Page 16
player to the INPUT (VIDEO) jack, as shown on the TV set below. 2. Connect the cable from the AUDIO OUT R : 1. Completely insert the connection cord plugs when connecting to rear panel jacks. The picture and sound that is played back guide for more information on line input-output connections. 16 - Hitachi 60VX500 | Owners Guide - Page 17
laserdisc player to the INPUT (S-VIDEO) jack, as shown on the TV set below. 2. Connect the cable from the AUDIO OUT R Completely insert the connection cord plugs when connecting to rear panel jacks. The picture and sound that is played guide for more information on line input-output connections. 17 - Hitachi 60VX500 | Owners Guide - Page 18
to the DVI-HDTV input as shown on the TV set below. 2. Connect the cable from the to return to the previous channel. DIGITAL OUTPUT CAPABILITY DIGITAL OUTPUT LR OUTPUT ANT A TO CONVERTER Completely insert the connection cord plugs when connecting to rear panel jacks. The picture and sound that is - Hitachi 60VX500 | Owners Guide - Page 19
player or HDTV set top box to the INPUT (Y) jack, as shown on the TV set below. 2. Connect the cable from the CB/PB OUT or B-Y OUT VIDEO S-VIDEO NOTES: 1. Completely insert the connection cord plugs when connecting to rear panel jacks. The picture and sound that is played back will be abnormal if - Hitachi 60VX500 | Owners Guide - Page 20
Hitachi TV Remote Control. You can use your Hitachi remote control to control the Audio/Video equipment command without the equipment's remote control. The television rear IR sensor for the AV Network to work. 3. The correct codes must be entered for each of the Audio/Video components for the - Hitachi 60VX500 | Owners Guide - Page 21
to. HITACHI AV NET SET UP DVD Device Code Video Input Audio Input 0 6 7 2 (Enter code "9999" to uninstall) Input 1 Using TV Transmission Remote Control A/V NET button usage on page 26. NOTES: 1. If your equipment cannot be operated after performing the above procedures, your equipment code - Hitachi 60VX500 | Owners Guide - Page 22
Sylvania 0675 Technics 0490 Techwood 0692 Theta Digital 0571 Toshiba 0503, 0695 Urban Concepts 0503 Yamaha 0490, 0545, 0539 Zenith 0591, 0503 CABLE BRAND CODE ABC 0003, 0008, 0014, 0017 Americast 0899 Bell & Howel 0014 Bell South 0899 Director 0476 General Instrument 0003, 0476, 0276 - Hitachi 60VX500 | Owners Guide - Page 23
. The TV button will blink, indicating that the remote will now control your television. To operate your VCR, point the remote at the remote sensor of the VCR and press the VCR button. The VCR button will blink, indicating that the remote will now control your VCR (see page 37 for instructions on - Hitachi 60VX500 | Owners Guide - Page 24
USE THE REMOTE TO CONTROL YOUR LCD REAR PTV ቶ 23 POWER TV DVD VCR turn the TV set on or off when the remote is in TV mode (see page 23 for instructions on how to set the remote control to TV mode). ባ TV button When the TV button is pressed, it will blink, to indicate the remote is in TV - Hitachi 60VX500 | Owners Guide - Page 25
code, etc. Enter one, two, or three numbers to select channels. Enter "0" first for channels 1 to 9, or simply press the single digit channel you wish to tune then wait a few seconds for the TV timer is set, it will reset to the original condition. The DASH (-) button can only be used when the remote - Hitachi 60VX500 | Owners Guide - Page 26
user to control external components with the LCD Rear PTV's remote control. When you press the AV NET button the "Custom" icon and following the instructions of the AV NET learning wizard (see PV Recorder AV Receiver POWER CH ̄ CH ̆ MENU TV/VCR b MORE.. Move INFO Device Setting THUMB STICK - Hitachi 60VX500 | Owners Guide - Page 27
REMOTE TO CONTROL YOUR LCD REAR PTV Photo MC The Photo MC feature is useful for viewing digital still pictures from your digital camera using a memory card and displaying them on the TV the front of the TV. LED Light and OSD Indicator Press THUMBSTICK ̈ to view the digital photos in THUMBNAIL - Hitachi 60VX500 | Owners Guide - Page 28
THE REMOTE TO CONTROL YOUR LCD REAR , press SELECT to change interval time from 5, 10 and 30 seconds. Each press will change interval time from the Design rule for Camera File System). 3. This TV set displays only digital pictures from digital cameras which meet DCF Standard. Pictures that were - Hitachi 60VX500 | Owners Guide - Page 29
REMOTE CONTROL HOW TO USE THE REMOTE TO CONTROL YOUR LCD REAR PTV B VCR PV Recorder AV Receiver POWER CH ̆ Move INFO Device Setting CH ̄ MENU TV/VCR b INFO GUIDE MORE.. THUMB STICK THUMB STICK SELECT MORE.. VCR PV Recorder AV Receiver POWER CH ̄ CH ̆ MENU THUMB STICK 1 2 3 TV - Hitachi 60VX500 | Owners Guide - Page 30
Wizard will transfer any remote button IR code of your equipment to the soft keys of your AV NET. If all remote button transfers are successful, the user can now control their equipment by using the TV remote control. HITACHI AV NET WIZARD (Learning) C Use this wizard to manually learn or modify - Hitachi 60VX500 | Owners Guide - Page 31
HOW TO USE THE REMOTE TO CONTROL YOUR LCD REAR PTV ቱ ASPECT button Press this button to quickly change the picture format ASPECT . (1) NTSC/480i/480p Input 4:3 INPUT 4:3 STANDARD 4:3 EXPANDED 4:3 ZOOM1 THE REMOTE CONTROL (2) 480i/480p INPUT 16:9 INPUT 16:9 ZOOM 16:9 STANDARD 4:3 ZOOM2 - Hitachi 60VX500 | Owners Guide - Page 32
REMOTE TO CONTROL YOUR LCD REAR PTV ቲ VIDEO button Press this button to directly access the VIDEO adjustment menu. VIDEO Contrast Next/Prev 100% Change SEL Tune When no on-screen displays are on the TV screen, use THUMB STICK ̇ or ̈ to access MUTE button again to turn the sound off completely - Hitachi 60VX500 | Owners Guide - Page 33
USE THE REMOTE TO CONTROL YOUR LCD REAR PTV 1 LAST If a channel is changed during this SURF scanning, sub-pictures will be removed from the screen. If Movie/TV Ratings Lock setting is ON brightness and contrast to compete with room light. Select Night for night time viewing with less brightness and - Hitachi 60VX500 | Owners Guide - Page 34
THE REMOTE CONTROL PICTURE-IN-PICTURE (PIP) Your HITACHI LCD Rear PTV incorporates dual tuner technology convenient when you want to watch more than one program at the same time. You can watch a TV program while viewing other programs from the Ant A source or any of the video inputs. ANT A - Hitachi 60VX500 | Owners Guide - Page 35
THE REMOTE CONTROL PICTURE-IN-PICTURE (PIP) SPLIT MODE PICTURE-IN-PICTURE Split SPLIT SWAP NOTE: The SWAP button will only operate in POP/PIP/SPLIT PIP mode. ቤ PIP MODE button To change between the available PIP modes (moving picture - SPLIT, POP or PIP; freeze picture - SPLIT, STROBE, MAIN and - Hitachi 60VX500 | Owners Guide - Page 36
THE REMOTE CONTROL PICTURE-IN-PICTURE (PIP) ብ FREEZE button (With PIP ON) If you the picture, depending on the PIP mode selected (POP Main Freeze, POP Sub Freeze, SPLIT and STROBE). To change FREEZE modes, use the PIP MODE button to cycle through the four different modes. POP MAIN FREEZE (with PIP - Hitachi 60VX500 | Owners Guide - Page 37
4. Hold down the VCR button on the remote and enter the two digit preset code that matches your VCR, as shown on page 44. The indicator light will flash 3 times if the code was accepted. 5. Aim the remote at the VCR and press the POWER button. The remote will turn off your VCR when the correct two - Hitachi 60VX500 | Owners Guide - Page 38
down the CBL button on the remote and enter the two digit preset code that matches your cable box as shown on page 44. The indicator light will flash 3 times if the code was accepted. 5. Aim the remote at the cable box and press the POWER button. The remote will turn off your cable box when the - Hitachi 60VX500 | Owners Guide - Page 39
light will flash 3 times if the code was accepted. 5. Aim the remote at the set-top-box/satellite receiver and press the POWER button. The remote will turn off your set-top-box/satellite receiver when the correct two digit preset code RECEIVER/STB CODE IS: NOTE: Refer to instruction manual of the - Hitachi 60VX500 | Owners Guide - Page 40
down the DVD button on the remote and enter the two digit preset code that matches your DVD player, as shown on page 44. The indicator light will flash 3 times if the code was accepted. 5. Aim the remote at the DVD player and press the POWER button. The remote will turn off your DVD player when the - Hitachi 60VX500 | Owners Guide - Page 41
. 4. Hold down the PVR button on the remote and enter the two digit preset code that matches your PVR, as shown on page 44. The indicator light will flash 3 times if the code was accepted. 5. Aim the remote at the PVR and press the POWER button. The remote will turn off your PVR when the correct two - Hitachi 60VX500 | Owners Guide - Page 42
or AMP button on the remote and enter the two digit preset code that matches your Audio component, as shown on page 44. The indicator light will flash 3 times if the code was accepted. 5. Aim the remote at the Audio component and press the POWER button. The remote will turn off your Audio component - Hitachi 60VX500 | Owners Guide - Page 43
HITACHI has provided a second remote control for your convenience. The Simple Remote Control has the basic features that are most often used. ባ ቦ ቪ CH + A/V NET VOL - SELECT VOL + MUTE CH - MENU EXIT/ASPECT FAV CH ANT ቫ ቤ ብ ቧ ቩቨ ቢ POWER ᕃ POWER button Press Power button to turn the TV - Hitachi 60VX500 | Owners Guide - Page 44
and AUDIO CODES FOR REMOTE CONTROL VCR BRAND CODE Adventura Yamaha 25 Zenith 10, 15, 22 DVD BRAND CODE APEX 15 Denon 04 Go Video 14 Hitachi 07, 12, 13 JVC 01 Kenwood 04, 25 Texscan 18 Tocom 07, 27, 50 Toshiba 03 Tusa 51 TV 86 29 Unika 11, 39 United Artists 36 United Cable 49 - Hitachi 60VX500 | Owners Guide - Page 45
DISPLAY (OSD) 1. Press MENU on the remote control to display the different features on your HITACHI LCD TV. 2. Press the THUMB STICK to highlight a different feature. 3. Press EXIT on the remote control to quickly exit from a menu. 4. Press A/V Net on the remote control to access the AV Net menu - Hitachi 60VX500 | Owners Guide - Page 46
with more blue, set to Reset Change Lock access code. Choose to lock channel, video input, and front panel. Set specific time to Lock TV. Block various types of movies and video types based on motion picture ratings. Block various types of movies and television programming based on a parental guide - Hitachi 60VX500 | Owners Guide - Page 47
is selected, only the selected mode will reset to initial conditions. Picture Mode Use this function to choose from automatic picture settings to optimize your TV's performance. Video Audio Aspect Chan. Manager Locks MENU Setup Move SEL Sel THUMB STICK SELECT Video Picture Mode Contrast - Hitachi 60VX500 | Owners Guide - Page 48
Sharpness Color Temperature Black Enhancement Contrast Mode Reset Video Settings Move SEL Select ANT A/B Day to quit menu. Contrast Use this function to change the contrast between black and white levels in the this to High for cooler color with more blue, set to Medium for more natural color, - Hitachi 60VX500 | Owners Guide - Page 49
% Red 50% Yellow 50% Green 50% Cyan 50% Blue 50% Reset Move SEL Select Use THUMBSTICK to highlight function. Press down to to highlight and adjust individual colors. Use THUMBSTICK to highlight and select "Reset" to return all colors to default settings. NOTE: When the Set User - Hitachi 60VX500 | Owners Guide - Page 50
50% Tint Reset Move SEL Return 60 fields like video. When film is transferred to video for television viewing, the disparity between the two frame rates must be reconciled. This involves a process known as 3:2 pulldown. When Auto Movie Mode is turned On from the Video menu, your Hitachi LCD TV - Hitachi 60VX500 | Owners Guide - Page 51
Noise Cancel On Perfect Volume On Loudness On Move Change Value SEL Return Press THUMB STICK ̆, ̄, LCD TV's internal speakers. Sound Enhancement See page 52. Audio Source Multi-Channel Television average volume level. Loudness This function turns loudness On or Off. It will improve - Hitachi 60VX500 | Owners Guide - Page 52
technology produces sound that is natural and crisp from just two speakers (or) the two channel speakers of your HITACHI REAR LCD television. If your HITACHI REAR LCD television is connected to an external audio system, BBE will also create an incredible crisp sound experience from two speakers and - Hitachi 60VX500 | Owners Guide - Page 53
availability. Vertical Position This function allows you to select when aspect style is either 4:3 EXPANDED/ZOOM1/ZOOM2 or 16:9 ZOOM. Vertical position can be changed with these modes. For example, it will be useful for centering the picture area at both the top and bottom of the picture with 480i - Hitachi 60VX500 | Owners Guide - Page 54
you are using an indoor or outdoor antenna. Select Cable if you have cable TV. Chan. Manager Ant. A Ant. B Move SEL Select THUMB STICK SELECT Reception channels for each mode are shown at the left. Refer to your cable or TV guide for channel identification standards. ON-SCREEN DISPLAY 54 - Hitachi 60VX500 | Owners Guide - Page 55
CHANNEL MANAGER Auto Channel Scan This feature will automatically store active TV channels in Auto Channel Scan. This will allow you to skip unused channels when using CHANNEL UP (̆) or DOWN (̄). Chan. Manager Ant. A Channel Source Antenna - Hitachi 60VX500 | Owners Guide - Page 56
Off Off CH ID Move SEL Return Lock Press THUMB STICK ̆ or ̄ to review more channels. Press EXIT to quit the menu. Scan Use this feature after Auto Scan is completed to add (On) or skip (Off) additional channels to the remote control channel ̆ or ̄ buttons. Chan. Manager Ant. A Ch# 2 3 - Hitachi 60VX500 | Owners Guide - Page 57
easier and more enjoyable. Use this feature to give up to 20 channels a name when Antenna signal source is selected and up to 60 channels a name when Cable TV signal source is selected. THUMB STICK Chan. Manager Ant. A Ch# [2 3 4 5 6 7 8 9 Scan On On Off Off Off Off Off Off Ch ID Lock - Hitachi 60VX500 | Owners Guide - Page 58
a four digit secret code number. The factory preset code is 0000. Use the number buttons to select access code. Video Audio Aspect Chan. Manager Locks Setup Move SEL Sel THUMB STICK SELECT Please Enter Access Code [ - - - - ] [# Keys] Enter Code Locks Change Access Code Engage Lock TV Time Lock - Hitachi 60VX500 | Owners Guide - Page 59
Use Movie Ratings to block from showing any movie you feel might have inappropriate content. THUMB STICK MENU Locks Change Access Code Engage Lock TV Time Lock Movie Ratings TV Ratings Canadian Ratings (Eng) Canadian Ratings (Frn) Move SEL Select THUMB STICK SELECT Locks Movie Ratings Status Not - Hitachi 60VX500 | Owners Guide - Page 60
might have inappropriate content. Locks Change Access Code Engage Lock TV Time Lock Movie Ratings TV Ratings Canadian Ratings (Eng) Canadian Ratings (Frn) Move SEL Select THUMB STICK SELECT Locks TV Ratings Status D TV-Y: TV-Y7: TV-G: TV-PG: TV-14: TV-MA: Move SEL Return Sub Category - Hitachi 60VX500 | Owners Guide - Page 61
Canadian Ratings (Eng) to block any type of movie and television program in Canada that (Eng) you feel might be inappropriate in its content. MENU THUMB STICK Locks Change Access Code Engage Lock TV Time Lock Movie Ratings TV Ratings Canadian Ratings (Eng) Canadian Ratings (Frn) Move SEL Select - Hitachi 60VX500 | Owners Guide - Page 62
STICK Locks Change Access Code Engage Lock TV Time Lock Movie Ratings TV Ratings Canadian is selected, for example 8 ans+, all movies and television programs rated 8 ans+ and higher will be automatically blocked for a broad audience but contains light or occasional violence that could disturb young - Hitachi 60VX500 | Owners Guide - Page 63
or ̄ on the remote to highlight the function desired. MENU THUMB STICK Video Audio Aspect Chan. Manager Locks Setup Move SEL Sel THUMB STICK SELECT Setup Menu Preference Screen Saver Set The Clock Set The Inputs Set The Color System Set Black Side Panel Set Event Timer Set Closed Captions Move - Hitachi 60VX500 | Owners Guide - Page 64
), or select Shaded for a light background. Screen Saver Continuous on- "remain picture" to the LCD Rear PTV. Use the SCREEN SAVER Set Black Side Panel Set Event Timer Set Closed Captions Move SEL Select THUMB Option 3 The whole picture will shift every 60 minutes by two pixels. Screen Wipe If - Hitachi 60VX500 | Owners Guide - Page 65
Timer" or "TV Time Out" features. Setup Menu Preference Screen Saver Set The Clock Set The Inputs Set The Color System Set Black Side Panel Set Event Timer or ̄ to set the time and date. Press THUMB STICK ̇ or ̈ to change position. Press EXIT to quit menu. THUMB STICK Setup Set The Clock Time : - Hitachi 60VX500 | Owners Guide - Page 66
Set The Color System Set Black Side Panel Set Event Timer Set Closed Captions Move SEL Select THUMB STICK SELECT Setup Remote Off Move SEL Return DVD VCR VCR2 Reset Use THUMB STICK ̇, ̈, ̆ or ̄, then press down on THUMB STICK to change Auto Link setting. When Auto is selected, the TV will turn - Hitachi 60VX500 | Owners Guide - Page 67
change tint and color coordinates for DTV programs. HDTV - High Definition Television - Use for High Vision Signal Y-PBPR from HDTV Set-Top Box. SDTV/DVD - Standard Definition Television or DVD (Digital Set Black Side Panel The Black Side Panel function turns the gray side bars on/off when watching - Hitachi 60VX500 | Owners Guide - Page 68
no channel selection was made after this time. If you change the channel after the On Timer has been activated, the Off Timer will deactivate. 4. If no remote control button is pressed after Event Timer is activated, the TV will automatically turn off after three hours. Therefore, do not Set Event - Hitachi 60VX500 | Owners Guide - Page 69
television program or home video which are displayed on the TV screen. Your local TV program guide denotes these programs as or . Setup Menu Preference Screen Saver Set The Clock Set The Inputs Set The Color System Set Black Side Panel Set Event Timer the function to change then press down - Hitachi 60VX500 | Owners Guide - Page 70
LAMP REPLACEMENT LAMP REPLACEMENT Lamp Life The lamp life may vary based on usage of the LCD Rear PTV. Turning on and off frequently may shorten the life of the lamp. Lamp Replacement After extended use, if the TV picture turns dark, the color looks unusual or LAMP INDICATOR light turns on, then it - Hitachi 60VX500 | Owners Guide - Page 71
LAMP REPLACEMENT LAMP REPLACEMENT 1. Turn off the main power switch and unplug the power cord. Wait at least 30 minutes to allow the lamp to cool down before replacing it. 120V FRONT COVER PUSH POWER NOTE: THE LAMP IS VERY HOT AND MAY CAUSE FIRE OR SEVERE BURNS. WAIT AT LEAST 30~45 MINUTES TO - Hitachi 60VX500 | Owners Guide - Page 72
to your fingers. NOTE: DO NOT PUT YOUR HAND IN THE LAMP STORAGE AREA AFTER THE LAMP UNIT IS REMOVED, YOU MAY GET BURNED. HANDLE LAMP UNIT REMOVE SCREWS HANDLE 5. Replace with the new lamp. Place the removed lamp into the empty box of the replacement lamp. Do not touch the front glass of the new - Hitachi 60VX500 | Owners Guide - Page 73
LAMP REPLACEMENT LAMP REPLACEMENT 6. Without installing the lamp cover, the power will be off and the Lamp Indicator will flash (see page 8). Be sure to install the lamp cover by re-engaging the two clips and tighten the screws before turning the power on, otherwise it may cause unusual colors. - Hitachi 60VX500 | Owners Guide - Page 74
Television. Do not touch the screen too often. Do not subject the remote control to shocks such as dropping it on the floor, etc. Physical damage to the precision parts may result. Avoid placing the remote down, remote control operation will become erratic or possibly stop altogether. Replace the old - Hitachi 60VX500 | Owners Guide - Page 75
lamps, electrical drills, and other electrical appliances. • GHOSTS: Ghosts are caused by the television signal following two paths. One is the direct path and the other is reflected from tall buildings, hills or some other objects. Changing the picture. NOTE: The TV set can generate sound distortion in - Hitachi 60VX500 | Owners Guide - Page 76
© Poor color © © ©©© ©© Dark Picture ©© © HITACHI Liquid Crystal Display incorporates advanced power surge protection technology designed to protect against component or circuit damage due to external or internal voltage power surges. IF YOUR TELEVISION SHOULD APPEAR TO HAVE A LOSS OF POWER - Hitachi 60VX500 | Owners Guide - Page 77
4 components with one remote. (2 IR Mouse Digital Content Protection V1.0 compatible). • Photo MC (View digital Consumption - Refer to rear panel at the back A-5 ~ A-1 A-I Super Band J-W Dimensions: 50VX500 60VX500 Hyper Band W+1 - W+28 Ultra Band guide are subject to change without notice. 77 - Hitachi 60VX500 | Owners Guide - Page 78
a week, 24 hours a day (1-800-448-2244) Hitachi America, LTD. Home Electronics Division Hitachi has made every effort to assure you hours of trouble free operation from your unit. However, should you require service, a network of Hitachi Authorized Service Facilities has been established in all 50 - Hitachi 60VX500 | Owners Guide - Page 79
INFO Hitachi Canada, LTD. Digital Media Division Should you have any questions regarding warranty, service, operation, or technical assistance, please contact: In Canada: 1-800-HITACHI (1-800-448-2244) Monday - Friday EST 9:00am - 7:00pm Saturday EST 9:00am - 5:00pm Look for your French Manual on - Hitachi 60VX500 | Owners Guide - Page 80
Network (A/V Net), 21 - 22, 26, 29-30 Auto Color, 50 Auto Noise Cancel, 51 AV Net AV Net Code, 22 AV Net Setup, 20~21 AV Net Usage, 26~30 B Balance, 51 Bass, 51 Black Enhancement, 48 , 48 Contrast, 48 D DVI-HDTV, 11, 12, 18 E Event Timer ANT A/B, 68 I Input Setup, 66 IR Blaster, 11, 20 INDEX 80 - Hitachi 60VX500 | Owners Guide - Page 81
INDEX L Lamp Lamp Indicator, 8 Lamp Replacement, 70-73 Language Menu Language, 63 Locks Change Access Code, 58 Channel Lock, 58 Input Lock, 58 Front Panel Lock, 58 TV Time Lock, 58 Movie Ratings, 59 TV Ratings, 60 TV Ratings (Canadian - English), 61 TV Ratings (Canadian - French), 62 Loudness, - Hitachi 60VX500 | Owners Guide - Page 82
NOTES 82 - Hitachi 60VX500 | Owners Guide - Page 83
NOTES 83 - Hitachi 60VX500 | Owners Guide - Page 84
QR58982
-
 1
1 -
 2
2 -
 3
3 -
 4
4 -
 5
5 -
 6
6 -
 7
7 -
8
-
9
-
10
-
11
-
12
-
13
-
14
-
15
-
16
-
17
-
18
-
19
-
20
-
21
-
22
-
23
-
24
-
25
-
26
-
27
-
28
-
29
-
30
-
31
-
32
-
33
-
34
-
35
-
36
-
37
-
38
-
39
-
40
-
41
-
42
-
43
-
44
-
45
-
46
-
47
-
48
-
49
-
50
-
51
-
52
-
53
-
54
-
55
-
56
-
57
-
58
-
59
-
60
-
61
-
62
-
63
-
64
-
65
-
66
-
67
-
68
-
69
-
70
-
71
-
72
-
73
-
74
-
75
-
76
-
77
-
78
-
79
-
80
-
81
-
82
-
83
-
84
 |
 |
LCD REAR PROJECTION TELEVISION
OPERATING GUIDE
IMPORTANT SAFETY INSTRUCTIONS
2-3
FIRST TIME USE
4-22
THE REMOTE CONTROL
ON-SCREEN DISPLAY
USEFUL INFORMATION INDEX
70-81
45-69
23-44
Locks
Chan. Manager
Aspect
Audio
Video
Move
SEL
Sel
Setup
As an E
NERGY
S
TAR
®
Partner, Hitachi, Ltd. has determined that this
product meets the E
NERGY
S
TAR
®
guidelines for energy efficiency.