Hitachi 61UDX10B Owners Guide
Hitachi 61UDX10B Manual
 |
View all Hitachi 61UDX10B manuals
Add to My Manuals
Save this manual to your list of manuals |
Hitachi 61UDX10B manual content summary:
- Hitachi 61UDX10B | Owners Guide - Page 1
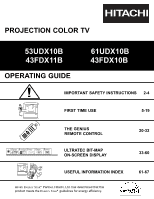
COLOR TV 53UDX10B 43FDX11B OPERATING GUIDE 61UDX10B 43FDX10B IMPORTANT SAFETY INSTRUCTIONS 2-4 FIRST TIME USE 5-19 THE GENIUS REMOTE CONTROL SETUP CUSTOMIZE VIDEO SEL AUDIO THEATER ULTRATEC BIT-MAP ON-SCREEN DISPLAY USEFUL INFORMATION INDEX As an ENERGY STAR¤ Partner, Hitachi, Ltd - Hitachi 61UDX10B | Owners Guide - Page 2
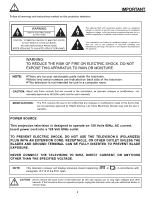
. NOTE: ¥There are no user serviceable parts inside the television. ¥Model and serial numbers are indicated on back side of the television. ¥ This television is not intended for use in a computer room. CAUTION: Adjust only those controls that are covered in the instructions, as improper changes or - Hitachi 61UDX10B | Owners Guide - Page 3
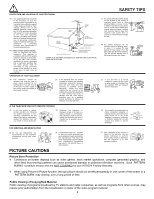
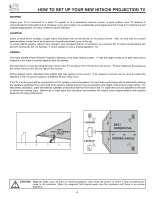
CAUTION: ¥ Read these instructions. ¥ Keep these instructions. ¥ Heed all warnings. ¥ Follow all instructions. SAFETY POINTS YOU SHOULD KNOW ABOUT YOUR HITACHI PROJECTION TELEVISION Our reputation has been built on the quality, performance, and ease of service of HITACHI televisions. Safety is - Hitachi 61UDX10B | Owners Guide - Page 4
, be sure the service technician has used replacement parts specified by the manufacturer that have the same characteristics as the original part. Unauthorized substitutions may result in fire, electric shock, or other hazards. 27. Upon completion of any service or repairs to the television - Hitachi 61UDX10B | Owners Guide - Page 5
model SP-43H is designed for use with a 43 inch or smaller television set. Use of a smaller stand, a non Hitachi recommended stand or a generic stand may result in instability, causing possible injury. 1. Remote Control Unit CLU-5711TSI (Part No. HL01641), or Remote Control Unit CLU-5713TSI (Part - Hitachi 61UDX10B | Owners Guide - Page 6
right of the receiver. During daylight hours, reflections from outside light may appear on the screen. If so, drapes or screens can be used to reduce the reflection or the TV can be located in a different section of the room. If the TV s audio output will be connected to a Hi-Fi system s external - Hitachi 61UDX10B | Owners Guide - Page 7
Type 75-Ohm Coaxial Antenna Connector For connecting RF signals (antenna or cable TV) to the antenna jack on the television. Phono Connector Used on all antenna cable mixer to the TV antenna terminal, and connect the cables to the antenna mixer. Consult your dealer or service store for the antenna - Hitachi 61UDX10B | Owners Guide - Page 8
FRONT VIEW FRONT PANEL CONTROLS Models: 61UDX10B, 53UDX10B CH+ POWER INPUT MENU VOL- EXIT SELECT CH- ቤ PUSH VOL+ SRS (G)€/ CH+ POWER INPUT MENU VOLEXIT SELECT CH- ብ MAGIC VOL+ FOCUS ቪ Push open door and pull forward and down ቫ Models: 43FDX11B, 43FDX10B CH+ POWER INPUT MENU VOL- EXIT - Hitachi 61UDX10B | Owners Guide - Page 9
amount of light in the room to give the best picture. (see page 54) ቩ REMOTE CONTROL sensor Point your remote at this area when selecting channels, adjusting volume, etc. ቪ DIGITAL ARRAY (Model: 43FDX10B/43FDX11B) MAGIC FOCUS (Models: 53UDX10/61UDX10B) Use this button to adjust your picture quality - Hitachi 61UDX10B | Owners Guide - Page 10
provided as a convenience to allow you to easily connect a camcorder or VCR as shown in the following examples: MAGIC FOCUS S-VIDEO VIDEO L/MONO R INPUT 3 AUDIO S-INPUT (Optional, see note) INPUT S-VHS V Back of VCR have a mono VCR, insert the audio cable into the left audio jack of your TV. 10 - Hitachi 61UDX10B | Owners Guide - Page 11
R AUDIO R AUDIO INPUT 5 MONITOR OUT ብ ባ ቤ ቢ Antenna Input/Output The remote control allows you to switch between two separate 75-Ohm RF antenna inputs, ANT A camcorders, laserdisc players, DVD players etc. (If you have mono sound, insert the audio cable into the left audio jack.) NOTE: You - Hitachi 61UDX10B | Owners Guide - Page 12
. 2. Your component outputs may be labeled Y-CBCR. In this case, connect the component CB output to the TV s PB input and the component CR output to the TV s PR input. 3. It may be necessary to adjust TINT to obtain optimum picture quality when using the Y-PBPR inputs. (See pages 53 and 54) 4. To - Hitachi 61UDX10B | Owners Guide - Page 13
REAR PANEL CONNECTIONS TYPICAL FULL-FEATURE SETUP Outside antenna or cable TV coaxial cable 2-Way signal splitter VCR #1 ANT 15 OUTPUT INPUT Cable TV Box Optional, see tips on page 15 S-VIDEO V L R OUTPUT Y PB PR L R OUTPUT Laserdisc player, VCR, camcorder, etc. HDTV Set-Top Box NOTE: - Hitachi 61UDX10B | Owners Guide - Page 14
one audio output (mono sound), connect it to the left audio jack on the television. Refer to the operating guide of your other electronic equipment the TV s PB input and the components CR output to the TV s PR input. You may use standard video signal for INPUT:4 and 5. It may be necessary to adjust - Hitachi 61UDX10B | Owners Guide - Page 15
To control the audio level of an external audio amplifier with the remote control, connect the system as shown below. REAR PANEL OF TELEVISION ANT the speaker and distorted sound, set the volume control of the audio amplifier lower and adjust the sound using the remote control of the TV set. 15 - Hitachi 61UDX10B | Owners Guide - Page 16
player, DVD player, or HDTV Set Top Box to your TV set is dependent on the model and features of each component. Check the owner's manual of each component for the location MONO) L L PR R AUDIO R AUDIO INPUT 5 MONITOR OUT AUDIO OUT VIDEO OUT Back of VCR VCR Hitachi Model or Similar Model 16 - Hitachi 61UDX10B | Owners Guide - Page 17
or the laserdisc player to the INPUT (VIDEO) jack, as shown on the TV set below. 2. Connect the cable from the AUDIO OUT R of the VCR OUT VCR Hitachi Model or Similar Model NOTES: 1. Completely insert the connection cord plugs when connecting to rear panel jacks. The picture and sound that is - Hitachi 61UDX10B | Owners Guide - Page 18
(S-VIDEO) jack, as shown on the TV set below. 2. Connect the cable from VCR or Laserdisc Player Hitachi Model or Similar Model Rear Panel of Television to rear panel jacks. The picture and sound that is played back will be abnormal guide for more information on line inputoutput connections. 18 - Hitachi 61UDX10B | Owners Guide - Page 19
the Laserdisc/DVD player or HDTV set top box to the INPUT (Y) jack, as shown on the TV set below. 2. Connect the R Y PB PR HDTV Set-Top Box DVD Player Hitachi Model or Similar Model OUTPUT Back of VIDEO AUDIO to rear panel jacks. The picture and sound that is played back will be abnormal if - Hitachi 61UDX10B | Owners Guide - Page 20
and press the AV1, AV2 or AV3 button. This button will blink, indicating that the remote will now control the desired component. (See page 31 for instructions on how to program the remote to control additional Audio/Video equipment.) ቢ POWER ባ TV DVD VCR CBL SOURCE WIZARD AV1 AV2 STB AV3 - Hitachi 61UDX10B | Owners Guide - Page 21
+ INFO GUIDE/TV SCHD VID 5 VID 2 VID 4 VID 3 PIP PIP CH FREEZE PIP MODE PIP ACCESS SWAP PROG TV/VCR SLOW ብ ቦ ቨ 23 1 REC REC CLU-5711TSI CLU-5713TSI ᕃ POWER button Press this button to turn the TV set on or off when the remote is in TV mode. (See page 22 for instructions on how - Hitachi 61UDX10B | Owners Guide - Page 22
REMOTE TO CONTROL YOUR TV ቨ AV1, AV2, AV3, or CD, TAPE, AMP buttons When pressed, each of these buttons will blink to indicate the remote is in Audio/Video mode. (see page 31) NOTE: Your remote digit channel you wish to tune then wait a few seconds for the TV of the screen. Every subsequent FORMATS - Hitachi 61UDX10B | Owners Guide - Page 23
REMOTE TO CONTROL YOUR TV ቴ THUMB STICK/SELECT button All the On-Screen Display features can be set or adjusted by using the THUMB STICK. The THUMB STICK will highlight functions or adjust MUTE button again to turn the sound off completely (MUTE). To restore the sound, press the MUTE button one more - Hitachi 61UDX10B | Owners Guide - Page 24
on the remote. The GUIDE/TV SCHD VID 5 VID 2 VID 4 VID 3 PIP PIP CH FREEZE PIP MODE PIP ACCESS SWAP PROG TV/VCR SLOW ብ,ቦ ባ REC VCR Hitachi Model or Similar Model screen. Press the PIP button again to remove the sub-picture from the screen sound from the main picture can be heard. 24 - Hitachi 61UDX10B | Owners Guide - Page 25
39) If a channel is tuned during this SURF scanning, sub-pictures will be removed from the screen. SURF MODE PIP is allowed only when ANT A is selected as the main channel. If PARENTAL CONTROL MOVIE/TV RATINGS setting is ON, PIP SURF mode will be deactivated. Closed Caption will not appear when - Hitachi 61UDX10B | Owners Guide - Page 26
PICTURE-IN-PICTURE (PIP) ብ FREEZE button (With PIP ON) If you wish to freeze the sub-picture, press the FREEZE button. This is convenient when trying to write down the address for a mail order company, recording statistics for a sporting event, etc. To return the picture to motion, press the FREEZE - Hitachi 61UDX10B | Owners Guide - Page 27
CH ባ ባ SVCS VID 1 MUTE STATUS VCR PLUS+ INFO GUIDE/TV SCHD VID 5 VID 2 PIP VID 3 PIP CH VID 4 FREEZE PIP MODE PROG PIP ACCESS SWAP TV/VCR SLOW REC ቤ CLU-5711TSI CLU-5713TSI MY VCR CODE IS: NOTE: Refer to instruction manual of the VCR for operation of the buttons exclusively for - Hitachi 61UDX10B | Owners Guide - Page 28
CABLE BOX buttons These buttons transmit the chosen precoded cable codes. ቤ EXCLUSIVE TV buttons These buttons are for operating the TV. REC CLU-5711TSI REC CLU-5713TSI MY CABLE BOX CODE IS: NOTE: Refer to instruction manual of the Cable Box for operation of the buttons exclusively for the Cable - Hitachi 61UDX10B | Owners Guide - Page 29
CH SVCS VID 1 MUTE STATUS VCR PLUS+ INFO GUIDE/TV SCHD VID 5 VID 2 VID 4 VID 3 PIP PIP CH FREEZE PIP MODE PIP ACCESS SWAP PROG TV/VCR SLOW ባ ቤ ባ REC CLU-5713TSI MY SATELLITE RECEIVER/STB CODE IS: NOTE: Refer to instruction manual of the set-top-box/satellite receiver for - Hitachi 61UDX10B | Owners Guide - Page 30
CH ባ SVCS VID 1 MUTE STATUS VCR PLUS+ INFO GUIDE/TV SCHD VID 5 VID 2 VID 4 VID 3 PIP PIP CH FREEZE PIP MODE PIP ACCESS SWAP PROG TV/VCR SLOW REC ቤ CLU-5711TSI CLU-5713TSI MY DVD PLAYER CODE IS: NOTE: Refer to instruction manual of the DVD player for operation of the buttons - Hitachi 61UDX10B | Owners Guide - Page 31
1 MUTE STATUS VCR PLUS+ INFO GUIDE/TV SCHD VID 5 VID 2 VID 4 VID 3 PIP PIP CH FREEZE PIP MODE PIP ACCESS SWAP PROG TV/VCR SLOW REC ቤ CLU-5711TSI CLU-5713TSI MY AUDIO/VIDEO EQUIPMENT CODE IS: AV1 (CD) AV2 (TAPE) AV3 (AMP/RCVR) NOTE: Refer to instruction manual of the Audio/Video - Hitachi 61UDX10B | Owners Guide - Page 32
Ryung 20 Eastern 14 Electricord 31 Everquest 51 Focus 52 Garrard 11 GC Electronics 32, 39 Gemini 05 18 Tocom 07, 27, 50 Toshiba 03 Tusa 51 TV 86 29 Unika 11, 39 United Artists 36 United , 48 Zentek 52 SATELLITE BRAND CODE Echostar 04 Hitachi 01 Hughes 05 RCA 02 Sony 03 SET-TOP - Hitachi 61UDX10B | Owners Guide - Page 33
SETUP CUSTOMIZE VIDEO SEL AUDIO THEATER Set Menu Language Plug & Play Set Antenna/Cable Set Channel Memory Edit Channel Memory View Channel List Set The Clock Magic Focus* Picture Formats To Quit Exit This part of the screen shows which remote control buttons to use. * 43FDX10B/43FDX11B Models - Hitachi 61UDX10B | Owners Guide - Page 34
Magic Focus Automatically match red, green, and blue colors to make white. (53UDX10B/61UDX10B) Digital Array Adjust red and blue to match green manually. (43FDX10B/43FDX11B) Picture Formats channel picture and sound. Turn TV on and off once, daily, or weekly. Automatically turn TV on to VIDEO - Hitachi 61UDX10B | Owners Guide - Page 35
TV up for the first time. Use the THUMB STICK ̆ or ̄ on the remote to highlight the function desired. MENU SETUP CUSTOMIZE VIDEO SEL AUDIO THEATER Set Menu Language Plug & Play Set Antenna/Cable Set Channel Memory Edit Channel Memory View Channel List Set The Clock Magic Focus Picture Formats - Hitachi 61UDX10B | Owners Guide - Page 36
SETUP CUSTOMIZE VIDEO SEL AUDIO THEATER Set Menu Language Plug & Play Set Antenna/Cable Set Channel Memory Edit Channel Memory View Channel List Set The Clock Magic Focus Picture Formats M e n u To M e n u B a r To E x i t Q u i t THUMB STICK Welcome To Your Plug & Play On Screen Set Up Guide - Hitachi 61UDX10B | Owners Guide - Page 37
TV. SETUP CUSTOMIZE VIDEO SEL AUDIO THEATER Set Menu Language Plug & Play Set Antenna/Cable Set Channel Memory Edit Channel Memory View Channel List Set The Clock Magic Focus Picture Formats 2 CATV CHANNEL Indicated on VHF 2~13 the screen 2 ~ 13 Mid band A~1 A-5 ~ TV guide for channel identification standards - Hitachi 61UDX10B | Owners Guide - Page 38
Plug & Play Set Antenna/Cable Set Channel Memory Edit Channel Memory View Channel List Set The Clock Magic Focus Picture Formats M e n u To M e n u B a r Begin To Q u i t E x i t THUMB STICK SETUP SEL Press select to set Set Menu Language Plug & Play Set Antenna/Cable Set Channel Memory Edit - Hitachi 61UDX10B | Owners Guide - Page 39
additional channels to the remote control CHANNEL ̆ or ̄ buttons. SETUP CUSTOMIZE VIDEO SEL AUDIO THEATER Set Menu Language Plug & Play Set Antenna/Cable Set Channel Memory Edit Channel Memory View Channel List Set The Clock Magic Focus Picture Formats M e n u To M e n u B a r Channel 3 Add - Hitachi 61UDX10B | Owners Guide - Page 40
Set The Clock Magic Focus Picture Formats M e n u To M e n u B a r To Q u i t E x i t THUMB STICK SETUP CUSTOMIZE VIDEO SEL e n u B a r To Q u i t E x i t Press THUMB STICK ̆ or ̄ to review more channels. Press EXIT to quit menu or THUMB STICK ̇ to return to previous menu. NOTE: Each touch of - Hitachi 61UDX10B | Owners Guide - Page 41
TIMER or TV TIME OUT. SETUP CUSTOMIZE VIDEO SEL AUDIO THEATER Set Menu Language Plug & Play Set Antenna/Cable Set Channel Memory Edit Channel Memory View Channel List Set The Clock Magic Focus Picture Formats M e n u To M e n u B a r To Q u i t E x i t THUMB STICK SETUP SEL SETUP İ To - Hitachi 61UDX10B | Owners Guide - Page 42
SETUP SET UP MAGIC FOCUS Model: 43FDX10B/43FDX11B - Please see Digital Array on page 43. Your HITACHI Projection TV has three color projection tubes: one for red, one for green, one for blue. When mixed together in the proper proportion, the output of these three color tubes can produce any color. - Hitachi 61UDX10B | Owners Guide - Page 43
other to produce the white lines. To simplify convergence, HITACHI incorporates a feature to allow you to display a test pattern of horizontal and vertical lines at 9 different locations on the screen. Simply use the remote control to adjust the red and blue colors to match the green. When properly - Hitachi 61UDX10B | Owners Guide - Page 44
Set The Clock Magic Focus Picture Formats M e n u To M e n u B a r To Q u i t E x i t THUMB STICK SETUP Press Select To Set SEL Picture Formats Aspect Style V. Position Comp Color Type Video Display M e n u To M e n u B a r Ant A 6 Aspect 1 Aspect 2 Aspect 3 Aspect 4 Aspect 5 +5 HDTV SDTV/DVD - Hitachi 61UDX10B | Owners Guide - Page 45
SETUP SET UP Picture Formats Depending on the input signal, the PICTURE FORMAT aspect ration allows you to adjust the image through the following options. (1) NTSC Input - ANT A/B, VID1 ~ VID5, - 4x3 Format HDTV SDTV/DVD 1080i 540P To Q u i t E x i t SETUP Press Select To Set SEL Picture Formats - Hitachi 61UDX10B | Owners Guide - Page 46
Color Type Video Display M e n u To M e n u B a r Y-PBPR: 4 Aspect 1 Aspect 2 Aspect 3 Aspect 4 Aspect 5 +5 HDTV SDTV/DVD 1080i 540P To Q u i t E x i t SETUP Press Select To Set SEL Picture Formats Aspect Style V. Position Comp Color Type Video Display M e n u To M e n u B a r Y-PBPR: 4 Aspect - Hitachi 61UDX10B | Owners Guide - Page 47
advanced features which will make TV viewing easier and more enjoyable. NAME THE CHANNEL Use this feature to give up to 20 channels a name when ANTENNA signal source is selected and up to 60 channels a name when CATV signal source is selected. MENU THUMB STICK SETUP CUSTOMIZE VIDEO SEL AUDIO - Hitachi 61UDX10B | Owners Guide - Page 48
set SEL Name the Inputs Vid 1 Vid 2 Vid 3 Vid 4 Vid 5 Input Name List Custom Name Reset Menu To Menu Bar To Quit Exit THUMB STICK SETUP CUSTOMIZE VIDEO SEL AUDIO THEATER Name the Inputs Vid 1 Vid 2 Vid 3 Vid 4 Vid 5 ̆ Input Name List CAM Custom Name CBL Reset DVD LD SAT - Hitachi 61UDX10B | Owners Guide - Page 49
Sensor Closed Caption Menu Background Menu To Menu Bar To Quit Exit THUMB STICK SETUP CUSTOMIZE VIDEO SEL AUDIO THEATER Set Favorite Ch. Ch 3 MOVIES 3 6 to be added is displayed in the top right corner of the screen. Enter channel 00 to erase a favorite channel. To reset categories and - Hitachi 61UDX10B | Owners Guide - Page 50
MENU and the category will be displayed as sub-pictures at the right edge of the screen. This is useful for previewing a category. Use THUMB STICK ̇, ̈, ̆ or ̄ to highlight a favorite channel and the TV will automatically tune to that channel. Press EXIT to remove FAVORITE CHANNELS OSD from the - Hitachi 61UDX10B | Owners Guide - Page 51
one of the video inputs. When QUICK LOCK is turned on, the picture and sound for channels 3, 4 on both ANT A/B and all video inputs will be Parental Control Movie/TV Ratings Reference Guide. To change the secret code number, select CHANGE SECRET CODE. Enter a new four digit key number you prefer - Hitachi 61UDX10B | Owners Guide - Page 52
set, you can not use this function and the screen below will appear. SETUP CUSTOMIZE VIDEO SEL AUDIO THEATER Set Program Timer Please Set Clock First MENU TO MENU BAR TO QUIT EXIT NOTE: 1. The OFF Timer will only activate if the TV was turned on or tuned with the ON Timer and - Hitachi 61UDX10B | Owners Guide - Page 53
function to automatically turn the TV on and tune to VIDEO: 4 when it detects a VIDEO input. SETUP CUSTOMIZE VIDEO SEL AUDIO THEATER to watch a movie with your VCR, laserdisc player, or DVD player. When REMOTE is selected, the TV will turn on and tune to VIDEO: 4 automatically, when the VIDEO: 4 - Hitachi 61UDX10B | Owners Guide - Page 54
and/or sound effects of a television program or home video which are displayed on the TV screen. Your local TV program guide denotes these programs as or . SETUP CUSTOMIZE VIDEO background is visible (no picture can be seen behind menu screen), select SHADED and a light background is visible. 54 - Hitachi 61UDX10B | Owners Guide - Page 55
VIDEO VIDEO Select VIDEO to adjust picture settings and improve picture quality. VIDEO THUMB STICK MENU SETUP CUSTOMIZE VIDEO SEL AUDIO THEATER Contrast Brightness Color Tint Sharpness Reset Advanced Settings Menu To Menu Bar 100% 50% 50% 50% To Quit Exit THUMB - Hitachi 61UDX10B | Owners Guide - Page 56
HITACHI Projection TV has a PERFECT PICTURE function which will automatically adjust picture settings to produce the highest quality picture possible. When PERFECT PICTURE is highlighted, press down on THUMB STICK to turn the PERFECT PICTURE on or off. SETUP the edges between light and dark areas. - Hitachi 61UDX10B | Owners Guide - Page 57
AUDIO AUDIO Select AUDIO to adjust the TV to your preference and to improve the sound quality. AUDIO MENU THUMB STICK SETUP CUSTOMIZE VIDEO SEL AUDIO THEATER Bass Treble Balance Reset Advanced Settings 50% 50% THUMB STICK SETUP CUSTOMIZE VIDEO SEL AUDIO THEATER Bass Treble Balance Reset - Hitachi 61UDX10B | Owners Guide - Page 58
Use ADVANCED SETTINGS to improve the sound performance of your TV, depending on listening conditions. SETUP CUSTOMIZE VIDEO SEL AUDIO THEATER THUMB low and high frequency sounds when listening at low volume levels. PERFECT VOLUME This function will automatically adjust volume so each channel - Hitachi 61UDX10B | Owners Guide - Page 59
to choose from automatic picture settings to optimize your TV s performance. SETUP CUSTOMIZE VIDEO SEL AUDIO THEATER MENU THUMB STICK Theater . When MOVIE MODE is selected from the THEATER menu, your Hitachi Projection Television will activate the circuitry for this special feature to - Hitachi 61UDX10B | Owners Guide - Page 60
your HITACHI television. If your HITACHI television is connected to an external audio system, BBE will also create an incredible crisp sound experience sound as though the sound was being produced live. NOTES: BBE functions the same manner on TV mode and on VIDEO mode. NOTES: Licensed by BBE Sound, - Hitachi 61UDX10B | Owners Guide - Page 61
CARE OF YOUR HITACHI PROJECTION TV AND YOUR REMOTE CONTROL DO Dust the screen and cabinet with a soft cloth. Clean the screen with a soft cloth moistened in warm water and dry with a soft cloth. A mild soap may be used if the screen is extremely dirty. Place your television away from extreme heat, - Hitachi 61UDX10B | Owners Guide - Page 62
RECEPTION PROBLEMS ¥ IGNITION NOISE: Black spots or horizontal streaks may appear, picture may flutter or streaks, and in some cases, causes loss of contrast in the picture. NOTE: The TV set can generate sound distortion in external devices such as a radio. Please separate radio equipment from the - Hitachi 61UDX10B | Owners Guide - Page 63
OK, picture poor © Picture OK, sound poor © © ©©© © © Picture blurred © © ©©© © Lines or streaks in picture © ©©© © Poor reception on some channels © ©©© © Picture rolls vertically © © No color © © ©©© © Poor color © © ©©© ©© HITACHI Projection Television incorporates advanced - Hitachi 61UDX10B | Owners Guide - Page 64
¥ ON SCREEN PLUG and PLAY guide ¥ Full Set of Input Jacks, including S-VIDEO ¥ COMPONENT VIDEO: Y-PB/PR ¥ Velocity Modulation ¥ Closed Caption Decoder ¥ High Resolution Picture-In-Picture with Freeze ¥ Tuned Port Bass Reflex Speakers ¥ Magic Focus (Auto Digital Convergence) 53UDX10B/61UDX10B - Hitachi 61UDX10B | Owners Guide - Page 65
with the terms of the limited warranty as stated on your warranty card or operating guide. Should you have any questions regarding warranty, service, operation, or technical assistance, please contact: Hitachi America, LTD. Home Electronics Division 1855 Dornoch Court San Diego, CA 92154 In Canada - Hitachi 61UDX10B | Owners Guide - Page 66
NOTES 66 - Hitachi 61UDX10B | Owners Guide - Page 67
NOTES 67 - Hitachi 61UDX10B | Owners Guide - Page 68
QR48504
-
 1
1 -
 2
2 -
 3
3 -
 4
4 -
 5
5 -
 6
6 -
 7
7 -
8
-
9
-
10
-
11
-
12
-
13
-
14
-
15
-
16
-
17
-
18
-
19
-
20
-
21
-
22
-
23
-
24
-
25
-
26
-
27
-
28
-
29
-
30
-
31
-
32
-
33
-
34
-
35
-
36
-
37
-
38
-
39
-
40
-
41
-
42
-
43
-
44
-
45
-
46
-
47
-
48
-
49
-
50
-
51
-
52
-
53
-
54
-
55
-
56
-
57
-
58
-
59
-
60
-
61
-
62
-
63
-
64
-
65
-
66
-
67
-
68
 |
 |
PROJECTION COLOR TV
53UDX10B
61UDX10B
43FDX11B
43FDX10B
OPERATING GUIDE
IMPORTANT SAFETY INSTRUCTIONS
2-4
FIRST TIME USE
5-19
THE GENIUS
REMOTE CONTROL
ULTRATEC BIT-MAP
ON-SCREEN DISPLAY
USEFUL INFORMATION INDEX
61-67
33-60
20-32
CUSTOMIZE
SETUP
VIDEO
AUDIO
THEATER
SEL
As an
E
NERGY
S
TAR
¤
Partner, Hitachi, Ltd. has determined that this
product meets the
E
NERGY
S
TAR
¤
guidelines for energy efficiency.