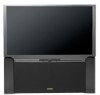
Hitachi 65X500 Owners Guide
Hitachi 65X500 Manual
 |
View all Hitachi 65X500 manuals
Add to My Manuals
Save this manual to your list of manuals |
Hitachi 65X500 manual content summary:
- Hitachi 65X500 | Owners Guide - Page 1
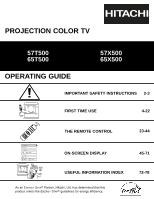
PROJECTION COLOR TV 57T500 65T500 OPERATING GUIDE 57X500 65X500 IMPORTANT SAFETY INSTRUCTIONS 2-3 FIRST TIME USE 4-22 THE REMOTE CONTROL Video Audio Aspect Ch. Manager Locks Setup Move SEL Sel ON-SCREEN DISPLAY USEFUL INFORMATION INDEX As an ENERGY STAR® Partner, Hitachi, Ltd. has - Hitachi 65X500 | Owners Guide - Page 2
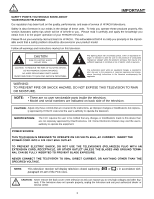
no user serviceable parts inside the television. • Model and serial numbers are indicated on back side of the television. CAUTION: Adjust only those controls that are covered in the instructions, as improper changes or modifications not expressly approved by HITACHI could void the user's authority - Hitachi 65X500 | Owners Guide - Page 3
instructions pertaining to your resident state. For disposal or recycling information, please contact your local authorities or the Electronic Industries Alliance: www.eiae.org. Projection TV to television receivers. Such "SCREEN BURNS" constitute misuse and are NOT COVERED by your HITACHI Factory - Hitachi 65X500 | Owners Guide - Page 4
CONTROL CH + A/V NET VOL - SELECT VOL + MUTE CH - MENU EXIT FAV CH ANT POWER REMOTE CONTROL POWER TV DVD VCR CBL SOURCE WIZARD CD PVR STB AMP 1 2 3 4 5 6 7 8 9 SLEEP C.C. ANT 0 INFO A/V NET ASPECT VIRTUAL HD MENU EXIT VOL SELECT CH MUTE LAST CH VID 1 - Hitachi 65X500 | Owners Guide - Page 5
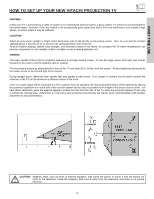
changes, and increased chance of set failure, do not place the TV where temperatures can become excessively hot, for example, in direct sunlight or near a heating appliance, etc. VIEWING The major benefit of the HITACHI Projection Television is its large viewing screen. To see this large screen at - Hitachi 65X500 | Owners Guide - Page 6
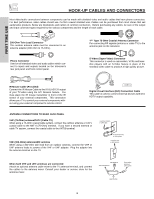
RF signals (antenna or cable TV) to the antenna jack on the television. S-Video (Super Video) your TV to control your external components without using your external component's remote to the TV antenna terminal, and connect the cables to the antenna mixer. Consult your dealer or service store - Hitachi 65X500 | Owners Guide - Page 7
into the left audio jack. ቩ IR RECEIVER / LEARNING AV NET sensor The screen area acts as the IR receiver (remote sensor) and the LEARNING AV NET sensor of the TV. When using the remote control, point it towards the screen for best response. ቪ PHOTO MC Insert Photo memory card to view your digital - Hitachi 65X500 | Owners Guide - Page 8
S-INPUT cable in place of the standard video cable. 3. If you have a mono VCR, insert the audio cable into the left audio jack of your TV. 8 - Hitachi 65X500 | Owners Guide - Page 9
ቧ ቧ Models: 57T500 and 65T500 Models: 57X500 and 65X500 ቢ Antenna Input/Output The remote control allows controlled by the television's main volume. ቦ CENTER IN (Input) These the TV speakers to be used as a center speaker. The TV must be set as a center channel by selecting "TV as - Hitachi 65X500 | Owners Guide - Page 10
this case, connect the components B-Y output to the TV's PB input and the components R-Y output to the TV's PR input. 3. Your component outputs may be labeled connection will allow you to control the external components with your television's remote control (see page 20). ቪ DVI-HDTV Input (INPUT 1) - Hitachi 65X500 | Owners Guide - Page 11
TYPICAL FULL-FEATURE SETUP Models: 57T500 and 65T500 CONNECT TO IR BLASTER IR Sensor (Provided) Outside antenna or cable TV coaxial cable 2-Way signal VIDEO S-VIDEO VCR #1 ANT OUTPUT IN S-VIDEO V L R OUTPUT INPUT Cable TV Box C OUTPUT LR INPUT IR Sensor S-VIDEO V L R INPUT S-VIDEO - Hitachi 65X500 | Owners Guide - Page 12
Outside antenna or cable TV coaxial cable 2-Way signal splitter REAR PANEL CONNECTIONS TYPICAL FULL-FEATURE SETUP Models: 57X500 and 65X500 CONNECT TO IR BLASTER S-VIDEO VCR #1 ANT OUTPUT IN S-VIDEO V L R OUTPUT INPUT Cable TV Box C OUTPUT LR INPUT IR Sensor S-VIDEO V L R INPUT S-VIDEO - Hitachi 65X500 | Owners Guide - Page 13
connect it to the left audio jack on the television. • Refer to the operating guide of your other electronic equipment for additional information on case, connect the components CB output to the TV's PB input and the components CR output to the TV's PR input. • You may use composite video - Hitachi 65X500 | Owners Guide - Page 14
: 57T500 65T500 Models: 57X500 65X500 LR INPUT LR INPUT Stereo System Amplifier Stereo System Amplifier NOTE: 1. To prevent damage to the speaker and distorted sound, set the volume control of the audio amplifier lower and adjust the sound using the remote control of the TV set. 2. See page - Hitachi 65X500 | Owners Guide - Page 15
the VCR or the laserdisc player to the INPUT (VIDEO) jack, as shown on the TV set below. 2. Connect the cable from the AUDIO OUT of the VCR or the laserdisc VIDEO S-VIDEO INPUT 4 R (MONO)/L VIDEO S-VIDEO MONITOR OUT R L VIDEO AUDIO S-VIDEO Models: 57X500 65X500 Audio Video OUTPUT VCR 15 - Hitachi 65X500 | Owners Guide - Page 16
player to the INPUT (VIDEO) jack, as shown on the TV set below. 2. Connect the cable from the AUDIO OUT R of S-VIDEO MONITOR OUT R L AUDIO VIDEO S-VIDEO Models: 57X500 65X500 OUTPUT RL V VCR VCR NOTES: 1. Completely insert guide for more information on line input-output connections. 16 - Hitachi 65X500 | Owners Guide - Page 17
laserdisc player to the INPUT (S-VIDEO) jack, as shown on the TV set below. 2. Connect the cable from the AUDIO OUT R of VIDEO MONITOR OUT R L AUDIO VIDEO S-VIDEO Models: 57X500 65X500 OUTPUT RL V S-VIDEO VCR VCR NOTES: guide for more information on line input-output connections. 17 - Hitachi 65X500 | Owners Guide - Page 18
INPUT 1 OR INPUT 2 (Models: 57/65X500) 1. Connect the DVI connection cable from the output of the HDTV set top box or DVD player to the DVI-HDTV input as shown on the TV set below. 2. Connect the the DVI interface so proper set-up of device user settings determines final video appearance. 18 - Hitachi 65X500 | Owners Guide - Page 19
or HDTV set top box to the INPUT (Y) jack, as shown on the TV set below. 2. Connect the cable from the CB/PB OUT or B-Y OUT S-VIDEO INPUT 4 R (MONO)/L VIDEO MONITOR OUT R L VIDEO AUDIO S-VIDEO S-VIDEO Models: 57X500 65X500 ANT A TO CONVERTER ANT B AUDIO TO HI-FI CENTER IN IR BLASTER L R - Hitachi 65X500 | Owners Guide - Page 20
Hitachi TV Remote Control. You can use your Hitachi remote control to control the Audio/Video equipment command without the equipment's remote control. The Television MONITOR OUT R L AUDIO VIDEO S-VIDEO S-VIDEO S-VIDEO Models: 57X500 65X500 ANT A TO CONVERTER ANT B AUDIO TO HI-FI CENTER - Hitachi 65X500 | Owners Guide - Page 21
HITACHI AV NET SET UP DVD Device Code Video Input Audio Input 0 6 7 2 (Enter code "9999" to uninstall) Input 1 Using TV TV Not Setup Not Setup Not Setup Not Setup Not Setup Not Setup EXIT SEL Select 6. Enter "9999" to uninstall the equipment from your AV Network. 7. See Remote guide. 21 - Hitachi 65X500 | Owners Guide - Page 22
HI-Q 0047 Harley Davidson 0000 Harman/Kardon 0038, 0081 Harwood 0072 Hitachi 0000, 0041, 0042 Hughes Network Systems 0042 JVC 0067, 0041 0008, 0014, 0017 Americast 0899 Bell & Howel 0014 Bell South 0899 Director 0476 General Instrument 0003, 0476, 0276, 0810 GoldStar 0144 Hamlin 0009, - Hitachi 65X500 | Owners Guide - Page 23
CONTROL In addition to controlling all the functions on your HITACHI Projection TV, the new remote control is designed to operate different types of VCRs, CATV (Cable TV) converters, set-top-box, satellite receiver, DVD players, and other audio/video equipment with one touch. Basic operation keys - Hitachi 65X500 | Owners Guide - Page 24
ᕃ POWER button Press this button to turn the TV set on or off when the remote is in TV mode (see page 23 for instructions on how to set the remote control to TV mode). ባ TV button When the TV button is pressed, it will blink, to indicate the remote is in TV mode. ቤ VCR button When the VCR button - Hitachi 65X500 | Owners Guide - Page 25
CONTROL HOW TO USE THE REMOTE TO CONTROL YOUR TV ቨ PVR (Personal Video Recorder) button When pressed, this button will blink to indicate the remote is in PVR mode (see page 41). ቩ CD and AMP buttons When pressed, each of these buttons will blink to indicate the remote is in Audio mode (see page - Hitachi 65X500 | Owners Guide - Page 26
network (AV Net) menu. The AV Net allows the user to control external components with the Projection TV's remote control. When you press the AV NET button, the list and soft keys by selecting the "Custom" icon and following the instructions of the AV NET learning wizard (see page 30). This window - Hitachi 65X500 | Owners Guide - Page 27
HOW TO USE THE REMOTE TO CONTROL YOUR TV Photo MC The Photo MC feature is useful for viewing digital still pictures from your digital camera using a memory card and displaying them on the TV screen. Insert Photo MC (memory card) to be viewed to a PC Card adapter. Insert the loaded PC Card adapter - Hitachi 65X500 | Owners Guide - Page 28
CONTROL HOW TO USE THE REMOTE TO CONTROL YOUR TV SLIDESHOW Select this menu item to start a slideshow . The sub directory then should be placed on a main directory with a "dcim" file name format. 2. Supported image types are from VGA (640 x 480) up to UXGA (1600 x 1200); JPEG format should conform - Hitachi 65X500 | Owners Guide - Page 29
GUIDE OF EQUIPMENT Move AV NET Return C See Page 30 DVD VCR Cable Box Photo MC POWER MENU MORE.. Move INFO Device Setting NOTE: To access the cursor function of a specific equipment (Ex. PV Recorder), select the "MENU" soft key on OSD, and press the MENU button of the Projection TV remote - Hitachi 65X500 | Owners Guide - Page 30
remote button transfers are successful, the user can now control their equipment by using the TV remote control. HITACHI AV NET WIZARD (Learning) C Use this wizard to manually of the Projection TV remote control. In order to use THUMBSTICK and EXIT button of the Projection TV remote control, " - Hitachi 65X500 | Owners Guide - Page 31
HOW TO USE THE REMOTE CONTROL TO CONTROL YOUR TV ቱ ASPECT button Press this button to quickly zoom 16:9 images. (1) NTSC/480i/480p Input 4:3 INPUT 4:3 STANDARD 4:3 EXPANDED 4:3 ZOOM1 THE REMOTE CONTROL (2) 480i/480p INPUT 16:9 INPUT 16:9 ZOOM 16:9 STANDARD 4:3 ZOOM2 4:3 STANDARD 4:3 - Hitachi 65X500 | Owners Guide - Page 32
button on the remote control. Some people like the crisp picture from 540p and some people like the smooth and detailed 1080i. Hitachi offers you the A8 A6 A3 Del Move SEL Select When no on-screen displays are on the TV screen, use THUMB STICK ̇ or ̈ to access the Favorite Channels feature. - Hitachi 65X500 | Owners Guide - Page 33
control to stop on a chosen channel. Press SELECT again to resume SURF scanning. 24 VID1 ~ VID5 When the remote control is in TV mode, press these buttons to directly select the video input sources between the five video inputs. Stereo ST/SA Ant A 28 TAKA VID 1 YPBPR:1 VID1 - Hitachi 65X500 | Owners Guide - Page 34
THE REMOTE CONTROL PICTURE-IN-PICTURE (PIP) Your HITACHI Projection TV incorporates Dual Tuner VIDEO S-VIDEO INPUT 4 R (MONO)/L VIDEO S-VIDEO MONITOR OUT R L VIDEO AUDIO S-VIDEO Models: 57X500 65X500 Audio Video OUTPUT MENU EXIT VOL SELECT CH ቤ ቢ ቤ MUTE LAST CH VID 1 VID 2 - Hitachi 65X500 | Owners Guide - Page 35
THE REMOTE CONTROL PICTURE-IN-PICTURE (PIP) SPLIT MODE PICTURE-IN-PICTURE Split Mode PIP displays the main picture and sub-picture evenly on the screen. Main - Hitachi 65X500 | Owners Guide - Page 36
THE REMOTE CONTROL PICTURE-IN-PICTURE (PIP) ብ FREEZE button (With PIP ON) If you wish to freeze the sub-picture, press the FREEZE button. This is convenient - Hitachi 65X500 | Owners Guide - Page 37
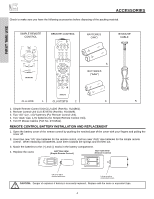
the remote control. After replacing the batteries repeat the entire programming procedure as stated above. 4. The MENU button will act as the VCR MENU button for HITACHI VCRs. ባ REC MY VCR CODE IS: NOTE: Refer to instruction manual of the VCR for operation of the buttons exclusively for the VCR. 37 - Hitachi 65X500 | Owners Guide - Page 38
button allows the remote to control your cable box by setting it to CABLE mode. ባ PRECODED CABLE BOX buttons These buttons transmit the chosen precoded cable codes. ቤ EXCLUSIVE TV buttons These buttons are for operating the TV. REC MY CABLE BOX CODE IS: NOTE: Refer to instruction manual of the - Hitachi 65X500 | Owners Guide - Page 39
guide. 3. The remote control will remember the codes satellite codes. ቤ EXCLUSIVE TV buttons These buttons are for operating the TV. ባ POWER TV DVD VCR CBL SOURCE SATELLITE RECEIVER/STB CODE IS: NOTE: Refer to instruction manual of the set-top-box/satellite receiver for operation of - Hitachi 65X500 | Owners Guide - Page 40
player operating guide. 3. The remote control will remember the codes you have programmed until the batteries are removed from the remote control. ቤ ባ REC MY DVD PLAYER CODE IS: NOTE: Refer to instruction manual of the DVD player for operation of the buttons exclusively for the DVD player. 40 - Hitachi 65X500 | Owners Guide - Page 41
guide. 3. The remote control will remember the codes you have programmed until the batteries are removed from the remote ". ቤ EXCLUSIVE TV Buttons These buttons are for operating the TV. ባ POWER TV DVD VCR CBL instruction manual of the PVR for operation of the buttons exclusively for the PVR. - Hitachi 65X500 | Owners Guide - Page 42
Buttons These buttons are for operating the TV. MUTE LAST CH VID 1 VID 2 PIP VID 3 SURF VID 5 VID 4 FREEZE PIP MODE PIP ACCESS SWAP DAY/NIGHT ባ REC ቤ MY AUDIO EQUIPMENT CODE IS: CD AMP/RCVR NOTE: Refer to instruction manual of the Audio equipment for operation of the buttons exclusively - Hitachi 65X500 | Owners Guide - Page 43
to start the On-Screen Display. ቫ AV NET Press this button to access the Audio/Video network (AV Net) menu. The AV Net allows the user to control external components with the TV's remote control. (See complete explanation and example on page 26, item ተ.) NOTE: The Simple - Hitachi 65X500 | Owners Guide - Page 44
VIDEO CODES FOR REMOTE CONTROL VCR BRAND Teleview 25 Texscan 18 Tocom 07, 27, 50 Toshiba 03 Tusa 51 TV 86 29 Unika 11, 39 United Artists 36 United Cable 49 Universal 40 Zenith 03, 48 Zentek 52 SATELLITE BRAND CODE Echostar 04 Hitachi 01 Hughes 05 RCA 02 Sony 03 SET-TOP-BOX CODE - Hitachi 65X500 | Owners Guide - Page 45
control to display the different features on your HITACHI Projection TV. 2. Press the THUMB STICK to highlight a different feature. 3. Press EXIT on the remote control to quickly exit from a menu. 4. Press A/V Net on the remote control to access the A/V Net menu to control external components - Hitachi 65X500 | Owners Guide - Page 46
About Your TV View/edit television programming based on a parental guide ratings. Block various types of movies and television programming based on the Canadian ratings system. Block various types of movies and television programming based on the Canadian French ratings system. Automatic and manual - Hitachi 65X500 | Owners Guide - Page 47
settings. Function Contrast Brightness Color Tint Sharpness Color Temperature Black Enhancement Edge Enhancement Auto Color Noise Reduction Color Management (Set User Colors) Auto Movie Mode (TV/Cinema Detection) Day 100% 50% 50% Center 50% High High High Off Off Off Off Night 50% 50% 45% Center - Hitachi 65X500 | Owners Guide - Page 48
VIDEO Video Audio Aspect Ch. Manager Locks MENU Setup Move SEL Sel THUMB STICK SELECT Video Picture Mode Contrast Brightness Color Tint Sharpness Color Temperature Black Enhancement Edge Enhancement Reset Video Settings Move SEL Select ANT A/B Day 100% 50% 50% Night 50% High High High - Hitachi 65X500 | Owners Guide - Page 49
Management Color Decoding Auto Color Noise Reduction Auto Movie Mode Move SEL Select ANT A/B Off Off Off THUMB STICK Video Color Management Set User Colors Magenta 50% Red 50% Yellow 50% Green 50% Cyan 50% Blue 50% Reset Move SEL Return Use THUMBSTICK to highlight function. Press - Hitachi 65X500 | Owners Guide - Page 50
Red, Green and Color according to the user's preference. Use TINT to adjust flesh . Set NOISE REDUCTION to OFF if the TV experiences picture blocking. When Noise Reduction is is turned ON from the VIDEO menu, your Hitachi Projection Television will activate the circuitry for this special feature to - Hitachi 65X500 | Owners Guide - Page 51
speakers. Sound Enhancement See page 52. Balance This function will control the left to right balance of the Projection TV internal speakers. Audio Source Multi-Channel Television Sound will allow you to select STEREO (a stereo broadcast), MONO (monaural sound) used when receiving a weak stereo - Hitachi 65X500 | Owners Guide - Page 52
. The BBE technology produces sound that is natural and crisp from just two speakers (or) the two internal speakers of your HITACHI television. If your HITACHI television is connected to an external audio system, BBE will also create an incredible crisp sound experience from two speakers and even - Hitachi 65X500 | Owners Guide - Page 53
ASPECT MODE Aspect Mode Use this function to select the Picture Format Aspect Ratio. Auto Aspect Automatically adjust the Aspect Ratio depending on the input signal to fill the screen. Press THUMB STICK ̆, ̄, to select menu item. Press down on THUMBSTICK to select. A "ͱ" in the box indicates - Hitachi 65X500 | Owners Guide - Page 54
you are using an indoor or outdoor antenna. Select Cable if you have cable TV. Chan. Manager Ant. A Ant. B Move SEL Select THUMB STICK THUMB STICK Reception channels for each mode are shown at the left. Refer to your cable or TV guide for channel identification standards. ON-SCREEN DISPLAY 54 - Hitachi 65X500 | Owners Guide - Page 55
CHANNEL MANAGER Auto Channel Scan This feature will automatically store active TV channels in Auto Channel Scan. This will allow you to skip unused channels when using CHANNEL UP (̆) or DOWN (̄). Chan. Manager Ant. A Channel Source Antenna - Hitachi 65X500 | Owners Guide - Page 56
Off Off CH ID Move SEL Return Lock Press THUMB STICK ̆ or ̄ to review more channels. Press EXIT to quit the menu. Scan Use this feature after Auto Scan is completed to add (On) or skip (Off) additional channels to the remote control channel ̆ or ̄ buttons. Chan. Manager Ant. A Ch# 2 3 - Hitachi 65X500 | Owners Guide - Page 57
CHANNEL MANAGER Channel ID This section contains advanced features which will make TV viewing easier and more enjoyable. Use this feature to give up to 20 channels a name when ANTENNA signal source is selected and up to 60 - Hitachi 65X500 | Owners Guide - Page 58
based on motion picture ratings. Picturein-Picture will also be blocked automatically (see page 59). When TV RATINGS is selected, various types of television programming based on a parental guide ratings will be blocked. Picture-in-Picture will also be blocked automatically (see page 60). Use - Hitachi 65X500 | Owners Guide - Page 59
of any movie that you feel may be inappropriate due to its content. THUMB STICK MENU Locks Change Access Code Engage Lock TV Time Lock Movie Ratings TV Ratings Canadian Ratings (Eng) Canadian Ratings (Frn) Move SEL Select THUMB STICK SELECT Locks Movie Ratings Status Not Rated: G: PG: PG-13 - Hitachi 65X500 | Owners Guide - Page 60
RATINGS that you have selected. Press EXIT to quit the menu or select TV RATINGS to return to the previous menu. TV Parental Guide Ratings Chart N/A TV-Y TV-Y7 TV-G TV-PG TV-14 TV-MA FV V S L D None. All children. The themes and elements in this program are specifically designed for a very young - Hitachi 65X500 | Owners Guide - Page 61
Canadian Ratings (Eng) to block any type of movie and television program in Canada that (Eng) you feel might be inappropriate in its content. THUMB STICK MENU Locks Change Access Code Engage Lock TV Time Lock Movie Ratings TV Ratings Canadian Ratings (Eng) Canadian Ratings (Frn) Move SEL Select - Hitachi 65X500 | Owners Guide - Page 62
MENU THUMB STICK Locks Change Access Code Engage Lock TV Time Lock Movie Ratings TV Ratings Canadian Ratings (Eng) Canadian Ratings (Frn) selected. Once rating is selected, for example 8 ans+, all movies and television programs rated 8 ans+ and higher will be automatically blocked. Press EXIT to - Hitachi 65X500 | Owners Guide - Page 63
SETUP Setup Select SETUP when setting your TV up for the first time. Use the THUMB STICK ̆ or ̄ on the remote to highlight the function desired. MENU THUMB STICK Video Audio Aspect Ch. Manager Locks Setup Move SEL Sel THUMB STICK SELECT Setup Magic Focus Tune - Hitachi 65X500 | Owners Guide - Page 64
Convergence Adjustment Please turn ON your television for at least 20 minutes before using this feature. The Magic Focus button on control panel will not work when adjustment mode is set to Manual (see page 65). Your HITACHI Projection TV has three color projection tubes: one for red, one for - Hitachi 65X500 | Owners Guide - Page 65
turn ON your television for at least 20 minutes before using this feature. 2. Auto Adjustment Mode is recommended. If convergence is still not acceptable, use the Manual Adjustment Mode. DO NOT press MAGIC FOCUS or use Auto Adjustment Mode after using Manual Adjustment Mode. Using the Remote Control - Hitachi 65X500 | Owners Guide - Page 66
Set The Clock Set The Inputs Set The Color System Set Virtual HD Set Black Side Panel Set Event Timer Set Closed Caption About Your TV Move SEL Select Setup Menu Preferences Set The Language English Francais Español Set The Menu Background Shaded Solid Move SEL Select THUMB STICK SELECT - Hitachi 65X500 | Owners Guide - Page 67
The clock must be adjusted before you can use the "Set Event Timer" or "TV Time Out" features. Setup Magic Focus Tune Up Menu Preference Set The Clock Set The Virtual HD Set Black Side Panel Set Event Timer Set Closed Caption About Your TV Move SEL Select Setup Set The Clock Time : 03:57 PM Apr 29, - Hitachi 65X500 | Owners Guide - Page 68
input device is turned on. This is convenient when you want to watch a movie with your VCR, laserdisc player, or DVD player. When REMOTE is selected, the TV will turn on and switch to Video2 automatically when the Video2 input device is turned on and the VCR, laserdisc, or DVD play button - Hitachi 65X500 | Owners Guide - Page 69
- High Definition Television - Use for High Vision Signal Y-PBPR from HDTV Set-Top Box. SDTV/DVD - Standard Definition Television or DVD ( SPLIT MODE PIP and SPLIT FREEZE. NOTE: To maximize operating life of the TV's picture tubes when watching 4:3 signal, Black Side Panel is cancelled at Power - Hitachi 65X500 | Owners Guide - Page 70
Set Event Timer This function will automatically turn the Projection TV on and off, one time only, every day, to control your television with the remote control. CAUTION: Do not use your TV as a deterrent when away from home by using the On and Off Timers. For safety, the TV should be turned off - Hitachi 65X500 | Owners Guide - Page 71
sound effects of a television program or home video which are displayed on the TV screen. Your local TV program guide denotes these programs as not work. About Your TV The TV model name and set dimensions will be displayed on the TV screen. The set dimensions of each TV model are listed on page 75 - Hitachi 65X500 | Owners Guide - Page 72
CARE OF YOUR HITACHI TELEVISION AND YOUR REMOTE CONTROL DO Dust the screen and cabinet with a soft cloth. Clean the screen with a soft cloth moistened in warm water and dry with a soft cloth. A mild soap may be used if the screen is extremely dirty. Place your Television away from extreme heat, - Hitachi 65X500 | Owners Guide - Page 73
PROBLEMS • IGNITION NOISE: Black spots or horizontal streaks may appear, picture may flutter or drift. Usually caused by interference from automobile ignition systems, neon lamps, electrical drills, and other electrical appliances. • GHOSTS: Ghosts are caused by the television The TV set can generate - Hitachi 65X500 | Owners Guide - Page 74
streaks in picture © ©©© © Poor reception on some channels © ©©© © Picture rolls vertically © © No color © © ©©© © Poor color © © ©©© ©© HITACHI Projection Television incorporates advanced power surge protection technology designed to protect against component or circuit damage due to - Hitachi 65X500 | Owners Guide - Page 75
Remote (Controls many VCR brands, cable boxes, satellite boxes, and other audio equipment.) • Extra Simple Remote to 4 components with one remote. (2 IR Mouse cables Digital Convergence and Manual Adjustment) • 65T500 65X500 59 7/8 1,520.7 61 1,549.0 28 3/16 716.0 - Hitachi 65X500 | Owners Guide - Page 76
, 24 hours a day 800 HITACHI (1-800-448-2244) Hitachi America, LTD. Home Electronics Division Hitachi has made every effort to assure you hours of trouble free operation from your unit. However, should you require service, a network of Hitachi Authorized Service Facilities has been established in - Hitachi 65X500 | Owners Guide - Page 77
EST 9:00am - 7:00pm Saturday EST 9:00am - 5:00pm Look for your French Manual on the outside of the box. If the manual is missing, call 1-800-HITACHI (1-800-448-2244) for a copy. Pour de plus amples renseignements sur le service durant la période couverte par la garantie, sur le fonctionnement ou - Hitachi 65X500 | Owners Guide - Page 78
TV Time Lock 58 Movie Ratings 59 TV Ratings 60 TV Ratings (Canadian - English 61 TV Ratings (Canadian - French 62 Loudness 51 M Magic Focus Auto Convergence 7, 64 Manual POP 34 R Remote Control Functions 23-44 Installing Batteries 4 Programming Codes 37-42, 44 Simple Remote 43 S Sharpness - Hitachi 65X500 | Owners Guide - Page 79
NOTES 79 - Hitachi 65X500 | Owners Guide - Page 80
QR57061
-
 1
1 -
 2
2 -
 3
3 -
 4
4 -
 5
5 -
 6
6 -
 7
7 -
8
-
9
-
10
-
11
-
12
-
13
-
14
-
15
-
16
-
17
-
18
-
19
-
20
-
21
-
22
-
23
-
24
-
25
-
26
-
27
-
28
-
29
-
30
-
31
-
32
-
33
-
34
-
35
-
36
-
37
-
38
-
39
-
40
-
41
-
42
-
43
-
44
-
45
-
46
-
47
-
48
-
49
-
50
-
51
-
52
-
53
-
54
-
55
-
56
-
57
-
58
-
59
-
60
-
61
-
62
-
63
-
64
-
65
-
66
-
67
-
68
-
69
-
70
-
71
-
72
-
73
-
74
-
75
-
76
-
77
-
78
-
79
-
80
 |
 |
PROJECTION COLOR TV
57T500
57X500
65T500
65X500
OPERATING GUIDE
IMPORTANT SAFETY INSTRUCTIONS
2-3
FIRST TIME USE
4-22
THE REMOTE CONTROL
ON-SCREEN DISPLAY
USEFUL INFORMATION INDEX
72-78
45-71
23-44
Setup
Locks
Aspect
Audio
Video
Move
SEL
Sel
Ch. Manager
As an E
NERGY
S
TAR
®
Partner, Hitachi, Ltd. has determined that this
product meets the E
NERGY
S
TAR
®
guidelines for energy efficiency.