Hitachi C10RB Instruction Manual
Hitachi C10RB - 10" Professional Jobsite Table Saw Manual
 |
UPC - 717709011045
View all Hitachi C10RB manuals
Add to My Manuals
Save this manual to your list of manuals |
Hitachi C10RB manual content summary:
- Hitachi C10RB | Instruction Manual - Page 1
Model Modèle Modelo English C 10RB Jobsite Table Saw Scie sur table pour chantier Lugar de trabajo de la sierra de mesa INSTRUCTION MANUAL AND SAFETY INSTRUCTIONS WARNING Improper and unsafe use of this power tool can result in death or serious bodily injury! This manual motorisé. MANUAL DE - Hitachi C10RB | Instruction Manual - Page 2
Accessories and Attachments 7 Tools Needed for Assembly 7 Carton Contents 7 SECTION PAGE Know Your Table Saw 9 Glossary of Terms 10 Assembly and Adjustments 11 Operation 18 Maintenance 23 Troubleshooting Guide 24 Push Stick Pattern 25 Parts List 72 HITACHI AUTHORIZED SERVICE - Hitachi C10RB | Instruction Manual - Page 3
MOTOR HP (Maximum developed 4.4 Type Universal Amps 15 Voltage 120 Hz 60 RPM (no load 4000 Overload Protection YES SAW Table Size with Extensions .......... 30-3/32" x 21-3/4" Table Extension Right Rip Capacity with Extension ......... 24-1/2" Blade Size 10" Rip Scale YES Rip Fence - Hitachi C10RB | Instruction Manual - Page 4
may get caught in moving parts. Non-slip footwear is recommended. Wear protective hair covering to contain long hair. 11. WEAR A FACE MASK OR DUST MASK. Sawing, cutting and sanding operations produce dust. 12. DISCONNECT TOOLS before servicing and when changing accessories, such as blades, cutters - Hitachi C10RB | Instruction Manual - Page 5
stop. 10. NEVER use the rip fence as a cut-off gauge when crosscutting. 11. NEVER ATTEMPT TO FREE A STALLED SAW BLADE without first turning the saw OFF. Turn power switch OFF immediately to prevent motor damage. 20. For proper operation follow the instructions in this Operator's Manual entitled - Hitachi C10RB | Instruction Manual - Page 6
The table above service personnel if you do not completely understand the grounding instructions, or if you are not sure the saw is properly grounded. Use only 3-wire extension cords that have 3-prong grounding plugs and 3-pole grounding receptacles that accept the saw's plug. Repair or replace - Hitachi C10RB | Instruction Manual - Page 7
Do not use molding head set with this saw. • Do not modify this power tool or use accessories not recommended by Store. TOOLS NEEDED FOR TABLE OF LOOSE PARTS ITEM A B C D E F G H I J K L DESCRIPTION QUANTITY Table saw assembly 1 Blade guard and splitter ass'y 1 Rip fence 1 Dado table - Hitachi C10RB | Instruction Manual - Page 8
English UNPACKING YOUR JOBSITE TABLE SAW A B D C G H F I E J K L M - 8 - - Hitachi C10RB | Instruction Manual - Page 9
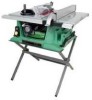
KNOW YOUR JOBSITE TABLE SAW Blade guard Miter gauge Hand hold Tabel Blade tilt pointer Blade tilt scale Overload reset switch ON/OFF switch with key Table insert Rip fence Side table extension Blade elevation handwheel Blade bevel lock knob Stand Rear Of The Table Saw Rip fence and miter - Hitachi C10RB | Instruction Manual - Page 10
cutting operation. RIP FENCE - A guide used for rip cutting that clamps to the tabletop. It allows the workpiece to be straight. TABLE INSERT - Provides access to the blade arbor for changing blades. OVERLOAD RESET SWITCH - Resets the thermocouple and provides a way to restart the saw motor if it - Hitachi C10RB | Instruction Manual - Page 11
TABLE SAW saw base. 4. Fasten the saw to the stand using the four handle (1) then tighten securely . 5. Position the saw sawing operations. 1 Installing the blade guard assembly (Fig. C) 1. Remove the table kickback pawls (4) toward the rear of the table, and align the splitter mounting holes to the - Hitachi C10RB | Instruction Manual - Page 12
saw). Position them over the corresponding mounting bolt holes (refer to step 6-b) after removing the adhesive backing affixed to the washers. 8. Replace again at both 90° and 45°. 10.Add or remove the spacers until the alignment is correct. 11.Replace the table insert. Fig. D ALIGNING THE BLADE - Hitachi C10RB | Instruction Manual - Page 13
. 5. Pull the motor locking lever (1) toward the front of the machine while spinning the blade until the latch locks into place and the blade will no longer turn. 6. Place the wrench on the arbor nut and turn clockwise (toward the rear of the saw table). 7. Replace the table insert and blade guard - Hitachi C10RB | Instruction Manual - Page 14
and mark with a felt tip marker, one blade tooth with a "right set" angle and position this tooth at the front of the saw approximately ½" above the table. 5. Place the combination square base (1) into the right side miter gauge groove (2) flush against the inside of the miter gauge groove. 6. Adjust - Hitachi C10RB | Instruction Manual - Page 15
for the rip fence (3) and miter gauge (4) are located on the right side of the saw housing. NOTE:Adjust the miter gauge to 450~600 before putting to the storage. Blade (Fig. K) 1. Loosen and remove the knob (1) on the left side of the saw housing. 2. Place extra blades onto the arbor. Replace the - Hitachi C10RB | Instruction Manual - Page 16
front rail (2). Push the handle (3) down to lock. 3. To change the position of the fence, lift up on the RIP FENCE INDICATOR (FIG. O) NOTE: The rip fence indicator points to the scale on the front of the table saw. Measurement shown by the indicator will provide the user with accuracy up to 1/16 of - Hitachi C10RB | Instruction Manual - Page 17
the screw. Fig. P 1 13 2 ADJUSTING CAM LOCKING LEVER (FIG. Q) If the extension table moves when it is open and locked, then the cam locking lever (1) may be loose and locking lever tension, turn the bar (2) with a 10 mm wrench until it is tightened, but do not over tighten. Fig. Q 1 2 English - - Hitachi C10RB | Instruction Manual - Page 18
(2) at the rear of the table saw. DO NOT operate the saw with the hose in place unless the vacuum is turned on. Fig. T 2 1 USING THE TABLE EXTENSION (FIG. U) NOTE: Use scale on front rail for rip cuts up to 13". For rip cuts greater than 13" set the lock the fence on the 13" mark. Unlock - Hitachi C10RB | Instruction Manual - Page 19
front of this manual, can greatly increase the likelihood of injury. RIPPING (FIG. V, W) WARNING To prevent serious injury: • Never use a miter gauge when ripping. • Never use more than one rip fence during a single cut. • Do not allow familiarity or frequent use of your table saw to cause careless - Hitachi C10RB | Instruction Manual - Page 20
rip fence, use one or more push sticks to move the workpiece. Always use a push stick during ripping operations. CROSSCUTTING (FIG. X) To prevent serious injury: • Do not allow familiarity or frequent use of your table saw , you can make a simple outfeed support by clamping a piece of plywood to - Hitachi C10RB | Instruction Manual - Page 21
sawing rip fence. 2. Attach the wood facing to the fence with wood screws (3) through the holes in the fence. A wood fence should be used when ripping material such as thin paneling to prevent the material from catching between the bottom of the fence and the table. Fig. BB 3 2 1 AUXILIARY FENCE - Hitachi C10RB | Instruction Manual - Page 22
Attach auxiliary fence to rip fence with two "C" clamps. (Fig. DD) Fig. EE Fig. DD 2 1 3 DADO CUTS (FIG. EE) 1. The dado blade insert is included with this saw. Remove the saw blade, original table inser and blade guard. Install the dado and dado blade insert. 2. Instruction for operating - Hitachi C10RB | Instruction Manual - Page 23
Hitachi Authorized Service Center for service. Use only identical replacement parts. Any other parts Hitachi Authorized Service Center immediately. LUBRICATION All motor bearings are permanently lubricated at the factory and require no additional lubrication. On all mechanical parts of your table saw - Hitachi C10RB | Instruction Manual - Page 24
Cord damaged. 3. Have cord replaced by Hitachi 1. Positive stop not adjusted correctly. Authorized Service Center. 1. Check blade with square and adjust positive stop. 2. Tilt angle pointer not set accurately. 2. Check blade with square and adjust to zero. 1. Rip fence not aligned with blade - Hitachi C10RB | Instruction Manual - Page 25
PUSH STICK CONSTRUCTION ● This is a full-size drawing (actual size) ● Use good quality plywood or solid wood ● Use 1/2 in. or 3/4 in. material ● Push stick MUST be thinner than the width of material being cut English Drill Hole For Hanging Notch To Prevent Hand From Slipping Cut Here To Push 1/2 - Hitachi C10RB | Instruction Manual - Page 26
contre surcharges OUI SCIE Dimensions de la table avec rallonges 30-1/4 po x 21po Rallonges Droite et arrière Capacité, guide de rallonge ......... 24-1/2 po à droite Dimension de la lame 10 po Guide de coupe de fil OUI Échelle de refente OUI Guide de refente OUI Prof. max. de coupe - Hitachi C10RB | Instruction Manual - Page 27
la scie à table avant d'avoir lu et bien compris les consignes suivantes : 1. Lire et se familiariser avec ce Guide d'utilisation. APPRENDRE ou un accessoire pour faire un travail pour lequel il n'a pas été conçu. 10. PORTER DES VÊTEMENTS APPROPRIÉS. NE PAS porter de vêtements amples, des gants, - Hitachi C10RB | Instruction Manual - Page 28
À SCIER SUR LA LAME, contre son sens de rotation seulement. 10. NE JAMAIS utiliser le guide de refente comme jauge de coupe pour le tronçonnage. 11. les pièces en plastique. 16. ASSEMBLER la scie à table sur un établi ou sur un support avant de procéder aux opérations de coupe. Voir ASSEMBLAGE - Hitachi C10RB | Instruction Manual - Page 29
l'endommagement de la scie à table, utiliser une bonne protection des de 25. 50. 100. 150. 6 18 16 16 14 10 18 16 14 12 12 16 16 14 12 16 14 12 l'équipement sur une forme sous tension. Si on ne comprend pas parfaitement les instructions de mise à la terre, ou si on n'est pas sûr que l'outil - Hitachi C10RB | Instruction Manual - Page 30
rayon de la quincaillerie Hitachi ou consulter le catalogue des outils électriques et à main Hitachi pour acheter les accessoires A Scie à table QUANTITÉ 1 STAND B Protège-lame et fendeur 1 C Guide de refente 1 D Plaque amovible pour rainurer 1 ART DESCRIPTION M Support QUANTITÉ 1 E - Hitachi C10RB | Instruction Manual - Page 31
DÉBALLAGE DE LA SCIE À TABLE DE CHANTIER Français A B D C G H I E F J K L M - 31 - - Hitachi C10RB | Instruction Manual - Page 32
de réenclenchement Interrupteur ON/OFF avec clé Plaque amovible Guide de refente Rallonge de table latérale Volant de réglage de hauteur de lame Bouton de blocage en biseau de la lame Support L'arriére de la scie sur table Rangement pour guide de refente et jauge à onglets Gaine du cordon - 32 - Hitachi C10RB | Instruction Manual - Page 33
DE BISEAU DE LAME - Mesure l'angle d 'inclinaison de la lame lorsque celle-ci est réglée pour une coupe en biseau. ÉCHELLE DE TABLE - Mesure la distance à laquelle est réglée le guide de refente par rapport à la lame, ce qui permet des réglages rapides. CLIQUETS ANTIRECUL - Empêche la pièce de bois - Hitachi C10RB | Instruction Manual - Page 34
l'orifice du volant (2), puis serrer l'écrou contre le volant avec une clé de 10 mm. Note : Si le boulon de la poignée se desserre, enlever l'embout en plastique vers l'arrière de la table, et aligner les orifices de montage du fendeur vis-à-vis les orifices du support. 8. Placer la rondelle plate - Hitachi C10RB | Instruction Manual - Page 35
cliquet antirecul s'engage dans l'orifice de la table et ne peut pas en être délogé. S'assurer boulons (3) du support de montage (5). 7. Placer deux entretoises (4) sur le support de montage du fendeur et de la lame à 90° et à 45°. 10.Ajouter ou enlever des entretoises jusqu'à ce que l'alignement - Hitachi C10RB | Instruction Manual - Page 36
. 2. Lever le protège-lame et le placer vers l'arrière de la table. 3. Régler la lame à 90° en débloquant le bouton de blocage d'inclinaison et tourner dans le sens des aiguilles d'une montre (vers l'arrière de la table de scie). 7. Réinstaller la plaque amovible et le protège-lame. S 'assurer - Hitachi C10RB | Instruction Manual - Page 37
avec un crayon feutre une dent de lame avec « écartement à droite » et placer cette dent à l'avant de la scie à environ ½ po au-dessus de la table. 5. Placer la base de l'équerre combinée (1) dans la rainure de jauge à onglets de droite (2) à égalité contre l'intérieur de la rainure de la jauge - Hitachi C10RB | Instruction Manual - Page 38
un demi-tour les quatre vis de réglage (1) sur le dessus de la table. 2. Avec un morceau de carton plié couvrant la lame pour se protéger du bâti. Fig. J RANGEMENT (FIG. J,K) Guide de refente et jauge à onglets (Fig. J) Les supports de rangement du guide de refente (3) et de la jauge à onglets (4) - Hitachi C10RB | Instruction Manual - Page 39
et à droite, puis le replacer de nouveau contre la rainure de la jauge à onglets et bloquer en place pour vérifier de nouveau son alignement. INDICATEUR DU GUIDE DE REFENTE (FIG. O) NOTE : L'indicateur du guide de refente pointe vers l 'échelle à l'avant de la scie à table. Les mesures montrées par - Hitachi C10RB | Instruction Manual - Page 40
la vis. Fig. P 1 2 RÉGLAGE DU LEVIER DE BLOCAGE DE CAME (FIG. Q) Si la table de rallonge bouge lorsqu'elle est ouverte et bloquée, alors le levier de blocage de came est peutêtre tourner la barre (2) avec une clé de 10 mm jusqu'à ce qu'elle soit serrée, mais ne pas trop serrer. Fig. Q 1 2 - 40 - Hitachi C10RB | Instruction Manual - Page 41
refente jusqu'à 13 po. Pour les coupes de refente de plus de 13 po, régler et bloquer le guide sur la marque 13 po, débloquer la table de rallonge et faire coulisser la table avec le guide jusqu'à la dimension souhaitée à l' aide de l'échelle arrière. Dégager le levier de blocage de came. 1. Faire - Hitachi C10RB | Instruction Manual - Page 42
le protège-lame et qu'elle sorte à l'arrière de la table. 10.Ne jamais tirer la pièce à scier vers soi lorsque la lame tourne le compartiment de rangement de la base de la scie. 2. Fixer solidement le guide de refente à la table. 3. Relever la lame pour qu'elle dépasse d'environ 1/8 po le dessus - Hitachi C10RB | Instruction Manual - Page 43
protège-lame. Pour la coupe de longues pièces, on peut fabriquer un support pour coupe vers l'extérieur en fixant une pièce de contreplaqué à guide à onglets entrera en contact avec le protège-lame. Fig. Y 3 1 AVERTISSEMENT Toujours placer la plus grande surface de la pièce de bois contre la table - Hitachi C10RB | Instruction Manual - Page 44
bois pour la refente de matériaux comme des panneaux fi ns afi n d'empêcher le matériau de se coincer entre le bas du guide et la table. Fig. BB 3 2 1 GUIDE AUXILIAIRE (FIG.CC) Fabrication de la base : • Commencer avec un morceau de contre-plaqué de 3/8 po de 5 ½ po de large ou plus et - Hitachi C10RB | Instruction Manual - Page 45
lors de l'utilisation de cette lame. 6. N'utiliser que le nombre correct de lames extérieures rondes et de molettes intérieures comme illustré dans le guide d'utilisation. La lame ou la molette ne doit pas dépasser 13/16 po. 7. Vérifier la scie pour s'assurer que la lame à rainurer ne touche - Hitachi C10RB | Instruction Manual - Page 46
de la lame ou du mécanisme d'inclinaison, communiquer immédiatement avec le Service d'entretien Hitachi local. Fig. FF 1. Nettoyer toute la sciure accumulée à l'intérieur du carter de scie et du moteur. 2. Polir la table de scie avec une cire pour automobile afin de la maintenir propre et pour - Hitachi C10RB | Instruction Manual - Page 47
GUIDE DE DÉPANNAGE AVERTISSEMENT Pour éviter toute blessure causée par une mise en marche accidentelle, régler l'interrupteur à OFF et débrancher la fiche de la prise de courant avant de procéder à tout réglage. • Consulter le service d'entretien Hitachi travail 5. Nettoyer la table avec de la - Hitachi C10RB | Instruction Manual - Page 48
Français FABRICATION D'UN POUSSOIR • Il s'agit d'un dessin pleine grandeur (taille réelle). • Servez-vous d'un contre-plaqué ou d'un bois massif de bonne qualité. • Utilisez un matériau de 1/2 ou de 3/4 de pouce. • Le poussoir DOIT être plus étroit que la largeur du matériau à scier. Trou - Hitachi C10RB | Instruction Manual - Page 49
están diseñadas específicamente para filtrar partículas microscópicas. ESPECIFICACIONES DEL PRODUCTO MOTOR CV (Desarrollo máximo 4.4 Tipo Universal Derecha Capacidad de Corte al Hilo con Extensión 24-1/2" Tamaño de la hoja 10" Escala guía SI Guía de corte en dirección a la veta...... SI - Hitachi C10RB | Instruction Manual - Page 50
la alineación de las partes móviles, el ajuste de las partes móviles, la montura suelta su capacidad para utilizar la herramienta apropiadamente. 10.USE LA VESTIMENTA APROPIADA. NO utilice ropa UTILICE UNICAMENTE LOS ACCESORIOS RECOMENDADOS. Consulte el Manual del operador NOTA: Las lentes o gafas - Hitachi C10RB | Instruction Manual - Page 51
hoja ni deje que alguna parte de su cuerpo quede en linea sentido opuesto al de la rotación. 10. NUNCA use la guía de corte Manual de operaciones (página 57). Si no hace este agujero, el aserrín se acumulará en el área del motor y puede ocasionar un riesgo de incendio y un potencial daño en el motor - Hitachi C10RB | Instruction Manual - Page 52
AWG / 120 voltios) Indicación de amperaje Longitud total en pies Más de No más de 25' 50' 100' 150' 0 6 18 16 16 14 6 10 18 16 14 12 10 12 16 16 14 12 12 16 14 12 No aplicable INDICACIONES PARA LOS CABLESPROLONGADORES Todos los cables prolongadores utilizados paraherramientas el - Hitachi C10RB | Instruction Manual - Page 53
componentes o consulte elCatálogo de herramientas eléctricas y manuales paraadquirir los accesorios recomendados para estaherramienta eléctrica. Para Llave hexagonal 2 eliminarse la espuma de poliestireno entre el motor y la L Bolso ass'y del hardware del 1 mesa. protector de la lámina - 53 - - Hitachi C10RB | Instruction Manual - Page 54
Español CÓMO DESEMPACAR SU SIERRA DE MESA PARA EL LUGAR DE TRABAJO A B D C G H F I E J K L M - 54 - - Hitachi C10RB | Instruction Manual - Page 55
sobrecarga Interruptor de ENCENDIDO/ APAGADO con llave Volante de mano para elevar e inclinar la hoja Perilla de sujeción de bisel de la hoja Soporte La parte trasera de la sierra de mesa Almacenaje de la guía de corte y del cartabón de ingletes - 55 - Arrollamiento de los cables - Hitachi C10RB | Instruction Manual - Page 56
se usa para cortar en dirección a la veta y que se sujeta en la parte superior de la mesa. Permite cortar la pieza de modo que el corte quede derecho POR SOBRECARGA - Reinicia el termopar y proporciona una forma de reiniciar el motor de la sierra en caso de que se produzca una sobrecarga o - Hitachi C10RB | Instruction Manual - Page 57
mango de bloqueo de bisel. 5. Ubique el soporte del conjunto separador (3) en la parte trasera de la hoja. 6. Cubra los dientes de la hoja con un cartón sus manos. 7. Coloque los dos seguros contra retroceso (4) hacia la parte trasera de la mesa y haga coincidir los agujeros para montaje del - Hitachi C10RB | Instruction Manual - Page 58
de mesa. 2. Levante el protector de la hoja y colóquelo hacia la parte posterior de la mesa. 3. Ajuste la hoja a una posición vertical de 9. Controle la alineación del separador y la hoja nuevamente a 90° y 45°. 10.Agregue o quite las arandelas adhesivas hasta que la alineación sea la correcta. 11. - Hitachi C10RB | Instruction Manual - Page 59
el protector de la hoja y colóquelo hacia la parte posterior de la mesa. 3. Ajuste la hoja a una . 4. Tire de la perilla de bloqueo del motor (1) hacia el frente de la máquina mientras es necesario. Tope de seguridad a 90° 1. Disconnect the saw from the power source. 2. Eleve la hoja a su altura - Hitachi C10RB | Instruction Manual - Page 60
del bisel. 7. Check again to see if the blade is 45° to the table. If not, repeat step 5. Fig. G 3 4 ALINEACION DE LA HOJA CON LA la hoja de manera que el diente marcado quede a 1/2" sobre la mesa en la parte frontal de la sierra. 5. Coloque la base de la escuadra mixta (1) en la ranura - Hitachi C10RB | Instruction Manual - Page 61
motor otras partes cuando table.If the table insert is not flush with the table, adjust the four bolts (1) with a 4mm hex. wrench until it is parallel with the table. NOTE:To raise the insert ,turn the hex screws counterclockwise, to lower the insert,turn the hex screws clockwise. 1. Replace the table - Hitachi C10RB | Instruction Manual - Page 62
tornillo del indicador (2). Deslice el indicador Si se necesitan ajustes para que sea paralela: 1. Afloje los dos pernos de llave hexagonal (4) en la parte superior de la guía de corte y levante el mango (3). 2. Ajuste la guía (5) para que esté paralela a la ranura del cartabón de ingletes y bloquee - Hitachi C10RB | Instruction Manual - Page 63
ajustada. Por lo tanto, se necesita el ajuste de la palanca de bloqueo de la leva. Para ajustarla, gire la barra (2) con una llave de 10 mm hasta que se apriete evitando apretar demasiado. - 63 - - Hitachi C10RB | Instruction Manual - Page 64
se minimiza el riesgo de un uso no autorizado por parte de niños u otras personas. 1. Para encender PROTECCIÓN CONTRA LA SOBRECARGA (Fig. S) This saw has an overload relay button (3) that resets the Esta Espere unos cinco minutos para que se enfríe el motor. Pulse el botón de reposición (3) y coloque - Hitachi C10RB | Instruction Manual - Page 65
normas de seguridad y con las impresas en el frente de este manual puede aumentar considerablemente el riesgo de lesiones. CORTE EN DIRECCION A LA hasta que pase por el protector de la hoja y la parte trasera de la mesa quede despejada. 10.Nunca hale de la pieza mientras la hoja está girando. - Hitachi C10RB | Instruction Manual - Page 66
ón de ingletes en una de las ranuras del cartabón en la mesa. 2. Ajuste la altura de la hoja de modo que quede aproximadamente a 1/8" sobre la parte superior de la pieza de trabajo. 3. Colopue la pieza de trabajo en posición horizontal sobre la mesa y contra el tope. Mantenga la pieza de trabajo - Hitachi C10RB | Instruction Manual - Page 67
de madera al realizar cortes de veta en materiales como por ejemplo los paneles, para así evitar que los materiales queden atrapados entre la parte inferior del separador y la mesa. Fig. BB 3 1 2 TOPE AUXILIAR (Fig. CC) Fabricación de la base: ● Empiece con una pieza de contrachapado con un - Hitachi C10RB | Instruction Manual - Page 68
hojas externas redondeadas y de astilladoras internas, como se muestra en el manual de instrucciones del juego de la hoja para cortar ranuras. La hoja para cortar ranuras no golpeará la carcasa, el inserto o el motor cuando esté en funcionamiento. ADVERTENCIA Para su propia seguridad, siempre - Hitachi C10RB | Instruction Manual - Page 69
hoja está demasiado floja, lleve la unidad completa al Centro de reparaciones autorizado de Hitachi. LUBRICACION Todos los cojinetes del motor se lubrican permanentemente en la fábrica y no requieren lubricación adicional. En todas las partes mecánicas de su sierra de mesa donde está presente un gorr - Hitachi C10RB | Instruction Manual - Page 70
el enchufe de la fuente de energía antes de realizar los ajustes. • Si por cualquier motivo el motor no funciona, póngase en contacto con el centro de reparaciones autorizado de Hitachi. PROBLEMA CAUSAS DEL PROBLEMA SOLUCION La sierra no enciende 1. La sierra no está enchufada. 1. Enchufe la - Hitachi C10RB | Instruction Manual - Page 71
CONSTRUCCION DEL EMPUJADOR • Éste dibujo es del tamaño completo (tamaño real) • Use madera contrachapada de buena calidad o madera sólida • Use material de 1/2" ó 3/4" • EI empujador DEBE ser más angosto que el ancho del material que está cortando Español Taladre el agujero para colgarlo Muesca - Hitachi C10RB | Instruction Manual - Page 72
10" JOB SITE TABLE SAW PARTS LIST PARTS LIST Always order by I.D. Number MODEL NO. C10RB Size D=φ16 D=φ15 D=φ16 H=16 D=φ20 d=φ10 φ45 φ5*10 1 1 1 M5*0.8-16 2 325812 2DVA HANDLE 3 M5*0.8-12 2 325817 2E0T MOTOR 1 M5*0.8-25 1 325820 2EA9 SPACER 2 M6*1.0-35 2 325823 2EHM WARNING LABEL - Hitachi C10RB | Instruction Manual - Page 73
10" JOB SITE TABLE SAW English MODEL NO. C10RB 2ETF 0J4D4 0JX72 28PA 2C88 - 73 - - Hitachi C10RB | Instruction Manual - Page 74
English 10" JOB SITE TABLE SAW PARTS LIST FOR STAND HKU# 325785 325786 325797 726482 325735 325712 726617 I.D. 2CCD 2CCE 2CFW 0J4W 0U6V . HD. BOLT LOCK NUT WING NUT LEVELING PAD FLOOR PLATE Size #CE #CE φ8.2*18-1.5 φ10*25-3 M8X1.25-70 M8*1.25 T=8 MODEL NO. C10RB QTY 1 1 3 4 2 2 2 1 1 1 - 74 - - Hitachi C10RB | Instruction Manual - Page 75
English - 75 - - Hitachi C10RB | Instruction Manual - Page 76
Koki Co., Ltd. Shinagawa Intercity Tower A, 15-1, Konan 2-chome, Minato-ku, Tokyo 108-6020, Japan Distributed by Hitachi Koki U.S.A., Ltd. 3950 Steve Reynolds Blvd. Norcross, GA 30093 Hitachi Koki Canada Co. 6395 Kestrel Road Mississauga ON L5T 1Z5 - 76 - 602 Code No. C09011045 Printed in Taiwan
-
 1
1 -
 2
2 -
 3
3 -
 4
4 -
 5
5 -
 6
6 -
 7
7 -
8
-
9
-
10
-
11
-
12
-
13
-
14
-
15
-
16
-
17
-
18
-
19
-
20
-
21
-
22
-
23
-
24
-
25
-
26
-
27
-
28
-
29
-
30
-
31
-
32
-
33
-
34
-
35
-
36
-
37
-
38
-
39
-
40
-
41
-
42
-
43
-
44
-
45
-
46
-
47
-
48
-
49
-
50
-
51
-
52
-
53
-
54
-
55
-
56
-
57
-
58
-
59
-
60
-
61
-
62
-
63
-
64
-
65
-
66
-
67
-
68
-
69
-
70
-
71
-
72
-
73
-
74
-
75
-
76
 |
 |

– 1 –
English
Model
Modèle
Modelo
Jobsite Table Saw
Scie sur table pour chantier
Lugar de trabajo de la sierra de mesa
C 10RB
INSTRUCTION MANUAL AND SAFETY INSTRUCTIONS
Improper and unsafe use of this power tool can result in death or serious bodily injury!
This manual contains important information about product safety. Please read and understand this manual
before operating the power tool. Please keep this manual available for others before they use the power
tool.
WARNING
MODE D’EMPLOI ET INSTRUCTIONS DE SECURITE
AVERTISSEMENT
Une utilisation incorrecte et dangereuse de cet outil motorisé peut entraîner la mort ou de
sérieuses blessures corporelles!
Ce mode d’emploi contient d’importantes informations à propos de la sécurité de ce produit.
Priére de lire et d’assimiler ce mode d’emploi avant d’utiliser I’outil motorisé. Garder ce mode
d’emploi à la disponiblilité des autres utilisateurs avant qu’ils utilisent I’outil motorisé.
MANUAL DE INSTRUCCIONES E INSTRUCCIONES DE SEGURIDAD
La utilización inapropiada e insegura de esta herramienta eléctrica puede resultar en lesiones
serias o en la muerte!
Este manual contiene información importante sobre la seguridad del producto. Lea y comprenda
este manual antes de utilizar la herramienta eléctrica. Guarde este manual para que puedan
leerlo otras personas antes de que utilicen la herramienta eléctrica.
ADVERTENCIA
!
Hitachi Koki