Hitachi CP-WX625 Technical Manual
Hitachi CP-WX625 - WXGA LCD Projector Manual
 |
UPC - 050585151444
View all Hitachi CP-WX625 manuals
Add to My Manuals
Save this manual to your list of manuals |
Hitachi CP-WX625 manual content summary:
- Hitachi CP-WX625 | Technical Manual - Page 1
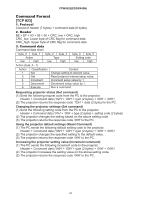
CPWX625(ED3WX40N) 10. RS-232C communication 1 23 45 67 8 9 1 23 45 67 8 9 CONTROL port of the projector RS-232C cable (Cross) - (1) RD (2) TD (3) - (4) GND (5) - (6) RTS (7) CTS (8) - (9) (1) CD (2) RD (3) TD (4) DTR (5) GND (6) DSR (7) RTS (8) DTS (9) RI RS-232C port of the computer - Hitachi CP-WX625 | Technical Manual - Page 2
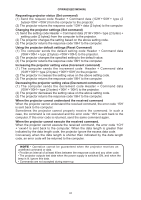
projector. (2) The projector changes the specified setting to the default value. (3) The projector returns the response code '06H' to the computer. Increasing the projector to the computer. Sometimes the projector cannot properly receive the command. In such a case, the command is not executed and - Hitachi CP-WX625 | Technical Manual - Page 3
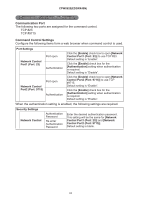
settings are required. Security Settings Network Control Authentication Password Re-enter Authentication Password Enter the desired authentication password. This setting will be the same for [Network Control Port1 (Port: 23)] and [Network Control Port2 (Port: 9715)]. Default setting is blank. 63 - Hitachi CP-WX625 | Technical Manual - Page 4
CPWX625(ED3WX40N) Command Format [TCP #23] 1. Protocol Consist of header (7 bytes) + command code. (3) The projector returns the response code '06H' to the PC. Using the projector default settings (Reset Command) (1) The PC sends the following default setting code to the projector. Header + Command - Hitachi CP-WX625 | Technical Manual - Page 5
is sent back to the PC. Sometimes the projector cannot properly receive the command. In such a case, the command is not executed and the ). 2. Header 02, Fixed 3. Data Length Network control commands byte length (0D, Fixed) 4. Command data Network control commands that start with BE EF (13bytes). 5. - Hitachi CP-WX625 | Technical Manual - Page 6
a challenge response type authentication with an MD5 (Message Digest 5) algorithm. When the projector is using a LAN, a random 8 bytes will be returned if authentication is enabled. Bind this received 8 bytes and the authentication password and digest this data with the MD5 algorithm and add this in - Hitachi CP-WX625 | Technical Manual - Page 7
CPWX625(ED3WX40N) Names Power Operation Type Set TURN OFF TURN ON Get Input Source Error Status Set HDMI RGB1 RGB2 VIDEO S-VIDEO error) 05 00 (Air flow error) 08 00 (Filter error) BE EF 03 06 00 89 D2 BE EF 00 (Fan error) 06 00 (Lamp time error) 03 00 (Lamp error) 07 00 (Cold error) - Hitachi CP-WX625 | Technical Manual - Page 8
CPWX625(ED3WX40N) Names Operation Type GAMMA Set User Gamma Pattern Set User Gamma Point 1 User Gamma Point 2 User Gamma Point 3 User Gamma Point 4 User Gamma Point 5 User Gamma Point 6 User Gamma Point 7 User Gamma Point 8 #1 DEFAULT #2 DEFAULT #3 DEFAULT #4 DEFAULT #5 DEFAULT #6 DEFAULT #1 - Hitachi CP-WX625 | Technical Manual - Page 9
CPWX625(ED3WX40N) Names Operation Type Header COLOR TEMP Set COLOR TEMP GAIN R COLOR TEMP GAIN G COLOR TEMP GAIN B COLOR TEMP OFFSET R COLOR TEMP OFFSET G COLOR TEMP - Hitachi CP-WX625 | Technical Manual - Page 10
CPWX625(ED3WX40N) Names Operation Type MY MEMORY Load Set MY MEMORY Save Set PROGRESSIVE Set 3D-YCS Set VIDEO NR Set ASPECT Set OVER SCAN OVER SCAN Reset V POSITION V POSITION Reset H POSITION H POSITION Reset H PHASE H SIZE H SIZE Reset AUTO ADJUST 1 2 3 4 1 2 3 4 TURN OFF TV FILM - Hitachi CP-WX625 | Technical Manual - Page 11
CPWX625(ED3WX40N) Names Operation Type COLOR SPACE Set COMPONENT Set C-VIDEO FORMAT Set S-VIDEO FORMAT Set HDMI Set RGB IN1 Set RGB IN2 Set FRAME LOCK - RGB1 Set FRAME LOCK - RGB2 Set FRAME LOCK - HDMI Set KEYSTONE V KEYSTONE V Reset - Hitachi CP-WX625 | Technical Manual - Page 12
CPWX625(ED3WX40N) Names Operation Type AUTO KEYSTONE V EXECUTE AUTO KEYSTONE V Set KEYSTONE H KEYSTONE H Reset ACTIVE IRIS Set WHISPER Set MIRROR Set MONITOR OUT - RGB1 Set MONITOR OUT - RGB2 Set MONITOR OUT - HDMI Set MONITOR OUT - Set COMPONENT MONITOR OUT - Set S-VIDEO MONITOR OUT - - Hitachi CP-WX625 | Technical Manual - Page 13
CPWX625(ED3WX40N) Names Operation Type MONITOR OUT - Set STANDBY VOLUME - RGB1 VOLUME - RGB2 VOLUME - HDMI VOLUME COMPONENT VOLUME - S-VIDEO VOLUME - VIDEO VOLUME - AUDIO OUT STANDBY TREBLE - RGB1 TREBLE -RGB2 TREBLE - HDMI TREBLE COMPONENT TREBLE - VIDEO TREBLE - S-VIDEO TREBLE - AUDIO OUT - Hitachi CP-WX625 | Technical Manual - Page 14
CPWX625(ED3WX40N) Names Operation Type BASS - RGB1 BASS - RGB2 BASS - HDMI BASS - COMPONENT BASS - S-VIDEO BASS - VIDEO BASS - AUDIO OUT STANDBY SRS WOW - RGB1 Set SRS WOW - RGB2 Set SRS WOW - HDMI Set SRS WOW - Set COMPONENT SRS WOW - S-VIDEO Set SRS WOW - VIDEO Set SRS WOW - AUDIO OUT - Hitachi CP-WX625 | Technical Manual - Page 15
CPWX625(ED3WX40N) Names Operation Type SPEAKER Set AUDIO - RGB1 Set AUDIO - RGB2 Set AUDIO - HDMI Set AUDIO - COMPONENT Set AUDIO - S-VIDEO Set AUDIO - VIDEO Set AUDIO OUT STANDBY Set HDMI AUDIO Set TURN OFF TURN ON Get TURN OFF AUDIO1 AUDIO2 AUDIO3 AUDIO4 Get TURN OFF AUDIO1 AUDIO2 - Hitachi CP-WX625 | Technical Manual - Page 16
CPWX625(ED3WX40N) Names Operation Type REMOTE FRONT Set REMOTE REAR Set REMOTE TOP Set REMOTE FREQUENCY Set NORMAL REMOTE FREQUENCY Set HIGH LANGUAGE Set Off On Get Off On Get Off On Get Disable Enable Get Disable Enable Get ENGLISH FRANCAIS DEUTSCH ESPANOL ITALIANO - Hitachi CP-WX625 | Technical Manual - Page 17
CPWX625(ED3WX40N) Names Operation Type BLANK On/Off Set START UP Set MyScreen LOCK Set -LINE2 DOT-LINE3 DOT-LINE4 Get TURN OFF TURN ON Get RGB1 RGB2 HDMI COMPONENT S-VIDEO VIDEO Get LEFT RIGHT Get RGB1 RGB2 HDMI COMPONENT S-VIDEO VIDEO Get TURN OFF TURN ON Get Header BE EF 03 06 00 BE EF 03 06 - Hitachi CP-WX625 | Technical Manual - Page 18
CPWX625(ED3WX40N) Names Operation Type Header AUTO OFF Get Increment Decrement AUTO ON Set TURN OFF TURN ON Get LAMP TIME Get LAMP TIME Reset Execute FILTER TIME Get FILTER TIME Reset Execute MY BUTTON-1 Set RGB1 RGB2 HDMI COMPONENT S-VIDEO VIDEO INFORMATION AUTO - Hitachi CP-WX625 | Technical Manual - Page 19
CPWX625(ED3WX40N) Names Operation Type MY SOURCE Set MAGNIFY FREEZE Set -1 Delete MY IMAGE IMAGE-2 Delete MY IMAGE IMAGE-3 Delete MY IMAGE IMAGE-4 Delete RGB1 RGB2 HDMI COMPONENT S-VIDEO VIDEO Get Get Increment Decrement NORMAL FREEZE Get TURN OFF TURN ON AUTO Get CAPTIONS TEXT Get 1 2 3 4
-
 1
1 -
 2
2 -
 3
3 -
 4
4 -
 5
5 -
 6
6 -
 7
7 -
8
-
9
-
10
-
11
-
12
-
13
-
14
-
15
-
16
-
17
-
18
-
19
 |
 |
61
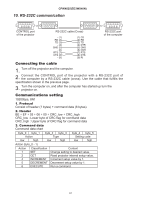
10. RS-232C communication
6
7
8
9
1
2
3
4
5
6
7
8
9
1
2
3
4
5
CONTROL port
RS-232C cable (Cross)
RS-232C port
of the projector
of the computer
- (1)
(1) CD
RD (2)
(2) RD
TD (3)
(3) TD
- (4)
(4) DTR
GND (5)
(5) GND
- (6)
(6) DSR
RTS (7)
(7) RTS
CTS (8)
(8) DTS
- (9)
(9) RI
Connecting the cable
1.
Turn off the projector and the computer.
2.
Connect the CONTROL port of the projector with a RS-232C port of
the computer by a RS-232C cable (cross). Use the cable that fulfills the
speci
fi
cation shown in the previous page.
3.
Turn the computer on, and after the computer has started up turn the
projector on.
Communications setting
19200bps, 8N1
1. Protocol
Consist of header (7 bytes) + command data (6 bytes).
2. Header
BE + EF + 03 + 06 + 00 + CRC_low + CRC_high
CRC_low : Lower byte of CRC
fl
ag for command data
CRC_high : Upper byte of CRC
fl
ag for command data
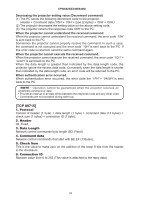
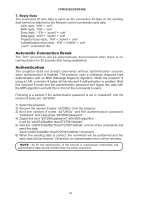
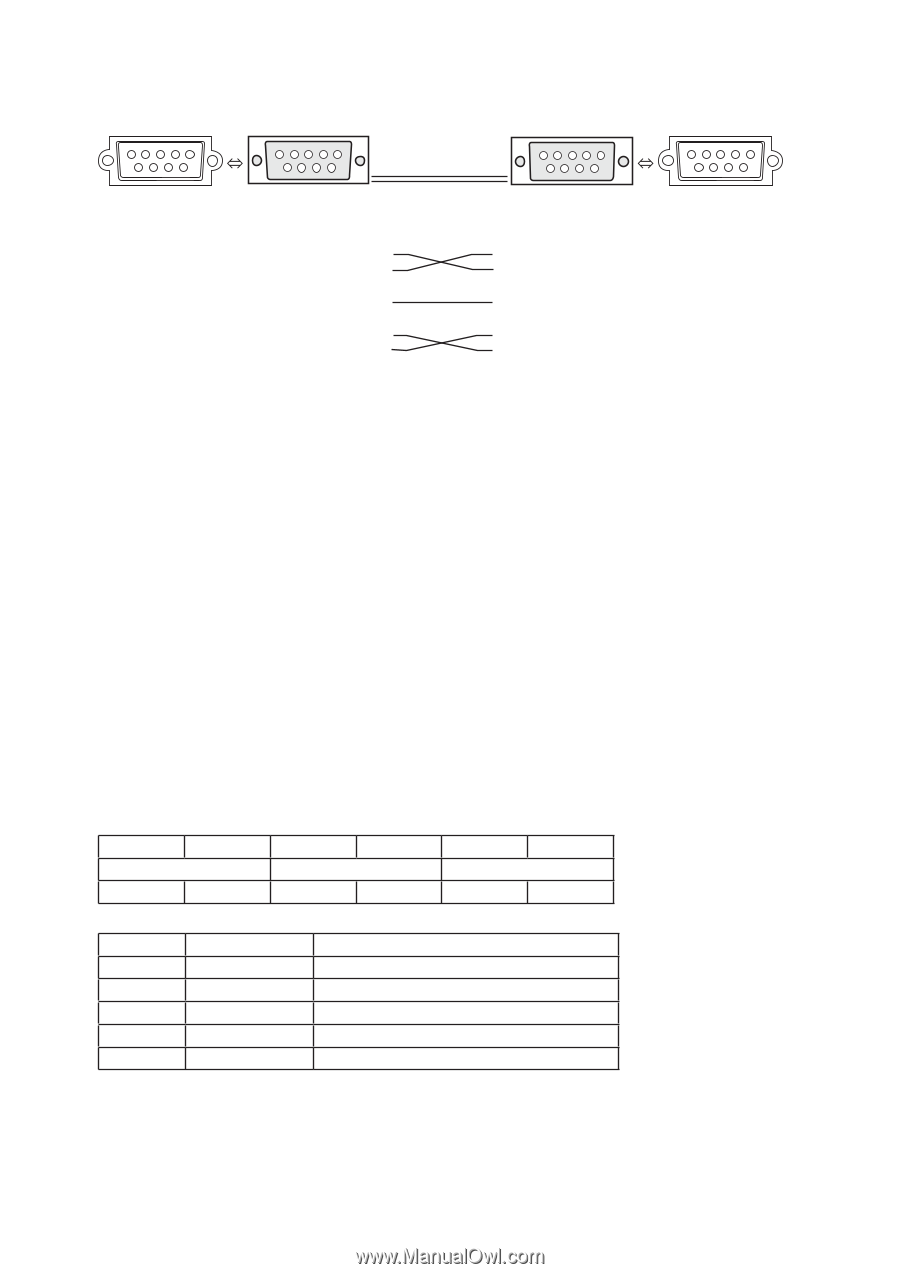
3. Command data
Command data chart
byte_0
byte_1
byte_2
byte_3
byte_4
byte_5
Action
Type
Setting code
low
high
low
high
low
high
Action (byte_0 - 1)
Action
Classi
fi
cation
Content
1
SET
Change setting to desired value.
2
GET
Read projector internal setup value.
4
INCREMENT
Increment setup value by 1.
5
DECREMENT
Decrement setup value by 1.
6
EXECUTE
Run a command.
CPWX625(ED3WX40N)