Hitachi CPD10WALLARM Operating Guide
Hitachi CPD10WALLARM Manual
 |
View all Hitachi CPD10WALLARM manuals
Add to My Manuals
Save this manual to your list of manuals |
Hitachi CPD10WALLARM manual content summary:
- Hitachi CPD10WALLARM | Operating Guide - Page 1
manuals for this product. Be sure to read "Safety Guide" first. After reading them, store them in a safe place for future reference. About this manual Various symbols are used in this manual trouble. Please refer to the pages written following this symbol. NOTE • The information in this manual - Hitachi CPD10WALLARM | Operating Guide - Page 2
Contents About this manual 1 PICTURE menu LAMP TIME, FILTER TIME, MY BUTTON, MY SOURCE, SERVICE Selecting an input signal 15 SECURITY menu 47 Searching 20 Other care 56 Temporarily freezing the screen . . . 21 Troubleshooting 57 Temporarily blanking the screen . . 21 Related messages 58 - Hitachi CPD10WALLARM | Operating Guide - Page 3
you with various ways of use. The double layer filter system is expected to function longer and offers you less maintenance frequency. batteries (2) Power cord (3) Computer cable (4) Lens cover and Strap (5) User's manuals (Book x1, CD x1) (6) Security label POSITION MENU ESC ENTER RESET - Hitachi CPD10WALLARM | Operating Guide - Page 4
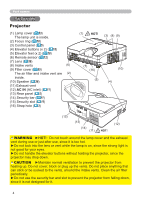
Part names Part names Projector (1) Lamp cover ( 53) The lamp unit is inside. (2) Focus ring ( 18) (3) Control panel ( 5) (4) Elevator buttons (x 2) ( 18) (5) Elevator feet (x 2) ( 18) (6) Remote sensor ( 12) (7) Lens ( 56) (8) Intake vents (6) (9) Filter cover ( 55) The air filter and - Hitachi CPD10WALLARM | Operating Guide - Page 5
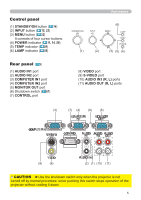
Control panel (1) STANDBY/ON button ( 14) (2) INPUT button ( 15, 22) (3) MENU button ( 22) It consists of four cursor buttons. (4) POWER indicator ( 11, 14, 59) (5) TEMP indicator ( 59) (6) LAMP indicator ( 59) Part names STANDBY/ON (1) INPUT (2) (6) MENU LAMP TEMP POWER (3) (5) (4) Rear - Hitachi CPD10WALLARM | Operating Guide - Page 6
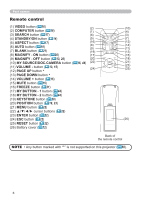
ENTER RESET (10) (4) (3) (7) (12) (14) (11) (13) (15) (18) (21) (23) (25) (26) Back of the remote control NOTE • Any button marked with "*" is not supported on this projector ( 58). 6 - Hitachi CPD10WALLARM | Operating Guide - Page 7
from the ceiling or other location due to the flexibility of the plastic projector body. If readjustment is necessary, consult with your dealer or service personnel. • The projected image position and/or focus may change during warmup (approx. 30 minutes after the lamp is turned on) or when the - Hitachi CPD10WALLARM | Operating Guide - Page 8
mounting accessories the manufacturer specified, and leave installing and removing the projector with the mounting accessories to the service personnel. • Read and keep the user's manual of the mounting accessories used. CAUTION ►Avoid placing the projector in smoky, humid or dusty place. Placing the - Hitachi CPD10WALLARM | Operating Guide - Page 9
up Connecting your devices Be sure to read the manuals for devices before connecting them to the projector. as the input ports of the projector are recessed. NOTE • The COMPUTER IN1/2 port can support a component signal also. The specific adapter or the specific cable is required for a component video - Hitachi CPD10WALLARM | Operating Guide - Page 10
which are not supported by this please refer to the instruction manual of the corresponding laptop PC system and peripheral equipment (i.e. display devices). This projector is VESA DDC 2B compatible. Plug-and-Play can be used by connecting this projector to a PC that is VESA DDC (display data - Hitachi CPD10WALLARM | Operating Guide - Page 11
be attached to the security bar on the projector. Also this product has the security slot for the Kensington lock. For details, see the manual of the security tool. Security slot Anti-theft chain or wire Security bar WARNING ►Do not use the security bar and slot to prevent the projector from - Hitachi CPD10WALLARM | Operating Guide - Page 12
control and store them in a safe place. 1. Holding the hook part of the battery cover, remove it. 1 2 3 2. Align and insert the two AA batteries (HITACHI MAXELL, Part No. LR6 or R6P) according to their plus and minus terminals as indicated in the remote control. 3. Replace the battery cover in - Hitachi CPD10WALLARM | Operating Guide - Page 13
the RESET buttons (2) Set to Mode 2:HIGH... the MAGNIFY OFF and the ESC buttons ESC ENTER RESET Please remember that the REMOTE FREQ. in the SERVICE item of the OPTION menu ( 46) of the projector to be controlled should be set to the same mode as the remote control. 13 - Hitachi CPD10WALLARM | Operating Guide - Page 14
Power on/off Power on/off Turning on the power STANDBY/ON button POWER indicator 1. Make sure that the power cord is firmly and STANDBY/ON INPUT correctly connected to the projector and the MENU LAMP TEMP outlet. POWER 2. Make sure that the POWER indicator is steady orange ( 59). Then remove - Hitachi CPD10WALLARM | Operating Guide - Page 15
Operating Operating Adjusting the volume VOLUME +/- buttons 1. Use the VOLUME +/- buttons to adjust the volume. A dialog will appear on the screen to aid you in adjusting the volume. If you do not do anything, the dialog will automatically disappear after a few seconds. ● When is selected for - Hitachi CPD10WALLARM | Operating Guide - Page 16
Operating Selecting an input signal (continued) 1. Press the COMPUTER button on the remote control. COMPUTER button Each time you press the button, the projector switches its input port from the current port as below. MY SOURCE/ VIDEO COMPUTER DOC.CAMERA COMPUTER IN 1 COMPUTER IN 2 ASPECT - Hitachi CPD10WALLARM | Operating Guide - Page 17
Operating Searching an input signal SEARCH button 1. Press the SEARCH button on the remote control. The projector will start to check its input ports as below in order to find any input signals. When an input is found, the projector will stop searching and display the image. If no signal is found, - Hitachi CPD10WALLARM | Operating Guide - Page 18
elevator feet. 4. After making sure that the elevator feet are locked, put the projector down gently. 5. If necessary, the elevator feet can be manually twisted to make more precise adjustments. Hold the projector when twisting the feet. 1 5 To loose an elevator foot, push the elevator button on - Hitachi CPD10WALLARM | Operating Guide - Page 19
the PC model. ● The items adjusted by this function may vary when the FINE or DISABLE is selected for the AUTO ADJUST item of the SERVICE item in the OPTION menu ( 45). Adjusting the position 1. Press the POSITION button on the remote control while no menu is on screen, to display - Hitachi CPD10WALLARM | Operating Guide - Page 20
Operating Correcting the keystone distortions KEYSTONE button 1. Press the KEYSTONE button on the remote control. A dialog will appear on the screen to aid you in correcting the distortion. 2. Use the ◄/► cursor buttons for adjustment. To close the dialog and complete this operation, press the - Hitachi CPD10WALLARM | Operating Guide - Page 21
Operating Temporarily freezing the screen 1. Press the FREEZE button on the remote control. FREEZE button The "FREEZE" indication will appear on the screen (however, the indication will not appear when the OFF is selected for MY SOURCE/ VIDEO COMPUTER DOC.CAMERA the MESSAGE item in the SCREEN - Hitachi CPD10WALLARM | Operating Guide - Page 22
and press the ► cursor (or the ENTER) button to progress. The operation menu or dialog of the selected item will appear. (3) Use the buttons as instructed in the OSD to operate the item. (continued on next page) 22 - Hitachi CPD10WALLARM | Operating Guide - Page 23
Using the menu function (continued) Operating 3. To close the MENU, press the MENU button again or select the EXIT and press the ◄ cursor (or the ENTER) button. Even if you do not do anything, the dialog will automatically disappear after about 30 seconds. ● If you want to move the menu position, - Hitachi CPD10WALLARM | Operating Guide - Page 24
EASY MENU EASY MENU From the EASY MENU, items shown in the table below can be performed. Select an item using the ▲/▼ cursor buttons. Then perform it according to the following table. Item ASPECT D-ZOOM KEYSTONE Description Using the ◄/► cursor buttons switches the mode for aspect ratio. See the - Hitachi CPD10WALLARM | Operating Guide - Page 25
EASY MENU Item Description ECO MODE Using the ◄/► cursor buttons turns off/on the eco mode. See the ECO MODE item in the SETUP menu ( 34). MIRROR Using the ◄/► cursor buttons switches the mode for mirror status. See the MIRROR item in the SETUP menu ( 35). RESET Performing this item resets - Hitachi CPD10WALLARM | Operating Guide - Page 26
PICTURE menu PICTURE menu From the PICTURE menu, items shown in the table below can be performed. Select an item using the ▲/▼ cursor buttons, and press the ► cursor (or the ENTER) button to execute the item. Then perform it according to the following table. Item BRIGHTNESS CONTRAST Description - Hitachi CPD10WALLARM | Operating Guide - Page 27
PICTURE menu Item Description Using the ▲/▼ cursor buttons switches the color temperature mode. 1 HIGH 1 CUSTOM 2 MID 2 CUSTOM 6 CUSTOM 3 LOW 6 Hi-BRIGHT-3 3 CUSTOM COLOR TEMP COLOR TINT SHARPNESS 5 CUSTOM 5 Hi-BRIGHT-2 4 CUSTOM 4 Hi-BRIGHT-1 To adjust CUSTOM Selecting a mode whose name - Hitachi CPD10WALLARM | Operating Guide - Page 28
keep the current adjustment, please save it before performing a LOAD function. • There may be some noise and the screen may flicker for a moment when loading data. This is not malfunction. • You can perform the LOAD function using the MY BUTTONs. Please see the MY BUTTON item in the OPTION menu ( 44 - Hitachi CPD10WALLARM | Operating Guide - Page 29
IMAGE menu From the IMAGE menu, items shown in the table below can be performed. Select an item using the ▲/▼ cursor buttons, and press the ► cursor (or the ENTER) button to execute the item. Then perform it according to the following table. IMAGE menu Item Description Using the ▲/▼ cursor - Hitachi CPD10WALLARM | Operating Guide - Page 30
PC model. • The items adjusted by this function may vary when the FINE or the DISABLE is selected for the AUTO ADJUST item of the SERVICE item in the OPTION menu ( 45). 30 - Hitachi CPD10WALLARM | Operating Guide - Page 31
or 576i@50. • When the TV or the FILM is selected, the screen image will be sharp. The FILM adapts to the 2-3 Pull-Down conversion system. But these may cause a certain defect (for example, jagged line) of the picture for a quick moving object. In such a case, please select the OFF, even - Hitachi CPD10WALLARM | Operating Guide - Page 32
the signal connector so that no signal is received and select the SYNC ON G OFF, and then reconnect the signal. • The COMPUTER IN1/2 port can support a component signal also ( 9). Set the frame lock function on/off for each port. (1) Use the ▲/▼ cursor buttons to select the input ports. COMPUTER IN1 - Hitachi CPD10WALLARM | Operating Guide - Page 33
RESOLUTION_CUSTOM box will be displayed. Set the horizontal (HORZ) and vertical (VERT) resolutions using CUSTOM ↓ the cursor buttons. This function is may not support all resolutions. (2) Move the cursor to the OK on screen and press the ► cursor (or the ENTER) button. The message "ARE YOU - Hitachi CPD10WALLARM | Operating Guide - Page 34
SETUP menu SETUP menu From the SETUP menu, items shown in the table below can be performed. Select an item using the ▲/▼ cursor buttons, and press the ► cursor (or the ENTER) buttonn to execute the item. Then perform it according to the following table. Item Description D-ZOOM Using the ◄/► - Hitachi CPD10WALLARM | Operating Guide - Page 35
Item SETUP menu Description Using the ▲/▼ cursor buttons switches the mode for mirror status. MIRROR NORMAL H:INVERT V:INVERT H&V:INVERT STANDBY MODE If the Transition Detector is on and the MIRROR status is changed, the TRANSITION DETECTOR ON alarm ( 50) will be displayed when projector is - Hitachi CPD10WALLARM | Operating Guide - Page 36
AUDIO menu AUDIO menu From the AUDIO menu, items shown in the table below can be performed. Select an item using the ▲/▼ cursor buttons, and press the ► cursor (or the ENTER) button to execute the item. Then perform it according to the following table. Item VOLUME SPEAKER Description Using the ◄/► - Hitachi CPD10WALLARM | Operating Guide - Page 37
SCREEN menu From the SCREEN menu, items shown in the table below can be performed. Select an item using the ▲/▼ cursor buttons, and press the ► cursor (or the ENTER) button to execute the item. Then perform it according to the following table. SCREEN menu Item Description LANGUAGE Using the - Hitachi CPD10WALLARM | Operating Guide - Page 38
SCREEN menu Item Description MyScreen This item allows you to capture an image for use as a MyScreen image which can be used as the BLANK screen and the START UP screen. Display the image you want to capture before executing the following procedure. 1. Selecting this item displays a dialog - Hitachi CPD10WALLARM | Operating Guide - Page 39
SCREEN menu Item Description MyScreen Lock Using the ▲/▼ cursor buttons turns on/off the MyScreen lock function. ON OFF When the ON is selected, the item MyScreen is locked. Use this function for protecting the current MyScreen. • This function cannot be selected when the ON is selected to the - Hitachi CPD10WALLARM | Operating Guide - Page 40
SCREEN menu Item SOURCE NAME TEMPLATE Description Each input port for this projector can have a name applied to it. (1) Use the ▲/▼ cursor buttons on the SCREEN menu to select the SOURCE NAME and press the ► cursor (or the ENTER) button. The SOURCE NAME menu will be displayed. (2) Use the ▲/▼ - Hitachi CPD10WALLARM | Operating Guide - Page 41
format video or 480i@60 format component video source supporting C.C. feature to utilize this function. It may , and / or sound effects of a television program or other video sources. The Closed Caption Text data, which is for additional information such as news reports or a TV program guide. - Hitachi CPD10WALLARM | Operating Guide - Page 42
OPTION menu OPTION menu From the OPTION menu, items shown in the table below can be performed. Select an item using the ▲/▼ cursor buttons, and press the ► cursor (or the ENTER) button to execute the item, except for the items LAMP TIME and FILTER TIME. Then perform it according to the following - Hitachi CPD10WALLARM | Operating Guide - Page 43
Item OPTION menu Description Using the ▲/▼ cursor buttons adjusts the time to count down to automatically turn the projector off. Long (max. 99 minutes) Short (min. 0 minute = DISABLE) AUTO POWER OFF When the time is set to 0, the projector is not turned off automatically. When the time is set to - Hitachi CPD10WALLARM | Operating Guide - Page 44
as shown in the right appears. If you want to keep the current adjustment, please press the ► cursor button to exit. Otherwise loading a data will overwrite the current adjusted condition. • PICTURE MODE: Changes the PICTURE MODE ( 24). • FILTER RESET: Displays the filter time reset confirmation - Hitachi CPD10WALLARM | Operating Guide - Page 45
FINE FAST DISABLE SERVICE FINE: Finer tuning including the H.SIZE adjustment. FAST: Faster tuning, setting the H.SIZE to prearranged data for the input choose the DISABLE to disable the automatic adjustment, and make adjustment manually. GHOST 1. Select a color element of ghost using the ◄/► - Hitachi CPD10WALLARM | Operating Guide - Page 46
OPTION menu Item SERVICE (continued) Description KEY LOCK Using the ▲/▼ cursor buttons turns on/off the key lock feature. When the ON is selected, the buttons on the projector - Hitachi CPD10WALLARM | Operating Guide - Page 47
SECURITY menu SECURITY menu This projector is equipped with security functions. From the SECURITY menu, items shown in the table below can be performed. To use SECURITY menu: User registration is required before using the security functions. Enter the SECURITY menu 1. Use the ▲/▼ cursor buttons on - Hitachi CPD10WALLARM | Operating Guide - Page 48
SECURITY menu Item Description MyScreen PASSWORD The MyScreen PASSWORD function can be used to prohibit access to the MyScreen function and prevent the currently registered MyScreen image from being overwritten. 1 Turning on the MyScreen PASSWORD 1-1 Use the ▲/▼ cursor buttons on the SECURITY - Hitachi CPD10WALLARM | Operating Guide - Page 49
SECURITY menu Item PIN LOCK Description The PIN LOCK is a function which prevents the projector from being used unless a registered Code is input. 1 Turning on the PIN LOCK 1-1 Use the ▲/▼ cursor buttons on the SECURITY menu to select PIN LOCK and press the ► cursor (or the ENTER) button to - Hitachi CPD10WALLARM | Operating Guide - Page 50
SECURITY menu Item Description TRANSITION DETECTOR ɾTransition Detector alarm shown below might appear on screen, if the projector has been moved or re-installed. ɾTransition Detector alarm might appear on screen, if the MIRROR setting has been changed. • To display the signal again, set this - Hitachi CPD10WALLARM | Operating Guide - Page 51
SECURITY menu Item MY TEXT PASSWORD Description The MY TEXT PASSWORD function can prevent the MY TEXT from being overwritten. When the password is set for the MY TEXT; • The MY TEXT DISPLAY menu will be unavailable, which can prohibit changing the DISPLAY setting. • The MY TEXT WRITING menu will - Hitachi CPD10WALLARM | Operating Guide - Page 52
it is set to the ON, the MY TEXT will be displayed on the START UP screen and the INPUT_INFORMATION when the INFORMATION on the SERVICE menu is chosen. • This function is available only when the MY TEXT PASSWORD function is set to the OFF. (1) Use the ▲/▼ cursor buttons on the - Hitachi CPD10WALLARM | Operating Guide - Page 53
Maintenance Maintenance Replacing the lamp A lamp has finite product life. Using the lamp for long periods of time could cause the pictures darker or the color tone poor. Note that each lamp has a different lifetime, and some may burst or burn out soon after you start using them. Preparation of a - Hitachi CPD10WALLARM | Operating Guide - Page 54
the lamp breaks soon after the first time it is used, it is possible that there are electrical problems elsewhere besides the lamp. If this happens, consult your local dealer or a service representative. • Handle with care: jolting or scratching could cause the lamp bulb to burst during use. • Using - Hitachi CPD10WALLARM | Operating Guide - Page 55
Maintenance Cleaning and replacing the air filter The air filter has two kinds of filters inside. Please check and clean the air filter periodically. When the indicators or a message prompts you to clean the air filter, comply with it as soon as possible. If the filters are damaged or heavily soiled, - Hitachi CPD10WALLARM | Operating Guide - Page 56
an injury but adverse influence such as discoloration, peeling paint, etc. ►Do not use cleaners or chemicals other than those specified in this manual. ►Do not polish or wipe with hard objects. 56 - Hitachi CPD10WALLARM | Operating Guide - Page 57
Troubleshooting Troubleshooting If an abnormal operation should occur, stop using the projector sure that the smoke or odor has stopped, contact to your dealer or service company. Otherwise if a problem occurs with the projector, the following checks and measures are recommended before requesting - Hitachi CPD10WALLARM | Operating Guide - Page 58
Troubleshooting indication is displayed after the remedy, please set FAN SPEED of the SERVICE item in the OPTION menu to HIGH. A note of precaution lter referring to the "Cleaning and replacing the air filter" section of this manual. After you have cleaned or changed the air filter, please be sure to - Hitachi CPD10WALLARM | Operating Guide - Page 59
Troubleshooting Regarding the indicator lamps When operation of the POWER, TEMP and LAMP indicators differs from usual, check and cope , turn the power on again. If the same indication is displayed after the remedy, please contact your dealer or service company. (Continued on next page) 59 - Hitachi CPD10WALLARM | Operating Guide - Page 60
Troubleshooting Regarding the indicator lamps (continued) POWER TEMP LAMP the power on again. If the same indication is displayed after the remedy, please contact your dealer or service company. Blinking In Red or Lighting Lighting In Red In Red Turned off There is a possibility that - Hitachi CPD10WALLARM | Operating Guide - Page 61
Troubleshooting is hard to correct some wrong settings, the FACTORY RESET function of SERVICE item in OPTION menu ( 46) can reset all settings(except LANGUAGE Correctly set up the signal source device by referring to the manual of the source device. The input changeover settings are mismatched. - Hitachi CPD10WALLARM | Operating Guide - Page 62
Troubleshooting Phenomena that may be easy to be mistaken for machine defects (continued) Phenomenon Cases not involving a machine defect Reference page The signal cables are not - Hitachi CPD10WALLARM | Operating Guide - Page 63
Troubleshooting Phenomena that may be easy to be mistaken for machine defects (continued) Phenomenon Cases not involving a machine defect Reference page The brightness and/or contrast - Hitachi CPD10WALLARM | Operating Guide - Page 64
Specifications Specifications Specifications Item Product name Liquid Crystal Panel Lens Lamp Speaker Power supply Power consumption Temperature range Size Weight (mass) Ports Optional parts Specification Liquid crystal projector 786,432 pixels (1024 horizontal x 768 vertical) F2.14 f=6.8mm 180 W UHB - Hitachi CPD10WALLARM | Operating Guide - Page 65
Specifications (continued) Specificationsv 303 103 333 131 67 125 [unit: mm] 65
-
 1
1 -
 2
2 -
 3
3 -
 4
4 -
 5
5 -
 6
6 -
 7
7 -
8
-
9
-
10
-
11
-
12
-
13
-
14
-
15
-
16
-
17
-
18
-
19
-
20
-
21
-
22
-
23
-
24
-
25
-
26
-
27
-
28
-
29
-
30
-
31
-
32
-
33
-
34
-
35
-
36
-
37
-
38
-
39
-
40
-
41
-
42
-
43
-
44
-
45
-
46
-
47
-
48
-
49
-
50
-
51
-
52
-
53
-
54
-
55
-
56
-
57
-
58
-
59
-
60
-
61
-
62
-
63
-
64
-
65
 |
 |

1
Projector
CP-D10
User's Manual (detailed)
Operating Guide
Thank you for purchasing this projector.
►Before using this product, please read all manuals for this
product. Be sure to read “
Safety Guide
” first. After reading them, store them in a
safe place for future reference.
WARNING
• The information in this manual is subject to change without notice.
• The manufacturer assumes no responsibility for any errors that may appear in
this manual.
• The reproduction, transfer or copy of all or any part of this document is not
permitted without express written consent.
NOTE
Trademark acknowledgment
Various symbols are used in this manual. The meanings of these symbols are
described below.
About this manual
WARNING
CAUTION
This symbol indicates information that, if ignored, could possibly
result in personal injury or even death due to incorrect handling.
This symbol indicates information that, if ignored, could possibly
result in personal injury or physical damage due to incorrect
handling.
Please refer to the pages written following this symbol.
±
•
Mac
®
is a registered trademark of Apple Inc.
•
Windows
®
is a registered trademark of Microsoft Corporation in the U.S. and/or
other countries.
•
VESA and DDC are trademarks of the Video Electronics Standard Association.
All other trademarks are the properties of their respective owners.
NOTICE
This entry notices of fear of causing trouble.