Hitachi DZ GX5020A Owners Guide - Page 19
Setups
 |
UPC - 050585223875
View all Hitachi DZ GX5020A manuals
Add to My Manuals
Save this manual to your list of manuals |
Page 19 highlights
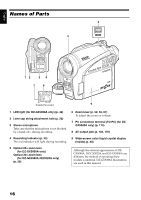
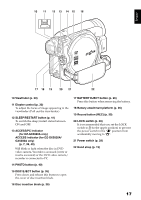
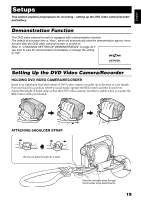
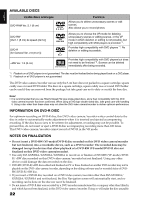
English Setups This section explains preparations for recording - setting up the DVD video camera/recorder and battery. Demonstration Function This DVD video camera/recorder is equipped with a demonstration function. The default at purchase time is "Auto", which will automatically start the demonstration approx. three minutes after the DVD video camera/recorder is turned on. Refer to "CHANGING SETTING OF DEMONSTRATION" on page 33 if you wish to view the demonstration immediately or change the setting to "Off". Setting Up the DVD Video Camera/Recorder HOLDING DVD VIDEO CAMERA/RECORDER Insert your right hand from the bottom of DVD video camera/recorder up to the base of your thumb. Put your hand in a position where you can easily operate the REC button and the Zoom lever. Adjust the length of hand strap so that the DVD video camera/recorder is stable when you press the REC button with your thumb. ATTACHING SHOULDER STRAP Be sure to pass through the 2 slots. Pass the shoulder strap through the shoulder strap attachments. 19
-
 1
1 -
2
-
3
-
4
-
5
-
6
-
7
-
8
-
9
-
10
-
11
-
12
-
13
-
 14
14 -
 15
15 -
 16
16 -
 17
17 -
 18
18 -
 19
19 -
 20
20 -
 21
21 -
 22
22 -
 23
23 -
 24
24 -
25
-
26
-
27
-
28
-
29
-
30
-
31
-
32
-
33
-
34
-
35
-
36
-
37
-
38
-
39
-
40
-
41
-
42
-
43
-
44
-
45
-
46
-
47
-
48
-
49
-
50
-
51
-
52
-
53
-
54
-
55
-
56
-
57
-
58
-
59
-
60
-
61
-
62
-
63
-
64
-
65
-
66
-
67
-
68
-
69
-
70
-
71
-
72
-
73
-
74
-
75
-
76
-
77
-
78
-
79
-
80
-
81
-
82
-
83
-
84
-
85
-
86
-
87
-
88
-
89
-
90
-
91
-
92
-
93
-
94
-
95
-
96
-
97
-
98
-
99
-
100
-
101
-
102
-
103
-
104
-
105
-
106
-
107
-
108
-
109
-
110
-
111
-
112
-
113
-
114
-
115
-
116
-
117
-
118
-
119
-
120
-
121
-
122
-
123
-
124
-
125
-
126
-
127
-
128
-
129
-
130
-
131
-
132
-
133
-
134
-
135
-
136
-
137
-
138
-
139
-
140
-
141
-
142
-
143
-
144
-
145
-
146
-
147
-
148
-
149
-
150
-
151
-
152
-
153
-
154
-
155
-
156
-
157
-
158
 |
 |