Hitachi DZ GX5020A Owners Guide - Page 88
Playing Back Program Play, Changing Title Of Program Title
 |
UPC - 050585223875
View all Hitachi DZ GX5020A manuals
Add to My Manuals
Save this manual to your list of manuals |
Page 88 highlights
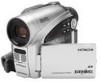
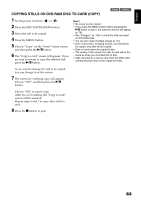
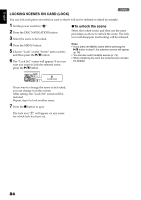
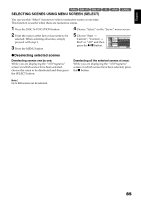
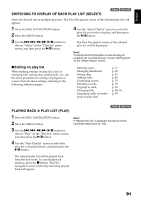
English PLAYING BACK PROGRAM (PLAY) You can play back only the selected program. 1 Press the DISC NAVIGATION button. 2 Press the MENU button. 3 Use the f/e/d/c/A buttons to choose "Play" on the "Program" menu screen, and then press the A button. 12/ 4 Select the program to be played back, and then press the A button. Playback will start from the first scene of the selected program. Note: If "Repeat Play: On" is specified, the selected program will be repeatedly played back (PLAYING BACK SCENES REPEATEDLY (REPEAT PLAY), p. 102). CHANGING TITLE OF PROGRAM (TITLE) 1< The recording date/time has initially been attached to any program. You can change the recording date/time to any desired title. 1 Press the DISC NAVIGATION button. 2 Press the MENU button. 3 Choose "Title" on the "Program" menu screen, and then press the A button. 4 Select the program whose title you want to change, and then press the A button. Program T i t l e 01 1/ 1 0/ 2007 02 1/ 15/ 2007 03 2/10/ 2007 ENTER RETURN 6 After entering the title, choose "Enter" and then press the A button. 7 The screen for verifying the change in title will appear: Choose "YES", and then press the A button. T I T L E a t a Pa r k 1 2 3 4 5 6 7 8 9 0 SPACE abcdefghi jk lm n o p q r s t u vwx yz 2 Ent er Cancel ENTER DELETE SEL SELECT T I T L E a t a Pa r k Finish t i t l e set t i ng? YES NO ENTER The screen for setting a title will appear. 5 Use f/e/d/c to select a letter, and then press the A button: The selected letter will be entered. Repeat this procedure to create a title. Up to 20 characters can be input. Title input bar TITLE 2 /10/ 2007 1 2 3 4 5 6 7 8 9 0 SPACE ABCDEFGH I JKLM NOPQR S T UVWX Y Z 1 Ent er Cancel INPUT DELETE SEL SELECT Input mode Palette for selecting characters Choose "NO" to cancel changing of the title. After Yes or No setting, the Disc Navigation screen of the selected program will appear. 88
-
 1
1 -
2
-
3
-
4
-
5
-
6
-
7
-
8
-
9
-
10
-
11
-
12
-
13
-
14
-
15
-
16
-
17
-
18
-
19
-
20
-
21
-
22
-
23
-
24
-
25
-
26
-
27
-
28
-
29
-
30
-
31
-
32
-
33
-
34
-
35
-
36
-
37
-
38
-
39
-
40
-
41
-
42
-
43
-
44
-
45
-
46
-
47
-
48
-
49
-
50
-
51
-
52
-
53
-
54
-
55
-
56
-
57
-
58
-
59
-
60
-
61
-
62
-
63
-
64
-
65
-
66
-
67
-
68
-
69
-
70
-
71
-
72
-
73
-
74
-
75
-
76
-
77
-
78
-
79
-
80
-
81
-
82
-
 83
83 -
 84
84 -
 85
85 -
 86
86 -
 87
87 -
 88
88 -
 89
89 -
 90
90 -
 91
91 -
 92
92 -
 93
93 -
94
-
95
-
96
-
97
-
98
-
99
-
100
-
101
-
102
-
103
-
104
-
105
-
106
-
107
-
108
-
109
-
110
-
111
-
112
-
113
-
114
-
115
-
116
-
117
-
118
-
119
-
120
-
121
-
122
-
123
-
124
-
125
-
126
-
127
-
128
-
129
-
130
-
131
-
132
-
133
-
134
-
135
-
136
-
137
-
138
-
139
-
140
-
141
-
142
-
143
-
144
-
145
-
146
-
147
-
148
-
149
-
150
-
151
-
152
-
153
-
154
-
155
-
156
-
157
-
158
 |
 |