Hitachi T-17SXL User Guide
Hitachi T-17SXL Manual
 |
View all Hitachi T-17SXL manuals
Add to My Manuals
Save this manual to your list of manuals |
Hitachi T-17SXL manual content summary:
- Hitachi T-17SXL | User Guide - Page 1
of this user's guide, specify T269-2-801. Read this user's guide and carefully retain it for future reference. Before using this product, carefully read and fully understand the safety instructions. Store this User's Guide nearby for ease of reference. T269-2-801 Hitachi Software Engineering Co - Hitachi T-17SXL | User Guide - Page 2
PRINTED ON RECYCLED PAPER - Hitachi T-17SXL | User Guide - Page 3
, please verify the product home page. Disclaimers Hitachi Software Engineering Co., Ltd. assumes no liability and makes no warranty, either express or implicit, regarding the contents of this user's guide. Also, the company makes no warranty as to the product's suitability, merchantability or - Hitachi T-17SXL | User Guide - Page 4
markets. For warranty details, refer to Appendix 3.6 at the end of this user's guide. This First edition of the user's guide (T269-2-801) is for the following products: 95.64301G00E (StarBoard T-17SXL) The StarBoard T-17SXL incorporates WALTOP's 17-inch LCD monitor integrated digitizer technology - Hitachi T-17SXL | User Guide - Page 5
StarBoard T-17SXL Safe Handling Safe Handling Markings and Symbols Various markings and symbols are used in this user's guide and on this below. Understand the information well before reading the body of the user's guide. WARNING This symbol indicates the presence of potential dangers that, if - Hitachi T-17SXL | User Guide - Page 6
StarBoard T-17SXL Safety Precautions Safe Handling Always comply with them WARNINGS Securely insert the power plug into the power socket. If it is not plugged in securely, - Hitachi T-17SXL | User Guide - Page 7
StarBoard T-17SXL Safety Precautions Safe Handling Always comply with them WARNINGS Do not use a power cable other than the accessory power cable. If a power cable other than - Hitachi T-17SXL | User Guide - Page 8
the technical support of Hitachi Software. a. After the power cord or AC Adaptor plug is damaged. b. After liquid is spilled onto the main unit. c. After the main unit is exposed to rain or water. d. After this product malfunctions, even when operated according to the instruction manual. Adjust this - Hitachi T-17SXL | User Guide - Page 9
StarBoard T-17SXL Safe Handling Careful thought was given to the cautions on this device and in this user's guide. However, unanticipated circumstances might occur. When operating this product, users themselves must exercise caution as well as follow instructions the pen's rear part too forcefully. - Hitachi T-17SXL | User Guide - Page 10
Menu 2-6 2.3.1 OSD Buttons and Their Functions 2-6 2.3.2 OSD Adjustment Options 2-7 3. Appendix ...3-1 3.1 Troubleshooting 3-1 3.2 System Specifications 3-4 3.3 How to Take Care of the StarBoard 3-5 3.4 Consumables...3-5 3.5 LCD Panel ...3-5 3.6 Provisions of Product Warranty 3-6 8 English - Hitachi T-17SXL | User Guide - Page 11
- Hitachi T-17SXL | User Guide - Page 12
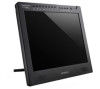
Overview StarBoard T-17SXL is a convenient and easy-to-use tablet-type interactive electronic board that lets you operate a PC with a stylus pen, and write text and images to a PC screen in real time as well as simultaneously input those to the PC. Those features work when the included software is - Hitachi T-17SXL | User Guide - Page 13
mini-plug) 1 (10) Pen tip replacement pin set 1 (11) StarBoard Software x.x (CD-ROM) (*1) 2 (12) StarBoard T-17SXL User's Guide (this manual) 1 (13) StarBoard Software x.x User's Guide (*1) 1 (14) StarBoard Function Buttons User's Guide 1 (15) Warranty Sheet 1 (*1) The term "x.x." as - Hitachi T-17SXL | User Guide - Page 14
StarBoard T-17SXL 1.3 Part Names and Functions 1.3.1 Front Screen (1) Introduction (4) (5) (3) (2) (1) LCD and tablet operating area Receives text and graphical information entered with the stylus pen, and transmits the data to a PC. (4) Front switch panel by the StarBoard software are assigned - Hitachi T-17SXL | User Guide - Page 15
StarBoard T-17SXL 1.3.2 Front Switch Panel Introduction (3) (4) (6) (5) (1) (2) (1) Power button This button turns the StarBoard LCD monitor ON/OFF. (2) Power indicator This indicator turns green when power is supplied normally to the StarBoard and an image signal is detected. It turns red - Hitachi T-17SXL | User Guide - Page 16
StarBoard T-17SXL 1.3.3 Connector Panel Bottom Introduction Top (5) (4) (1) (2) (3) (4) (5) View of StarBoard Back Right Side (1) Power port The AC adapter is connected here. (2) VGA input port This port is used to connect a PC via RGB cable to display images from the PC. (3) VGA output port - Hitachi T-17SXL | User Guide - Page 17
StarBoard T-17SXL 1.3.4 Function Buttons Introduction (1) ToolBar hide/un-hide Hides/displays StarBoard Software ToolBar. (2) New blank page Adds a new blank page. (3) Previous page Displays the page before the currently displayed page. (4) Next page Displays the page after the currently displayed - Hitachi T-17SXL | User Guide - Page 18
StarBoard T-17SXL Introduction 1.4 Assembly and Setup Keep the following points in mind when installing the StarBoard. Select a stable, flat location. Avoid installing in locations that are dusty, extremely hot, cold, or humid. Also avoid installing in locations exposed to direct sunlight. 1.4.1 - Hitachi T-17SXL | User Guide - Page 19
StarBoard T-17SXL (3) Check that the lever and stand are secure. Introduction CAUTION Hold may reflect off the screen. 1.4.2 How to Use the Pen Holder The T-17SXL comes with a pen holder on the back side. Store the stylus pen in the pen holder when not in use. Insert vertically 1-8 English - Hitachi T-17SXL | User Guide - Page 20
StarBoard T-17SXL 1.4.3 Connection Procedure Follow the procedure below to connect the PC and StarBoard. StarBoard (2) (3) (1) Introduction PC (4) (6) (5) To power outlet (1) Connect the RGB cable to the VGA input port on the side of the StarBoard, and tighten the screws to fasten. Connect the - Hitachi T-17SXL | User Guide - Page 21
StarBoard T-17SXL Introduction WARNING Use the AC Adaptor supplied with this product. Use only AC Adaptor or power cables specified by the manufacturer. Use of improper adaptors or cables can damage the product or cause a fire. 1-10 English - Hitachi T-17SXL | User Guide - Page 22
the software is installed.) Notice when displaying screens at SXGA resolution Be sure to set the monitor refresh rate to 60 Hz if displaying the StarBoard at SXGA resolution (1280×1024). If used at a refresh rate other than 60 Hz, the pen may not operate correctly due to noise from the LCD panel - Hitachi T-17SXL | User Guide - Page 23
StarBoard T-17SXL 2.2 Using the Stylus Pen This section describes how to use the StarBoard stylus pen. Usage 2.2.1 How to Use the Stylus Pen The stylus pen has a power switch. Battery life can be prolonged by switching the power switch OFF when not in use. To draw characters and figures using the - Hitachi T-17SXL | User Guide - Page 24
the pen tip slightly removed from the screen (5 mm or less). Same as above. Corresponding mouse action Mouse left-click Mouse left double-click Mouse right-click Pen tip Side Button No. 1 Side Button No. 0 For details on changing the button settings, see the StarBoard Software x.x User's Guide - Hitachi T-17SXL | User Guide - Page 25
StarBoard T-17SXL Usage 2.2.4 Changing the Battery in the Stylus Pen The stylus pen contains a single AAA alkaline dry cell battery. If the pen begins to operate erratically (e.g., if pen the battery as described below. (1) Turn the stylus pen grip to separate the two halves. (2) Remove the - Hitachi T-17SXL | User Guide - Page 26
StarBoard T-17SXL Usage 2.2.5 Replacing the Stylus Pen Tip When the stylus pen tip wears down and becomes too short, replace it as described below. (1) Using the special pin set, remove the stylus pen tip. (2) Insert a new pen tip into the stylus pen. 2-5 English - Hitachi T-17SXL | User Guide - Page 27
StarBoard T-17SXL Usage 2.3 Using the OSD Menu The OSD menu is used when adjusting the StarBoard LCD screen. OSD is an abbreviation for On-Screen Display. The OSD feature allows you to view and adjust the settings for the display on the screen. 2.3.1 OSD Buttons and Their Functions •Menu - Hitachi T-17SXL | User Guide - Page 28
StarBoard T-17SXL 2.3.2 OSD Adjustment Options Usage (1) BRIGHTNESS Used to adjust screen brightness. (0-100) (2) CONTRAST Used to adjust colour contrast. The larger the value, the brighter the image - Hitachi T-17SXL | User Guide - Page 29
StarBoard T-17SXL (4) COLOUR TEMPRATURE Used to adjust the colour temperature of the screen. (SRGB . RETURN : Used to return to the previous page. (6) LANGUAGE Used to select the display language. The following languages are available: Japanese, English, French, German, Spanish, Italian, and - Hitachi T-17SXL | User Guide - Page 30
StarBoard T-17SXL (7) OTHER SETUP Usage SMOOTH : Used to adjust the smoothness of the image. automatically. (0-60) : Used to adjust the speaker volume. (0-100) : Used to turn the screen resolution display ON/OFF. RESET RETURN : Used to reset OSD menu settings to their default values. : Used to - Hitachi T-17SXL | User Guide - Page 31
- Hitachi T-17SXL | User Guide - Page 32
right (may selected, or that just the monitor is be assigned to a function selected. (For details on selection, see key)? the PC manual and other documentation.) Other Contact technical support. StarBoard Software-related problems In this case StarBoard is not recognized. Check this And do - Hitachi T-17SXL | User Guide - Page 33
StarBoard T-17SXL Appendix Stylus pen-related problems In this case Check this And do this Stylus pen does not operate. StarBoard Software may be Uninstall StarBoard Software, and damaged or may not be then reinstall. (For details on how to installed correctly. install StarBoard software, - Hitachi T-17SXL | User Guide - Page 34
button-related problems In this case Function buttons don't operate. Check this And do this Is the USB cable connected Connect USB cable to PC. (For details properly? on how to connect, see "1.4.3 Connection Procedure" on page 1-9 of this User's Guide.) Is the StarBoard Software running - Hitachi T-17SXL | User Guide - Page 35
No. StarBoard T-17SXL 95.64301G00E Display characteristics Driver type Effective screen size Resolution Active-Matrix Liquid Crystal Display (TFT characteristics Viewing angles Input system Pen right 70°, left 70°, up 70°, down 70° Electromagnetic induction Stylus pen (Uses one AAA alkaline dry - Hitachi T-17SXL | User Guide - Page 36
StarBoard T-17SXL Appendix 3.3 How to Take Care of the StarBoard Please clean your StarBoard periodically so it will continue to work for a long time. (1) Cleaning and care • Use a dry, soft cloth to clean the StarBoard display surface. Do not use detergents. • Use a diluted detergent without - Hitachi T-17SXL | User Guide - Page 37
The warranty coverage is as listed in the following table: Product Name Part Name Warranty Coverage StarBoard 17-inch LCD monitor + Stylus pen + (6) In the event of problems resulting from handling contrary to the handling and precautions mentioned in this user's guide. (7) In the event - Hitachi T-17SXL | User Guide - Page 38
StarBoard T-17SXL , review the contents of this user's guide. If the problems remain irreparable, contact technical support. Technical support will responsibility for the return shipping to the customer. 7. This warranty does not cover labour fees for repair-associated equipment assembly or
-
 1
1 -
 2
2 -
 3
3 -
 4
4 -
 5
5 -
 6
6 -
 7
7 -
8
-
9
-
10
-
11
-
12
-
13
-
14
-
15
-
16
-
17
-
18
-
19
-
20
-
21
-
22
-
23
-
24
-
25
-
26
-
27
-
28
-
29
-
30
-
31
-
32
-
33
-
34
-
35
-
36
-
37
-
38
 |
 |

StarBoard T-17SXL
User's Guide
How to Request a User's Guide
When requesting a separate copy of this user's guide, specify
T269-2-801
.
T269-2-801
Hitachi Software Engineering Co., Ltd.
Read this user’s guide and carefully retain it for future reference.
Before using this product, carefully read and fully understand the safety instructions.
Store this User’s Guide nearby for ease of reference.