Honeywell 3800G14E User Manual - Page 52
Other Programming Selections, Data Format Editor Commands, Send Commands
 |
View all Honeywell 3800G14E manuals
Add to My Manuals
Save this manual to your list of manuals |
Page 52 highlights
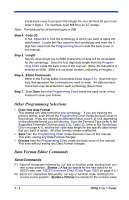
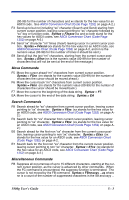
inside back cover to program the imager for your terminal ID (you must enter 3 digits). For example, scan 0 0 3 for an AT wedge. Note: The wildcard for all terminal types is 099. Step 4. Code I.D. In the Appendix A, find the symbology to which you want to apply the data format. Locate the Hex value for that symbology and scan the 2 digit hex value from the Programming Chart inside the back cover of this manual. Step 5. Length Specify what length (up to 9999 characters) of data will be acceptable for this symbology. Scan the four digit data length from the Programming Chart inside the back cover of this manual. (Note: 50 characters is entered as 0050. 9999 is a universal number, indicating all lengths.) Step 6. Editor Commands Refer to the Format Editor Commands Chart (page 5-2). Scan the symbols that represent the command you want to enter. 94 alphanumeric characters may be entered for each symbology data format. Step 7. Scan Save from the Programming Chart inside the back cover of this manual to save your entries. Other Programming Selections • Clear One Data Format This deletes one data format for one symbology. If you are clearing the primary format, scan 0 from the Programming Chart inside the back cover of this manual. If you are clearing an alternate format, scan 1, 2, or 3, depending on the alternate format you are clearing. Scan the Terminal Type (refer to the Supported Terminals Chart on page 2-2), Code I.D. (refer to the Symbology Chart on page A-1), and the bar code data length for the specific data format that you want to delete. All other formats remain unaffected. • Save from the Programming Chart inside the back cover of this manual This exits, saving any Data Format changes. • Discard from the Programming Chart inside the back cover of this manual This exits without saving any Data Format changes. Data Format Editor Commands Send Commands F1 Send all characters followed by "xx" key or function code, starting from current cursor position. Syntax = F1xx (xx stands for the hex value for an ASCII code, see ASCII Conversion Chart (Code Page 1252) on page A-2.) F2 Send "nn" characters followed by "xx" key or function code, starting from current cursor position. Syntax = F2nnxx (nn stands for the numeric value 5 - 2 3800g User's Guide
-
 1
1 -
2
-
3
-
4
-
5
-
6
-
7
-
8
-
9
-
10
-
11
-
12
-
13
-
14
-
15
-
16
-
17
-
18
-
19
-
20
-
21
-
22
-
23
-
24
-
25
-
26
-
27
-
28
-
29
-
30
-
31
-
32
-
33
-
34
-
35
-
36
-
37
-
38
-
39
-
40
-
41
-
42
-
43
-
44
-
45
-
46
-
 47
47 -
 48
48 -
 49
49 -
 50
50 -
 51
51 -
 52
52 -
 53
53 -
 54
54 -
 55
55 -
 56
56 -
 57
57 -
58
-
59
-
60
-
61
-
62
-
63
-
64
-
65
-
66
-
67
-
68
-
69
-
70
-
71
-
72
-
73
-
74
-
75
-
76
-
77
-
78
-
79
-
80
-
81
-
82
-
83
-
84
-
85
-
86
-
87
-
88
-
89
-
90
-
91
-
92
-
93
-
94
-
95
-
96
-
97
-
98
-
99
-
100
-
101
-
102
-
103
-
104
-
105
-
106
-
107
-
108
-
109
-
110
-
111
-
112
-
113
-
114
-
115
-
116
-
117
-
118
-
119
-
120
-
121
-
122
-
123
-
124
-
125
-
126
-
127
-
128
-
129
-
130
-
131
-
132
-
133
-
134
-
135
-
136
-
137
-
138
-
139
-
140
-
141
-
142
-
143
-
144
 |
 |