Honeywell CT3200 Owner's Manual - Page 9
Special wiring instructions - programmable thermostat
 |
View all Honeywell CT3200 manuals
Add to My Manuals
Save this manual to your list of manuals |
Page 9 highlights
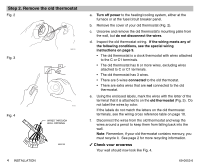
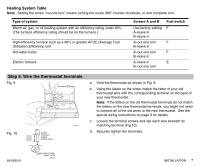
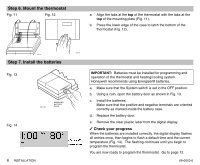
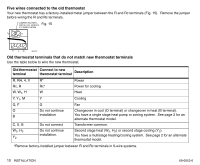
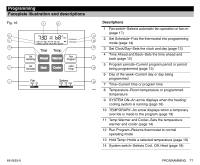
Special wiring instructions A clock thermostat with C or C1 terminals A clock thermostat has one or two extra wires attached to the C or C1 terminals that allow the clock to operate. These wires are not used during the installation of your new 3200 thermostat and must be insulated from each other to avoid damaging your electrical circuit. a. Make sure that power to the heating/cooling system is turned off. b. Locate the wires that are connected to the clock terminals marked C or C1. c. As you disconnect the wires, do not allow these wires to touch. d. Wrap the wires separately, using electrical tape to insulate the wires. e. Place the wires where they will not interfere with the operation of the new thermostat. You will not connect these wires to your 3200 thermostat. f. Continue with the installation as instructed on page 4 at step 2e. Six or more wires If your old thermostat has six or more wires (excluding clock wires attached to the C or C1 terminals), your heating/cooling system is most likely a variation of a heat pump or multistage system. Your 3200 thermostat will NOT work with such systems and should be returned to the place of purchase. See the compatibility table on page 2 for information about which programmable thermostat WILL work with your system. Three thermostat wires If you have three wires for heating only and can operate the fan using the fan ON switch, the 3200 thermostat will work with your system. Continue the installation procedure on page 4, step 2e. If you have a three-wire heating-only system and cannot operate the fan using the fan ON switch, the 3200 thermostat will probably NOT work with your system. Contact your heating contractor for installation assistance. Wires that are not connected to the old thermostat If there are extra wires that do not connect to your old thermostat, do not label them. You will not connect these wires to your new thermostat. Tape off the wires with electrical tape and place them where they will not interfere with the operation of the new thermostat. Continue the installation procedure on page 4, step 2e. 69-0653-6 INSTALLATION 9
-
 1
1 -
2
-
3
-
 4
4 -
 5
5 -
 6
6 -
 7
7 -
 8
8 -
 9
9 -
 10
10 -
 11
11 -
 12
12 -
 13
13 -
 14
14 -
15
-
16
-
17
-
18
-
19
-
20
-
21
-
22
-
23
-
24
 |
 |
