Honeywell CT33 Owner's Manual
Honeywell CT33 Manual
 |
View all Honeywell CT33 manuals
Add to My Manuals
Save this manual to your list of manuals |
Honeywell CT33 manual content summary:
- Honeywell CT33 | Owner's Manual - Page 1
Owner's Manual CT30/CT33 Low-voltage Thermostat Getting started Check to make sure your package includes the following items: CT30/CT33 thermostat Cover plate Wire labels Caution card Wall anchors and mounting screws (2 each) Before you begin, make sure you have: • Screwdriver • Hammer • - Honeywell CT33 | Owner's Manual - Page 2
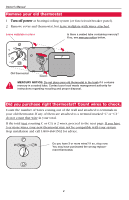
C or C1) is 2 wires, proceed to the next page. If you have 3 or more wires, your new thermostat may not be compatible with your system. Stop installation and call 1-800-468-1502 for advice. Do you have 3 or more wires? If so, stop now. You may have purchased the wrong replacement thermostat. 2 - Honeywell CT33 | Owner's Manual - Page 3
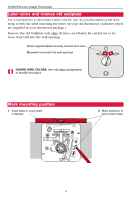
CT30/CT33 Low-voltage Thermostat Label wires and remove old wallplate Use a screwdriver to disconnect wires one by one.As you disconnect each wire, wrap it with the label matching the letter on your old thermostat. (Adhesive labels are supplied in your thermostat package.) Remove the old wallplate - Honeywell CT33 | Owner's Manual - Page 4
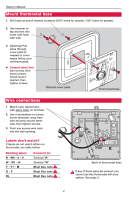
Owner's Manual Mount thermostat base 1 Drill holes at pencil-marked locations (3/16" holes for drywall, 7/32" holes for plaster). 2 Use hammer to tap anchors into holes until flush with wall. 3 [Optional] Pull wires through cover plate (if needed to cover marks left by your old thermostat). 4 - Honeywell CT33 | Owner's Manual - Page 5
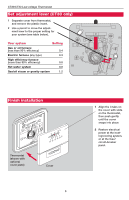
CT30/CT33 Low-voltage Thermostat Set adjustment lever (CT30 only) 1 Separate cover from thermostat, and remove the plastic insert. 2 Use a pencil to move the adjustment lever 0.8 Gas/oil steam or gravity system 1.2 Finish installation Thermostat (shown with optional cover plate) Cover 5 1 - Honeywell CT33 | Owner's Manual - Page 6
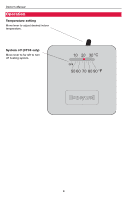
Owner's Manual Operation Temperature setting Move lever to adjust desired indoor temperature. System off (CT33 only) Move lever to far left to turn off heating system. 6 - Honeywell CT33 | Owner's Manual - Page 7
CT30/CT33 Low-voltage Thermostat Limited Warranty Honeywell warrants this product to be free from defects in the workmanship or materials, under normal use and service consumer. Honeywell's sole responsibility shall be to repair or replace the product within the terms stated above. HONEYWELL SHALL - Honeywell CT33 | Owner's Manual - Page 8
Need Help? For assistance with this product please visit www.honeywell.com/yourhome or call Honeywell Customer Care toll-free at 1-800-468-1502 Automation and Control Solutions Honeywell International Inc. Honeywell Limited-Honeywell Limitée 1985 Douglas Drive North 35 Dynamic Drive Golden - Honeywell CT33 | Owner's Manual - Page 9
Guide d'utilisation CT30/CT33 Thermostat basse tension Éléments nécessaires à l'installation Assurez-vous que le paquet contient les éléments suivants : Thermostat CT30/CT33 plâtre) ® U.S. Marque déposée. Brevets en instance. Copyright © 2005 Honeywell International Inc. Tous droits réservés. - Honeywell CT33 | Owner's Manual - Page 10
Guide d'utilisation Retirez l'ancien thermostat 1 Coupez le courant au niveau de l'installation de chauffage/de climatisation (ou du panneau de fusibles ou de disjoncteurs). 2. Retirez le boîtier et le thermostat. Laissez la plaque murale et les fils qui y sont fixés. Laissez la plaque de montage - Honeywell CT33 | Owner's Manual - Page 11
basse tension CT30/CT33 Étiquetez les fils et retirez l'ancienne plaque de montage Débranchez les fils un par un à l'aide d'un tournevis. À mesure que vous les débranchez, enveloppez-les avec l'étiquette correspondant à la lettre de votre ancien thermostat. (Des étiquettes adhésives sont fournies - Honeywell CT33 | Owner's Manual - Page 12
Guide d'utilisation Montez la thermostat 1 Percez des trous aux emplacements repérés Reportez-vous à la note Rc Reportez-vous à la note Face arrière du thermostat Si un de ces fils sont Si ce fil est présent, vous ne pouvez pas utiliser ce thermostat avec votre installation. Voir la page 2. 4 - Honeywell CT33 | Owner's Manual - Page 13
tension CT30/CT33 Positionnement du levier de réglage (CT30 seulement) 1 Séparez le couvercle du thermostat et retirez la plaquette en plastique. 2 À l'aide d'un crayon, amenez le levier de réglage à l'emplacement convenant à votre installation (voir le tableau ci-dessous). Votre installation - Honeywell CT33 | Owner's Manual - Page 14
Guide d'utilisation Mode d'emploi Réglage de la température Déplacez le levier pour obtenir la température intérieure désirée Arrêt de l'installation (CT33 seulement) Amenez le levier à l'extrême gauche pour arrêter l'installation de chauffage. 6 - Honeywell CT33 | Owner's Manual - Page 15
Thermostat basse tension CT30/CT33 Garantie limitée Honeywell garantit ce produit contre tout vis de fabrication ou de matière dans des conditions d'utilisation et de service pas les frais de démontage ou de réinstallation. Elle ne s'applique pas si Honeywell prouve que le défaut ou la défaillance - Honeywell CT33 | Owner's Manual - Page 16
obtenir de l'assistance concernant ce produit, visitez www.honeywell.com/yourhome ou appelez gratuitement l'assistance client d'Honeywell au 1-800-468-1502 Automation and Control Solutions Honeywell International Inc. Honeywell Limited-Honeywell Limitée 1985 Douglas Drive North 35 Dynamic Drive
-
 1
1 -
 2
2 -
 3
3 -
 4
4 -
 5
5 -
 6
6 -
 7
7 -
8
-
9
-
10
-
11
-
12
-
13
-
14
-
15
-
16
 |
 |

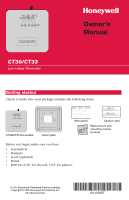
CT30/CT33
Low-voltage Thermostat
Owner’s
Manual
Getting started
Before you begin, make sure you have:
•
Screwdriver
•
Hammer
•
Level (optional)
•
Pencil
•
Drill bit (3/16” for drywall, 7/32” for plaster)
Caution card
Wire labels
Wall anchors and
mounting screws
(2 each)
CT30/CT33 thermostat
Cover plate
Check to make sure your package includes the following items:
® U.S. Registered Trademark. Patents pending.
Copyright © 2005 Honeywell International Inc.
All rights reserved.