Honeywell CT3451 Owner's Manual
Honeywell CT3451 Manual
 |
View all Honeywell CT3451 manuals
Add to My Manuals
Save this manual to your list of manuals |
Honeywell CT3451 manual content summary:
- Honeywell CT3451 | Owner's Manual - Page 1
CT3451 Programmable Thermostat OWNER'S GUIDE MERCURY NOTICE If this control is replacing a control that contains mercury in a sealed tube, do not place your old control in the trash. Dispose of it properly. Contact your local waste management authority for instructions regarding recycling and the - Honeywell CT3451 | Owner's Manual - Page 2
CT3451 Yes Yes Yesa Yes Yesa Yes Yes Yes Yes No No Not compatible with any 120/240 volt circuit. aCompatible with 2-wire Honeywell zone valves. Isolating relay required for zone valves that have a 3-wire thermostat connection. CAUTION Equipment Damage Hazard. Handling wires during installation - Honeywell CT3451 | Owner's Manual - Page 3
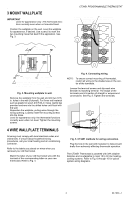
if desired. Use a pencil to mark the two mounting holes that best fit the application. See Fig. 3. WALL 1 WALL ANCHORS (2) CT3451 PROGRAMMABLE THERMOSTAT TERMINAL SCREW FOR STRAIGHT INSERTION STRIP 5/16 IN. (8 MM) FOR WRAPAROUND STRIP 7/16 IN. (11 MM) G Rc R W B Y O M12559A MOUNTING SCREWS - Honeywell CT3451 | Owner's Manual - Page 4
CT3451 PROGRAMMABLE THERMOSTAT THERMOSTAT G Rc R 3 1 L1 (HOT) L2 W Y HEAT RELAY FAN RELAY COMPRESSOR CONTACTOR B O 2 DISCONNECT MEANS AND OVERLOAD PROTECTION AS REQUIRED. 2 REMOVE RC TO R JUMPER WHEN INSTALLED ON A TWO TRANSFORMER SYSTEM. 3 CAN BE USED FOR CHANGEOVER VALVE ON SINGLE- - Honeywell CT3451 | Owner's Manual - Page 5
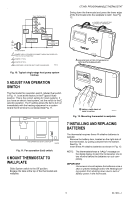
CT3451 PROGRAMMABLE THERMOSTAT ❑ Swing down the thermostat and press the lower edge of the thermostat thermostat and wallplate. 7 INSTALLING AND REPLACING BATTERIES The thermostat requires three AA alkaline batteries to operate: ❑ Remove the battery door, located on the right side of the thermostat - Honeywell CT3451 | Owner's Manual - Page 6
typical example is shown, but information displayed varies by model. This information is for factory use only.) M20514 Fig. 13. Installing batteries. ❑ Restore power to the heating/cooling system. 8 CUSTOMIZE YOUR THERMOSTAT Your Honeywell thermostat comes preset to the most commonly used settings - Honeywell CT3451 | Owner's Manual - Page 7
but CC varies by model. (This information is for factory use only.) M14692 ❑ Exit Installer Setup. - Press manufacturer's instructions. 9 PROGRAM YOUR THERMOSTAT The thermostat is preprogrammed in the morning. CT3451 PROGRAMMABLE THERMOSTAT NOTE: The heating and cooling program times are the - Honeywell CT3451 | Owner's Manual - Page 8
CT3451 PROGRAMMABLE THERMOSTAT SET M12625C 2. Leave. a. Press Select. Press ▼ or ▲ key to set Leave time. Setting Saturday and Sunday Programs To set the Saturday program: 1. Wake a. Press Select. Press ▼ or ▲ key to set Wake time. SET SET M18566 b. Press Select. Press ▼ or ▲ key to set Leave - Honeywell CT3451 | Owner's Manual - Page 9
temperature. CT3451 PROGRAMMABLE THERMOSTAT Setting Manually control Fan and System settings using the switches located at the bottom of the thermostat case. See. Fig. 14 for switch locations. M18556 7. Repeat programming steps to set heat or cool program, as desired. 10 OPERATE YOUR THERMOSTAT - Honeywell CT3451 | Owner's Manual - Page 10
CT3451 PROGRAMMABLE THERMOSTAT System Switch ❑ The System switch settings control thermostat operation as follows: Cool: The thermostat controls the cooling system. Off: Both heating and cooling are off. Heat: The thermostat controls the heating system. ❑ Slide the System switch on the thermostat - Honeywell CT3451 | Owner's Manual - Page 11
TROUBLESHOOTING CT3451 PROGRAMMABLE THERMOSTAT Table 4. Frequently Asked Questions. If ... Then ... Display does not come on. Make sure the batteries are fresh and installed correctly. Temperature display does not go lower than 40°F (4°C) or higher than 99°F (37°C during programming. Your - Honeywell CT3451 | Owner's Manual - Page 12
CT3451 PROGRAMMABLE THERMOSTAT PERCENT OF HEATING COSTS YOU CAN SAVE SAVINGS FOR ONCE-A-DAY 10°F (5°C) to the following address: Honeywell Return Goods Dock 4, MN10-3860 1885 Douglas Dr N Golden Valley, MN 55422 Canada: Honeywell Limited/Honeywell Limitée Product Services ON15 35 Dynamic Dr
-
 1
1 -
 2
2 -
 3
3 -
 4
4 -
 5
5 -
 6
6 -
 7
7 -
8
-
9
-
10
-
11
-
12
 |
 |

® U.S. Registered Trademark
Copyright © 2003 Honeywell •
•All Rights Reserved
OWNER’S GUIDE
69-1620-1
CT3451
Programmable Thermostat
Programmable Heat and/or Cool
Low Voltage (20 to 30 Vac) Thermostat and Wallplate
Congratulations on the purchase of your new thermostat!
More than 100 years of Honeywell engineering produced
this thermostat that can provide you with a more
comfortable and convenient living environment.
Your new thermostat automatically controls the
temperature in your home, keeping you comfortable
while saving energy when programmed according to
these instructions.
Direct questions about this thermostat to our Web site at
www.honeywell.com/yourhome or call the customer
information line at 1-800-468-1502.
MERCURY NOTICE
If this control is replacing a control that contains
mercury in a sealed tube, do not place your old
control in the trash. Dispose of it properly.
Contact your local waste management authority
for instructions regarding recycling and the
proper disposal of an old control.
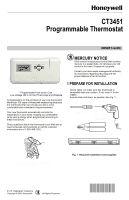
1 PREPARE FOR INSTALLATION
Check Table 1 to make sure this thermostat is
compatible with your system. If not, return it to the
retailer.
Acquire tools and items, as needed. See Fig. 1.
Fig. 1. Required installation tools/supplies.
M10614
MERCURY
SWITCH
TYPICAL LOCATION OF A MERCURY
SWITCH IN A THERMOSTAT
M20551
SCREWDRIVER
HAND OR POWER
DRILL WITH 3/16 INCH
DRILL BIT, IF NEEDED TO
DRILL HOLES IN WALL
WIRE CUTTER/STRIPPER IF NEEDED TO STRIP WIRES
LEVEL, IF NEEDED TO LEVEL
THERMOSTAT FOR APPEARANCE