Honeywell HPFF12 Operation Manual - Page 23
Installing Chassis-Mounting Plates onto Backbox, EQBB-D4 Shown, HPFF12 NAC Expander
 |
View all Honeywell HPFF12 manuals
Add to My Manuals
Save this manual to your list of manuals |
Page 23 highlights
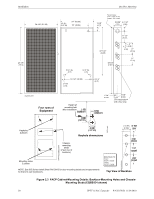
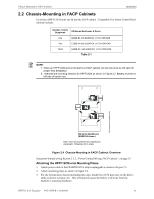
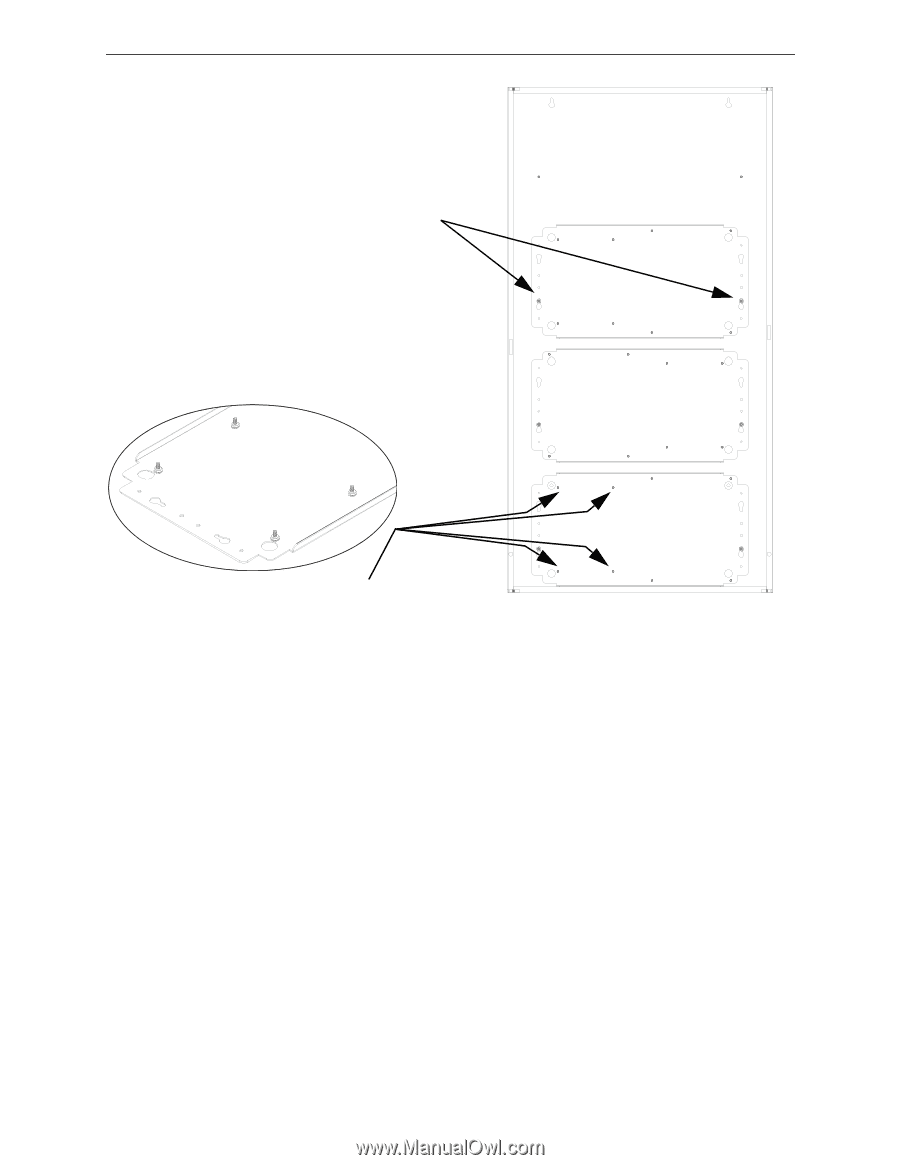
hpff12cm-plate-mtg.wmf, hpff12cm-bottom-spacers.wmf Chassis-Mounting in FACP Cabinets Attach each chassismounting plate to backbox with two #8-32 kep nuts. Installation For the bottom chassis-mounting plate only: Install four #8-32 kep nuts onto studs where battery well is to be located. NOTE: This can be done before or after attaching chassis-mounting plate to backbox. Note: Two-row and three-row mounting is equivalent. Figure 2.6 Installing Chassis-Mounting Plates onto Backbox (EQBB-D4 Shown) HPFF12 NAC Expander - P/N 53576:B 11/24/2010 23
-
 1
1 -
2
-
3
-
4
-
5
-
6
-
7
-
8
-
9
-
10
-
11
-
12
-
13
-
14
-
15
-
16
-
17
-
 18
18 -
 19
19 -
 20
20 -
 21
21 -
 22
22 -
 23
23 -
 24
24 -
 25
25 -
 26
26 -
 27
27 -
 28
28 -
29
-
30
-
31
-
32
-
33
-
34
-
35
-
36
-
37
-
38
-
39
-
40
-
41
-
42
-
43
-
44
-
45
-
46
-
47
-
48
-
49
-
50
-
51
-
52
-
53
-
54
-
55
-
56
-
57
-
58
-
59
-
60
-
61
-
62
-
63
-
64
 |
 |
HPFF12 NAC Expander —
P/N 53576:B
11/24/2010
23
Chassis-Mounting in FACP Cabinets
Installation
Figure 2.6
Installing Chassis-Mounting Plates onto Backbox
(EQBB-D4 Shown)
hpff12cm-plate-mtg.wmf, hpff12cm-bottom-spacers.wmf
Attach each chassis-
mounting plate to
backbox with two
#8-32 kep nuts.
For the bottom chassis-mounting plate only:
Install four #8-32 kep nuts onto studs
where battery well is to be located.
NOTE: This can be done before or after
attaching chassis-mounting plate to backbox.
Note: Two-row and three-row mounting is equivalent.