Honeywell HY-048BP User Guide
Honeywell HY-048BP - Consumer Products Digital Tower Fan Manual
 |
UPC - 092926345266
View all Honeywell HY-048BP manuals
Add to My Manuals
Save this manual to your list of manuals |
Honeywell HY-048BP manual content summary:
- Honeywell HY-048BP | User Guide - Page 1
Owner's Manual TOWER FAN EFY-041 Series, EFY-045 Series EFY-047 Series, HY-041 Series HY-047 Series, HY-048 Series IMPORTANT SAFETY INSTRUCTIONS READ AND SAVE THESE SAFETY INSTRUCTIONS BEFORE USING THIS FAN When using electrical appliances, basic precautions should always be followed to reduce the - Honeywell HY-048BP | User Guide - Page 2
remote control that has been provided with the tower fan. Make sure that the remote control is not thrown out with the packing materials. • Install batteries into the remote control battery compartment Fig. 5 (see Battery Installation/Replacement Instructions). • Place the remote control in the - Honeywell HY-048BP | User Guide - Page 3
remote control that has been provided with the tower fan. Make sure that the remote control is not thrown out with the packing materials. • Install batteries into the remote control battery compartment (see Battery Installation/Replacement Instructions). • Place the remote control in the recessed - Honeywell HY-048BP | User Guide - Page 4
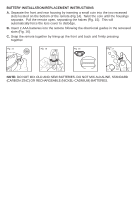
BATTERY INSTALLATION/REPLACEMENT INSTRUCTIONS A. Separate the front and rear housing by inserting a force the lens cover to dislodge. B. Insert 2 AAA batteries into the remote following the directional guides in the recessed slots (Fig. 16). C. Snap the remote together by lining up the front - Honeywell HY-048BP | User Guide - Page 5
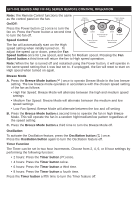
on High speed when turned on again. Breeze Mode A. Press the Breeze Mode button ( ) once to operate Breeze Mode in the low breeze setting ( ). The low breeze mode operates in accordance with the chosen speed setting of the fan as follows: • High Fan Speed: Breeze Mode will alternate between the high - Honeywell HY-048BP | User Guide - Page 6
speed setting that it was last set to. If unplugged, the fan will reset to start on High speed when turned on again. Breeze Mode A. Press the Breeze Mode button ( ) once to operate Breeze Mode in the low breeze setting. The low breeze mode operates in accordance with the chosen speed setting of the - Honeywell HY-048BP | User Guide - Page 7
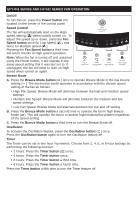
( ) will display and blink on the LCD screen and the desired room temperature will be displayed. The default temperature setting is 74°F (23°C). To change the temperature setting, press the Up and Down buttons ( ). The fan may be programmed in two degree increments between 60°F (16°C) and 90°F (32 - Honeywell HY-048BP | User Guide - Page 8
time to turn the Breeze Mode off. °F to °C Display Change This is done by simultaneously pressing and holding the Up and Down buttons ( ) for 2 seconds. Note: The EFY-045, EFY-047, HY-047 and HY-048 Series are not air purifiers. These fans are equipped with an ionizer feature which helps freshen - Honeywell HY-048BP | User Guide - Page 9
the remote control to change the temperature or timer settings. Note: The Temperature and Timer, or the combined Temperature/Timer mode cannot be entered by using the remote control. Oscillation and Ionizer Mode The fan may be operated in Oscillation or Ionizer mode independently or may be operated - Honeywell HY-048BP | User Guide - Page 10
available on the EFY-041 Series, EFY-047 Series, HY-041 Series, HY-047 Series, and HY-048 Series. The EFY-045 Series does not have this feature. The filter is located behind the rear grille of the fan. To clean the filter: • Be sure the fan is turned off and the power cord in unplugged from - Honeywell HY-048BP | User Guide - Page 11
is turned off and the power cord is unplugged from the outlet. • Use only a soft, damp cloth to gently wipe the outer surfaces of the fan clean. • To clean between the grilles, we recommend using a pipe cleaner, flexible dustwand, vacuum cleaner or compressed air to gently remove the dust. • DO NOT - Honeywell HY-048BP | User Guide - Page 12
model number. Call us toll-free at: 1-800-477-0457 E-mail: [email protected] Or visit our website at: www.kaz.com NOTE: IF YOU EXPERIENCE A PROBLEM accordance with the instruction manual. D. Return defective product to Kaz, Incorporated with a brief description of the problem. Include proof - Honeywell HY-048BP | User Guide - Page 13
Guide d'utilisation VENTILATEUR-TOUR Série EFY-041, Série EFY-045, Série EFY-047, Série HY-041, Série HY-047, Série HY-048 IMPORTANTES INSTRUCTIONS DE SÉCURITÉ LIRE ET CONSERVER CES INSTRUCTIONS DE SÉCURITÉ AVANT D'UTILISER LE VENTILATEUR L'utilisation d'appareils électriques nécessite des pré - Honeywell HY-048BP | User Guide - Page 14
dans le compartiment à piles de la télécommande Fig. 5 (voir Instructions d'installation et de remplacement des piles). • Placer la télécommande dans le support encastré situé sur le dessus du ventilateur (Fig. 5). INSTRUCTIONS POUR ASSEMBLER LE VENTILATEUR À UNE HAUTEUR ÉLEVÉE (en utilisant la - Honeywell HY-048BP | User Guide - Page 15
de ne pas la jeter avec le matériel d'emballage. Fig. 12 • Insérer les piles dans le compartiment à piles de la télécommande (voir Instructions d'installation et de remplacement des piles). • Placer la télécommande dans le support encastré situé sur le dessus du ventilateur (Fig. 13). Fig. 13 - Honeywell HY-048BP | User Guide - Page 16
INSTRUCTIONS D'INSTALLATION ET DE REMPLACEMENT DES PILES A. Séparer la partie avant logera le couvercle du compartiment des piles. B. Insérer 2 piles AAA dans la télécommande en suivant les guides directionnels se trouvant dans les rainures encastrées (Fig. 16). C. Aligner le devant et l'arrière de - Honeywell HY-048BP | User Guide - Page 17
FAONNCOTPIEORNANTEIOMNENT DES VENTILATEURS DES SÉRIES EFY-041 ET HY-041 Marche/Arrêt Pour mettre le ventilateur en marche, appuyer sur le bouton d'alimentation ( ) situé au centre du panneau de commande. Réglage de la vitesse - Honeywell HY-048BP | User Guide - Page 18
EFOFYN-C04T1IOSNENREIEMSERNETMDOETSETCÉOLÉNCTORMOLMOAPNEDREASTDIOENS SÉRIES EFY-041 ET HY-041 Remarque : Les fonctions de la télécommande sont identiques à celles du panneau de commande du ventilateur. Marche/Arrêt : Appuyer une fois sur le bouton d'alimentation ( ) - Honeywell HY-048BP | User Guide - Page 19
-C0T4I1ONSNEERMIEESNTREDMESOTTÉELÉCCOONMTMRAONLDOEPSEDREASTSIOÉRNIES EFY-041 ET HY-041 (suite) Lampe de poche : derrière le panneau de commande. FONCTIONNEMENT DES VENTILATEURS DES SÉRIES EFY-045, EFY-047, HY-047 ET HY-048 Mise en marche et réglage de la vitesse A. Appuyer une fois sur le bouton - Honeywell HY-048BP | User Guide - Page 20
appuyer sur le bouton Mode une quatrième fois pour recommencer et suivre les instructions des étapes A et B. D. Appuyer une quatrième fois sur le bouton bas ( ). Remarque : Les ventilateurs des séries EFY-045, EFY-047, HY-047 et HY-048 ne sont pas des purificateurs d'air. Ils sont équipés d'un - Honeywell HY-048BP | User Guide - Page 21
FONCTIONNEMENT DES TÉLÉCOMMANDES DES SÉRIES EFY-045, EFY-047, HY-047 ET HY-048 Mise en marche et réglage de la vitesse A. Appuyer une fois sur le bouton d'alimentation ( ) : le ventilateur se met en marche à vitesse élevée ( ). B. Appuyer - Honeywell HY-048BP | User Guide - Page 22
ée située derrière le panneau de commande. NETTOYAGE ET ENTREPOSAGE, SÉRIES EFY-041, HY-041, EFY-047, HY-047 ET HY-048 A. NETTOYAGE DU FILTRE Remarque : Seuls les ventilateurs des séries EFY-041, EFY-047, HY-041, HY-047 et HY-048 possèdent un filtre. Les ventilateurs de la série EFY-045 n'ont pas - Honeywell HY-048BP | User Guide - Page 23
NETTOYAGE ET ENTREPOSAGE, SÉRIE EFY-045 • S'assurer que le ventilateur est hors tension et qu'il est débranché. • N'utiliser qu'un linge doux et humide pour nettoyer délicatement la surfaceexterne du ventilateur. • Pour nettoyer entre les grilles, utiliser un cure-pipe, un plumeau flexible, un - Honeywell HY-048BP | User Guide - Page 24
notre site Web : www.kaz.com REMARQUE : EN CAS DE PROBLÈME, CONTACT LA SERVICE À LA CLIENTÈLE PREMIÈREMENT OU CONSULTER LA GARANTIE. NE PAS RETOURNER L'APPAREIL À L' GARANTIE LIMITÉE DE 5 ANS Prière de lire toutes les instructions avant de tenter d'utiliser ce produit. A. Cette garantie limitée - Honeywell HY-048BP | User Guide - Page 25
Manual del Usuario VENTILADOR TIPO TORRE Serie EFY-041, Serie EFY-045, Serie EFY-047, Serie HY-041, Serie HY-047, Serie HY-048 heridas, principalmente: 1. Siempre que utilice el ventilador, confórmese al presente manual, de lo contrario podría provocar incendios, choques eléctricos o daños - Honeywell HY-048BP | User Guide - Page 26
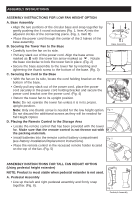
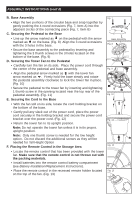
DE ENSAMBLAJE A. Ensamblaje de la base • Coloque el cable de alimentación en el centro de las 2 mitades de la base. • Alinee las dos partes de la base circular y únalas empujando cuidadosamente las 4 extrusiones redondas (Fig. 1, punto A) en los círculos adyacentes de la pieza de fijación (Fig - Honeywell HY-048BP | User Guide - Page 27
INSTRUCCIONES DE ENSAMBLAJE (continuación) • Alinee las dos partes de la base circular y únalas empujando cuidadosamente las 4 cambiar las pilas). • Coloque el mando a distancia en el soporte empotrado ubicado en la parte superior del ventilador (Fig. 13). Fig. 7 A B Ensamblaje de la base Fig. - Honeywell HY-048BP | User Guide - Page 28
á. B. Coloque dos pilas AAA en el mando a distancia guiándose por las guías de las ranuras incrustadas (Fig. 16). C. Vuelva a unir la parte delantera y trasera del mando a distancia alineándolas y presionándolas firmemente. D. Vuelva a colocar la tapa en su sitio presionándola (Fig. 17). Fig. 14 - Honeywell HY-048BP | User Guide - Page 29
DE LOS VENTILADORES - SERIES EFY-041 Y HY-041 Marcha/Parada Para poner en marcha el automáticamente a velocidad elevada ( ). Para cambiar de velocidad, pulse una vez el selector de velocidad (Fan Speed) y obtendrá la velocidad baja ( ) o dos veces para obtener la velocidad media ( ). - Honeywell HY-048BP | User Guide - Page 30
EFUFYN-C04IO1NSAEMRIESNTROEMDEOLTEMCAONNDTORAODL IOSPTAENRCATIAIO-NSERIES EFY-041 Y HY-041 Nota: las funciones del mando a distancia son idénticas a las del panel de mandos del ventilador. Marcha / Parada Pulse el interruptor ( ) una vez para - Honeywell HY-048BP | User Guide - Page 31
EFUFNYC-0IO4N1ASMEIRENIETSO RDEELMMOATNEDCOOANDTISRTOANLCOIAP-ESREARTIEIOSNEFY-041 Y HY-041 (continuación) Linterna: Para prender la linterna, mantenga pulsado el botón de la linterna ( ) situado en la parte trasera del mando a distancia. Nota: sólo se prenderá una lámpara cuando active esta funci - Honeywell HY-048BP | User Guide - Page 32
simultáneamente los botones con las flechas hacia arriba y hacia abajo ( ) durante 2 segundos. Nota: los aparatos de las series EFY-045, EFY-047, HY-047 y HY-048 no son purificadores de aire. Están equipados con un ionizador que ayuda a refrescar el aire con iones negativos creando un ambiente seco - Honeywell HY-048BP | User Guide - Page 33
DEL MANDO A DISTANCIA - SERIES EFY-045, EFY-047, HY-047 Y HY-048 Puesta en marcha y control de la velocidad A. Pulse una solos o simultáneamente. A. Pulse una vez el botón de oscilación / ionización (oscillate/ionizer) ( ) para poner en marcha la función de oscilación. B. Vuelva a pulsar el bot - Honeywell HY-048BP | User Guide - Page 34
linterna ( ) situado en la parte trasera del mando a distancia. Para guardar el mando a distancia: Cuando no lo use, guarde el mando a distancia en la sección empotrada detrás del panel de mandos. LIMPIEZA Y ALMACENAMIENTO - SERIES EFY-041, HY-041, EFY-047, HY-047 Y HY-048 A. LIMPIEZA DEL FILTRO - Honeywell HY-048BP | User Guide - Page 35
LIMPIEZA Y ALMACENAMIENTO - SERIE EFY-045 • Compruebe que el ventilador está apagado y desenchufado. • Utilice únicamente un paño suave humedecido para limpiar con delicadeza la superficie exterior del ventilador. • Limpie entre las rejillas utilizando un limpiatubos, un plumero flexible, un - Honeywell HY-048BP | User Guide - Page 36
. C. Esta garantía no cubre los daños ocasionados por tentativas de reparación no autorizadas o por el uso no conforme con el presente manual. D. Devolución del producto defectuoso a Kaz, Incorporated con una breve descripción del problema. Debe incluirse un comprobante de compra y un cheque o giro
-
 1
1 -
 2
2 -
 3
3 -
 4
4 -
 5
5 -
 6
6 -
 7
7 -
8
-
9
-
10
-
11
-
12
-
13
-
14
-
15
-
16
-
17
-
18
-
19
-
20
-
21
-
22
-
23
-
24
-
25
-
26
-
27
-
28
-
29
-
30
-
31
-
32
-
33
-
34
-
35
-
36
 |
 |

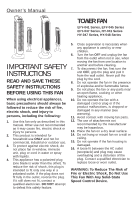
IMPORTANT SAFETY
INSTRUCTIONS
READ AND SAVE THESE
SAFETY INSTRUCTIONS
BEFORE USING THIS FAN
When using electrical appliances,
basic precautions should always be
followed to reduce the risk of fire,
electric shock, and injury to
persons, including the following:
1.
Use this fan only as described in this
manual. Other use not recommended
as it may cause fire, electric shock or
injury to persons.
2.
This product is intended for
household use
ONLY
and not for
commercial, industrial or outdoor use.
3.
To protect against electric shock, do
not place fan in window, immerse
unit, plug or cord in water or spray
with liquids.
4.
This appliance has a polarized plug
(one blade is wider than the other). To
reduce the risk of shock, this plug is
intended to fit only one way in a
polarized outlet. If the plug does not
fit fully in the outlet, reverse the plug.
If it still does not fit, contact a
qualified electrician.
DO NOT
attempt
to defeat this safety feature.
5.
Close supervision is necessary when
any appliance is used by or near
children.
6.
Turn the fan
OFF
and unplug the fan
from the outlet when not in use, when
moving the fan from one location to
another and before cleaning.
7.
To disconnect the fan, first turn the
unit
OFF
, grip the plug and pull it
from the wall outlet. Never pull the
plug by the cord.
8.
Do not operate the fan in the presence
of explosive and/or flammable fumes.
9.
Do not place the fan or any parts near
an open flame, cooking or other
heating appliance.
10.
Do not operate the fan with a
damaged cord or plug or if the
product malfunctions, is dropped or
damaged in any manner (see
warranty).
11.
Avoid contact with moving fan parts.
12.
The use of attachments not
recommended by the manufacturer
may be hazardous.
13.
Place the fan on a dry level surface.
14.
Do not hang or mount fan on a wall or
ceiling.
15.
Do not operate if the fan housing is
damaged.
16.
A loose fit between the AC outlet
(receptacle) and plug may cause
overheating and a distortion of the
plug. Contact a qualified electrician to
replace loose or worn outlet.
WARNING: To Reduce The Risk of
Fire or Electric Shock, Do Not Use
This Fan With Any Solid-State
Speed Control Device.
TOWER FAN
EFY-041 Series, EFY-045 Series
EFY-047 Series, HY-041 Series
HY-047 Series, HY-048 Series
Owner’s Manual