Honeywell T812A1002 User Guide
Honeywell T812A1002 - Mechanical Thermostat Manual
 |
View all Honeywell T812A1002 manuals
Add to My Manuals
Save this manual to your list of manuals |
Honeywell T812A1002 manual content summary:
- Honeywell T812A1002 | User Guide - Page 1
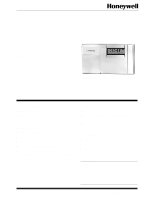
s Digital LCD display. s Easy to program and install. s Precise temperature control. s Four daily energy saving programs. s Available in taupe and Premier White™. Programming the Thermostat 8 Checkout and Settings 10 Troubleshooting 11 Cross Reference 12 B.M. • Rev. 61-94 • ©Honeywell Inc. 1994 - Honeywell T812A1002 | User Guide - Page 2
/T8132B Programmable Thermostats: Provide eight program keys; without keyboard door. T8131C/T8132C Programmable Thermostats: Deluxe models 1000. In Canada-Honeywell Controls Limited/Honeywell Limitée, 740 Ellesmere Road, Scarborough, Ontario M1P 2V9 . International Sales and Service offices in all - Honeywell T812A1002 | User Guide - Page 3
service technician. 4. After completing installation, use these instructions to check out product operation. COMPATIBILITY Check Table 1 to make sure the thermostat . a Compatible with 2-wire Honeywell zone valves. Isolating relay required for 3-wire thermostats for zone valves. Not compatible - Honeywell T812A1002 | User Guide - Page 4
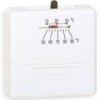
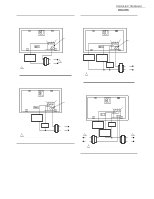
instructions provided with the controlled equipment. Loosen the terminal screws and slip each wire beneath its matching terminal. See Fig. 4 for wiring insertion techniques. Tighten terminals securely Run the required number of wires to the thermostat location (check the appropriate wiring diagram). - Honeywell T812A1002 | User Guide - Page 5
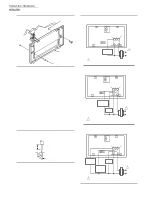
Fig. 8-2-wire heat-only application (jumper intact). 2-WIRE HEAT-ONLY (JUMPER INTACT) A C B D W Y G JUMPER R Rc HEATING RELAY OR VALVE COIL L1 (HOT) 1 L2 1 POWER SUPPLY. PROVIDE DISCONNECT MEANS AND OVERLOAD PROTECTION AS REQUIRED. M1709B Fig. 9-3-wire cool-only application (jumper - Honeywell T812A1002 | User Guide - Page 6
back of the thermostat, using the heating system table in Fig. 12 as a guide. To minimize turn. NOTE: These thermostats do not have a setting for steam/ gravity air. Cycles would not be long enough for accurate temperature control. NOTE: For condensing furnaces, follow manufacturer instructions - Honeywell T812A1002 | User Guide - Page 7
and mounting plate (see Fig. 14) and then press the lower edge of the case to latch. Fig. 15-Mounting the thermostat on the subbase. A. ENGAGE TABS AT TOP OF THERMOSTAT AND MOUNTING PLATE. B. PRESS LOWER EDGE OF CASE TO LATCH. NOTE: FOR T8131A, C AND T8132A, C, SWING OPEN COVER. CHECK OPERATION - Honeywell T812A1002 | User Guide - Page 8
THE THERMOSTAT Programming the Thermostat Program With the system switch at COOL, follow the same instructions as for Heating Program section. After programming, adjust the fan and release Run Program to start the program. A Quick Guide for Operating or Making Changes NOTE: System switch must be - Honeywell T812A1002 | User Guide - Page 9
programming, adjust fan and system switches as desired. Press and release Run Program to start the program. T8131A,B,C; T8132A,B,C PROGRAMMING THE THERMOSTAT A Quick Guide for Operating or Making Changes NOTE: System switch must be set to Heat or Cool to perform the following. To temporarily change - Honeywell T812A1002 | User Guide - Page 10
jumpering thermostat terminals at the primary control, such as the gas valve, zone valve, or oil burner control. This will damage the thermostat. Move manufacturer instructions for further information. NOTE: When cooling setting is changed, thermostat may delay up to five minutes before turning on - Honeywell T812A1002 | User Guide - Page 11
TROUBLESHOOTING SETTINGS AND ADJUSTMENTS Set the Fan and System Switches First set the fan switch FAN AUTO: Normal setting for most homes. A single-speed fan will turn Off Heat HEAT: The thermostat controls the heating system. Cool lit, see furnace manufacturer instructions. T8131 • Check that - Honeywell T812A1002 | User Guide - Page 12
is set correctly according to instructions on page 6. • Check system setting on back of thermostat. • Readjust according to instructions on page 6. • Check Premier White™. C1011 Honeywell logo; TRADELINE® model; T8132C1011 Premier White™. Home and Building Control Honeywell Inc. 1985 Douglas
-
 1
1 -
 2
2 -
 3
3 -
 4
4 -
 5
5 -
 6
6 -
 7
7 -
8
-
9
-
10
-
11
-
12
 |
 |

B.M.
•
Rev. 6-94
•
©Honeywell Inc. 1994
•
Form Number 68-0148—1
T8131A,B,C; T8132A,B,C
Programmable Thermostats
The T8131 and T8132 Thermostats provide
energy savings for single-stage heating and cool-
ing applications while providing reliable, precise
temperature control.
T8131/T8132 Models
■
HEAT-OFF-COOL system switch.
■
AUTO-ON fan switch.
■
Separate programs for weekdays and weekends
5 day/2 day.
■
Digital LCD display.
■
Easy to program and install.
■
Precise temperature control.
■
Four daily energy saving programs.
■
Available in taupe and Premier White
™
.
■
Compatible with most 24 Vac standing pilot, gas
electronic ignition, oil or central electric systems.
T8131 Models Only
■
Powered directly from 24 Vac system transformer.
■
Green light emitting diode (LED) lights when prop-
erly connected.
■
Two AA alkaline batteries for backup power
recommended.
T8132 Models Only
■
Requires two AA alkaline batteries.
■
LCD flashes “bAt Lo” indicating low battery power.
■
Isolated heating/cooling circuits.
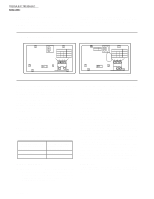
T8131C
T8132C
CONTENTS
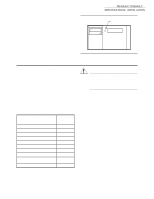
Specifications
................................................
2
Ordering Information
....................................
2
Installation
....................................................
3
Programming the Thermostat
.......................
8
Checkout and Settings
.................................
10
Troubleshooting
..........................................
11
Cross Reference
..........................................
12