Hoover CH86000 Manual
Hoover CH86000 Manual
 |
View all Hoover CH86000 manuals
Add to My Manuals
Save this manual to your list of manuals |
Hoover CH86000 manual content summary:
- Hoover CH86000 | Manual - Page 1
VACUUM PARTS MANUAL INTRODUCTION OPERATING & MAINTENANCE INSTRUCTIONS instructions, you can cause an injury or damage equipment, furniture or buildings. For new books write to: Hoover, Inc. 7500 Cochran Road Glenwillow, OH 44139 For Service: (888) 321-1134 ext. 2554 The contents of this manual - Hoover CH86000 | Manual - Page 2
5. Do not operate this machine unless it is completely assembled. The dust bag and/or filters must be in place. Use only manufacturer's attachments. 6. water, return it to a service center. 11. Connect to a properly grounded outlet only (See Grounding Instructions). 12. To prevent electric shock - Hoover CH86000 | Manual - Page 3
-prong grounding type plugs and three-pole receptacles that accept the appliance's plug. Replace or repair any damaged cords or plugs. When servicing, refer to authorized person only. Use only identical replacement parts. NOTE: Do not use adapters shown in figures B & C in Canada Vacuum Switch - Hoover CH86000 | Manual - Page 4
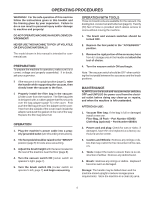
gasket on the rest of the way. Replace the filter bag when full. OPERATION 1. Plug the machine's power cable into a properly grounded outlet (see Grounding Instructions). 2. The foot pedal should be raised to the "BRUSH" position (page 8) for wide area vacuuming. 3. Adjust the brush height with the - Hoover CH86000 | Manual - Page 5
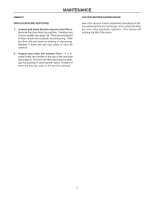
: UNPLUG BEFORE SERVICING. 1. Inspect and clean the two vacuum inlet filters. Remove the cover from the machine. The filters are now accessible (see page 10). They are constructed of foam attached to a plastic mounting ring. Slide the filters off and clean by shaking or vacuuming. Replace if there - Hoover CH86000 | Manual - Page 6
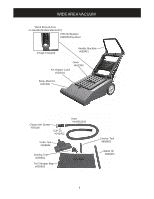
WIDE AREA VACUUM Wand Recess Area on Handle (Models after 11/07) #201202 Bumper #930005 Pop Rivet (Image Enlarged) Handle #651305 Clamp with Screw #S611A Cuff (2) #242402 Hose #440001310 Turbo Tool #608844 Dusting Tool #658801 Tool Storage Bag #650603 Crevice Tool #658802 Wand (2) #659801 6 - Hoover CH86000 | Manual - Page 7
Gasket, Cover #653402 Cover #652302 Screws, Handle (2) #962119 Screws, Brace (2) #W343D Cap, Handle (2) Not Shown: #651501 Paper Vacuum Bags, 10 Pack #440001304 Optional Cloth Bag #440001305 WHEEL ASSEMBLY Screw, 10-24x1 PHP #W343D Shaft, Wheel #657703 Nut, 10-20 ESNA S/S #920017 Wheel - Hoover CH86000 | Manual - Page 8
HANDLE & EXHAUST FILTER COMPONENTS Not Shown (at top of handle): Clamp #1394 Spring #228331 Screw #W343D Wiring Harness #911210 Connectors (5) #911179 Jacknut #920026 Clamp, Cable #612001 Screw #W343D Handle #653901 Cord Assembly, 75 Feet #440001309 Strain Relief #508510 Nut, 1/2 Pipe Lock # - Hoover CH86000 | Manual - Page 9
#657701 Shaft, Short #657702 Two (2) Sets,not shown: Guard #650902 Includes Brush with Shafts for Service Brush Motor #655201 #653601 Screw, #4x1/4 Type Z PH SMS(2) #962144 Support, Motor #650801 Screws (4) #962019 Note: Brush Motor Internal Rectifier #911066 Bracket, Brush Motor #658503 - Hoover CH86000 | Manual - Page 10
-32x1/2 Type F #962030 (230V Only) Not Shown: Washer (1) #W124D Lead Assembly, Green (2) #911212 Washer (1) #W124D Screw , Motor Mount (4) #962089 Nut (4) #W106D Washer (4) #W401D (230V Only) Vacuum Inlet Filters (2) #440001306 Not Shown: Gasket, Hopper #653403 BOTTOM VIEW 10 - Hoover CH86000 | Manual - Page 11
Door #652701 Seal, Vacuum Door #657601 Plate, Not Shown, Below Seal #657202 BRUSH ADJUSTMENT ASSEMBLY Two (2) Sets: Screw #962010 Washer, 1/4 Lock #980002 Nut, 1/4-20 Zinc #920025 Plate, Adjustment #656601 Arm, Support (2) #650301 Screw, #8x1/2 THP #W136D Support, Caster #658502 Spring #658302 - Hoover CH86000 | Manual - Page 12
WARRANTY POLICY GROUND COMMAND WIDE AREA VACUUM LIMITED WARRANTY The Hoover Wide Area Vacuum has been manufactured, tested and inspected in accordance with specific engineering requirements and is WARRANTED to be free from defects in workmanship and materials as follows: Five (5) years parts, one
-
 1
1 -
 2
2 -
 3
3 -
 4
4 -
 5
5 -
 6
6 -
 7
7 -
8
-
9
-
10
-
11
-
12
 |
 |

The contents of this manual are based on the latest
product information available at the time of publication.
Hoover, Inc. reserves the right to make changes or im-
provements to its machines without notice.
FOR YOUR CONVENIENCE, RECORD THE
FOLLOWING IMPORTANT INFORMATION:
MODEL
SERIAL NUMBER
PART NUMBER
DATE PURCHASED
WIDE AREA VACUUM
PARTS MANUAL
OPERATING & MAINTENANCE
INTRODUCTION
INSTRUCTIONS
READ THIS BOOK
This operator’s book has important information for the
use and safe operation of this machine.
Read this book
carefully before starting the machine.
Keep this book
and tell all operators to read the book.
If you do not
follow the instructions, you can cause an injury or dam-
age equipment, furniture or buildings.
For new books write to:
Hoover, Inc.
7500 Cochran Road
Glenwillow, OH
44139
For Service:
(888) 321-1134 ext. 2554
Carefully inspect all components to ensure that there is
no concealed freight damage.
If such damage is dis-
covered, file a “CONCEALED DAMAGE REPORT” im-
mediately with the delivering carrier.