Hoover H3000 Manual - Page 9
How to clean - filter
 |
UPC - 895916001179
View all Hoover H3000 manuals
Add to My Manuals
Save this manual to your list of manuals |
Page 9 highlights
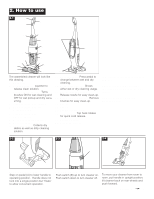
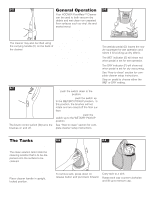
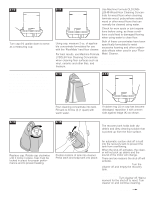
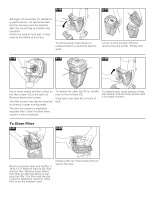
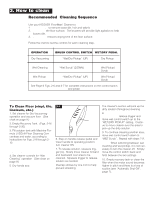
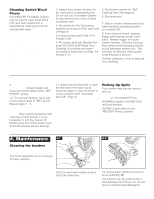
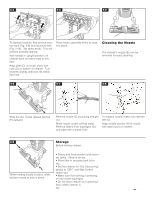
3. How to clean Recommended Cleaning Sequence Use your HOOVER 'FloorMate' Cleaner to: 1. Dry Vacuum to remove loose dirt, hair and debris. 2. Wet Clean the floor surface. The brushes will provide light agitation to help loosen dirt. 3. Wet Pickup reduces drying time of the floor surface. Follow the chart to set the controls for each cleaning step. OPERATION Dry Vacuuming BRUSH CONTROL SWITCH WET/DRY PEDAL "Wet/Dry Pickup" (UP) Dry Pickup Wet Cleaning "Wet Scrub" (DOWN) Wet Pickup/ Scrub Wet Pickup "Wet/Dry Pickup" (UP) Wet Pickup/ Scrub See Page 6 Figs. 2-6 and 2-7 for complete instructions on the control switch and pedal. To Clean Floor (vinyl, tile, linoleum, etc.) 1. Set cleaner for Dry Vacuuming operation and vacuum floor. (See chart on page 9.) 2. Empty Recovery Tank. (Figs. 2-16 through 2-20). 3. Fill solution tank with Machine Formula LYSOL® Floor Cleaning Concentrate and water, according to instructions for Figs. 2-8 through 212. Do not use pine or solvent based cleaning concentrates in your cleaner. Do not use any type of wax in your cleaner. 4. Set cleaner controls for "Wet Cleaning" operation. (See chart on page 9.) 5. Dry hands and plug cleaner into a properly grounded outlet. 3-1 A 6. Step on handle release pedal and lower handle to operating position; turn cleaner ON. 7. To release solution, squeeze trigger (A). Slowly move cleaner forward and backward over area to be cleaned. Squeeze trigger to release solution as needed. Overlap strokes by one inch to help prevent streaking. The cleaner's suction will pick up the dirty solution throughout cleaning. 8. To greatly enhance drying of the floor surface, release trigger and move wet control switch up to the "WET/DRY PICKUP" setting. Continue to move cleaner over the area to pick up the dirty solution. 9. To continue cleaning another area, move wet control switch down to "WET Scrub". Repeat with steps 7-9. NOTE: When switching between wet cleaning and wet pickup, it is not necessary to turn the cleaner off. Simply move the control switch back and forth between the two settings. 10. Empty recovery tank or clean the filter when the motor sound becomes higher in pitch and there is a loss of suction (see "Automatic Shut-Off", page 7). 9
-
 1
1 -
2
-
3
-
 4
4 -
 5
5 -
 6
6 -
 7
7 -
 8
8 -
 9
9 -
 10
10 -
 11
11 -
 12
12 -
 13
13 -
 14
14
 |
 |