Hoover Power Scrub Elite Product Manual English
Hoover Power Scrub Elite Manual
 |
View all Hoover Power Scrub Elite manuals
Add to My Manuals
Save this manual to your list of manuals |
Hoover Power Scrub Elite manual content summary:
- Hoover Power Scrub Elite | Product Manual English - Page 1
PROFESSIONALSERIES USER MANUAL POWER SCRUB ELITE™ PET+ CARPET CLEANER IMPORTANT: Read carefully before assembly and use. ©2019 Techtronic Floor Care Technology Limited. All Rights Reserved. Distributed by, Royal Appliance Mfg. Co. Charlotte, NC 28262. All Rights Reserved. #961152073-R1 - Hoover Power Scrub Elite | Product Manual English - Page 2
Welcome to Hoover ownership. Get cleaning confidence for up to 2 years with the Hoover limited warranty. - Hoover Power Scrub Elite | Product Manual English - Page 3
3 How to assemble your Power Scrub Elite™ 4 Features 5 Tools 7 Before you begin Cleaning 8 Getting started with your Power Scrub Elite™ 9 Using your Power Scrub Elite™ 13 Tools and Accessories 15 Maintenance 21 Hoover Cleaning Solution Guide 23 Troubleshooting 25 Warranty 26 - Hoover Power Scrub Elite | Product Manual English - Page 4
servicing. • Use indoors only. • Do not immerse. Use only on carpet moistened by cleaning process. • Use only HOOVER as described in this manual. Use only manufacturer's all parts of body away from open ings and moving parts. Grounding Instructions. • Unplug before connecting SpinScrub®® powered hand - Hoover Power Scrub Elite | Product Manual English - Page 5
reproductive harm. WASH HANDS AFTER HANDLING. A C B2 D G D FE GROUNDING INSTRUCTIONS: CAUTION: TO REDUCE THE RISK OF DAMAGE: This appliance must be grounded. in the risk of electric shock. Check with a qualified electrician or service person if you are in doubt as to whether the outlet is • - Hoover Power Scrub Elite | Product Manual English - Page 6
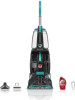
Tool* K. 2-in-1 Antimicrobial Tool* L. Sample Bottle of Cleaning Solution *Tools vary per model. Accessories not included with your model may be purchased separately by visiting Hoover.com - Hoover Power Scrub Elite | Product Manual English - Page 7
How to assemble your Power Scrub Elite™: 1 Insert the handle into the base. 2 Insert both screws and tighten with a screwdriver. 3 Angle the Solution/Clean Water tank above the Dirty Water Recovery Tank and click it into place. 4 Wrap the power cord around the cord hooks for convenient storage. - Hoover Power Scrub Elite | Product Manual English - Page 8
Features: 14. 6. 7. 5 1. 10. 15. 4. 3. 5. 9. 13. 8. 12. 11. 2. 1. Water & Solution Trigger: Press to release 2. ON/OFF Pedal 3. Wash/Rinse Mode Selector 4. Clean Water/Solution Tank 5. Dirty Water Recovery Tank 6. Dirty Water Recovery Tank Latch 7. Solution Connection Port for Hose 8. - Hoover Power Scrub Elite | Product Manual English - Page 9
Features: Cleaning Modes: 1. Turn the cleaning mode selection dial on the base of the unit to choose your preferred cleaning mode. Align arrow to preferred mode. a. Quick Clean Mode: Best for a quick, surface clean because carpets dry in less than 1 hour. b. Deep Clean Mode: Best overall - Hoover Power Scrub Elite | Product Manual English - Page 10
you to choose between two inserts. The rubber nub insert is for unpleasant stain removal and hygienic clean-ups. The bristle insert is for tough scrubbing power. *Tools vary per model. Accessories not included with your model may be purchased separately by visiting - Hoover Power Scrub Elite | Product Manual English - Page 11
skirts and draperies. Pretreat spots and heavy traffic areas with a Hoover® Cleaning Solution*. See the "Cleaning Solutions" section. *Available at Pretreating: For best results, pretreat stains with a Hoover spot treatment (see Hoover Cleaning Solution Guide, pg. 23) to help loosen and remove even - Hoover Power Scrub Elite | Product Manual English - Page 12
Getting started with your Power Scrub Elite™: To fill the Clean Water/Solution Tank: 1 Press down on top latch of clean water tank and pull to remove. 9 2 3 Twist off the clean water - Hoover Power Scrub Elite | Product Manual English - Page 13
Getting started with your Power Scrub Elite™: Cord: How to empty: Unwrap the power cord and plug unit in an electrical outlet. 1 Turn the cleaner off and unplug from electrical outlet. 2 Release Dirty Water Tank Latch. 3 Grab the Dirty - Hoover Power Scrub Elite | Product Manual English - Page 14
Getting started with your Power Scrub Elite™: 4 5 Place on a flat surface and unlatch Dirty Empty tank, rinse and allow to air dry. Water Tank lid located below the Quick Spout Pour cap. 11 - Hoover Power Scrub Elite | Product Manual English - Page 15
Tank is properly secured before cleaning. Continue using dry strokes until little water is visible passing through the nozzle. For best results, Hoover recommends rinsing carpet with water only. This removes residual carpet cleaning solution. Fill Solution Tank with water and repeat. For heavily - Hoover Power Scrub Elite | Product Manual English - Page 16
Using your Power Scrub Elite™: 1 Choose cleaning mode by turning the dial on the base to "Quick Clean" or "Deep Clean" mode. 2 Ensure Wash/Rinse dial on the Clean Water Tank is turned to "Wash". 3 Plug into electrical outlet. Step on the Power Pedal to turn ON. 4 Step on the Handle Release Pedal - Hoover Power Scrub Elite | Product Manual English - Page 17
Using your Power Scrub Elite™: 5 Squeeze trigger to apply water and cleaning solution. Slowly push 6 Release the trigger and slowly push forward. Then slowly pull back toward you 7 For Best Results, Hoover recommends rinsing the carpet with clean water only. forward then backwards without - Hoover Power Scrub Elite | Product Manual English - Page 18
"Before You Begin Cleaning" instructions. Be sure to check Hoover® Cleaning Guide on page 23 and the cleaning code on your upholstery. Use your cleaner only on upholstery marked "W" or "W/S". ! CAUTION ! To reduce risk of injury from moving parts - Unplug before servicing. 1 2 3 Attach hose to the - Hoover Power Scrub Elite | Product Manual English - Page 19
the motor sound becomes higher pitched and there is a loss in suction (see "Automatic Shutoff"). When finished cleaning, follow "After Cleaning" and "After Using Tool" instructions on page 19. 16 - Hoover Power Scrub Elite | Product Manual English - Page 20
Tools and Accessories: How to Remove Hose: 1 Disconnect Hose Solution Tube from Hose Solution Port by pulling up firmly. Do not pull on tube, this may cause damage. Port door will automatically close. 17 2 Rotate hose end counterclockwise from the locked position to the unlocked position and - Hoover Power Scrub Elite | Product Manual English - Page 21
Tool and Accessories: How to Attach Tools: NOTE: Do not place unit at top of stairway to avoid falling down stairs. Place unit at bottom of stairs and work up. 1 To ensure maximum performance and to protect your carpet, be 2 Connect tool to hose by sliding it onto the 3 Using your thumb, push - Hoover Power Scrub Elite | Product Manual English - Page 22
Tools and Accessories: After Using Tools: ! CAUTION ! Always turn off appliance before connecting or disconnecting hose. 1 Drain hose by removing the solution tank and turning the cleaner ON. Aim hose in a downward angle and press trigger to remove excess water. 19 2 3 Turn OFF cleaner. - Hoover Power Scrub Elite | Product Manual English - Page 23
it may result in injury or damage. 2. Attach hose and solution tube as instructed (page 15). 9-12. End with more dry strokes to aid in faster drying wait until the carpet is 5. Fill Solution Tank with HOOVER solution according to instructions. completely dry before using the tool again. 6. Attach - Hoover Power Scrub Elite | Product Manual English - Page 24
notches on the foot (Fig. G). 8. Snap Nozzle to foot. 9. Rotate Nozzle latch to lock position. ! CAUTION ! To reduce the risk of injury from moving parts Unplug before connecting SpinScrub® Hand Tool. Not to be used for grooming pets. 21 Fig. E Fig. F Fig. G ! IMPORTANT ! The nozzle must be in - Hoover Power Scrub Elite | Product Manual English - Page 25
until post fits easily into hole. 3. Press brush assembly firmly to snap into place. ! CAUTION ! To reduce the risk of injury from moving parts - Unplug before connecting SpinScrub® Hand Tool. Not to be used for grooming pets. B A Fig.H Storage Before storing: Empty Clean Water Tank and let - Hoover Power Scrub Elite | Product Manual English - Page 26
Series Solution Guide: For optimal performance use Hoover® brand solutions and pretreats available at Hoover.com and The Home Breaks Down and Removes Deep, Tough Stains and Odors 23 Deep Clean Max™ Powerfully Removes Everyday Dirt and Grime Deep Clean Max™ Pet Eliminates and Deodorizes Pet Messes - Hoover Power Scrub Elite | Product Manual English - Page 27
need further assistance: If your product needs servicing within the warranty period, please contact Customer Service at 1-800-944-9200; Mon-Fri 7am-6pm EST. Always identify your carpet washer by the complete model number when requesting information or ordering parts. (The model number of the carpet - Hoover Power Scrub Elite | Product Manual English - Page 28
representative. USE TROUBLESHOOTING GUIDE AS A FIRST STEP TO RESOLVE ANY PROBLEMS YOU MAY BE EXPERIENCING. If appliance is not working as it should, has been dropped, damaged, left outdoors, or dropped into water, call Customer Service at 1-800-944-9200 for further instruction before continuing use - Hoover Power Scrub Elite | Product Manual English - Page 29
Manual, your HOOVER® product is warranted against original defects in material and workmanship for a full two years from date of purchase (the "Warranty Period"). During the Warranty Period, Hoover® will provide labor and parts to a Hoover® Sales and Service Center for warranty service, cost of - Hoover Power Scrub Elite | Product Manual English - Page 30
Premiers pas avec votre Power Scrub EliteMC 33 Utilisation de votre Power Scrub EliteMC 35 Outil et accessoires 36 Entretien 40 Guide sur les solutions nettoyantes Hoover 41 Dépannage 43 Garantie 44 FRANÇAIS Guide d'utilisation IMPORTANT : Lire ces instructions attentivement avant - Hoover Power Scrub Elite | Product Manual English - Page 31
et ne pas contourner des LIRE TOUTES LES INSTRUCTIONS AVANT D'UTILISER CET coins ou des rebords façon décrite dans ce guide. Utiliser uniquement les accessoires et est tombé dans l'eau, l'apporter à un centre de service avant de poursuivre l'utilisation. •Ne pas utiliser l'appareil sans - Hoover Power Scrub Elite | Product Manual English - Page 32
des produits chimiques reconnus par l'État de la Californie comme pouvant causer le cancer ou, entraîner des malformations congénitales ou d'autres troubles de la reproduction. SE LAVER LES MAINS APRÈS L'UTILISATION. CONSIGNES DE MISE À LA TERRE : Cet appareil doit être mis à la terre. En cas - Hoover Power Scrub Elite | Product Manual English - Page 33
accessoires varient selon le modèle. Les accessoires non-inclus avec votre modèle peuvent être achetés séparément en vous rendant à Hoover.com Assemblage de votre Power Scrub EliteMC: 1 2 Insérez la poignée dans la base. Insérez les deux vis et serrez-les à l'aide d'un tournevis. 3 Inclinez le - Hoover Power Scrub Elite | Product Manual English - Page 34
Caractéristiques: 1. Détente d'eau/solution : Appuyez pour dégager 2. Pédale MARCHE/ARRÊT 3. Sélecteur de mode lavage/rinçage 4. Réservoir d'eau propre/solution 5. Réservoir de récupération d'eau sale 6. Loquet du réservoir de récupération d'eau sale 7. Prise de connexion de solution du tuyau 8. - Hoover Power Scrub Elite | Product Manual English - Page 35
votre modèle. Prétraitement: nPour obtenir des résultats optimaux, prétrai- tez les taches en utilisant un détachant Hoover (reportez-vous au guide des solutions nettoyantes Hoover, à la page 42) pour aider à déloger et à éliminer les taches les plus tenaces. REMARQUE : Pour éviter d'endommager les - Hoover Power Scrub Elite | Product Manual English - Page 36
Premiers pas avec votre Power Scrub EliteMC: Pour remplir le réservoir d'eau avec la solution: 1 Appuyez sur le loquet supérieur du réservoir d'eau propre et tirez 2 Dévissez le bouchon d'eau - Hoover Power Scrub Elite | Product Manual English - Page 37
d'effectuer des passages à sec jusqu'à ce que vous ne voyiez presque plus d'eau passer dans la buse. Pour obtenir des résultats optimaux, Hoover vous recommande de rincer les tapis à l'eau seulement. Cela permet d'éliminer les résidus de solution nettoyante pour tapis. Remplissez le réservoir de - Hoover Power Scrub Elite | Product Manual English - Page 38
Utilisation de votre Power Scrub EliteMC: 1 2 Choisissez votre mode de nettoyage en tournant la détente et poussez doucement vers l'avant. Ensuite, Pour obtenir des résultats optimaux, Hoover vous recommande de rincer les Poussez doucement vers tirez doucement vers tapis à l'eau seulement. - Hoover Power Scrub Elite | Product Manual English - Page 39
de déverrouillage. 4 Branchez le tube de solution du tuyau fermement dans la prise de solution du tuyau. Lisez les instructions « Avant de commencer le nettoyage ». Prenez soin de bien consulter le Guide de nettoyage HooverMD à la page 4, ainsi que le code de nettoyage de votre tissu de ! MISE EN - Hoover Power Scrub Elite | Product Manual English - Page 40
Outil et accessoires: Comment retirer le tuyau: 1 Débranchez le tube de solution du tuyau et la prise de solution du tuyau en tirant dessus fermement. Ne tirez pas sur le tube, car cela pourrait l'endommager. Le clapet de la prise se ferme automatiquement. 2 3 Tournez le bout du tuyau en sens - Hoover Power Scrub Elite | Product Manual English - Page 41
Outil et accessoires: Après avoir utilisé les outils: 1 Purgez le tuyau en retirant le réservoir de solution et en mettant 2 3 Éteignez le nettoyeur. Débranchez le tuyau et Purgez le tube de solution en positionnant son bout rond le tube de solution du dans l'évier et en plaçant le nettoyeur - Hoover Power Scrub Elite | Product Manual English - Page 42
. 14. Pour éviter de saturer le tapis, n'effectuez pas plus de quatre 5. Remplissez le réservoir de solution d'une solution HOOVER conformément aux instructions. passages à l'eau dans un espace donné. Terminez toujours en effectuant des passages à sec 6. Installez l'accessoire à l'extrémité du - Hoover Power Scrub Elite | Product Manual English - Page 43
Entretien: BUSE: Comment nettoyer ! AVERTISSEMENT ! Pour réduire le risque de blessures présenté par les pièces en mouvement - Débranchez l'appareil avant de brancher l'outil à main SpinScrubMD. N'utilisez pas l'appareil pour toiletter des animaux. 1. Pour empêcher les éventuelles fuites, retirez - Hoover Power Scrub Elite | Product Manual English - Page 44
Guide de la gamme de solutions nettoyantes professionnelles HooverMD: Optez pour une performance optimale en utilisant les solutions et prétraitements de HooverMD disponibles sur les sites de Hoover.com et The Home Depot. ! AVERTISSEMENT ! Pour réduire les risques d'incendie et de choc électrique - Hoover Power Scrub Elite | Product Manual English - Page 45
est toujours sous garantie et doit être réparé, contactez le service client au 1 800 944-9200. Toujours identifier votre produit au (800) 944-9200 Pour obtenir un guide de dépannage complet, reportez-vous à : Twitter: @HooverUSA Facebook: facebook.com/hoover Ne pas renvoyer au magasin. Reportez- - Hoover Power Scrub Elite | Product Manual English - Page 46
confiée à un représentant de service autorisé. UTILISER D'ABORD LE GUIDE DE DÉPANNAGE POUR RÉSOUDRE LES PROBL Hoover conçus pour cet appareil, comme il est indiqué ci-dessous. 43 PROBLEM en place 2. Remplissez le contenant conformément aux instructions de nettoyage 1. Tournez la molette sur « Wash - Hoover Power Scrub Elite | Product Manual English - Page 47
service autorisé. Vous trouverez le centre de service le plus près de chez vous en visitant notre site Web à www.hoover domestiques, comme il est stipulé dans le Guide de l'utilisateur, contre les défauts de ou à toute action ou négligence de la part du propriétaire de l'appareil, toute utilisation - Hoover Power Scrub Elite | Product Manual English - Page 48
comenzar la limpieza 50 Cómo preparar su Power Scrub Elite™ 51 Uso de su Power Scrub Elite™ 53 Herramienta y accesorios 54 Mantenimiento 58 Guía de soluciones de limpieza de Hoover: 59 Resolución de problemas 62 Garantía 63 45 Manual del usuario ESPAÑOL IMPORTANTE: Lea atentamente - Hoover Power Scrub Elite | Product Manual English - Page 49
en la placa de datos ubicada en la parte inferior de la misma. •No deje de limpieza. •Únicamente use los productos de limpieza marca HOOVER® destinados a este aparato. •No permita que el el producto únicamente como se describe en este manual. Use únicamente los productos y accesorios recomendados por - Hoover Power Scrub Elite | Product Manual English - Page 50
puede rayar o dañar sus pisos. adaptador temporal hasta que un electricista calificado instale apropiadamente •El agua goteará de los cepillos y de la parte inferior de la máquina lu- una toma de corriente con conexión a tierra (B) (Fig. 1). La oreja, patilla o dispos- ego de su utilización, lo - Hoover Power Scrub Elite | Product Manual English - Page 51
Botellas de muestra con solución para herramientas limpieza Cómo armar la Poder Scrub Elite™: *Las herramientas varían según el modelo. Puede comprar por separado, los accesorios que no vienen incluidos con su modelo en Hoover.com. 1 Coloque la manija en la base. 2 3 Coloque los dos tornillos - Hoover Power Scrub Elite | Product Manual English - Page 52
una limpieza a fondo y minuciosa. *Las herramientas varían según el modelo. Puede comprar por separado, los accesorios que no vienen incluidos con su modelo en Hoover.com. 49 - Hoover Power Scrub Elite | Product Manual English - Page 53
manche la alfombra. Fije los tapizados y cortinas. Trate previamente las manchas y las áreas de tráfico pesado con una solución de limpieza Hoover®*. Vea la sección "Soluciones de limpieza". *Disponible con un costo adicional, si no está incluida con su modelo. Tratamiento previo: Para obtener - Hoover Power Scrub Elite | Product Manual English - Page 54
Cómo preparar su Power Scrub Elite™: Para llenar el depósito de agua limpia/solución: 1 Presione la traba superior del depósito de agua limpia, y tire para extraer el depósito. 2 3 Desenrosque el tapón de la parte superior del depósito de Desenrosque el tapón para solución del agua limpia. Añ - Hoover Power Scrub Elite | Product Manual English - Page 55
poca agua a través de la boquilla. Para obtener los mejores resultados, Hoover recomienda enjuagar la alfombra solo con agua. Esto elimina la solución de . Después del uso, goteará agua desde los cepillos y por la parte inferior del producto que puede acumularse. Para evitar dañar suelos de madera - Hoover Power Scrub Elite | Product Manual English - Page 56
Uso de su Power Scrub Elite™: 1 Seleccione el modo de limpieza girando el dial que se encuentra en el gatillo y empújela lentamente hacia adelante. Luego, Para obtener mejores resultados, Hoover recomienda enjuagar la empuje la lavadora hacia lentamente, tírela alfombra solo con agua delante - Hoover Power Scrub Elite | Product Manual English - Page 57
de la Solución para la Manguera. Lea las instrucciones "Antes de comenzar la limpieza". Asegúrese de verificar la Guía de limpieza Hoover® de la página 4 y el código de limpieza de su tapizado. Utilice su aspiradora solo en tapizados marcados con "H" o "H/S". ! PRECAUCIÓN ! Para disminuir el - Hoover Power Scrub Elite | Product Manual English - Page 58
. vertical durante el uso de la manguera. La colocación del mango en posición vertical desactiva los cepillos SpinScrub®. NOTA: No coloque la lavadora en la parte superior de escaleras, para evitar que se caiga por las escaleras. Coloque la lavadora en la - Hoover Power Scrub Elite | Product Manual English - Page 59
Herramientas y accesorios: Herramientas para después del uso: 1 2 3 Drene la manguera quitando el depósito de la APAGUE la limpiadora. Desconecte la manguera Drene el tubo de la solución colocando el extremo solución y encendiendo y el tubo de la solución, de redondo en el fregadero y la - Hoover Power Scrub Elite | Product Manual English - Page 60
limpieza" de la 11. Levante la herramienta y colóquela contra la parte vertical del página 52. escalón. Tire lentamente de la herramienta, sobre más rápido. 5. Llene el Depósito de la Solución con una solución HOOVER, de 14. Para evitar saturar la alfombra, no realice más de 4 pasadas acuerdo - Hoover Power Scrub Elite | Product Manual English - Page 61
de alfombras. 6. Enjuague la boquilla para eliminar los residuos. 7. Coloque la boquilla sobre el pie, asegurándose de alinear las lengüetas de la parte inferior de la boquilla con las muescas del pie (Fig. G). 8. Trabe la boquilla al pie. 5. Empuje la boquilla hacia adelante para retirarla de la - Hoover Power Scrub Elite | Product Manual English - Page 62
! ADVERTENCIA ! Para reducir el riesgo de incendio y descarga eléctrica debido a daño de los componentes internos, utilice únicamente productos de limpieza Hoover® con fines de uso para el aparato. La forma y el tamaño de las botellas puede variar Limpieza máxima y profunda con Oxy Deshace - Hoover Power Scrub Elite | Product Manual English - Page 63
LA TIENDA. ¿TIENE PREGUNTAS O INQUIETUDES? Contáctenos: (800) 944-9200 Para obtener una guía completa de resolución de problemas, consulte: Twitter: @HooverUSA Facebook: facebook.com/hoover No devuelva la unidad a la tienda. Vea la parte posterior del producto para consultar el número de modelo. 60 - Hoover Power Scrub Elite | Product Manual English - Page 64
únicamente productos de limpieza Hoover® diseñados para el producto, como se indica abajo. 61 PROBLEM POSSIBLE CAUSE POSSIBLE SOLUTION La selector al modo "Lavado" Los cepillos no giran 1. Revise la pantalla en la parte frontal de la durante la limpieza de limpiadora, detrás de la boquilla; el - Hoover Power Scrub Elite | Product Manual English - Page 65
(El número de modelo y el código de fabricación están en la parte posterior del producto). GARANTÍA LIMITADA DE DOS AÑOS (PARA USO DOMÉSTICO) ÍA Siempre que su producto HOOVER® se use en el hogar en condiciones normales y se le dé mantenimiento de acuerdo con el Manual del usuario, tendrá garant - Hoover Power Scrub Elite | Product Manual English - Page 66
Notes 63 - Hoover Power Scrub Elite | Product Manual English - Page 67
Notes 64 - Hoover Power Scrub Elite | Product Manual English - Page 68
Find us on: Hoover.com youtube.com/hoover facebook.com/hoover twitter.com/hooverusa
-
 1
1 -
 2
2 -
 3
3 -
 4
4 -
 5
5 -
 6
6 -
 7
7 -
8
-
9
-
10
-
11
-
12
-
13
-
14
-
15
-
16
-
17
-
18
-
19
-
20
-
21
-
22
-
23
-
24
-
25
-
26
-
27
-
28
-
29
-
30
-
31
-
32
-
33
-
34
-
35
-
36
-
37
-
38
-
39
-
40
-
41
-
42
-
43
-
44
-
45
-
46
-
47
-
48
-
49
-
50
-
51
-
52
-
53
-
54
-
55
-
56
-
57
-
58
-
59
-
60
-
61
-
62
-
63
-
64
-
65
-
66
-
67
-
68
 |
 |

USER MANUAL
CARPET CLEANER
POWER SCRUB
ELITE™ PET+
IMPORTANT: Read carefully before assembly and use.
©2019 Techtronic Floor Care Technology Limited. All Rights Reserved. Distributed by, Royal Appliance Mfg. Co.
Charlotte, NC 28262. All Rights Reserved. #961152073-R1
PROFESSIONAL
SERIES