Hoover S3755 Manual
Hoover S3755 Manual
 |
UPC - 073502025260
View all Hoover S3755 manuals
Add to My Manuals
Save this manual to your list of manuals |
Hoover S3755 manual content summary:
- Hoover S3755 | Manual - Page 1
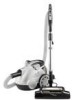
WindTunnel TM Bagless Canister Cleaner with Powered Nozzle Owner's Manual English § pp. 1-11 Español § pàg.12-17 Français § p.18-23 www.hoover.com Review this manual before operating cleaner. - Hoover S3755 | Manual - Page 2
service of your Hoover product. Index Assembling Cleaner 3 Cleaner Description 4 How To Use Canister Cleaner 4-6 Cleaning Tools 6 Powered Nozzle 5-6 To Clean Stairs 6 If You Have a Problem 10 Clearing Blockages 10 Important Safeguards 2 Maintenance Cleaning Filters 6-7 Emptying Dirt Cup - Hoover S3755 | Manual - Page 3
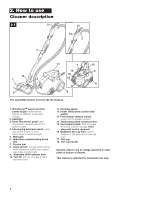
assembly or operation, Visit us online at www.hoover.com to find the nearest service outlet OR Call 1-800-944-9200 for an automated referral of authorized service parts shown. Remove and dispose of cardboard packing. A. Canister cleaner B. WindTunnel™ powered nozzle C. Extension wand and hose - Hoover S3755 | Manual - Page 4
15 17 8 The assembled cleaner will look like the drawing. 10 6 9 1. WindTunnel™ carpet and floor power HEPA exhaust filter 10. Tool lid: pull up on edge of lid in recessed area 11. Carrying handle cup filter: aids in filtration of dirt particles (inside dirt cup) 17. Dirt cup 18. Dirt cup handle - Hoover S3755 | Manual - Page 5
any way. 2-3 B Turning cleaner on and adjusting power level After assembling cleaner, plug cord into electrical outlet. Turn cleaner on by pushing . Spring latch will lock the wand into the selected position. 2-4 2-5 E 2-6 E F Power nozzle Handle positions The handle has two positions when - Hoover S3755 | Manual - Page 6
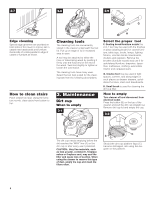
be attached to either the hose or telescoping wand by pushing it firmly onto the hose filter and cause loss of suction. When using the cleaner to remove this type of dust, empty the cup and clean the filters often. C C Should the dirt cup platform flaps (C) become dislodged, refit using the diagram - Hoover S3755 | Manual - Page 7
it in cleaner. Replace the filter by lining up tabs on filter with grooves on lid and rotating clockwise. If the red light is still on after the filter has been cleaned, there may be a blockage in the hose or wands. Refer to "If you have a problem" section. Washing the dirt cup Turn cleaner off - Hoover S3755 | Manual - Page 8
is stretched or cut, pull it off the motor pulley (H). J Lift up end of agitator brush roll. Remove old belt from agitator pulley (I) and replace with new belt. Lettering on belt must be visible. Stretch belt back and attach to motor pulley. Hold opposite end of agitator brush roll in place. Push - Hoover S3755 | Manual - Page 9
new agitator brush roll, ask for HOOVER part no. 48414071. How to replace Disconnect cleaner from electrical outlet. 1. Remove hood, duct cover, belt and brush roll as shown in Figs periodically by a Hoover Sales and Service Center or an authorized Hoover Warranty Service Dealer (Depot). 9 - Hoover S3755 | Manual - Page 10
breaker. • Replace fuse/reset breaker. Problem: Cleaner suction low Possible cause Possible solution • Dirt cup full. • Empty dirt cup. • Dirt cup filter dirty. • Clean the dirt cup filter with brush and water, allow to dry and replace in cleaner. • Obstruction in nozzle connector, hose or wand - Hoover S3755 | Manual - Page 11
(Domestic Use) Your HOOVER® appliance is warranted in normal household use, in accordance with the Owner's Manual against original defects in material and workmanship for a period of one full year from date of purchase. This warranty provides, at no cost to you, all labor and parts to place this - Hoover S3755 | Manual - Page 12
HOOVER® Aspiradora WindTunnel™ tipo receptáculo sin bolsa con boquilla turboaccionada Anote y guarde Los números de modelo y de serie se encuentran en la parte inferior de la aspiradora. Para sus archivos personales, anote los números COMPLETOS de modelo y serie en los espacios provistos y conserve - Hoover S3755 | Manual - Page 13
el manual de en nuestra página de Internet en www.hoover.com para encontrar el centro de servicio más culo B. Boquilla turboaccionada WindTunnel™ C. Tubo de extensi umbrales de puertas 9. Filtro de escape HEPA lavable 10. Tapa para los accesorios que se encuentra en la parte inferior de la aspiradora. - Hoover S3755 | Manual - Page 14
ósito y cambie los filtros a menudo. 3-2 Cómo vaciarlo Apague la aspiradora y desconéctela de la toma de corriente eléctrica. Presione el botón (B) en la parte superior de la aspiradora y jale el depósito para polvo directamente hacia fuera. Suelte la tapa del depósito para polvo y vacíe el depósito - Hoover S3755 | Manual - Page 15
éctrica. Saque el depósito para polvo presionando el botón en la parte superior de la aspiradora y jalando el depósito para polvo directamente hacia tamaños similares, pero no han sido diseñadas para la boquilla de HOOVER. Estas correas no accionan el agitador de manera correcta y pueden crear una - Hoover S3755 | Manual - Page 16
buscando en las páginas amarillas de la guía de teléfonos, bajo "Vacuum Cleaners-Household" ("Aspiradoras Artículos del hogar") O - • revisando la sección "Service" (Servicio) de Hoover en nuestra página de Internet en www.hoover.com O - • llamando al 1-800-944-9200 para obtener una referencia autom - Hoover S3755 | Manual - Page 17
del conector para la boquilla y elimine cualquier obstrucción. Garantía completa de un año (Uso doméstico) Su aparato HOOVER® está garantizado en caso de uso doméstico normal según el Manual del Propietario contra defectos en el material y la fabricación por el período de un año a contar de la - Hoover S3755 | Manual - Page 18
vente et de service Hoover ou chez un détaillant de service garanti autorisé Hoover (dépôt). • N' guide. N'utiliser que les accessoires recommandés par Hoover; d'autres accessoires pourraient s'avérer dangereux. © 2003 The Hoover Company www.hoover.com 18 Ranger et conserver ces instructions - Hoover S3755 | Manual - Page 19
instructions numérotées de cette section française avec les illustrations numérotées correspondantes de la section anglaise de ce guide pour parler à un représentant Hoover du service à la clientèle, lundi-vendredi d'évacuation lavable HEPA 10. Couvercle des Après avoir assemblé l'aspirateur, - Hoover S3755 | Manual - Page 20
2-4 Positions du manche avec l'embout à turbine Le manche peut être placé à deux positions lors de l'utilisation de l'embout à turbine : à la verticale ou en position de fonctionnement. Pour abaisser le manche en position de fonctionnement, il suffit d'appuyer fermement avec le pied sur l'embout et - Hoover S3755 | Manual - Page 21
le rouleau-brosse si ses brosses ne touchent pas au carton. Quoi acheter À l'achat d'un nouveau rouleau-brosse, demander la pièce n° 48414071 de HOOVER. Comment le remplacer Débrancher la shampouineuse de la prise de courant. 1. Enlever le couvercle, le protecteur de tuyau, la courroie et le rouleau - Hoover S3755 | Manual - Page 22
faire tourner pour la fixer en place. 3. Replacer le couvercle. Protecteur thermique Un protecteur thermique interne emp service Hoover garanti autorisé (dépôt). 4. Dépannage Si un problème d'ordre mineur survient, il peut habituellement être résolu très facilement. Il suffit de consulter la liste - Hoover S3755 | Manual - Page 23
des conditions d'usage domestique, tel que stipulé dans le guide de l'utilisateur, contre les défauts de matériaux et service Hoover. 2. Ateliers de service garanti autorisé Hoover (dépôt). Pour accéder à un service d'aide automatique qui vous donnera la liste des centres de service autorisés Hoover - Hoover S3755 | Manual - Page 24
HOOVER y ®son marcas registradas HOOVER et ®sont des marques déposées R2 5-05 S3755 HOOVER and ® are registered trademarks Printed in China 59134-003
-
 1
1 -
 2
2 -
 3
3 -
 4
4 -
 5
5 -
 6
6 -
 7
7 -
8
-
9
-
10
-
11
-
12
-
13
-
14
-
15
-
16
-
17
-
18
-
19
-
20
-
21
-
22
-
23
-
24
 |
 |

WindTunnel
Bagless Canister Cleaner
with Powered Nozzle
Owner’s Manual
English
±
pp. 1-11
Español
±
pàg.12-17
Français
±
p.18-23
Review this manual before
operating cleaner.
TM
www.hoover.com