Hoover U5140900 Manual
Hoover U5140900 - Blu Tempo Widepath Bagged Upright Vacuum Cleaner Manual
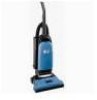 |
UPC - 719881157771
View all Hoover U5140900 manuals
Add to My Manuals
Save this manual to your list of manuals |
Hoover U5140900 manual content summary:
- Hoover U5140900 | Manual - Page 1
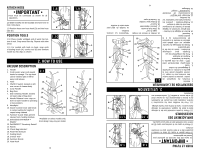
56511A66 ID100224-R7 Guide d'utilisation Instructions d'utilisation et d'entretien www.hoover.com www.hoover.com IMPORTANT : LIRE CES INSTRUCTIONS ATTENTIVEMENT AVANT D' Limited. Tous droits réservés. #56511A66 ID100224-R7 Owner's Manual Operating and Servicing Instructions Español - página E1 - Hoover U5140900 | Manual - Page 2
...6 Cleaner Description 6 Cleaning Tools...9 Maintenance...10 Filter Bag...10 Filters...11 Headlight...12 Belt...12 Agitator Brushroll 13 Clearing Blockages 14 Lubrication...14 Troubleshooting Guide 15 Service...15 Warranty...16 Contents Hint: Attach your sales receipt to this owner's manual - Hoover U5140900 | Manual - Page 3
followed, including the following: READ ALL INSTRUCTIONS BEFORE USING THIS APPLIANCE. WARNING: TO REDUCE THE RISK OF FIRE, ELECTRIC SHOCK OR INJURY: • Fully assemble before operating. • Operate vacuum only at voltage specified on data label on bottom of cleaner. • Do not leave appliance when plugged - Hoover U5140900 | Manual - Page 4
filter bag inlet, secondary filter, and final filter. 4. When cleaner is unplugged cleaner needs servicing. CAUTION: TO REDUCE THE RISK OF DAMAGE: • Brushroll continues to turn while product is turned on and handle is in upright malformations congénitales ou d'autres troubles de la reproduction. ! - Hoover U5140900 | Manual - Page 5
body by pushing down at top of door and pulling door outward. Switch (A) above bag door should be in OFF position. 1.3 Slide handle onto cleaner body. 1.4 Push bolts into holes on back of handle. 1.5 Place nuts in recessed areas on front of handle. Hold each nut in place while tightening - Hoover U5140900 | Manual - Page 6
1.9 D E 16. Final Filter Exhaust 15. Check Bag Indicator* 14. Wands 13. DirtFINDER™ Sensitivity Switch* cleaner from marking furniture 12. Embedded DirtFINDER™ display* *Available on select models only. Foot design may vary per model. 11. Furniture Guard: helps prevent carpet being cleaned - Hoover U5140900 | Manual - Page 7
on select models only) upright for cleaner has three 2.4 2.5 The handle of your Handle positions Transporting cleaner ON-OFF switch Plug cord into electrical outlet. To turn cleaner ON, push switch (A) toward front of cleaner. To turn cleaner OFF, push switch toward back of cleaner - Hoover U5140900 | Manual - Page 8
forward to back. Never leave the vacuum standing on stairs when not cleaning. 2.12 Cleaning lightweight flexible rugs Stand on one end of rug and move cleaner toward other end or edge. Before the handle should be in the upright position (C). 2.9 C 2.8 Carpet height adjustment Handle position 8 - Hoover U5140900 | Manual - Page 9
them with any of the above tools. *Available on select models only. C A B 3.2 Select Proper Tool A To use hose, lift hose end as shown. When using cleaning tools, cleaner handle should be in the upright position. Also, turn cleaner OFF before disconnecting and connecting hose to hose tube - Hoover U5140900 | Manual - Page 10
10 What to Buy Use only genuine HOOVER® bags with your vacuum. When purchasing a new bag, ask for HOOVER® Allergen Type Y Part No. 4010100Y. Filter bag: When to Replace Check filter bag from time to time. It is recommended that you change the filter bag when dirt reaches the dotted line. If more - Hoover U5140900 | Manual - Page 11
to Buy Use only genuine HOOVER® Secondary Filter with your vacuum. When purchasing a new Secondary Filter, ask for Hoover® Part No. 38765-019. Final Filter The final filter assists in the filtration process to return clean air to the room. 4.5 To remove this filter when it be-comes dirty, remove bag - Hoover U5140900 | Manual - Page 12
belt if it is stretched, cut or broken. ! CAUTION ! To reduce the risk of injury from moving parts, unplug vacuum before servicing. Belt: How to Replace The belt on your Hoover® cleaner select models only) ! WARNING ! To reduce the risk of electric shock, unplug vacuum before cleaning or servicing. - Hoover U5140900 | Manual - Page 13
reduce the risk of injury from moving parts, unplug vacuum before servicing. 4.16 The Agitator Brushroll: How to Replace HOOVER® Part No. 38528-033. vacuum. When purchasing a new Belt, ask for Use only genuine HOOVER® Belt with your What to Buy G 4.15 Reposition bottom plate and 4 Phillips - Hoover U5140900 | Manual - Page 14
parts, unplug vacuum before servicing. Low suction or pick up may be due to a blockage in the system. Refer to the following steps to check for blockages continuing with each step until the blockage is found: 1. Check fullness of filter bag; change if needed. Checking Airflow Path 2. Plug cleaner - Hoover U5140900 | Manual - Page 15
15 6. Service To obtain approved Hoover® service and genuine Hoover® parts, locate the nearest Authorized Hoover® Warranty Service Dealer (Depot) by: • Checking the Yellow Pages under "Vacuum Cleaners" or "Household". • Visit our website at hoover.com (U.S. Customers) or hoover.ca (Canadian - Hoover U5140900 | Manual - Page 16
parts, at no cost to you, to correct any such defect in products purchased in the United States, U.S. Military Exchanges and Canada. HOW TO MAKE A WARRANTY CLAIM If this product is not as warranted, take or send the product to either a Hoover® Sales and Service Center or Hoover dans le Guide de l' - Hoover U5140900 | Manual - Page 17
el uso y el mantenimiento de su producto HOOVER® se realicen en condiciones de uso doméstico normales y según el Manual del usuario, el producto estará garantizado contra TIPO O NATURALEZA CON RESPECTO AL PROPIETARIO O A CUALQUIER PARTE QUE REALICE UN RECLAMO A TRAVÉS DEL PROPIETARIO, YA SEA - Hoover U5140900 | Manual - Page 18
Manual del propietario. Para obtener el servicio de garantía de su producto HOOVER® Hoover.com, o llame al 18002366375 si prefiere hacerlo por teléfono. Código de fabricación (Etiqueta situada en la parte 4. Protector térmico activado. 1. Broken or worn belt La correa está rota o desgastada. 2. AEl - Hoover U5140900 | Manual - Page 19
y de servicio de garantía de Hoover (Depósito). E14 ¡SALVAGUARDIAS IMPORTANTES! placa de datos, que se encuentra en la parte inferior de la aspiradora. • Haga funcionar la • Use el producto sólo como se describe en este manual. Use sólo los accesorios y productos recomendados por el fabricante. - Hoover U5140900 | Manual - Page 20
enchufe. E4 4.12 Con las letras en la parte de afuera de la correa y con la correa 4.10. Deseche el agitador usado. 4.16 What to Buy La aspiradora necesita un agitador de 13 ó 15 pulgadas . de pieza 48414-110 de HOOVER 15 pulgadas - No. de pieza 48414-115 de HOOVER Para volver a colocar la correa - Hoover U5140900 | Manual - Page 21
912. Pieza No. 27313101 de HOOVER. 4.8 4.9 correa: Cuándo reemplazarla La correa de su aspiradora Hoover hace posible que el agitador gire Saque la puerta de bolsa del cuerpo de la aspiradora empujando hacia abajo la parte superior de la puerta y tirándola hacia fuera. El interruptor (A) ubicado - Hoover U5140900 | Manual - Page 22
model partículas de suciedad. Si el filtro se ensucia, extraiga la rejilla y saque el filtro. Lave el filtro a mano en agua fría con un detergente suave, déjelo secar al aire. Vuelva a colocar el filtro seco y la rejilla. 4.5 4.6 B Qué comprar Utilice únicamente filto secundario genuinas de HOOVER - Hoover U5140900 | Manual - Page 23
para filtración de alergenos, tipo Y pieza n.° 4010100Y de HOOVER®. E10 Interruptor de encendido y apagado (ON/OFF) Enchufe el cordón en una toma de corriente eléctrica. Para encender la aspiradora (ON) empuje el interruptor (A) hacia la parte delantera de la aspiradora. Para apagar la aspiradora - Hoover U5140900 | Manual - Page 24
alfombra y pase la aspiradora hacia el otro extremo o borde. Antes de llegar al borde, empuje el mango hacia abajo. Esto levantará la boquilla (parte delantera de la aspiradora) como se muestra y evitará que la alfombra se adhiera a la aspiradora. Continúe levantando la boquilla de modo que, cuando
-
 1
1 -
 2
2 -
 3
3 -
 4
4 -
 5
5 -
 6
6 -
 7
7 -
8
-
9
-
10
-
11
-
12
-
13
-
14
-
15
-
16
-
17
-
18
-
19
-
20
-
21
-
22
-
23
-
24
 |
 |

www.hoover.com
OWNER’S MANUAL
Operating and Servicing Instructions
©2009 Techtronic Floor Care Technology Limited. All rights reserved. #56511A66 ID100224-R7
IMPORTANT: READ CAREFULLY BEFORE ASSEMBLY AND USE.
Questions or concerns? For assistance, please call Customer Service at
1-800-944-9200 Mon-Fri 8am-7pm EST before returning this product to the store.
THIS PRODUCT IS INTENDED FOR HOUSEHOLD USE ONLY.
IF USED COMMERCIALLY WARRANTY IS VOID.
IMPORTANT : LIRE CES INSTRUCTIONS ATTENTIVEMENT AVANT
D’UTILISER L’ASPIRATEUR.
Vous avez des questions ou des inquiétudes? Pour obtenir de l’aide et avant de retourner
ce produit au magasin, veuillez appeler le service à la clientèle au 1 800 9449200 du
lundi au vendredi, de 8 h à 19 h (HNE).
www.hoover.com
GUIDE D’UTILISATION
Instructions d’utilisation et d’entretien
©2009 Techtronic Floor Care Technology Limited. Tous droits réservés. #56511A66 ID100224-R7
L’UTILISATION DE CE PRODUIT À DES FINS COMMERCIALES INVALIDE
LA PRÉSENTE GARANTIE.
Español - página E1