Hoover U5146-900 Owners Manual
Hoover U5146-900 - Bagless Upright Vacuum Cleaner Manual
 |
View all Hoover U5146-900 manuals
Add to My Manuals
Save this manual to your list of manuals |
Hoover U5146-900 manual content summary:
- Hoover U5146-900 | Owners Manual - Page 1
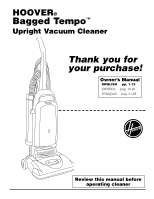
HOOVER® Bagged Tempo™ Upright Vacuum Cleaner Thank you for your purchase! Owner's Manual ENGLISH § pp. 1-12 ESPAÑOL § pág. 13-20 FRANÇAIS § pág. 21-28 www.hoover.com ® This product was designed for easy assembly (see page 3) Review this manual before operating cleaner - Hoover U5146-900 | Owners Manual - Page 2
, or dropped into water, take it to a Hoover Factory Service Center or Authorized Hoover Warranty Service Dealer (Depot). • Use vacuum cleaner only for its intended use as described in the instructions. Use only attachments recommended by The Hoover Company; others may cause hazards. Save these - Hoover U5146-900 | Owners Manual - Page 3
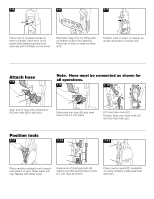
carton. Find the parts shown before disposing of packing materials. A. Handle section B. Cleaner body C. Hose, cleaning tools and wands E D. Crevice wand (included with some models) E. Handle bolts and nuts packet (in bag with owner's manual) D A B Attach handle 1-2 1-3 1-4 A Remove - Hoover U5146-900 | Owners Manual - Page 4
bottom of door into opening. Press top of door to snap securely shut. Position cord on back of cleaner as shown and press cord into clip. Attach hose 1-8 A B Align end of hose with projections (A) into clips as shown. Place crevice wand (D) (available on some models) inside extension wand (E). 4 - Hoover U5146-900 | Owners Manual - Page 5
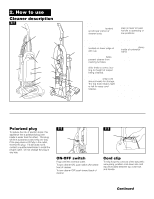
*Available on some models Operate cleaner only at voltage specified on data plate on bottom of cleaner. This cleaner is intended for cleaner ON, push switch (A) toward front of cleaner. To turn cleaner OFF, push toward back of cleaner. Cord clip To help keep the cord out of the way while vacuuming - Hoover U5146-900 | Owners Manual - Page 6
position for general operation on carpet and floors; low for reaching under low furniture. Step on handle release lever to lower handle. Transporting cleaner Put handle in upright position. Tilt cleaner back on rear wheels. Push forward. Carrying handle Use the carrying handle to lift the - Hoover U5146-900 | Owners Manual - Page 7
in carpet near baseboards and furniture. Guide either side of nozzle parallel to edge using cleaning tools, cleaner handle should be in the upright position. Also, turn cleaner OFF before disconnecting and above tools. G. Crevice wand (included on some models) may be used for the same tasks as the - Hoover U5146-900 | Owners Manual - Page 8
crevice wand (some models) to the cleaner is used to remove material of this nature, change filter bag often. Where to buy Filter bags may be purchased from your Authorized Hoover Dealer (Depot), leading retailers, Hoover Factory Service Centers or through The Hoover Company on-line at www.hoover - Hoover U5146-900 | Owners Manual - Page 9
water with mild detergent. Let filter air dry and reposition it on the side of cleaner. Reposition bag door. Should you want to replace this filter, ask for HOOVER part No. 40110004. Do not operate cleaner without either the secondary or final filter in place. Check agitator shield Because your - Hoover U5146-900 | Owners Manual - Page 10
HOOVER belts with your cleaner. When purchasing a new belt, ask for HOOVER part No. 38528033 (belt package part number 40201160). 3-10 A How to replace Disconnect cleaner roll Insert agitator through belt and place belt in belt guide (D) on agitator. Should the agitator shield (E) become dislodged - Hoover U5146-900 | Owners Manual - Page 11
steps, your cleaner may need servicing (see"Service" section). Service To obtain approved HOOVER service and genuine HOOVER parts, locate the nearest Hoover Factory Service Center or Authorized Hoover Warranty Service Dealer (Depot) by: • checking the Yellow Pages under "Vacuum Cleaners - Household - Hoover U5146-900 | Owners Manual - Page 12
check list below. Problem: Cleaner won't run Possible Manual against original defects in material and workmanship for a period of one full year from date of purchase. This warranty provides, at no cost to you, all labor and parts to a Hoover Factory Service Center for warranty service, transportation
-
 1
1 -
 2
2 -
 3
3 -
 4
4 -
 5
5 -
 6
6 -
 7
7 -
8
-
9
-
10
-
11
-
12
 |
 |

Thank you for
your purchase!
®
This product was designed for
easy assembly (see page 3)
www.hoover.com
ENGLISH
pp. 1-12
ESPAÑOL
pág. 13-20
FRANÇAIS
pág. 21-28
Owner’s Manual
Review this manual before
operating cleaner
HOOVER
®
Bagged Tempo
™
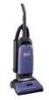
Upright Vacuum Cleaner