Hoover WindTunnel 3 High Performance Pet Product Manual
Hoover WindTunnel 3 High Performance Pet Manual
 |
View all Hoover WindTunnel 3 High Performance Pet manuals
Add to My Manuals
Save this manual to your list of manuals |
Hoover WindTunnel 3 High Performance Pet manual content summary:
- Hoover WindTunnel 3 High Performance Pet | Product Manual - Page 1
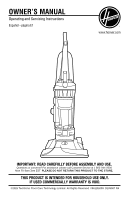
OWNER'S MANUAL Operating and Servicing Instructions Español - página E1 www.hoover.com IMPORTANT: READ CAREFULLY BEFORE ASSEMBLY AND USE. Questions or concerns? For assistance please call Customer Service at 1 800 944 9200 Mon Fri 8am 7pm EST PLEASE DO NOT RETURN THIS PRODUCT TO THE STORE. THIS - Hoover WindTunnel 3 High Performance Pet | Product Manual - Page 2
this owner s manual Verification of date of purchase may be required for warranty service of your HOOVER additional video instructions for assembly and maintenance CONTENTS Important Safety Instructions 3 Vacuum Headlight. 13 Belt. 14 Troubleshooting...15 Service...16 Warranty...17 If you - Hoover WindTunnel 3 High Performance Pet | Product Manual - Page 3
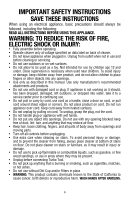
the following: READ ALL INSTRUCTIONS BEFORE USING THIS APPLIANCE. any openings. • Use only as described in this manual. Use only manufacturer's recommended attachments and products. • , left outdoors, or dropped into water, take it to a service center prior to continuing use. • Do not pull or carry - Hoover WindTunnel 3 High Performance Pet | Product Manual - Page 4
CAUTION: TO REDUCE THE RISK OF DAMAGE: • Avoid picking up hard, sharp objects with this product, as they may cause damage. • Store appropriately indoors in a dry place. Do not expose machine to freezing temperatures. • Do not use sharp objects to clean out hose as they can cause damage. • With - Hoover WindTunnel 3 High Performance Pet | Product Manual - Page 5
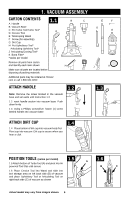
Hoover com or call 1 800 944 9200 B H C E F D G J K ATTACH HANDLE Note: Remove the screw located in the vacuum base and set aside until instruction 1 3 1 2 nsert handle section into vacuum base Push down firmly 1 3 Using a Phillips screwdriver fasten (1) screw behind handle into vacuum base - Hoover WindTunnel 3 High Performance Pet | Product Manual - Page 6
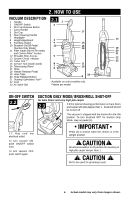
2. HOW TO USE VACUUM DESCRIPTION 1 Handle 2.1 1 2 ON/OFF Switch 2 3 Dirt Cup Release Button 4 Carry Handle 5 Dirt Cup 17 6 Stair Cleaning Handle 7 Headlight* 8 Height Adjustment 3 14 9 Furniture Guard 4 13 10 Brushroll On/Off Pedal 12 (Suction Only Mode) 15 16 19 11 Filter made - Hoover WindTunnel 3 High Performance Pet | Product Manual - Page 7
TRANSPORTING CLEANER 2 6 To move your cleaner from room to room put handle in upright position tilt cleaner back on rear wheels and push forward 2.6 HANDLE POSITIONS 2 7 The handle of your cleaner has two positions: 1) Upright for storage and when using cleaning tools 2) Operating position for - Hoover WindTunnel 3 High Performance Pet | Product Manual - Page 8
3. TOOLS Tools allow for cleaning surfaces above the floor and for reaching hard to clean areas The vacuum is ready for tool use when handle is in upright position SELECT PROPER TOOL (Tools may vary per model) 3.1 A B C D E A Use Upholstery Tool to clean upholstered furniture and carpeted - Hoover WindTunnel 3 High Performance Pet | Product Manual - Page 9
STAIR CLEANING 3 4 Lift vacuum by Stair Cleaning Handle and position on stairs Clean forward to back Never leave the vacuum standing on stairs when not cleaning 3 5 Use the Hose and Turbo Tool (Tool varies per model) for stair cleaning When using tools always ensure handle is in upright position - Hoover WindTunnel 3 High Performance Pet | Product Manual - Page 10
dropped damaged left outdoors or dropped into water take it to a service center prior to continuing use 4 1 The System Check ndicator located at (A) alerts you to possible system performance issues 4.1 A PROBLEM POSSIBLE CAUSE POSSIBLE SOLUTION f System Check 1 Rinsable filter and/or filter - Hoover WindTunnel 3 High Performance Pet | Product Manual - Page 11
receptacle and tap out dirt and debris Slide back into position on vacuum ! WARNING ! To reduce the risk of personal injury Unplug before cleaning or servicing Do not use vacuum without dirt cup or filters in place IMPORTANT 4.8 DO NOT R NSE OR WASH THE F LTER MADE W TH HEPA MED A A What to - Hoover WindTunnel 3 High Performance Pet | Product Manual - Page 12
4.12 C B Replace dirt cup as described in Fig 4 5 BRUSHROLL: How to Clean ! CAUTION ! To reduce the risk of injury from moving parts Unplug before servicing 4.13 A 4 13 Turn vacuum over so bottom side is facing up and remove the (6) screws (A) 4 14 Pivot out bottom plate away from hidden latch - Hoover WindTunnel 3 High Performance Pet | Product Manual - Page 13
click 4.16 A TURBO TOOL: How to Clean (Tool varies per model) ! CAUTION ! To reduce the risk of injury from moving parts Unplug vacuum before servicing 4 17 Clean the Turbo Tool by removing the two screws (A) located on the bottom cover with a Phillips head screwdriver 4 18 Remove the bottom cover - Hoover WindTunnel 3 High Performance Pet | Product Manual - Page 14
! To reduce the risk of injury from moving parts Unplug before servicing The belt is located under the bottom plate of the vacuum and 4.23 A 4.24 4.25 D B 4.26 E C 4.27 4.28 A F B IMPORTANT Rotate brushroll manually to make sure belt is not twisted 14 Actual model may vary from images shown. - Hoover WindTunnel 3 High Performance Pet | Product Manual - Page 15
5. TROUBLESHOOTING f a minor problem occurs it usually can be solved quite easily when the cause is found by using the checklist below Any other servicing should be done by an authorized service representative f appliance is not working as it should has been dropped damaged left outdoors or dropped - Hoover WindTunnel 3 High Performance Pet | Product Manual - Page 16
"Household • Visit our website at hoover com (U S Customers) or hoover ca (Canadian customers) Follow the service center link to find the service outlet nearest you • For an automated referral of authorized service outlet locations call 1 800 944 9200 Do not send your vacuum to Hoover® nc Company - Hoover WindTunnel 3 High Performance Pet | Product Manual - Page 17
in normal household use and in accordance with the Owner s Manual your HOOVER® product is warranted against original defects in material and assistance or information concerning this Warranty or the availability of warranty service outlets phone the Hoover® Consumer Response Center Phone 1 800 944 - Hoover WindTunnel 3 High Performance Pet | Product Manual - Page 18
GUIDE D'UTILISATION Instructions d'utilisation et d'entretien www.hoover.com IMPORTANT : LIRE CES INSTRUCTIONS ATTENTIVEMENT AVANT D'UTILISER L'ASPIRATEUR. Vous avez des questions ou des inquiétudes? Veuillez appeler le service à la clientèle au 1 800 9449200 du lundi au vendredi de 8 h à 19 h ( - Hoover WindTunnel 3 High Performance Pet | Product Manual - Page 19
recommandé de joindre votre reçu de caisse au guide de l utilisateur car une vérification de la date com pour visualiser une vidéo présentant les instructions d assemblage et d entretien CONTENU Consignes de sé 13 Courroie. 14 Dépannage...F15 Service...F16 Garantie...F17 Pour obtenir de l' - Hoover WindTunnel 3 High Performance Pet | Product Manual - Page 20
Durant l'utilisation d'un appareil électrique, toujours respecter les précautions élémentaires, y compris les suivantes : LIRE TOUTES LES INSTRUCTIONS AVANT D'UTILISER CET APPAREIL. AVERTISSEMENT: AFIN DE RÉDUIRE AU MINIMUM LES RISQUES D'INCENDIE, DE CHOC ÉLECTRIQUE OU DE BLESSURES : • Assembler - Hoover WindTunnel 3 High Performance Pet | Product Manual - Page 21
des produits chimiques reconnus par l'État de la Californie comme pouvant causer le cancer ou, entraîner des malformations congénitales ou d'autres troubles de la reproduction. SE LAVER LES MAINS APRÈS L'UTILISATION DE L'APPAREIL. MISE EN GARDE : POUR RÉDUIRE LES RISQUES DE DOMMAGES : • Éviter de - Hoover WindTunnel 3 High Performance Pet | Product Manual - Page 22
1. ENSAMBLADO DE LA ASPIRADORAN CONTENU DE L'EMBALLAGE A Manche B Base de l aspira eur C Accessoire urbo pour poils d animaux/accessoire urbo* D Suceur pla E Lance élescopique F Vis (pour l assemblage) G Gode à poussières H Brosse à épousse er/pour issu d animaux* Accessoire ar iculé pour - Hoover WindTunnel 3 High Performance Pet | Product Manual - Page 23
2. UTILISATION CARACTÉRISTIQUES 2.1 1 1 Manche 2 2 nterrupteur marche/arrêt 3 Loquet du godet à poussières 4 Poignée de transport 17 5 Godet à poussières 6 Poignée de nettoyage des escaliers 7 Phare avant* 3 4 13 14 8 Réglage de la hauteur 12 15 9 Protège meubles 16 10 Pédale de - Hoover WindTunnel 3 High Performance Pet | Product Manual - Page 24
TRANSPORT DE L'ASPIRATEUR 2 6 Pour déplacer l appareil d une pièce à l autre placer le manche en position verticale incliner l appareil vers l arrière pour le faire reposer sur ses roues arrière puis le pousser vers l avant 2.6 POSITIONS DU MANCHE 2 7 Le manche de l aspirateur comporte - Hoover WindTunnel 3 High Performance Pet | Product Manual - Page 25
3. ACCESSOIRES Les accessoires permettent de nettoyer les surfaces plus élevées et les endroits difficiles à atteindre Pour utiliser les accessoires placer le manche à la position verticale SÉLECTION DE L'ACCESSOIRE APPROPRIÉ (Les accessoires peuvent varier selon les modèles) 3.1 A B C D E A - Hoover WindTunnel 3 High Performance Pet | Product Manual - Page 26
NETTOYAGE D'ESCALIERS 3 4 Soulever l aspirateur à l aide de la poignée pour le nettoyage des escaliers et le placer dans les escaliers Nettoyer de l avant vers l arrière Ne jamais laisser l aspirateur dans un escalier lorsqu il n est pas utilisé 3 5 Utiliser le tuyau et l accessoire turbo pour - Hoover WindTunnel 3 High Performance Pet | Product Manual - Page 27
pour le régler en mode « FLOOR » ou « HOSE » Consulter la page 7 Toute autre tâche d entretien doit être confiée à un représentant de service autorisé ! AVIS ! L aspirateur est doté d un protecteur thermique interne pour le protéger contre la surchauffe Lorsque le protecteur thermique est activ - Hoover WindTunnel 3 High Performance Pet | Product Manual - Page 28
4.3 Comment le nettoyer 4 3 Appuyer sur le A 4.4 4.5 bouton de dégagement du videpoussière (A) et faire pivoter le videpoussière pour le C retirer 4 4 Tenir le videpou B ssière audessus d une D poubelle appuyer sur le bouton de dégagement de la porte du videpoussière Refermer la porte - Hoover WindTunnel 3 High Performance Pet | Product Manual - Page 29
Filtre au charbon : comment le nettoyer (Seulement sur certains modèles.) Le filtre au charbon est situé sous le filtre avec substance filtrante HEPA IMPORTANT NE PAS R NCER OU LAVER la cartouche du Filtre au charbon Quoi acheter : Carbon Filter adpDSpaoiepnsmlsrteoiablpanlferidlitpéerdé - Hoover WindTunnel 3 High Performance Pet | Product Manual - Page 30
TUYAU : Comment le nettoyer ! MISE EN GARDE ! Pour réduire les risques de blessures causées par des pièces débrancher l appareil avant d en effectuer l entretien 4 16 Pour retirer le tuyau afin d utiliser un accessoire appuyer sur le bouton de dégagement du tuyau (A) et tirer sur le tuyau pour en - Hoover WindTunnel 3 High Performance Pet | Product Manual - Page 31
COURROIE ! MISE EN GARDE ! Pour réduire les risques de blessures causées par des pièces en mouvement débrancher l appareil avant d en effectuer l entretien La courroie située sous la plaque au bas de l aspirateur doit être vérifiée périodiquement Quand procéder au remplacement Remplacer la courroie - Hoover WindTunnel 3 High Performance Pet | Product Manual - Page 32
facilement si la cause est déterminée à l aide de la liste ci dessous Toute autre tâche d entretien doit être confiée à un représentant de service autorisé Si l aspirateur ne fonctionne pas adéquatement s il est tombé a été endommagé a été laissé à l extérieur ou est tombé dans l eau l expédier à un - Hoover WindTunnel 3 High Performance Pet | Product Manual - Page 33
qu il soit réparé Cela n entraînera que des délais supplémentaires Si vous avez besoin d'autres renseignements : Pour parler avec un représentant du service à la clientèle composer le 1 800 944 9200 du lun au ven de 8 h à 17 h (HNE) Au Canada communiquer avec HooverMD Canada à Toronto : 755 Progress - Hoover WindTunnel 3 High Performance Pet | Product Manual - Page 34
d utilisation et d entretien domestiques comme il est stipulé dans le Guide de l utilisateur contre les défauts de matériaux et de fabrication pour question sur la présente garantie ou sur l emplacement des différents centres de service garanti télé phoner au 1 800 944 9200 du lun au ven de 8 h - Hoover WindTunnel 3 High Performance Pet | Product Manual - Page 35
MANUAL DEL PROPIETARIO Instrucciones de Funcionamiento y Servicio www.hoover.com IMPORTANTE: LEA ATENTAMENTE ANTES DE ENSAMBLAR Y USAR. ¿Tiene alguna pregunta o inquietud? Para obtener asistencia llame al - Hoover WindTunnel 3 High Performance Pet | Product Manual - Page 36
los números completos de Código de fabricación en los espacios provistos MODELO CÓDIGO DE FABRICACIÓN Consejo: Adjunte su recibo de compra a este Manual del propietario Para obtener el servicio de garantía de su producto HOOVER® puede requerirse la verificación de la fecha de compra nscriba su - Hoover WindTunnel 3 High Performance Pet | Product Manual - Page 37
lejos del producto y no permita que coloquen los dedos ni otros objetos dentro de las aberturas. • Use el producto sólo como se describe en este manual. Use sólo los accesorios y productos recomendados por el fabricante. • No use este aparato con un cordón o enchufe dañados. Si el aparato no est - Hoover WindTunnel 3 High Performance Pet | Product Manual - Page 38
• Sujete el enchufe cuando enrolle el cordón en la bobina. No permita que el enchufe dé latigazos al enrollarlo. • Desenchufe el aparato antes de conectar el accesorio de mano turboaccionado. • No aspire ningún objeto que se esté quemando o que libere humo, como cigar- rillos, fósforos o cenizas - Hoover WindTunnel 3 High Performance Pet | Product Manual - Page 39
1. ENSAMBLADO DE LA ASPIRADORA CONTENIDO DE LA CAJA 1.1 B C E F A Mango B Base de la aspiradora A C Accesorio de mano turboaccio nado* D Accesorio para hendiduras E Tubo telescópico F Tornillo (para el ensamblaje) G Recipiente de Polvo H Herramienta turbo para pelos de mascotas* - Hoover WindTunnel 3 High Performance Pet | Product Manual - Page 40
2. FUNCIONAMIENTO DESCRIPCIÓN DE LA ASPIRADORA 2.1 1 Mango 2 nterruptor de encender/apagar 3 Botón de liberación del recipiente 1 de polvo 2 4 Asa de transporte 5 Recipiente de Polvo 6 Asa para limpiar escaleras 17 7 Luz frontal* 8 Ajuste de la altura 9 Protector para muebles 10 Pedal - Hoover WindTunnel 3 High Performance Pet | Product Manual - Page 41
TRASLADO DE LA ASPIRADORA 2 6 Para mover su aspi radora de una habit ación a otra coloque el mango en posición ver tical incline la aspirado ra hacia atrás sobre las ruedas posteriores y empuje hacia delante 2.6 POSICIONES DEL MANGO 2 7 El mango de su aspiradora tiene dos posiciones: 1) vertical - Hoover WindTunnel 3 High Performance Pet | Product Manual - Page 42
la perilla a la posición de "FLOOR" (PISOS) para así recoger residuos a través del cepillo. CÓMO LIMPIAR LOS ACCESORIOS Para limpiar la Manguera y el Accesorio Manual mpulsado por Aire pase un trapo húmedo NO sum erja en agua Los otros accesorios de limpieza se pueden lavar en agua tibia con un - Hoover WindTunnel 3 High Performance Pet | Product Manual - Page 43
LIMPIEZA DE ESCALERAS 3 4 Levante la aspiradora por el mango para limpieza de escaleras y colóquela sobre las escaleras Limpie de adelante hacia atrás Nunca deje la aspiradora sobre las escaleras cuando no esté limpiando 3 5 Use la manguera y el accesorio de mano tur boaccionado (Los accesorios varí - Hoover WindTunnel 3 High Performance Pet | Product Manual - Page 44
4. MANTENIMIENTO Familiarícese con estas tareas de mantenimiento en el hogar ya que el uso y cuidado apropiados de su aspiradora asegurarán una limpieza continua mente eficaz Si el aparato no está funcionando adecuadamente se dejó caer se dañó se dejó a la intemperie o se dejó caer dentro del agua - Hoover WindTunnel 3 High Performance Pet | Product Manual - Page 45
DEPÓSITO PARA POLVO Como vaciarlo 4 3 Presione el botón de liberación del con tenedor para polvo (A) y gire el contenedor hacia afuera 4.3 A 4.4 4.5 C 4 4 Sujetando el con tenedor para polvo sobre el recipiente de basura presione el botón de liberación de la puerta del contenedor para polvo (A) - Hoover WindTunnel 3 High Performance Pet | Product Manual - Page 46
Filtro de carbono: Cómo limpiar (Disponible sólo en algunos modelos) El filtro de carbón se ubica en la parte inferior del filtro hecho con medio filtrante HEPA Qué comprar: Filtro de carbono: Si lo desea hay filtros adicionales disponibles Solicite la pieza n ° 902404001 de Hoover® IMPORTANTE NO - Hoover WindTunnel 3 High Performance Pet | Product Manual - Page 47
MANGUERA: Cómo limpiar ! ADVERTENCIA ! Para reducir el riesgo de lesiones ocasionadas por piezas en movimiento desenchufe la aspiradora antes de realizar el mantenimiento 4 16 A fin de retirar la manguera para usar el accesorio presione el botón de liberación de la manguera (A) y tire el extremo de - Hoover WindTunnel 3 High Performance Pet | Product Manual - Page 48
les six (6) vis (A) Appuyer fermement du côté du loquet pour s assurer qu elle est bien verrouillée F B IMPORTANTE Gire el rodillo de cepillos en forma manual para asegurarse de que no se haya torcido la correa LUBRIFICATION : Le moteur et le rouleau brosse sont équipés de paliers suffisamment - Hoover WindTunnel 3 High Performance Pet | Product Manual - Page 49
5. SOLUCIÓN DE PROBLEMAS Si ocurre un problema menor generalmente puede resolverse con bastante facilidad cuando se halla la causa usando esta lista de verificación Cualquier otra tarea de mantenimiento debe ser realizada por un representante de mantenimiento autorizado Si el aparato no está - Hoover WindTunnel 3 High Performance Pet | Product Manual - Page 50
6. SERVICIO Para obtener un servicio aprobado de Hoover® y piezas genuinas de Hoover® encuentre el Concesionario autorizado de servicio de garantía de Hoover® (depositario) más cercano: • Consultando las Páginas amarillas en la sección "Aspiradoras uso doméstico • Visite nuestro sitio web en hoover - Hoover WindTunnel 3 High Performance Pet | Product Manual - Page 51
ESTA GARANTÍA Siempre que el uso y el mantenimiento de su producto HOOVER® se realicen en condiciones de uso doméstico normales y según el Manual del usuario el producto estará garantizado contra defectos originales en el material y la fabricación durante de dos años completos desde la fecha de
-
 1
1 -
 2
2 -
 3
3 -
 4
4 -
 5
5 -
 6
6 -
 7
7 -
8
-
9
-
10
-
11
-
12
-
13
-
14
-
15
-
16
-
17
-
18
-
19
-
20
-
21
-
22
-
23
-
24
-
25
-
26
-
27
-
28
-
29
-
30
-
31
-
32
-
33
-
34
-
35
-
36
-
37
-
38
-
39
-
40
-
41
-
42
-
43
-
44
-
45
-
46
-
47
-
48
-
49
-
50
-
51
 |
 |
www.hoover.com
OWNER’S MANUAL
Operating and Servicing Instructions
©2015 Techtronic Floor Care Technology Limited All Rights Reserved #961151059 D105987 R4
THIS PRODUCT IS INTENDED FOR HOUSEHOLD USE ONLY.
IF USED COMMERCIALLY WARRANTY IS VOID.
Español - página E1
IMPORTANT: READ CAREFULLY BEFORE ASSEMBLY AND USE.
Questions or concerns? For assistance please call Customer Service at 1 800
944 9200
Mon Fri 8am 7pm EST
PLEASE DO NOT RETURN THIS PRODUCT TO THE STORE.