Hotpoint GSM2260NSS Use and Care Manual / Warranty
Hotpoint GSM2260NSS Manual
 |
View all Hotpoint GSM2260NSS manuals
Add to My Manuals
Save this manual to your list of manuals |
Hotpoint GSM2260NSS manual content summary:
- Hotpoint GSM2260NSS | Use and Care Manual / Warranty - Page 1
Racks 10 Loading Place Settings 11 Optional Accessories 12 Using the Dishwasher 8, 9 Troubleshooting Tips . . . 13, 14 Consumer Support Consumer Support 16 Warranty 15 Owner's Manual Write the model and serial numbers here: Model Serial You can find them on a label on the tub wall - Hotpoint GSM2260NSS | Use and Care Manual / Warranty - Page 2
Since the gas is flammable, do not smoke, use an open flame, or use the appliance during this process. Operating Instructions Troubleshooting Tips PROPER INSTALLATION AND MAINTENANCE This dishwasher must be properly installed and located in accordance with the Installation Instructions before it - Hotpoint GSM2260NSS | Use and Care Manual / Warranty - Page 3
: I Take off the door of the washing compartment or remove the door latch keeper (as shown). Door latch keeper Operating Instructions Troubleshooting Tips WARNING! When using your dishwasher, follow basic precautions, including the following: I Use this appliance only for its intended purpose as - Hotpoint GSM2260NSS | Use and Care Manual / Warranty - Page 4
models) START/RESET Touch START/RESET one time to start dishwasher cycle. Touch START/RESET a second time to pump out (electronic models) and then turn off the dishwasher. Do not touch START/RESET more than one time unless you intend to end the cycle. Troubleshooting Tips Consumer Support 4 - Hotpoint GSM2260NSS | Use and Care Manual / Warranty - Page 5
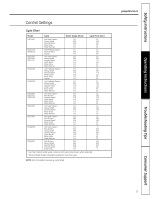
Wash 21.6 105 China/Crystal 23.9 80 Rinse Only 4.9 3 1 Hot Start Option adds water amount and cycle time shown when selected. * Normal Wash button should be pushed to run this cycle. NOTE: Not all models have every cycle listed. geappliances.ca Troubleshooting Tips Consumer Support - Hotpoint GSM2260NSS | Use and Care Manual / Warranty - Page 6
Instructions About the dishwasher control panel You can locate your model number on the left tub wall just inside the door. Throughout this manual, features and appearance may vary from your model. Please match the control panel for your unit to a similar control panel below. 6 Troubleshooting - Hotpoint GSM2260NSS | Use and Care Manual / Warranty - Page 7
Safety Instructions Operating Instructions Operation of models with cycle dial geappliances.ca Rinse Only For rinsing partial loads that will be washed later. Do not use detergent not hear any wash action right away. I Latch the door to begin the cycle. Troubleshooting Tips Consumer Support 7 - Hotpoint GSM2260NSS | Use and Care Manual / Warranty - Page 8
the door is opened. Operating Instructions Troubleshooting Tips Flashing Display Lights Lights START RESET What It Means This is normal. The START/RESET pad has been pressed. What To Do Allow the dishwasher to drain and reset before you start a new wash cycle. CLEAN Control Error Press - Hotpoint GSM2260NSS | Use and Care Manual / Warranty - Page 9
. Show anyone who may use the dishwasher the correct detergent and where it is stored. While there will be no lasting damage to the dishwasher, your dishes will not get clean using a dishwashing detergent that is not formulated to work with dishwashers. 9 Troubleshooting Tips Consumer Support - Hotpoint GSM2260NSS | Use and Care Manual / Warranty - Page 10
Instructions Operating Instructions Loading the dishwasher racks For best dishwashing results, follow these loading guidelines. Features and appearance of racks and silverware baskets may vary from your model the wash arm and cause poor washing results. Troubleshooting Tips Consumer Support 10 - Hotpoint GSM2260NSS | Use and Care Manual / Warranty - Page 11
model. Upper Rack-10 place settings Upper Rack-10 place settings Lower Rack-10 place settings Operating Instructions Troubleshooting any time before the main wash. 1 Push the door latch to the left. 2 Once the water calms, open the door. Steam may rise out of the dishwasher. 3 Add forgotten dish - Hotpoint GSM2260NSS | Use and Care Manual / Warranty - Page 12
. Non-wood countertop bracket kit-This is for installations which have non-wood countertops and includes side-mounting brackets and instructions for securing the dishwasher: I GPF65 Consult your GE Appliance dealer to get the correct kit for your model. Troubleshooting Tips Consumer Support 12 - Hotpoint GSM2260NSS | Use and Care Manual / Warranty - Page 13
you call for service... Troubleshooting Tips Save time and money! Review the charts on the following pages, or visit www.geappliances.ca. You may not need to call for service. geappliances.ca Operating Instructions Troubleshooting Tips Problem Possible Causes What To Do Dishwasher won't run - Hotpoint GSM2260NSS | Use and Care Manual / Warranty - Page 14
wash arm. No air gap or high drain loop • Verify that you have an air gap or a high drain loop. Refer to the Installation Instructions. Extremely hard water Low inlet water temperature Overloading the dishwasher not be properly seated • Call for service. Troubleshooting Tips Consumer Support - Hotpoint GSM2260NSS | Use and Care Manual / Warranty - Page 15
of charge, all labor and in-home service to replace the defective part. What Is Not Covered: I Service trips to your home to teach you how to use the product. I Improper installation. If you have an installation problem, contact your dealer or installer. You are responsible for providing adequate - Hotpoint GSM2260NSS | Use and Care Manual / Warranty - Page 16
We support the Universal Design concept-products, services and environments service their own appliances can have parts or accessories sent directly to their homes. Order on-line, 24 hours every day, or by phone at 1.800.661.1616 during normal business hours. Instructions contained in this manual - Hotpoint GSM2260NSS | Use and Care Manual / Warranty - Page 17
Lave-vaisselle Instructions de sécurit 2, 3 Instructions de fonctionnement Accessoires en option 12 Cycles du cadran 7 Chargement des couverts 11 Chargement des paniers 10 Panneau de contrôle 6 Réglages de contrôle 4-5 - Hotpoint GSM2260NSS | Use and Care Manual / Warranty - Page 18
correctement installé et placé en conformité avec les instructions d'installation avant d'être utilisé. Si vous n'avez pas reçu les instructions d'installation avec un électricien compétent ou un agent du service si vous ne savez pas si l'appareil est correctement mis à la terre. I Disposez - Hotpoint GSM2260NSS | Use and Care Manual / Warranty - Page 19
comme le montre l'illustration). Verrou de la porte Instructions de fonctionnement Conseils de dépannage Soutien au consommateur AVERTISSEMENT approuvés avec les lave-vaisselle GE. I Ne faites pas fonctionner le lave-vaisselle si les panneaux de l'habitacle ne sont pas installés. I N'altérez pas - Hotpoint GSM2260NSS | Use and Care Manual / Warranty - Page 20
Instructions de fonctionnement Soutien au consommateur Conseils de dépannage Réglage des contrôles Cycles Un témoin lumière située au-dessus de la touche choisie s'allume pour indiquer le Cycle choisi, sur certains modèles. POTS & PANS/ HEAVY WASH assiettes de service. Ce cycle electronic models - Hotpoint GSM2260NSS | Use and Care Manual / Warranty - Page 21
de sécurité Instructions de fonctionnement electromenagersge.ca Réglage des contrôles Tableau des cycles Modèle chaud (Hot Start) procure la quantité d'eau et la durée de cycle affichés. *Le bouton Normal Wash doit être enfoncé pour exécuter ce cycle. NOTE : Tous les modèles ne comportent pas - Hotpoint GSM2260NSS | Use and Care Manual / Warranty - Page 22
Instructions de sécurité Instructions de fonctionnement Le panneau de contrôle du lave-vaisselle Le numéro de modèle se trouve sur la paroi gauche de la cuve - Hotpoint GSM2260NSS | Use and Care Manual / Warranty - Page 23
service Instructions de fonctionnement Conseils de dépannage Soutien au consommateur Short Wash or Light Wash WASH ou WATER SAVER. 3 Verrouillez la porte pour démarrer le cycle. Start Delay (mise en marche de différé) (sur certains modèles) L'option START DELAY permet de différer le départ (Models - Hotpoint GSM2260NSS | Use and Care Manual / Warranty - Page 24
cycle. Propre Ce témoin s'allume lorsque le cycle de lavage est terminé. Il restera allumé jusqu'à l'ouverture de la porte. Instructions de fonctionnement Soutien au consommateur Conseils de dépannage Témoins lumineux clignotants Témoins START RESET Signification C'est normal. La touche START - Hotpoint GSM2260NSS | Use and Care Manual / Warranty - Page 25
Instructions pour tous les lave-vaisselle GE. Conservez votre détergent au et votre lave-vaisselle en contactant le service des eaux et en vous renseignant sur l'information du tableau suivant comme guide pour déterminer la quantité à utiliser et où il est rangé. Bien que cette erreur ne causera - Hotpoint GSM2260NSS | Use and Care Manual / Warranty - Page 26
bols vont le long des côtés, dans les coins ou à l'arrière. Le côté sale de la vaisselle doit être tourné vers le centre du panier. Instructions de fonctionnement Soutien au consommateur Conseils de dépannage Tour de lavage Gardez la partie centrale dégagée dans le panier inférieur. La tour de - Hotpoint GSM2260NSS | Use and Care Manual / Warranty - Page 27
peuvent varier par rapport à votre modèle. Panier supérieur-10 couverts Panier supérieur-10 couverts Panier inférieur-10 couverts Instructions de fonctionnement Conseils de dépannage Soutien au consommateur Panier supérieur-12 couverts Panier supérieur-12 couverts Panier inférieur-12 couverts - Hotpoint GSM2260NSS | Use and Care Manual / Warranty - Page 28
demandez à un technicien de service d'effectuer les opérations installations avec les comptoirs qui ne sont pas en bois. Inclut les supports de montage latéraux et les instructions pour stabiliser de manière sécuritaire le lave-vaisselle. I GPF65 Consultez votre revendeur d'électroménagers GE - Hotpoint GSM2260NSS | Use and Care Manual / Warranty - Page 29
le service de réparations. www.electromenagersge.ca Instructions de . Le courant est coupé • Dans certaines installations, le courant au lave-vaisselle est fourni par ajouté le plat à la charge pourrait réduire les taches. GE recommande Cascade® Plastic Booster pour faciliter le nettoyage de ce - Hotpoint GSM2260NSS | Use and Care Manual / Warranty - Page 30
service de réparations... Instructions plus élevé, tel que POTS & PANS (casseroles) ou HEAVY WASH (lavage en profondeur). • Vérifiez le distributeur d'agent de rinç retour ou une boucle élevée de vidange. Reportez-vous aux instructions d'installation. • Utilisez des agents de rinçage Jet-Dry® ou - Hotpoint GSM2260NSS | Use and Care Manual / Warranty - Page 31
de sécurité Instructions de fonctionnement Garantie sur les lave-vaisselle. Toutes les : I Tout déplacement de service chez vous pour vous apprendre à utiliser votre lave-vaisselle. I Toute mauvaise installation. Si vous avez un problème d'installation, appelez votre revendeur ou un installateur - Hotpoint GSM2260NSS | Use and Care Manual / Warranty - Page 32
pour votre appareil électroménager? Contactez-nous par Internet au site www.electromenagersge.ca 24 heures par jour, tous les jours de l'année. Service de réparations Service de réparations est tout près de vous. Pour faire réparer votre électroménager, il suffit de nous téléphoner. 1.800.561.3344
-
 1
1 -
 2
2 -
 3
3 -
 4
4 -
 5
5 -
 6
6 -
 7
7 -
8
-
9
-
10
-
11
-
12
-
13
-
14
-
15
-
16
-
17
-
18
-
19
-
20
-
21
-
22
-
23
-
24
-
25
-
26
-
27
-
28
-
29
-
30
-
31
-
32
 |
 |

Owner’s Manual
Dishwashers
165D4700P368
49-55043
10-07 JR
Safety Instructions
. . . . . . . . 2, 3
Operating Instructions
Care and Cleaning
. . . . . . . . . . . . . .12
Control Panels . . . . . . . . . . . . . . . . . . . .6
Control Settings . . . . . . . . . . . . . . .4–5
Dial Cycles . . . . . . . . . . . . . . . . . . . . . . .7
Flashing Display Lights
. . . . . . . . . . .8
Loading the
Dishwasher Racks . . . . . . . . . . . . . . .10
Loading Place Settings
. . . . . . . . . .11
Optional Accessories . . . . . . . . . . . .12
Using the Dishwasher . . . . . . . . . .8, 9
Troubleshooting Tips
. . . 13, 14
Consumer Support
Consumer Support
. . . . . . . . . . . . . 16
Warranty . . . . . . . . . . . . . . . . . . . . . . . 15
Write the model and serial
numbers here:
Model # ____________________
Serial # ____________________
You can find them on a label on the
tub wall just inside the door.