Hotpoint HDF310PGRBB Installation Instructions
Hotpoint HDF310PGRBB Manual
 |
View all Hotpoint HDF310PGRBB manuals
Add to My Manuals
Save this manual to your list of manuals |
Hotpoint HDF310PGRBB manual content summary:
- Hotpoint HDF310PGRBB | Installation Instructions - Page 1
leave these instructions for the consumer's and local inspector's use. • Note to Consumer - Keep these instructions with your Owner's Manual for future MUST be installed to allow for future removal from the enclosure if service is required. Care should be exercised when the appliance is installed - Hotpoint HDF310PGRBB | Installation Instructions - Page 2
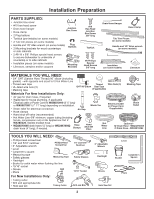
Installation Preparation PARTS SUPPLIED: • Junction box cover • #10 hex-head screw • Drain hose hanger • Hose clamp Junction Box Cover • 2 Plug buttons • Toekick (pre-installed on some models) • 2 Tub trim pieces (on some models) • Handle and 1/8" Allen wrench (on some models) • 2 Mounting - Hotpoint HDF310PGRBB | Installation Instructions - Page 3
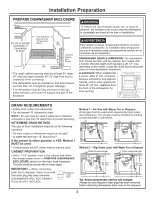
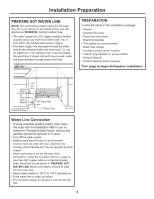
24" Min. 4" Plumbing and Electric Service Must Enter Inside This Area 6" 24" the top, sides and back, and must not support any part of the enclosure. WARNING To reduce the ordinances. The air gap must be installed according to manufacturer's instructions. 72" max. 72" max. Method 2 - "High - Hotpoint HDF310PGRBB | Installation Instructions - Page 4
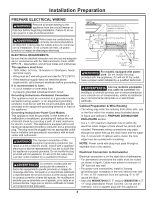
to the equipment-grounding terminal or lead on the appliance. Grounding Instructions-Power Cord Models This appliance must be grounded. In the event a risk of electric shock. Check with a qualified electrician or service representative if you are in doubt that the appliance is properly grounded - Hotpoint HDF310PGRBB | Installation Instructions - Page 5
brackets • Trim pieces (on some models) • Drain hose hanger • Insulation pieces (some models) • Toekick (pre-installed on some models) • Owner's Manual • Product samples and/or coupons Turn page to begin dishwasher installation. 1-1/2" Dia. Shut-off Hole 4" Valve Hot 2" 6" From Cabinet 19 - Hotpoint HDF310PGRBB | Installation Instructions - Page 6
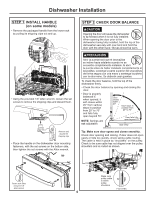
Dishwasher Installation STEP 1 INSTALL HANDLE (on some models) • Remove the packaged handle from the lower rack by pulling its shipping clips out and up. • Using the provided 1/8" Allen wrench, loosen the set screws to remove the shipping clips and discard them. Remove and discard the shipping - Hotpoint HDF310PGRBB | Installation Instructions - Page 7
Dishwasher Installation STEP 3 REMOVE WOOD BASE, INSTALL LEVELING LEGS NOTE: Some models have an attached wood base. CAUTION Do not remove wood base until you are ready to install the dishwasher. The dishwasher will tip over when the door is opened if base is removed. PRECAUCIÓN No quite la base de - Hotpoint HDF310PGRBB | Installation Instructions - Page 8
into the hole in cabinet side. If a power cord is used, guide the end through a separate cabinet opening. Pull insulation blanket over collar remove high drain loop from left side of dishwasher Tip: Prevent unnecessary service call charges for fill, drain or noise concerns. Position utility lines - Hotpoint HDF310PGRBB | Installation Instructions - Page 9
Dishwasher Installation STEP 9 INSTALL MOUNTING BRACKETS You will need the mounting brackets set aside in Step 1. You must install the mounting brackets onto the dishwasher tub frame top OR sides prior to sliding the dishwasher into place under the countertop. Install mounting brackets on top if - Hotpoint HDF310PGRBB | Installation Instructions - Page 10
right and front to back. Also, the dishwasher door should close without hitting the side of the tub. • Replace the lower rack. Tip: Prevent unnecessary service charges. Verify dishwasher is leveled. Pull the dish racks half way out. They should stay put. Open and close the door. The door should fit - Hotpoint HDF310PGRBB | Installation Instructions - Page 11
Dishwasher Installation STEP 12 POSITION DISHWASHER, SECURE TO COUNTERTOP OR CABINET In this step you will need the 2 Phillips special head screws from the screws set aside in Step 1. The dishwasher must be secured to the countertop or the cabinet sides. When the underside of the countertop is wood - Hotpoint HDF310PGRBB | Installation Instructions - Page 12
IMPORTANT: Do not cut corrugated portion of hose • If a longer drain hose is required, you can purchase an extension drain hose - GE Appliances service part WD24X10062 (4' length) or WD24X10065 (12' length) which can be connected directly to the drain hose already attached to the unit. To use the - Hotpoint HDF310PGRBB | Installation Instructions - Page 13
dishwasher to avoid charges for a service call that is not covered by your Warranty. • Check to be sure power is OFF. • Open door and remove all foam and paper packaging. • Locate the Owner's Manual set aside in Step 1. • Read the Owner's Manual for operating instructions. • Check door opening and - Hotpoint HDF310PGRBB | Installation Instructions - Page 14
Dishwasher Installation STEP 17 DISHWASHER WET TEST • Turn on power supply or plug power cord into outlet, if equipped. • Select a cycle to run and push the Start/Reset pad. • Ensure the door is latched. Dishwasher should start. • Check to be sure that water enters the dishwasher. If water does not - Hotpoint HDF310PGRBB | Installation Instructions - Page 15
two screws • Place toekick against the legs of the dishwasher. STEP 21 LITERATURE • Be sure to leave complete literature package, these Installation Instructions and product samples and/or coupons with the consumer. Toekick Attachment Screws • Align the toekick with the bottom edge and make sure - Hotpoint HDF310PGRBB | Installation Instructions - Page 16
NOTE: Product improvement is a continuing endeavor. Therefore, materials, appearance and specifications are subject to change without notice. 16 Printed in the United States - Hotpoint HDF310PGRBB | Installation Instructions - Page 17
Instructions D'Installation Lave-vaisselle encastré Consultez votre Manuel du Propriétaire assurer que les fils ne sont pas pliés ou en dommagés, que le câblage domestique est fixé au support de boîte de connexion par l'entremise d'un serre-câble et que toutes les connexions électriques faites au - Hotpoint HDF310PGRBB | Installation Instructions - Page 18
à tête hexagonale n° 10 de 9,5 mm (3/8 po) de long pour boîte de jonction Plinthe Vis à tête spéciale Phillips n° 8 de 15,8 mm (5/8 po) de long Support de tuyau de vidange Collier Moulure de cuve (sur certains modèles) Poignée et clé Allen de 1/8 po (certains modèles) Isolement (certains modèles - Hotpoint HDF310PGRBB | Installation Instructions - Page 19
Préparation pour l'installation PRÉPARATION DE L'OUVERTURE DANS LES ARMOIRES 33-1/2 po to 34-3/4 po du dessous du comptoir au plancher Le mur du fond doit être exempt de tuyaux ou de fils 61,0 cm (24 po) min. La partie ombrée est 10,1 cm (4 po) réservée à la plomberie et à l'électricité - Hotpoint HDF310PGRBB | Installation Instructions - Page 20
Préparation pour l'installation PRÉPARATION DU CÂBLAGE ÉLECTRIQUE AVERTISSEMENT Avant de commencer l'installation, coupez toute alimentation menant de l'appareil au disjoncteur ou au fusible. Dans le cas contraire, vous pourriez être victime d'une décharge électrique. ALIMENTATION ÉLECTRIQUE - Hotpoint HDF310PGRBB | Installation Instructions - Page 21
èces fournies dans l'emballage et mettez-les de côté: • Ensemble de vis • Couvercle de la boîte de jonction • Boyau de vidange et collier • Supports de montage • Moulures (certains modèles) • Crochet pour boyau de vidange • Pièces isolantes (certains modèles) • Plinthe (préinstallée sur certains mod - Hotpoint HDF310PGRBB | Installation Instructions - Page 22
Installation du lave-vaisselle ÉTAPE 1 INSTALLATION DE LA POIGNÉE (certains modèles) • Retirez la poignée emballée du panier inférieur en tirant ses pinces vers le haut pour les retirer. • Avec la clé Allen de 1/8 po fournie, dévissez les vis de serrage pour retirer les pinces d'expédition et les - Hotpoint HDF310PGRBB | Installation Instructions - Page 23
que le joint d'étanchéité en caoutchouc se situe entre l'électrovanne et le coude. • Ne serrez pas le coude de façon excessive; le support de l'électrovanne Coude de 90° pourrait se déformer ou le raccord de l'électrovanne pourrait se casser. Boyau de remplissage • Tournez l'extrémité du - Hotpoint HDF310PGRBB | Installation Instructions - Page 24
supérieure et centrez-la avec le loquet supérieur. Appuyez la garniture contre le support de gaine en la déplaçant de gauche à droite. • Prenez la garniture le bord supérieure de la garniture et appuyez-le contre le côté gauche du support de gaine en le déplaçant de haut en bas. Répétez cette étape - Hotpoint HDF310PGRBB | Installation Instructions - Page 25
dans les fentes du cadre de cuve, comme montré. REMARQUE : Vous pouvez devoir manœuvrer les languettes dans les fentes. Insérez les languettes du support dans les fentes de la cuve Montage sur le dessus Avec des pinces, pliez et courbez les languettes vers le haut pour les fixer fermement - Hotpoint HDF310PGRBB | Installation Instructions - Page 26
Installation du lave-vaisselle ÉTAPE 10 INSTLLATION DU LAVE-VAISSELLE DANS SON EMPLACEMENT DÉFINITIF (SUITE) • Vérifiez l'alignement du lave-vaisselle avant d'ouvrir la porte afin de prévenir tout dommage au panneau de la porte. • Ouvrez et fermez la porte du lave-vaisselle pour vous assurer qu' - Hotpoint HDF310PGRBB | Installation Instructions - Page 27
ou la conduite d'alimentation en eau. Pour vérifier, ouvrez et refermez la porte. Déplacez la conduite d'alimentation en eau ou pliez légèrement le support de l'électrovanne si vous entendez un bruit de frottement ou s'il y a de l'interférence lors de l'ouverture de la porte. Coude de 90 - Hotpoint HDF310PGRBB | Installation Instructions - Page 28
Installation du lave-vaisselle ÉTAPE 14 RACCORDEMENT DU BOYAU DE VIDANGE • Le tuyau doit déjà avoir été détaché de la baignoire aux emplacements indiqués. REMARQUE : Ne retirez pas la boucle du boyau de vidange supérieur. NE retirez PAS le boyau de cet emplacement (emplacement de la boucle du - Hotpoint HDF310PGRBB | Installation Instructions - Page 29
Assurez-vous que le couvercle de la boîte de jonction repose sur le support de montage. Vis de mise Mise à la Cavaliers à la terre terre ( moteur ou le cadre du lave-vaisselle pourrait provoquer l'apparition de bruits. Support de Noir Bague Blanc la boîte de anti-traction jonction • Ouvrez - Hotpoint HDF310PGRBB | Installation Instructions - Page 30
Installation du lave-vaisselle ÉTAPE 17 ESSAI DU LAVEVAISSELLE AVEC DE L'EAU • Rétablissez l'alimentation électrique ou si l'appareil est doté d'un cordon d'alimentation, branchez-le dans la prise de courant murale. • Sélectionnez un cycle à exécuter et pressez la touche Start/Reset (Démarrer/Ré - Hotpoint HDF310PGRBB | Installation Instructions - Page 31
Installation du lave-vaisselle ÉTAPE 19 INSTALLATION DU PANNEAU INFÉRIEUR REMARQUE : Sur certains modèles, l'embout peut être préinstallé. • Retirez les deux (2) installées sur l'équerre de renfort frontal. ÉTAPE 20 VÉRIFIEZ LES POINTS SUIVANTS • La moulure de la cuve ne gêne pas la porte • Le - Hotpoint HDF310PGRBB | Installation Instructions - Page 32
NOTE: Nous nous efforçons continuellement d'améliorer les produits. Par conséquent, les matériaux, l'aspect et les caractéristiques sont assujettis à des changements sans préavis. 16 Imprimé aux États-Unis
-
 1
1 -
 2
2 -
 3
3 -
 4
4 -
 5
5 -
 6
6 -
 7
7 -
8
-
9
-
10
-
11
-
12
-
13
-
14
-
15
-
16
-
17
-
18
-
19
-
20
-
21
-
22
-
23
-
24
-
25
-
26
-
27
-
28
-
29
-
30
-
31
-
32
 |
 |

FOR YOUR SAFETY
Read and observe all WARNINGS and CAUTIONS
shown throughout these instructions.
While performing installations described in this booklet,
gloves, safety glasses or goggles should be worn.
IMPORTANT –
Observe all governing codes and ordinances.
•
Note to Installer
– Be sure to leave these instructions
for the consumer’s and local inspector’s use.
•
Note to Consumer
– Keep these instructions with
your Owner’s Manual for future reference.
•
Skill Level
– Installation of this dishwasher requires
basic mechanical, electrical and plumbing skills.
Proper installation is the responsibility of the
installer. Product failure due to improper installation
is not covered under the GE Appliances Warranty.
See warranty information.
•
Completion Time – 1 to 3 Hours
. New installations
require more time than replacement installations.
IMPORTANT –
The dishwasher MUST be installed to
allow
for future removal from the enclosure if service is required.
Care should be exercised when the appliance is installed
or removed,
to reduce the likelihood of damage to the
power supply cord.
If you received a damaged dishwasher, you should
immediately contact your dealer or builder.
Optional Accessories – See the Owner’s Manual for
available custom panel kits.
Your dishwasher is a water heating appliance.
BEFORE YOU BEGIN
Read these instructions completely and carefully.
•
Remove all power leading to the appliance from the
circuit breaker or fuse box before beginning installation.
Failure to do so can result in a risk of electrical shock.
•
To reduce the risk of electric shock, fire, or injury to persons,
the installer must ensure that the dishwasher is completely
enclosed at the time of installation.
•
The improper connection of the equipment grounding
conductor can result in a risk of electric shock. Check
with a qualified electrician or service representative
if you are in doubt that the appliance is properly
grounded. If house wiring is not 2-wire with ground, a
ground must be by the installer. When house wiring
is aluminum, be sure to use UL-Listed anti-oxidant
compound and aluminum-to-copper connectors.
•
To reduce the risk of electric shock, fire, or injury to persons,
the installer should check to ensure that wires are not pinched
or damaged, the house wiring is attached to the junction box
bracket through a strain relief, and all electrical connections
made at the time of install (wire nuts) are contained inside of
the junction box cover.
WARNING
•
Retire todos los conductores de corriente del
electrodoméstico de disyuntor o de la caja del fusible
antes de comenzar con la instalación. Si no cumple con
esto, se podrá producir el riesgo de descargas eléctricas.
•
Para reducir el riesgo de descarga eléctrica, incendio
o lesiones a personas, el instalador debe asegurarse
de que el lavaplatos esté completamente cerrado en
el momento de la instalación.
•
La conexión inadecuada del conductor de conexión a
tierra del equipamiento puede provocar un riesgo de
descarga eléctrica. Consulte a un electricista calificado
o representante de servicio técnico si tiene dudas
sobre la correcta conexión a tierra del aparato. Si el
cableado doméstico no cuenta con un cable de 2 hilos
con conexión a tierra, un instalador debe realizar una
conexión a tierra. Cuando el cableado doméstico es de
aluminio, asegúrese de usar un compuesto antioxidante
y conectores de aluminio a cobre aprobados por UL.
•
Para reducir el riesgo de descarga eléctrica, incendio
o lesiones a personas, el instalador deberá realizar un
control para asegurar que los cables no estén pellizcados
ni dañados, que el cableado del hogar esté conectado a la
ficha de la caja de empalmes a través de un amortiguador
de refuerzo, y que todas las conexiones eléctricas
realizadas en el momento de la instalación (tuercas para
cables) estén dentro de la tapa de la caja de empalmes.
ADVERTENCIA
See your Owner’s Manual for details on how to contact us regarding installation questions
Built-In Dishwashers
Installation Instructions
31-4000220 Rev 3
05-21 GEA
Opening the door will cause the
dishwasher to tip forward when it is
not fully installed. When opening the door prior to the
dishwasher being fully installed, hold the top of the
dishwasher securely with one hand and hold the door
with the other hand. Gloves should be worn.
CAUTION
Abrir la puerta hará que el
lavavajillas se incline hacia
adelante cuando no se encuentre completamente
instalado. Al abrir la puerta antes de haber instalado
completamente el lavavajillas, sostenga la parte superior
del lavavajillas de forma segura con una mano y sostenga
la puerta con la otra mano. Se deberán usar guantes.
PRECAUCIÓN
READ CAREFULLY
KEEP THESE INSTRUCTIONS