Hotpoint HTR17BBSRWW Owners Manual
Hotpoint HTR17BBSRWW - 16.6 cu. Ft. Top Freezer Refrigerator Manual
 |
View all Hotpoint HTR17BBSRWW manuals
Add to My Manuals
Save this manual to your list of manuals |
Hotpoint HTR17BBSRWW manual content summary:
- Hotpoint HTR17BBSRWW | Owners Manual - Page 1
5 Installation Instructions Preparing to Install the Refligerator 9 Reversing the Door Swing . . .l 3-16 Water Line Installation ..... 10-12 Troubleshooting Tips Before You Call Fox Service Normal Operating Sounds .. 17, 18 ..... 17 Consumer Support Consumer Support .... Product - Hotpoint HTR17BBSRWW | Owners Manual - Page 2
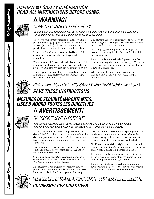
yore" old refi_igerato_; please follow the instructions below to help prevent acddents. Before ' climb inside. Refrigerants All refrigeration products contain refrigerants, which under federal CSA certified (in Canada), 3-wire grounding D'pe appliance extension cord having a grounding t)pe plug and - Hotpoint HTR17BBSRWW | Owners Manual - Page 3
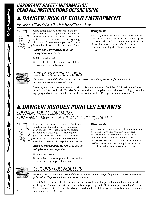
Manual SAFETYPRECAUTIONS When using electrical appfiances, basic safety precautions should be followed, including the following: _i: This refrigerator m ust be properl) instnll ed and located in accordance with the lnstnllation Instructions or any other appliance. i)_:Keep finge_ out moving parts - Hotpoint HTR17BBSRWW | Owners Manual - Page 4
(grounding) plug which nlates _lfl_ a standard 3-prong (grounding) wall outer to minimize fl_e p(_ssibilit}' of electric shock hazard from tiffs appliance. Have the wall outlet and circuit checked b) a qu_flified electrician to make sm'e fl_e outlet is properly grotmded. _Aqmre a standard 2-prong - Hotpoint HTR17BBSRWW | Owners Manual - Page 5
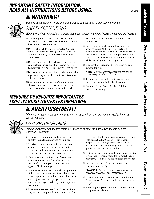
food and freezer. It does not shut off power to the refrigerator. Temperature Control Dial (on some models) Tile temperature control dial has shelf has stop-loclcs. When placed correctly on the shelf supports, tile shelf will stop belin'e coming completely out of the instructions. II II - Hotpoint HTR17BBSRWW | Owners Manual - Page 6
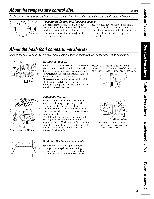
About the freezer compartment shelves. __ _.-_'__\. Step Shelf Toremove the step shelf." [] I,ifl left side ot shel_ slightl). [] Moxe shelf to the left to flee its right _] I,ower right side of shelf, moxe shelf to the right and take it out. Toreplace the step shelf." [7]_'_of - Hotpoint HTR17BBSRWW | Owners Manual - Page 7
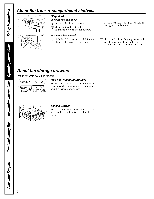
location. Full-Width Drawer with Plastic Cover To remove the cover, lift it off its supports, pull it torward, tilt it and take it out. Twin Drawer Shelf To remove: fl'ont into place. _] Replace the drawet_. A newly-installed refrigerator may take 12 to 24 hours to begin making ice, Thereare 2 - Hotpoint HTR17BBSRWW | Owners Manual - Page 8
dishwasher Moving the Refrigerator of the refrigerator cotmterclockwise tmfil the rolle_ support the refl' drop below fl'eezing, have a qualified servicer drain the water supply system (on some tot this purpose. It is awfilable at most appliance parts stores. 8 Preparing to Move Secm'e all - Hotpoint HTR17BBSRWW | Owners Manual - Page 9
instructions xdth the Consumer. • Note to Consumer - KeeI) these instructions for future reference. • Skill level - Installation of this appliance requires basic mechanical skills. • Completion time - Refrigerator 661.1616. or fl'om Parts and Accessories, REFRIGERATOR LOCATION • Do not install - Hotpoint HTR17BBSRWW | Owners Manual - Page 10
igerator or icemaker manufiicturer. Follow these instructions carefully to minimize the risk of in house plumbing can cause damage to reti'igerator parts and lead to water leakage or flooding. (; line to the hot water line. If you use your refrigerator befl>re connecting the water line, make sm'e the - Hotpoint HTR17BBSRWW | Owners Manual - Page 11
Installation instructions Install the shutoff _al_e on the nearest frequentl) used drinking water line. [] SHUT OFF THE MAIN WATER SUPPLY AND UNPLUG REFRIGERATOR Turn on the nearest fimcet (('omlterch)ckwise) hmg enough to clear the line of water. [] DRILL THE HOLE FOR THE VALVE Choose a - Hotpoint HTR17BBSRWW | Owners Manual - Page 12
Installation instructions ill INSTALLING THE WATER LINE (CONT.) [] CONNECT THE TUBING TO THE REFRIGERATOR NOTES: • Before making tile c(mnection be sm'e tile refrigerator power into tile wall outlet. to tile refrigerator, cord is not l_lugged,, • We recommend installing a water filter if - Hotpoint HTR17BBSRWW | Owners Manual - Page 13
instructions starting, all the way through heft)re • Handle parts carefifllv to avoid scratching paint, • Set screws down by their related them in the wrong places. parts wrench [] BEFORE YOU START 1.1 Unplug outlet. the refrigerator from its electrical 1.2 Empty COII/l)}l all door shelves - Hotpoint HTR17BBSRWW | Owners Manual - Page 14
Installation Instructions B REVERSING THE DOOR SWING (CONT.) [] REMOVE THE FRESH FOOD DOOR 3.1 Tape the door shut with masking tape. [] REMOVE THE FRESH FOOD DOOR (CONT.) 3.5 Transfer the - Hotpoint HTR17BBSRWW | Owners Manual - Page 15
Installation instructions [] REVERSING THE HARDWARE (CONT.) 4.2 Interchange hinge (and the shim glued to it) and screws at top right with screws at top left of cabinet. Do - Hotpoint HTR17BBSRWW | Owners Manual - Page 16
Installation Instructions REVERSING THE DOOR SWING (CONT.) [] REVERSING THE DOOR HANDLES (CONT.) 5.4 Transfer Freezer Door Handle 5.4.1 Remoxe the S( ]:(_ t holding the hmldle to the toil oI the door - Hotpoint HTR17BBSRWW | Owners Manual - Page 17
eqt_fli/_ltion. Before you call for service... Troubleshooting -tips Save time and money! Review the charts on the following pages first and you may not need to call for service. Possible Causes What ToDo Refrigerator does not operate Refrigerator Temperature in defrost cycle. control dial - Hotpoint HTR17BBSRWW | Owners Manual - Page 18
Before you call for service... Troubleshooting Tips Motor operates for long periods or cycles on and off frequently. (Modern refrigerators with more storage space and a larger Frostorice crystals on frozen food (frost within package is normal) Automaticicemaket does not work (on some models) - Hotpoint HTR17BBSRWW | Owners Manual - Page 19
(10)Years GEand All Other Brands:One(1) Year Parts Repairor Replace at Mabe'sOption GEProfile:Ten(10) Years evaporatorc, ondenser _.zll tubingand refrigerant) GEProfile:Five(5) Years GEand All appliance theowner's manual,propersettingof when calling for service. Mabe Serviceis availablecoast - Hotpoint HTR17BBSRWW | Owners Manual - Page 20
customer! in us. Follow these three steps to protect your new appliance investment: Complete and mall your Consumer Product Ownership Registration today. l{a_e dishwasher, washer and dryer, range, TV; VCP. and ill[lOll more--most amy brand! Plus there's no extra charge fl/r emergency service and - Hotpoint HTR17BBSRWW | Owners Manual - Page 21
Forrefrigeratorsinstalled in the U.S. _ c,. 1,_,,-_ Please place in envelope and mail to: General Electric Company Warranty Registration Department P.O. Box 32150 Louisville, KY 40232-2150 Forrefrigeratorsinstalled in Canada Please place in envelope and mail to: Veuillez mettre dans une enveloppe - Hotpoint HTR17BBSRWW | Owners Manual - Page 22
For refrigerators installed in the U.S. Consumer Product Ownership Registration _ c,. 1,er_ I I I I MIodeIl INumIberI I I I I I i Seiriali Niumbier i i Ms. Mrs. Miss NaFmire,,1 ] , special otlbrs and other importmlt communications from (;E Appliances (GEA). Check here if you do not want - Hotpoint HTR17BBSRWW | Owners Manual - Page 23
year warranty, GE will also proxide, free of charge, all labor and related service to replace the defective part, ThirtyDays (Waterfilter,if included) Fromthe original purchase date of the refrigerator Any part of the water filter cartt_idge which thils due to a defect in matet_ials or workmanship - Hotpoint HTR17BBSRWW | Owners Manual - Page 24
www.Hotpoint.com Haxe a question or need assistance xdth }our appliance? Tr) the (;E Appliances _ ebsite 24 hom_ a do,v, ' an} do} of the }ear! For greater comenience and fhster serdce, }ou can now id.m_tnhloeu_.ds.(h: _ne_ 's Menu fls, order parts, or e'_en schedule service on-line
-
 1
1 -
 2
2 -
 3
3 -
 4
4 -
 5
5 -
 6
6 -
 7
7 -
8
-
9
-
10
-
11
-
12
-
13
-
14
-
15
-
16
-
17
-
18
-
19
-
20
-
21
-
22
-
23
-
24
 |
 |

ge.com
N
r./3
0
Safety
Instructions
..........
9-4
Operating
Instructions
Automatic
Icemaker
.
..........
7
Care
and
Cleaning
............
8
Shelves
....................
5, 6
Storage
Drawers
...............
6
Temperature
Controls
..........
5
Installation
Instructions
Preparing
to Install
the
Refligerator
. ..............
9
Reversing
the
Door
Swing
. . .l 3-16
Water
Line
Installation
.....
10-12
Troubleshooting
Tips
Before
You
Call
Fox
Service
.. 17, 18
Normal
Operating
Sounds
.....
17
Consumer
Support
Consumer
Support
....
Back
Cover
Product
Registration
(Canadian)
..............
91,92
Product
Registration
(U.S.)
. 90-22
V(arranty
fox
Canadian
Customers
.........
19
Warranty
fox
U.S.
Customers
...
93
Write the model and serial
numbershere:
Model
#
Serial
#
You
can
find
them
on
a label
on
the
upper
lett
side
of
the
fresh
ti)od
c OIX/p}l
I'[ IX/e
IX [,
Models 18,17,18
197D7799POO#
49-80521
07-07 Jfl