Hotpoint NVLR223GGWW Installation Instructions
Hotpoint NVLR223GGWW - 5.8 cu. Ft. Gas Dryer Manual
 |
View all Hotpoint NVLR223GGWW manuals
Add to My Manuals
Save this manual to your list of manuals |
Hotpoint NVLR223GGWW manual content summary:
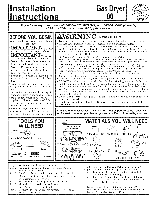
- Hotpoint NVLR223GGWW | Installation Instructions - Page 1
requires businesses to these instructions with the customer. warn customers of potential exposure to such substances. Gas appliances can cause minor * . in accordance with the instructions fbt]nd in "Connecting Tile Dryer To House Vent" on page 6 of this manual. Flexible ducting materials are - Hotpoint NVLR223GGWW | Installation Instructions - Page 2
service. FT]PREPARING FOR iNSTALLATiON OF NEW DRYER TIP: Install your dryer before installing your washer, This will allow better access when installing dryer exhaust, DiSCONNECTiNG GAS use new flexible connectors installing gas appliances. when _q GAS REQUIREMENTS WARNING * Installation IIIUSE - Hotpoint NVLR223GGWW | Installation Instructions - Page 3
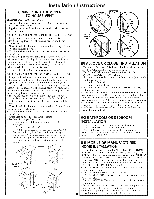
3/8" NPT ELBOW ITEMSNOT SUPPLIED 118" NPT PIPE PLUG FOR GAS INLET PRESSURE SHUT-OFF PIPE SIZE AT LEAST 1/2" Note: The connector and fittings are designed for use onty on the original insta[tation and are not to be reused for another appliance or at another location. Keep flare end of adaptor free - Hotpoint NVLR223GGWW | Installation Instructions - Page 4
instructions [] ELECTRICAL CONNECTION iNFORMATiON WARNING- TO REDUCE THE RISK OF FIRE, ELECTRICAL S HOCK, AND PERSONAL INJURY: * DO NOT USE AN EXTENSION CORD CRAM ADAPTER PLUG WITH THIS APPLIANCE RESPONSIBILITY, Problems due to duct must point away flom the dryer. * Do not assemble the ductwork - Hotpoint NVLR223GGWW | Installation Instructions - Page 5
the instructions found in "Connecting The D_Ter To House Vent" on page 6 of this manual. * Do not terminate exhaust in a chimney, a wall, a ceiling, gas vent, at least once a year. THiS DRYER COMES READY FOR REAR EXHAUSTING. iF SPACE iS LiMiTED, USE THE iNSTRUCTiONS iN SECTION 9 TO EXHAUST DIRECTLY - Hotpoint NVLR223GGWW | Installation Instructions - Page 6
gas leak in the supply line. * No other tirol-burning appliance shall be installed in the same closet wi/h the dwer. If0-] BATHROOM OR BEDROOM INSTALLATION e The dryer 24, PART 32-80 or, when such standard is not applicable, with AMERICAN NATIONAL STANDARD FOR MOBILE HOME, NO. 501B. * The dryer MUST - Hotpoint NVLR223GGWW | Installation Instructions - Page 7
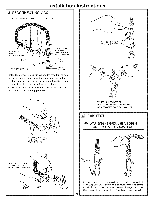
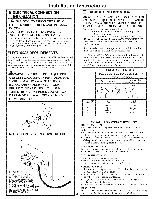
DRYER FROM ITS ELECTRICAL SUPPLY. PROTECT YOUR HANDS AND ARMS FROM SHARP EDGES WHEN WORKING INSIDE THE CABINET. BE SURE TO WEAR GLOVES Instructions the dryer when inserting the duct, J_ DUCT // TAPE BENDTAB UP450 Through the real" opening, locate the tab in the middle of the appliance base. - Hotpoint NVLR223GGWW | Installation Instructions - Page 8
your local service provider. Place dryer in final iocauon. ,_ WARNING- NEVER LEAVE THE BACK OPENING WITHOUT THE PLATE. [_ SERVICING For Quesdons DISCONNECTION WHEN SERVICING CONTROLS. WIRING ERRORS CAN CAUSE IMPROPER AND DANGEROUS OPERATION AFTER SERVICING/INST ALLATION. For replacement parts and
-
 1
1 -
 2
2 -
 3
3 -
 4
4 -
 5
5 -
 6
6 -
 7
7 -
8
 |
 |

nstal ati
nst
cti
G
If
you
have
any
questions,
call
1-800-GECARES
(US)
or 1-800-361-3400
(Canada)
or Visit our
Web
site at:
www.
GEAppliances.com
BEFORE
YOU
BEGIN
Read
these
instructions
completely
and
carefully.
"IMPORT. NT-Save
hese
instructions
for local
inspector's
use.
"IMPORTANT-obse,,,e
all governingcodes
and
ordinances.
*
Note
to
Installer-
Be sure
to leave
these
instructions
with
the customer.
* Note
to
Customer
- Keep
these
instrucOons
with your Use and
Care
Book for fhture
reference.
* Before
the
old dwer
is removed
f_om
smwice or discarded,
remove
the
dwer
door.
*
Inspect
the
dwer
exhaust
outlet
and
straighten
the
outlet
walls if they are
bent.
* Seiwice information
and
the wiring dia-
gram are
located
in the control
console.
* Do not allow children
on or in the
appliance.
Close supexMsion
of child-
ten
is necessa
W
when
the
appliance
is
used near
children.
*
Install
the
dwer
where
the
temp-
erature
is above
50°F for satisf_mtory
operation
of the
dwer
control
system.
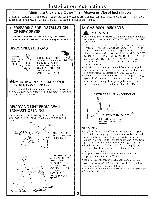
TOOLS YOU
WiLL NEED
(x2)
10"
ADJUSTABLE
WRENCHES
8"PIPE
WRENCH
LEVEL
SLIPJOINTPLIERS
FLATBLADE
SCREWDRIVER
WARN
NG
RIsK
oF
* To reduce
the
risk of severe
i_j ury or death,
follow all installation
instructions.
* Clothes
dryer
installation
must
be performed
by a qualified
installer.
* Install
the clothes
dwer
according
to these
instructions
and
in accordance
with
local
codes.
In the
absence
of local codes,
installation
Illust
comply
with National
Fuel
(;as Code,
ANSIZ223.1/NFPA
54 or the
Canadian
Natural
(;as and
Propane
Installation
Code,
CSA B 149.1.
*
(,Mifornia
Sidle DiJnking
14.'_ter
and
Toxic
En_)±wementAct
This act requires
the go, ernor
of CaliR)rnia to publish a list of substances known to the
state to cause cancer, birth def>cts or other reproductixe
harm and requires businesses to
warn customers of potential exposure
to such substances. Gas appliances can cause minor
exposure to four of these substances, namel)benzene,
carbon monoxide,
formaldehyde
and
soot,
caused
primaril)
b)
the
incomplete
combustion
of natural
gas
or
[,P
fi_els.
Properl)
adjusted dQers will minimize incomplete
combustion.
Exposure
to these
substances can be minimized fllrther b) properly xenting the dQ'er to the outdoors.
* This
(hTer must
be exhausted
to the
outdoors.
* Use only 4" rigid
metal
ducting
fbr exhausting
the
clothes
(hTer to the outdoors.
* DO NOT
install
a clothes
(hTer with flexible
plastic
ducting
materials.
If flexible
metal
(semi-rigid
or foil-D,pe ) duct
is installed,
it must be UL-listed
and
installed
in accordance
with
the
instructions
fbt]nd
in "Connecting
Tile
Dryer
To House
Vent" on page
6 of this manual.
Flexible
ducting
materials
are
known
to collapse,
be easily crushed,
and
trap
lint. These
conditions
will obstruct
dwer
airflow
and
increase
the
risk of fire.
* Do not install
or store
this appliance
in any location
where
it could
be exposed
to
water
and
or weather.
* Save these
instructions.
(Installers:
Be sure
to leave
these
instructions
with
the
customer).
in
the state
of
Massachusetts,
installation
must
be
performed
by a qualified
or licensed contractor,
plumber,
or gasfitter
qualified
or licensed
by the state.
MATERIALS YOU
WiLL NEED
4"DIA.
METAL
DUCT
e===_
(RECOMMENDED)
4"DIAMMETAL
ELBOW
4"DIA.FLEXIBLE
METALSEMI-RIGID)
ULLSTEDTRANSTONDUCT
(IFNEEDED)
KITWXO8X10077
(INCLUDES
2 ELBOWS)
4"DIA.FLEXIBLE
METAL
(FOILTYPE)
ULLISTED
TRANSITION
DUCT
(IFNEEDED.)
(x2)
PIPE
0
EXHAUST
HOODCOMPOUNDSOAPSOLUTION
FORLEAKDETECTION
4"DUCTCLAMPS
OR
4"SPRINGCLAMPS
_
_
Q_(x2)
FLEXIBLE
GASLINECONNECTORGLOVES
DUCTAPE
SAFETY
GLASSES
Step
1
Step
2
Step
3
Step
4
Step
5
Step
6
Step
7
Verify, Your Gas Installation
(see section
2).
Prepare
the Area
and
Exhaust
for Installation
of
New Dwer
(see secdon
1).
Check
and
Insure
the Existing
External
Exhaust
is
Clean
(see secdon
1) and
Meets
Attached
Installation
Specifications
(see secdon
6).
Remove
the
Foam
Shipping
Pads
(see section
1).
Move the
D_Ter to the Desired
Location.
Level Your Dryer
(see section
8).
Connect
the
(;as
Supply
(see section
3) and
check
for leaks
(see section
4).
Step
8
Step
9
Step
10
Step
11
Connect
the External
Exhaust
(see secdon
7).
Connect
the
Power
Supply
(see section
5).
Check
the
Operation
of the
Power
Supply,
Gas
Connections,
and Venting.
Place
the
Owners
Manual
and
the
Installation
Instructions
in a Location
Where
They Will Be
Noticed
By the
Owner.
For
Alcove
or
Closet
Installation
see
section
9.
For
Bathroom
or
Bedroom
Installation
see
section
10.
For
Mobile
or
Manufhctured
Home
see
section
11.