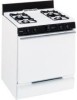
Hotpoint RGB508PPHWH Installation Instructions
Hotpoint RGB508PPHWH - 30 Inch Gas Range Manual
 |
UPC - 084691084983
View all Hotpoint RGB508PPHWH manuals
Add to My Manuals
Save this manual to your list of manuals |
Hotpoint RGB508PPHWH manual content summary:
- Hotpoint RGB508PPHWH | Installation Instructions - Page 1
34-37 Troubleshooting Tips . .40-42 Accessories 45 Consumer Support Consumer Support Back Cover Ownership Registration for Customers in Canada only 43, 44 Warranty for Customers in Canada 47 Warranty for Customers in the U.S.A 46 Owner's Manual & Installation Instructions Standard-Clean - Hotpoint RGB508PPHWH | Installation Instructions - Page 2
Consumer Support Troubleshooting Tips Installation Instructions Operating Instructions Safety Instructions IMPORTANT SAFETY INFORMATION. READ ALL INSTRUCTIONS BEFORE USING. WARNING! For your safety, the information in this manual must be followed to minimize the risk of fire or explosion, electric - Hotpoint RGB508PPHWH | Installation Instructions - Page 3
Safety Instructions Operating Instructions Installation Instructions Troubleshooting Tips Consumer Support GEAppliances.com WARNING! any part of your range unless it is specifically recommended in this manual. All other service should be referred to a qualified technician. I Plug your range into - Hotpoint RGB508PPHWH | Installation Instructions - Page 4
INSTRUCTIONS BEFORE USING. Consumer Support Troubleshooting Tips Installation Instructions Operating Instructions Safety Instructions near a cooktop. I Be sure your range is correctly adjusted by a qualified service technician or installer for the type of gas (natural or LP) that is to 's Manual. - Hotpoint RGB508PPHWH | Installation Instructions - Page 5
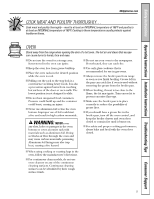
Safety Instructions Operating Instructions Installation Instructions Troubleshooting Tips Consumer Support GEAppliances.com COOK MEAT AND POULTRY THOROUGHLY... Cook meat and poultry thoroughly-meat to at least an INTERNAL temperature of 160°F and poultry to at - Hotpoint RGB508PPHWH | Installation Instructions - Page 6
INFORMATION. READ ALL INSTRUCTIONS BEFORE USING. Consumer Support Troubleshooting Tips Installation Instructions Operating Instructions Safety Instructions WARNING! SURFACE BURNERS turn off the gas to the range and call a qualified service technician. Never use an open flame to locate a leak. 6 - Hotpoint RGB508PPHWH | Installation Instructions - Page 7
Safety Instructions Operating Instructions Installation Instructions Troubleshooting Tips Consumer Support GEAppliances.com SURFACE BURNERS ( on standing pilot models), turn off the gas to the range and call a qualified service technician. Never use an open flame to locate a leak. I Do not place or - Hotpoint RGB508PPHWH | Installation Instructions - Page 8
Consumer Support Troubleshooting Tips Installation Instructions Operating Instructions Safety Instructions Using the gas surface burners. Throughout this manual, features and appearance may vary from your model. Before Lighting a Gas Burner I If drip pans are supplied with your range; they should - Hotpoint RGB508PPHWH | Installation Instructions - Page 9
Safety Instructions Operating Instructions Installation Instructions Troubleshooting Tips Consumer Support Use a flat-bottomed wok. a flat-bottomed wok should be used. Do not use a flat-bottomed wok on a support ring. Placing the ring over the burner or grate may cause the burner to work improperly - Hotpoint RGB508PPHWH | Installation Instructions - Page 10
Consumer Support Troubleshooting Tips Installation Instructions Operating Instructions Safety Instructions Using the clock and timer. Throughout this manual, features and appearance may vary from your model. You have the choice of having the timer show the time counting down or the time of - Hotpoint RGB508PPHWH | Installation Instructions - Page 11
Safety Instructions Operating Instructions Installation Instructions Troubleshooting Tips Consumer Support Using the oven. GEAppliances.com To avoid possible burns, place the racks in the desired position before you turn the oven on. Before You Begin... - Hotpoint RGB508PPHWH | Installation Instructions - Page 12
Consumer Support Troubleshooting Tips Installation Instructions Operating Instructions Safety Instructions Using the oven. The oven has a special low rack (R) position just above the oven bottom. Use it when extra cooking space is needed, for example, - Hotpoint RGB508PPHWH | Installation Instructions - Page 13
Safety Instructions Operating Instructions Installation Instructions Troubleshooting Tips Consumer Support How to Set the it just like the grid. Cut slits in the foil just like the grid. Broiling Guide Suggestions Both the oven and broiler compartment doors must be closed during broiling. I Always - Hotpoint RGB508PPHWH | Installation Instructions - Page 14
Consumer Support Troubleshooting Tips Installation Instructions Operating Instructions Safety Instructions Using the oven. Broiling Guide The size, weight, thickness, starting temperature and your preference of doneness will affect broiling times. This guide is based on meats at refrigerator - Hotpoint RGB508PPHWH | Installation Instructions - Page 15
Safety Instructions Operating Instructions Installation Instructions Troubleshooting Tips Consumer Support Adjust the oven thermostat-Do it yourself! GEAppliances.com You may find that your new oven cooks differently than the one it replaced. Use your - Hotpoint RGB508PPHWH | Installation Instructions - Page 16
Consumer Support Troubleshooting Tips Installation Instructions Operating Instructions Safety Instructions Care and cleaning of the range. Be sure electrical power is off and all surfaces are cool before cleaning any part of the range. WARNING: If your range is removed for cleaning, servicing or - Hotpoint RGB508PPHWH | Installation Instructions - Page 17
Safety Instructions Operating Instructions Installation Instructions Troubleshooting Tips Consumer Support Grate Burner cap Burner head Drip pan (if so equipped) Electrode Cooktop GEAppliances.com Sealed Burner Assemblies (on some models) Turn all controls OFF before - Hotpoint RGB508PPHWH | Installation Instructions - Page 18
Consumer Support Troubleshooting Tips Installation Instructions Operating Instructions Safety Instructions Care and cleaning of the range. Burner Caps and Heads (on sealed burners only) NOTE: Before removing the burner caps and heads, remember their size - Hotpoint RGB508PPHWH | Installation Instructions - Page 19
Safety Instructions Operating Instructions Installation Instructions Troubleshooting Tips Consumer Support GEAppliances.com Always wipe the surface in the direction of the grain. Follow the cleaner instructions for cleaning the stainless steel surface. To inquire about purchasing stainless steel - Hotpoint RGB508PPHWH | Installation Instructions - Page 20
Consumer Support Troubleshooting Tips Installation Instructions Operating Instructions Safety Instructions Care and cleaning of the range. Lift the door straight up and off the hinges. The gasket is designed with a gap at the bottom to - Hotpoint RGB508PPHWH | Installation Instructions - Page 21
Safety Instructions Operating Instructions Installation Instructions Troubleshooting Tips Consumer Support GEAppliances.com Grid Broiler Pan and Grid After broiling, remove the broiler pan from The broiler pan and grid may be cleaned the oven. Remove - Hotpoint RGB508PPHWH | Installation Instructions - Page 22
Consumer Support Troubleshooting Tips Installation Instructions Operating Instructions Safety Instructions Care and cleaning of the range. Oven Racks Clean the racks with an abrasive cleanser or scouring pad. After cleaning, rinse the racks with clean - Hotpoint RGB508PPHWH | Installation Instructions - Page 23
Safety Instructions Operating Instructions Installation Instructions Troubleshooting Tips Consumer Support GEAppliances.com Special Care . The oven door lifts off for cleaning away from the ContinuousCleaning Oven. For instructions on how to clean the inside of the oven door refer to the Lift-Off - Hotpoint RGB508PPHWH | Installation Instructions - Page 24
section in the front of this manual. Read them carefully. • IMPORTANT - Save these instructions for local inspector's use. • IMPORTANT instructions with the Consumer. • Note to Consumer - Keep these instructions for future reference. • Note - This appliance must be properly grounded. • Servicer - Hotpoint RGB508PPHWH | Installation Instructions - Page 25
Installation Instructions FOR YOUR SAFETY Do not store or use combustible materials, gasoline or other flammable vapors and liquids in the vicinity of this or any other - Hotpoint RGB508PPHWH | Installation Instructions - Page 26
INSTALLATION SAFETY INSTRUCTIONS Read these instructions completely and carefully. Improper installation, adjustment, alteration, service or maintenance can cause injury or property damage. Refer to this manual. For assistance or additional information, consult a qualified installer, service agency - Hotpoint RGB508PPHWH | Installation Instructions - Page 27
Installation Instructions DIMENSIONS AND CLEARANCES Provide adequate clearances between the range and adjacent combustible surfaces. These dimensions must be met for safe use of your range. The - Hotpoint RGB508PPHWH | Installation Instructions - Page 28
or higher than the floor covering. This will allow the range to be moved for cleaning or servicing. Also, make sure your floor covering will withstand 180°F. (See the Installation Safety Instructions section.) Make sure the wall coverings around your range can withstand the heat generated (up to 200 - Hotpoint RGB508PPHWH | Installation Instructions - Page 29
Installation Instructions 1 PROVIDE ADEQUATE GAS SUPPLY Your range is designed to operate at a to avoid damage. C Install male 1/2″ or 3/4″ flare union adapter to the NPT internal thread of the manual shut-off valve, taking care to back-up the shut-off valve to keep it from turning. When checking - Hotpoint RGB508PPHWH | Installation Instructions - Page 30
Installation Instructions GAS PIPE AND ELECTRICAL OUTLET LOCATIONS (for models with Sealed Burners) This area allows for flush range installation with through-the-wall connection of pipe - Hotpoint RGB508PPHWH | Installation Instructions - Page 31
Installation Instructions FLEXIBLE CONNECTOR HOOKUP (for models equipped with Sealed Burners) Pressure regulator Adapter Installer: Inform the consumer of the location of the gas shut-off valve. 1/2″ - Hotpoint RGB508PPHWH | Installation Instructions - Page 32
Installation Instructions FLEXIBLE CONNECTOR HOOKUP (for models equipped with Standard Twin Burners) Pressure regulator Adapter Manifold pipe Installer: Inform the consumer of the location of the gas - Hotpoint RGB508PPHWH | Installation Instructions - Page 33
Installation Instructions 3 ELECTRICAL CONNECTIONS Electrical Requirements 120-volt, 60 Hertz, properly grounded automatically switch off power when a threshold leakage level is detected. These devices must be manually reset by the consumer. The National Electrical Code requires the use of GFCI's in - Hotpoint RGB508PPHWH | Installation Instructions - Page 34
Installation Instructions 3 ELECTRICAL CONNECTIONS (cont.) When disconnecting the power cord from the adapter, always hold the adapter with one hand. If 16″ tall. A tinge of yellow appearing at the upper tip is normal. If you find pilot adjustment is necessary, follow instructions in Step B. 34 - Hotpoint RGB508PPHWH | Installation Instructions - Page 35
Installation Instructions 5 LIGHT THE PILOTS (cont.) B Adjust the Surface Burner Pilots if Necessary C Light the Oven Pilot (cont.) 4. Remove the oven bottom. To remove: • Remove knurled screws - Hotpoint RGB508PPHWH | Installation Instructions - Page 36
Installation Instructions 5 LIGHT THE PILOTS (cont.) D Check Ignition of Oven Burner The oven require electrical power to operate. In case of a power outage, the oven burners on these models cannot be lit manually with a match. Gas will not flow unless the glow bar is hot. If the oven is in use - Hotpoint RGB508PPHWH | Installation Instructions - Page 37
Installation Instructions 5 LIGHT THE PILOTS (cont.) F Check Ignition of Surface Burners Flames The combustion quality of burner flames needs to be determined visually. (A) Yellow flames- Call for service (B) Yellow tips on outer cones- Normal for LP gas (C) Soft blue flames-Normal for natural gas - Hotpoint RGB508PPHWH | Installation Instructions - Page 38
Installation Instructions 6 LEVEL THE RANGE A Install the oven racks in the oven and position the range where it will be installed. Raise range Lower range Lower Leg - Hotpoint RGB508PPHWH | Installation Instructions - Page 39
to LP gas, the conversion must be performed by a qualified LP gas installer. The conversion instructions and LP orifices can be found attached to the range next to the pressure regulator. Keep these instructions and the orifices in case you want to convert back to natural gas. Install the sleeve - Hotpoint RGB508PPHWH | Installation Instructions - Page 40
Consumer Support Troubleshooting Tips Installation Instructions Operating Instructions Safety Instructions Before you call for service... Troubleshooting Tips Save time and money! Review the charts on the following pages first and you may not need to call for service. Problem Top burners do not - Hotpoint RGB508PPHWH | Installation Instructions - Page 41
Instructions Operating Instructions Installation Instructions Troubleshooting Tips Consumer Support GEAppliances.com Problem See the Broiling section. not closed. Improper rack position being used. • See the Broiling guide. Food being cooked in a hot pan. • Use the broiling pan and grid that - Hotpoint RGB508PPHWH | Installation Instructions - Page 42
Consumer Support Troubleshooting Tips Installation Instructions Operating Instructions Safety Instructions Before you call for service... Troubleshooting Tips Problem "Crackling" or "popping" sound Rainbow effect in the oven window (on some models) Power outage, clock flashes Strong odor Fan noise - Hotpoint RGB508PPHWH | Installation Instructions - Page 43
Please place in envelope and mail to: Veuillez mettre dans une enveloppe et envoyez à : OWNERSHIP REGISTRATION P.O. BOX 1780 MISSISSAUGA, ONTARIO L4Y 4G1 (FOR CANADIAN CONSUMERS ONLY) 43 - Hotpoint RGB508PPHWH | Installation Instructions - Page 44
44 - Hotpoint RGB508PPHWH | Installation Instructions - Page 45
Safety Instructions Operating Instructions Installation Instructions Troubleshooting Tips Consumer Support Accessories. Looking For Something More? You can find these accessories and many more at GEAppliances.com, or call 800.626.2002 (during normal business hours). - Hotpoint RGB508PPHWH | Installation Instructions - Page 46
Consumer Support Troubleshooting Tips Installation Instructions Operating Instructions Safety Instructions GE Gas Range Warranty. (For customers in the United States) All warranty service provided by our Factory Service Centers or an authorized Customer Care® technician. To schedule service, visit - Hotpoint RGB508PPHWH | Installation Instructions - Page 47
Safety Instructions Operating Instructions Installation Instructions Troubleshooting Tips Consumer Support GE Gas Range Warranty. (For customers in Canada) All warranty service provided by our Factory Service Centres or an authorized Customer Care® technician. To schedule service, visit us on-line - Hotpoint RGB508PPHWH | Installation Instructions - Page 48
.com GE supports the Universal Design concept-products, services and environments that Instructions contained in this manual cover procedures to be performed by any user. Other servicing generally should be referred to qualified service personnel. Caution must be exercised, since improper servicing
-
 1
1 -
 2
2 -
 3
3 -
 4
4 -
 5
5 -
 6
6 -
 7
7 -
8
-
9
-
10
-
11
-
12
-
13
-
14
-
15
-
16
-
17
-
18
-
19
-
20
-
21
-
22
-
23
-
24
-
25
-
26
-
27
-
28
-
29
-
30
-
31
-
32
-
33
-
34
-
35
-
36
-
37
-
38
-
39
-
40
-
41
-
42
-
43
-
44
-
45
-
46
-
47
-
48
 |
 |

Safety Instructions
. . . .2–7, 25
Operating Instructions
Aluminum Foil . . . . . . . . .12, 13
Clock and Timer
. . . . . . . . . .10
Oven
. . . . . . . . . . . . . . . . .10–15
Baking and Roasting . . . . . .12
Broiling . . . . . . . . . . . . . .13, 14
Broiling Guide . . . . . . . . . . .14
Oven Control . . . . . . . . . . . .11
Power Outage . . . . . . . . . . . .11
Preheating
. . . . . . . . . . . . . .12
Surface Cooking
. . . . . . . . .8, 9
Thermostat Adjustment
. . . .15
Care and Cleaning
Air Vents
. . . . . . . . . . . . . . . . .21
Broiler Pan and Grid . . . . . . .21
Burner Assemblies . . . . . .16–18
Burner Caps and Heads . . . .18
Burner Grates . . . . . . . . . . . . .17
Control Panel and Knobs . . .21
Cooktop Surface
. . . . . . . . . .19
Drip Pans . . . . . . . . . . . . . . . . .16
Lift-Off Oven Door
. . . . . . . .20
Lift-Up Cooktop . . . . . . . . . . .19
Oven Bottom
. . . . . . . . . . . . .20
Oven Interior . . . . . . . . . .22, 23
Removable Broiler Drawer . .21
Racks
. . . . . . . . . . . . . . . . . . . .22
Stainless Steel Surfaces . . . . .19
Installation
Instructions
. . . . . . . . . . .24–39
Anti-Tip Device
. . . . .28, 38, 39
Connect the Range
to Gas . . . . . . . . . . . . . . . . .29–32
Convert to LP Gas . . . . . . . . .39
Dimensions and
Clearances . . . . . . . . . . . . . . . .27
Electrical Connections . .33, 34
Level the Range . . . . . . . . . . .38
Light the Pilots . . . . . . . . .34–37
Troubleshooting Tips
. .40–42
Accessories
. . . . . . . . . . . . . . .45
Consumer Support
Consumer
Support . . . . . . . . . .Back Cover
Ownership Registration
for Customers in Canada
only
. . . . . . . . . . . . . . . . . .43, 44
Warranty for Customers
in Canada
. . . . . . . . . . . . . . . .47
Warranty for Customers
in the U.S.A. . . . . . . . . . . . . . .46
Ranges
183D5580P236
49-85154
01-09 JR
Standard-Clean
Models:
Owner’s Manual
& Installation
Instructions
GEAppliances.com
Write the model and serial
numbers here:
Model #
______________________
Serial #
______________________
You can find them on a label on
the front of the range behind the
kick panel or broiler drawer.
RGB508
RGB524
RGB528
RGB530
RGB533
RGB540
Non-Self-Cleaning Gas
In Canada, contact us at:
www.GEAppliances.ca