Hunter 23683 Owner's Manual
Hunter 23683 Manual
 |
View all Hunter 23683 manuals
Add to My Manuals
Save this manual to your list of manuals |
Hunter 23683 manual content summary:
- Hunter 23683 | Owner's Manual - Page 1
For Your Records and Warranty Assistance Model Name Catalog/Model No Serial No Date Purchased Where Purchased For reference also attach your receipt or a copy of your receipt to the manual. 41922-01 • 02/26/07 - Hunter 23683 | Owner's Manual - Page 2
and Cleaning Your Ceiling Fan 14 11 • Troubleshooting 15 © 2007 Hunter Fan Company Your new Hunter® ceiling fan is an addition to your home or office that will provide comfort and performance for many years. is installation and operation manual gives you complete instructions for installing and - Hunter 23683 | Owner's Manual - Page 3
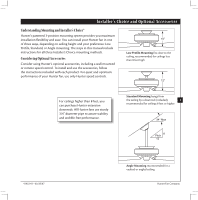
you maximum installation flexibility and ease. You can install your Hunter fan in one of three ways, depending on ceiling height and your preference: Low Profile, Standard, or Angle mounting. e steps in this manual include instructions for all three Installer's Choice mounting methods. Considering - Hunter 23683 | Owner's Manual - Page 4
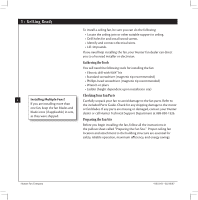
. If any parts are missing or damaged, contact your Hunter dealer or call Hunter Technical Support Department at 888-830-1326. Preparing the Fan Site Before you begin installing the fan, follow all the instructions in the pullout sheet called "Preparing the Fan Site." Proper ceiling fan location and - Hunter 23683 | Owner's Manual - Page 5
on the screws. Do not over tighten. Isolator Ceiling Plate Step 2-2 5 Flat Washer Steps 2-3 - 2-5 3" Screw 41922-01 • 02/26/07 For Angled Ceilings: Be sure to orient the ceiling plate so that the arrows printed on the ceiling plate are pointing towards the ceiling peak. Hunter Fan Company - Hunter 23683 | Owner's Manual - Page 6
three #8-32 x 3/4" screws. 3-6. Raise the fan and place the hook on the ceiling plate through the U-shaped hole in the rim. #8-32 x 3/4" Screw WARNING: Fan may fall if not assembled as directed in these installation instructions. Step 3-6 U-shaped Hole Hunter Fan Company 41922-01 • 02/26/07 - Hunter 23683 | Owner's Manual - Page 7
they don't match, the controller will not function. For instructions on how to set the jumpers, read the box below. CAUTION: e remote control device complies with part 15 of the FCC rules. Changes or modifications not expressly approved by Hunter Fan Company could void your authority to operate - Hunter 23683 | Owner's Manual - Page 8
into the outlet box. Small Wire Nut 5-7. Run the white antenna wire from the receiver through one of the slots in the ceiling plate so that it rests between the ceiling plate and the ceiling. Push it to the edge of the ceiling plate for clear reception. Hunter Fan Company 41922-01 • 02/26/07 - Hunter 23683 | Owner's Manual - Page 9
the fan off the hook. 6-2. Align the slots in the canopy with the tabs on the ceiling plate. 6-3. Raise the canopy over the ceiling plate. Rotate the canopy clockwise until the tabs on the ceiling plate canopy. Steps 6-4 - 6-5 9 Step 6-3 41922-01 • 02/26/07 Canopy Screw Hunter Fan Company - Hunter 23683 | Owner's Manual - Page 10
grommet Hunter fans use several styles of fan blade irons (brackets that hold the blade to the fan). 7-1. Your fan may include blade grommets. If your fan one blade mounting screw through the blade iron, and attach lightly to the fan. Insert the second blade mounting screw, then securely tighten - Hunter 23683 | Owner's Manual - Page 11
WARNING: Use only the light fixture supplied with this fan model. 8-1. To attach the upper switch housing, partially install two housing assembly screws could result in the Screw Switch switch housing and light fixture falling. Housing 11 41922-01 • 02/26/07 Step 8-4 Hunter Fan Company - Hunter 23683 | Owner's Manual - Page 12
8 • Installing the Light Kit (Continued) Steps 8-5 - 8-6 Lower Switch Housing Plug 12 Connector To install each shade, first loosen the three thumbscrews. 8-8. Raise the shade to the light fixture. Tighten the thumbscrews securely. 8-9. Install four candelabra bulbs (60 Watt maximum each). - Hunter 23683 | Owner's Manual - Page 13
holder to any toggle switch plate with the screws already in the switch plate. Or, you can simply mount the remote holder on the wall. Fan Speed Medium Fan Off Fan Light Steps 9-1 - 9-4 13 41922-01 • 02/26/07 Step 9-6 Step 9-5 Hunter Fan Company - Hunter 23683 | Owner's Manual - Page 14
Ceiling Fan 10-1. Turn on electrical power to the fan. 10-2. Ceiling fans work best by blowing air downward (counterclockwise blade rotation) in warm weather to cool the room with a direct breeze. In cold weather, having the fan cloth. Occasionally, apply a light coat of furniture polish for - Hunter 23683 | Owner's Manual - Page 15
use the enclosed balancing kit and instructions to balance the fan. 2. Tighten all blade and/or blade iron screws. 3. Turn power off, support fan very carefully, and check that the hanger ball is properly seated. 11 • Troubleshooting 15 If you need parts or service assistance, please call 888-830
-
 1
1 -
 2
2 -
 3
3 -
 4
4 -
 5
5 -
 6
6 -
 7
7 -
8
-
9
-
10
-
11
-
12
-
13
-
14
-
15
 |
 |

41922-01 • 02/2
6
/0
7
For Your Records and Warranty
Assistance
Model Name: _____________________
Catalog/Model No.: ________________
Serial No.: _______________________
Date Purchased: ___________________
Where Purchased: _________________
For reference also attach your receipt or a
copy of your receipt to the manual.